



Highlights
- What you'll build: A complete, hands-on MLOps pipeline using MLflow 3, DVC, FastAPI, and Docker - laptop-only, no cloud account required.
- Time required: ~90 minutes if you code along.
- Prerequisites: Python 3.10+, Git, Docker, and basic comfort with the terminal.
- Stack: DVC for data versioning, MLflow 3 for tracking + registry, FastAPI for serving, Docker for packaging, Prometheus for monitoring.
- Outcome: A reproducible pipeline you can extend with CI/CD, Kubernetes, or cloud deployment.
- Modern accuracy: Uses MLflow 3's aliases and tags model (stages are deprecated), most tutorials online are outdated on this.
You've read the explainers. You know what MLOps is. You can probably define drift, model registry, and feature store at a dinner party. But if someone handed you a laptop and said "ship a model end-to-end by lunch," would you actually know where to start?
That gap, between understanding MLOps and running one, is what this guide closes. Ninety minutes from now, you'll have a working pipeline on your machine: versioned data, tracked experiments, a registered model, a containerized inference API, and a monitoring endpoint. The same architecture production teams run, scaled down to a laptop.
Want to go beyond one pipeline?
Our 100 Days of MLOps challenge on KodeKloud Engineer takes the patterns in this blog and stretches them across real production scenarios - multi-stage deployments, drift incidents, retraining loops, and the kind of failures you only learn from doing.
Join the Challenge →What Counts as an "MLOps Pipeline"?
An MLOps pipeline is the automated chain of steps that takes raw data and produces a deployed, monitored model. It's not a single tool, it's an integrated workflow with seven distinct stages, each handled by a purpose-built tool:
- Data versioning - track datasets like you track code
- Training - produce a model from versioned data
- Experiment tracking - log every run so you can compare, debug, and reproduce
- Model registry - promote validated models through a controlled lifecycle
- Serving - expose the model as an API
- Containerization - package everything for portable deployment
- Monitoring - observe the running model so drift doesn't surprise you
If MLOps fundamentals are brand new, start with our What is MLOps: A Beginner's Guide before continuing, this blog assumes you know what drift is and why model versioning matters.
MLOps Pipeline Architecture
Before any code, here's the mental map. Every stage you'll build maps directly to one of these boxes:
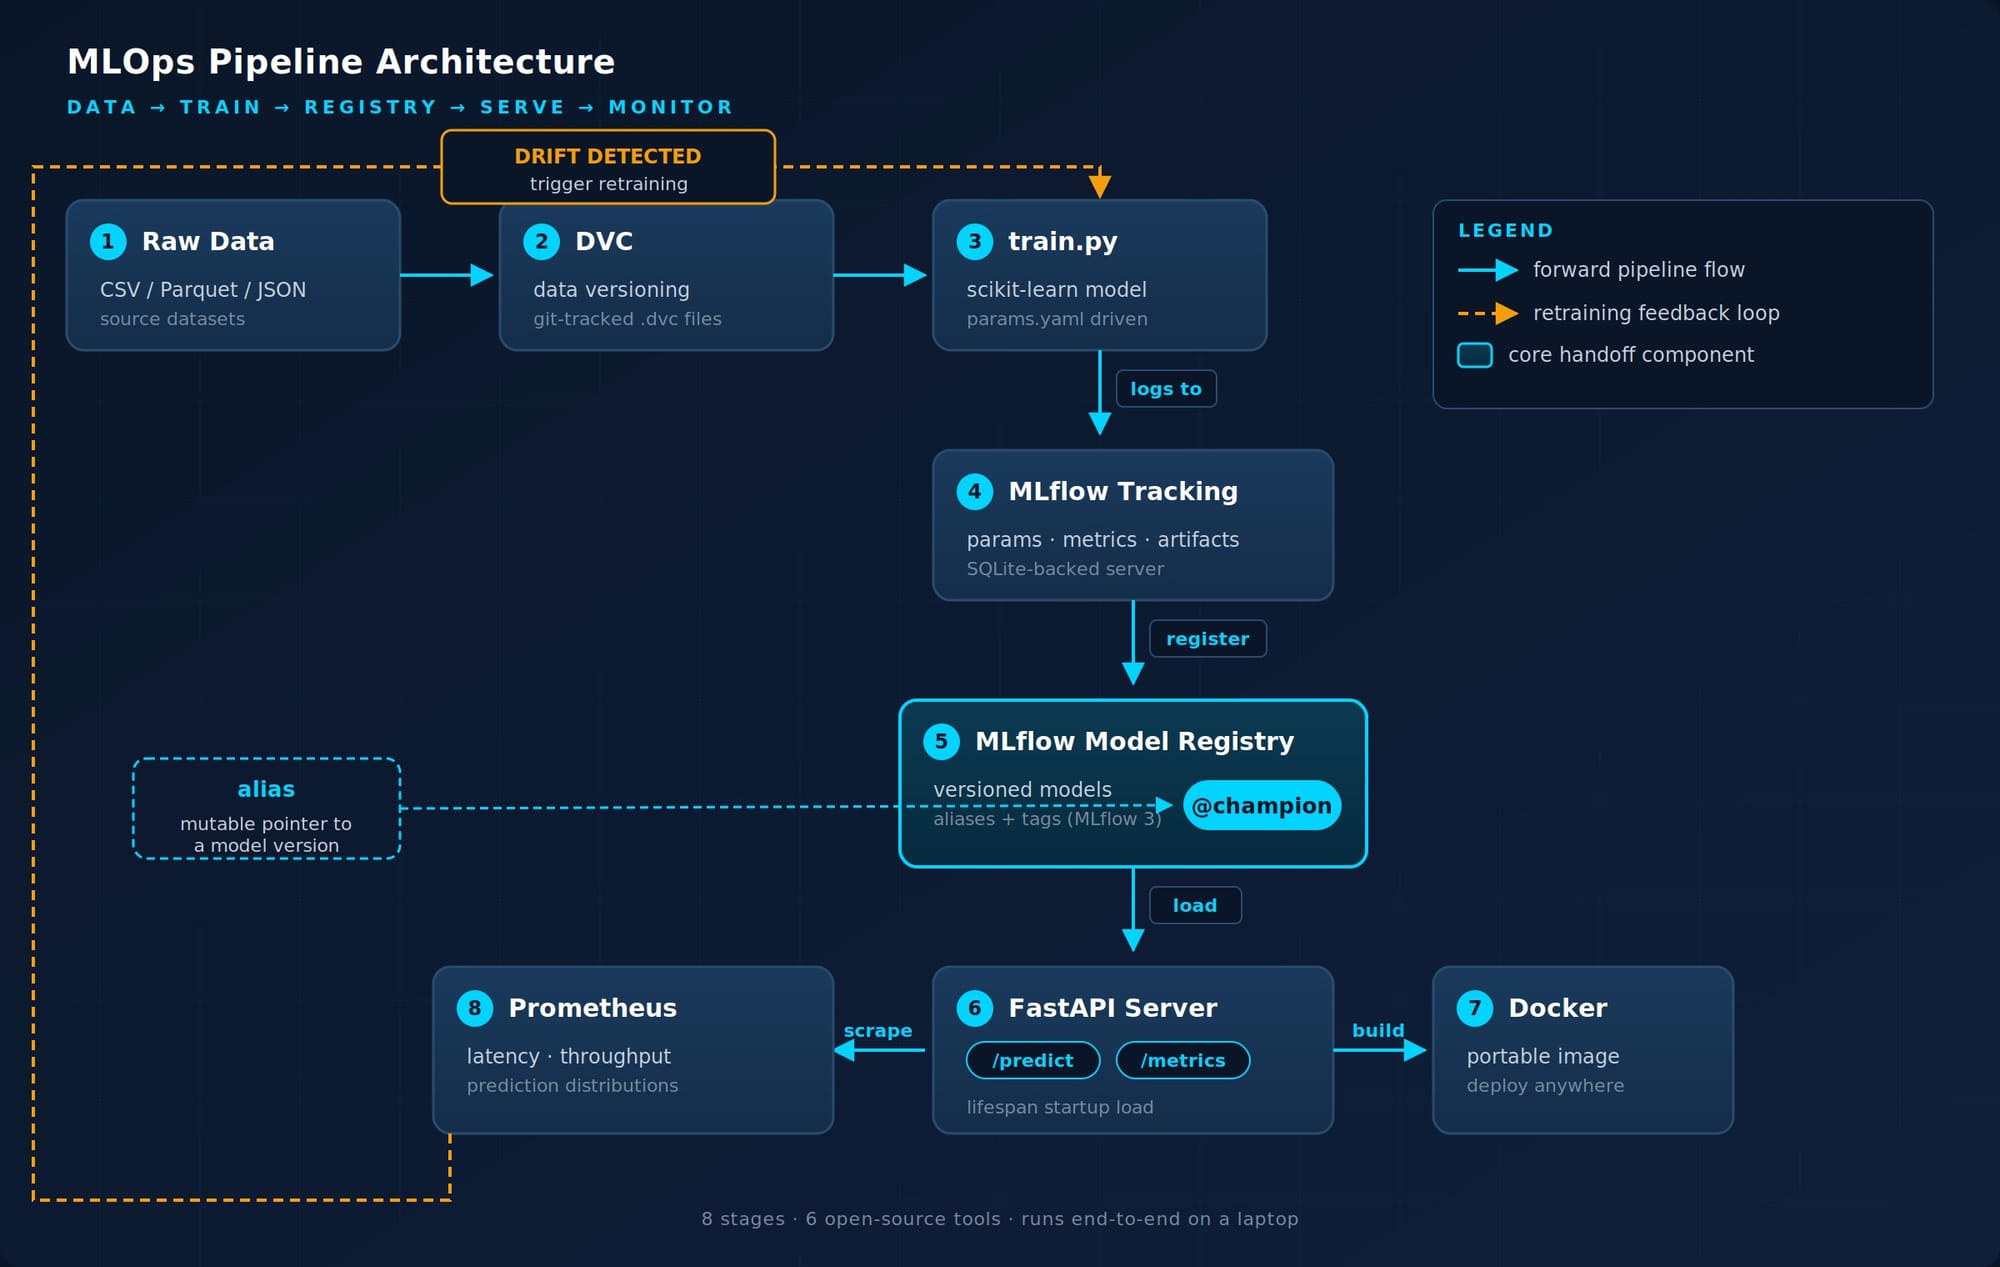
The arrow worth pausing on is the implicit one, from monitoring back to training. When drift fires, you re-run the pipeline. That feedback loop is what makes this MLOps and not just "ML with extra steps."
The MLOps Pipeline Tool Stack (and Why Each Choice)
Every tool here is open source, free, and runs on a laptop:
| Stage | Tool | Why this one |
|---|---|---|
| Data versioning | DVC | Git-native, no proprietary backend, scales from laptop to cloud |
| Training | scikit-learn | Standard, framework-agnostic patterns transfer to PyTorch/TensorFlow |
| Tracking + Registry | MLflow 3 | De facto standard, single tool for tracking and registry, latest 2026 API |
| Serving | FastAPI | Fast, production-grade, type-safe, used by real teams |
| Containerization | Docker | Universal, the deployment substrate for every modern MLOps stack |
| Monitoring | prometheus-fastapi-instrumentator | One-line instrumentation, exports Prometheus metrics |
You can swap any of these later. The point isn't the specific tools, it's understanding the seams between them. Once you've built this, swapping DVC for Pachyderm or MLflow for Weights & Biases is a few hours of work.
Prerequisites & Project Setup
Verify your environment:
python --version   # 3.13
git --version
docker --version
Create the project structure:
mkdir mlops-pipeline && cd mlops-pipeline
mkdir -p src data models
touch src/__init__.py
git init
Create requirements.txt with pinned versions (current as of May 2026):
mlflow==3.12.0
dvc==3.67.1
scikit-learn==1.6.1
pandas==2.2.3
fastapi==0.115.6
uvicorn[standard]==0.34.0
pydantic==2.10.5
joblib==1.4.2
prometheus-fastapi-instrumentator==7.1.0
pyyaml==6.0.2
Set up a virtual environment and install:
python -m venv .venv
source .venv/bin/activate   # On Windows: .venv\Scripts\activate
pip install -r requirements.txt
Add a .gitignore:
.venv/
__pycache__/
*.pyc
mlruns/
mlflow.db
.dvc/cache
.dvc/tmp
data/*.csv
!data/.gitkeep
touch data/.gitkeepYou now have the skeleton. Time to fill it in.
Stage 1 - Data Versioning with DVC
Code lives in Git. Data and models don't, they're too large and they change for different reasons. DVC bridges that gap: it tracks data the way Git tracks code, storing only lightweight .dvc pointer files in your repo while the actual data sits in a separate cache (local or cloud).
Initialize DVC inside your Git repo:
dvc init
git add .dvc .dvcignore
git commit -m "Initialize DVC"
For this tutorial we'll use sklearn's breast cancer dataset, but written to disk first so DVC has something real to track. Create src/prepare_data.py:
import pandas as pd
from sklearn.datasets import load_breast_cancer
from pathlib import Path

def main():
    data = load_breast_cancer(as_frame=True)
    df = data.frame
    Path("data").mkdir(exist_ok=True)
    df.to_csv("data/raw.csv", index=False)
    print(f"Saved {len(df)} rows to data/raw.csv")

if __name__ == "__main__":
    main()
Run it, then track the output with DVC:
python src/prepare_data.py
dvc add data/raw.csv
git add data/raw.csv.dvc .dvc/.gitignore
git commit -m "Track raw dataset with DVC"
DVC created data/raw.csv.dvc - a tiny YAML file containing a hash of the data. Commit that to Git; the actual CSV lives in .dvc/cache. To configure a local "remote" (in production, this would be S3, GCS, or Azure Blob):
mkdir -p /tmp/dvc-remote
dvc remote add -d local /tmp/dvc-remote
dvc push
git add .dvc/config
git commit -m "Configure DVC local remote"
Anyone cloning this repo can now run dvc pull to fetch the exact data version that produced the model. Data is now first-class versioned, alongside your code.
Stage 2 - A Reproducible Training Script
The training script needs to be reproducible. That means: parameters externalized, random seeds set, and outputs deterministic given the same inputs.
Create params.yaml:
train:
  test_size: 0.2
  random_state: 42
  n_estimators: 100
  max_depth: 5
  min_samples_split: 2
Create src/train.py:
import yaml
import joblib
import pandas as pd
from pathlib import Path
from sklearn.ensemble import RandomForestClassifier
from sklearn.model_selection import train_test_split
from sklearn.metrics import accuracy_score, f1_score, roc_auc_score

def load_params():
    with open("params.yaml") as f:
        return yaml.safe_load(f)["train"]

def main():
    params = load_params()

    df = pd.read_csv("data/raw.csv")
    X = df.drop(columns=["target"])
    y = df["target"]

    X_train, X_test, y_train, y_test = train_test_split(
        X, y,
        test_size=params["test_size"],
        random_state=params["random_state"],
        stratify=y,
    )

    model = RandomForestClassifier(
        n_estimators=params["n_estimators"],
        max_depth=params["max_depth"],
        min_samples_split=params["min_samples_split"],
        random_state=params["random_state"],
        n_jobs=-1,
    )
    model.fit(X_train, y_train)

    preds = model.predict(X_test)
    probs = model.predict_proba(X_test)[:, 1]

    metrics = {
        "accuracy": accuracy_score(y_test, preds),
        "f1": f1_score(y_test, preds),
        "roc_auc": roc_auc_score(y_test, probs),
    }

    Path("models").mkdir(exist_ok=True)
    joblib.dump(model, "models/model.joblib")
    print("Metrics:", metrics)
    return metrics

if __name__ == "__main__":
    main()
Run it:
python src/train.pyYou should see metrics printed and a model.joblib file produced. The script is parameterized, change params.yaml and rerun, no code edits needed. That's the first principle of MLOps: everything that affects the model is configuration, not code.
Stage 3 - Experiment Tracking with MLflow
Right now you have one model file, no history. Run training twice with different parameters and you've already lost track of what produced what. MLflow fixes that: every training run logs its parameters, metrics, and artifacts to a tracking server you can query later.
Start the MLflow tracking server locally (in a separate terminal):
mlflow server \
  --host 0.0.0.0 \
  --port 5050 \
  --backend-store-uri sqlite:///mlflow.db \
  --default-artifact-root ./mlruns \
  --allowed-hosts "host.docker.internal:5050,host.docker.internal,localhost:5050,127.0.0.1:5050" \
  --cors-allowed-origins "http://host.docker.internal:5050,http://localhost:5050"
Why a SQLite-backed server, not just file-based tracking? MLflow's model registry requires a database backend. If you skip this step and use the default file-based store, you'll hit a confusing error in Stage 4. Get the server right now, save yourself the debugging.
Update src/train.py to log to MLflow. Replace the file with this version:
import yaml
import mlflow
import mlflow.sklearn
import pandas as pd
from pathlib import Path
from sklearn.ensemble import RandomForestClassifier
from sklearn.model_selection import train_test_split
from sklearn.metrics import accuracy_score, f1_score, roc_auc_score
from mlflow.models import infer_signature

mlflow.set_tracking_uri("http://127.0.0.1:5000")
mlflow.set_experiment("breast-cancer-classifier")

def load_params():
    with open("params.yaml") as f:
        return yaml.safe_load(f)["train"]

def main():
    params = load_params()

    df = pd.read_csv("data/raw.csv")
    X = df.drop(columns=["target"])
    y = df["target"]

    X_train, X_test, y_train, y_test = train_test_split(
        X, y,
        test_size=params["test_size"],
        random_state=params["random_state"],
        stratify=y,
    )

    with mlflow.start_run() as run:
        mlflow.log_params(params)

        model = RandomForestClassifier(
            n_estimators=params["n_estimators"],
            max_depth=params["max_depth"],
            min_samples_split=params["min_samples_split"],
            random_state=params["random_state"],
            n_jobs=-1,
        )
        model.fit(X_train, y_train)

        preds = model.predict(X_test)
        probs = model.predict_proba(X_test)[:, 1]

        metrics = {
            "accuracy": accuracy_score(y_test, preds),
            "f1": f1_score(y_test, preds),
            "roc_auc": roc_auc_score(y_test, probs),
        }
        mlflow.log_metrics(metrics)

        # MLflow 3 requires a signature for clean registry workflows
        signature = infer_signature(X_train, model.predict(X_train))

        mlflow.sklearn.log_model(
            sk_model=model,
            name="model",
            signature=signature,
            input_example=X_train.iloc[:5],
        )

        print(f"Run ID: {run.info.run_id}")
        print("Metrics:", metrics)

if __name__ == "__main__":
    main()
MLflow 3 API note: Older tutorials useartifact_path="model"- that parameter was renamed tonamein MLflow 3. If you copy-paste from a 2024 blog you'll get a deprecation warning at best, a TypeError at worst.
Run training twice with different hyperparameters. First with defaults:
python src/train.pyThen edit params.yaml to change n_estimators: 200, max_depth: 10, and run again:
python src/train.pyOpen http://127.0.0.1:5000 in your browser. You'll see the breast-cancer-classifier experiment with two runs, side-by-side, comparable in one click. Click into a run and you'll see the logged parameters, metrics, the model artifact, and the input example. This is what reproducibility looks like in practice.
Stage 4 - Model Registry
The model registry is the handoff between training and deployment. Once a run produces a model good enough to ship, you register it so downstream services can reference it by name and version, not by run ID.
This is the section where most tutorials are wrong. MLflow 3 deprecated stages (None → Staging → Production → Archived) in favor of aliases and tags. Aliases are mutable named pointers to specific versions (e.g.,@champion,@challenger); tags are key-value annotations. The new model is more flexible, you can have multiple aliases pointing to different versions, and aliases work across environments without the rigidity of fixed stage names. If a tutorial tells you to calltransition_model_version_stage(), it's referencing a deprecated API.
Create src/register_model.py to register the best run and promote it:
import mlflow
from mlflow.tracking import MlflowClient

mlflow.set_tracking_uri("http://127.0.0.1:5000")
MODEL_NAME = "breast-cancer-classifier"

def main():
    client = MlflowClient()

    # Find the run with the best ROC AUC in our experiment
    experiment = client.get_experiment_by_name(MODEL_NAME)
    runs = client.search_runs(
        experiment_ids=[experiment.experiment_id],
        order_by=["metrics.roc_auc DESC"],
        max_results=1,
    )
    best_run = runs[0]
    best_run_id = best_run.info.run_id
    best_auc = best_run.data.metrics["roc_auc"]

    print(f"Best run: {best_run_id} (ROC AUC: {best_auc:.4f})")

    # Register the model from that run
    model_uri = f"runs:/{best_run_id}/model"
    registered = mlflow.register_model(model_uri, MODEL_NAME)
    print(f"Registered version: {registered.version}")

    # Set tags (the modern replacement for stages)
    client.set_model_version_tag(
        name=MODEL_NAME,
        version=registered.version,
        key="validation_status",
        value="approved",
    )
    client.set_model_version_tag(
        name=MODEL_NAME,
        version=registered.version,
        key="roc_auc",
        value=f"{best_auc:.4f}",
    )

    # Set the @champion alias to this version
    # This is what production code will reference
    client.set_registered_model_alias(
        name=MODEL_NAME,
        alias="champion",
        version=registered.version,
    )
    print(f"Alias 'champion' → version {registered.version}")

if __name__ == "__main__":
    main()
Run it:
python src/register_model.py
Heads-up on a warning you'll see: MLflow may printRun with id ... has no artifacts at artifact path 'model', registering model based on models:/<model_id> instead. This is benign, in MLflow 3 the model is stored under amodels:/URI rather than under the run's artifact path, and MLflow auto-resolves the registration correctly. Your registered version, tags, and alias all work as expected.
In the MLflow UI, click Models in the sidebar. You'll see breast-cancer-classifier with a version, your tags, and the @champion alias. Your serving code will load the model with the URI models:/breast-cancer-classifier@champion - when a better model gets trained next week and the alias gets reassigned, the serving code doesn't change.
🐳 Heading into containerization next. Production MLOps stacks run on Kubernetes - the moment you outgrow this laptop setup, that's the next stop. Our Kubernetes for Beginners guide covers the fundamentals, and the 100 Days of MLOps challenge puts them into practice.
Stage 5 - Model Serving with FastAPI
Time to expose the model as an HTTP API. The pattern that matters: load the model once, at startup, not on every request. Loading a model from MLflow takes seconds; doing it per request means every prediction is 100x slower than it needs to be.
FastAPI's lifespan context manager is the idiomatic place for startup loading.
Create src/serve.py:
import os
from contextlib import asynccontextmanager
import mlflow
import pandas as pd
from fastapi import FastAPI, HTTPException
from pydantic import BaseModel, Field
from typing import List

MLFLOW_TRACKING_URI = os.getenv("MLFLOW_TRACKING_URI", "http://127.0.0.1:5000")
MODEL_NAME = "breast-cancer-classifier"
MODEL_ALIAS = "champion"

# State held across requests
state = {"model": None, "model_version": None}


@asynccontextmanager
async def lifespan(app: FastAPI):
    # Startup: load model once
    mlflow.set_tracking_uri(MLFLOW_TRACKING_URI)
    model_uri = f"models:/{MODEL_NAME}@{MODEL_ALIAS}"
    print(f"Loading model from {model_uri}...")
    state["model"] = mlflow.sklearn.load_model(model_uri)

    # Capture which version we actually loaded — useful for /info and logs
    client = mlflow.tracking.MlflowClient()
    mv = client.get_model_version_by_alias(MODEL_NAME, MODEL_ALIAS)
    state["model_version"] = mv.version
    print(f"Loaded {MODEL_NAME} v{mv.version}")

    yield

    # Shutdown
    state.clear()


app = FastAPI(title="Breast Cancer Classifier", lifespan=lifespan)


class PredictionRequest(BaseModel):
    features: List[float] = Field(
        ...,
        description="30 feature values in sklearn's breast_cancer order",
        min_length=30,
        max_length=30,
    )


class PredictionResponse(BaseModel):
    prediction: int
    probability: float
    model_version: str


@app.get("/health")
def health():
    return {"status": "ok", "model_version": state.get("model_version")}


@app.post("/predict", response_model=PredictionResponse)
def predict(request: PredictionRequest):
    if state["model"] is None:
        raise HTTPException(status_code=503, detail="Model not loaded")

    feature_names = [
        "mean radius", "mean texture", "mean perimeter", "mean area",
        "mean smoothness", "mean compactness", "mean concavity",
        "mean concave points", "mean symmetry", "mean fractal dimension",
        "radius error", "texture error", "perimeter error", "area error",
        "smoothness error", "compactness error", "concavity error",
        "concave points error", "symmetry error", "fractal dimension error",
        "worst radius", "worst texture", "worst perimeter", "worst area",
        "worst smoothness", "worst compactness", "worst concavity",
        "worst concave points", "worst symmetry", "worst fractal dimension",
    ]
    X = pd.DataFrame([request.features], columns=feature_names)

    prediction = int(state["model"].predict(X)[0])
    probability = float(state["model"].predict_proba(X)[0][prediction])

    return PredictionResponse(
        prediction=prediction,
        probability=probability,
        model_version=state["model_version"],
    )
Run it (keep the MLflow server running in its own terminal):
uvicorn src.serve:app --host 0.0.0.0 --port 8000Test it with a sample from the dataset:
curl -X POST http://localhost:8000/predict \
  -H "Content-Type: application/json" \
  -d '{
    "features": [17.99, 10.38, 122.8, 1001.0, 0.1184, 0.2776, 0.3001,
                 0.1471, 0.2419, 0.07871, 1.095, 0.9053, 8.589, 153.4,
                 0.006399, 0.04904, 0.05373, 0.01587, 0.03003, 0.006193,
                 25.38, 17.33, 184.6, 2019.0, 0.1622, 0.6656, 0.7119,
                 0.2654, 0.4601, 0.1189]
  }'
You'll get back something like:
{"prediction": 0, "probability": 0.97, "model_version": "1"}The model is now a real service. The same pattern scales, replace uvicorn with gunicorn + uvicorn workers for production, or with KServe / Seldon Core when you graduate to Kubernetes.
Stage 6 - Containerization with Docker
The FastAPI service works on your machine. Docker is how you guarantee it works on any machine.
Create a Dockerfile:
FROM python:3.13-slim

WORKDIR /app

# Install build essentials only if needed — keeps image small
RUN apt-get update && apt-get install -y --no-install-recommends \
    build-essential \
    && rm -rf /var/lib/apt/lists/*

COPY requirements.txt .
RUN pip install --no-cache-dir -r requirements.txt

COPY src/ ./src/

EXPOSE 8000

# Pass MLflow URI as an env var so the same image works in any environment
ENV MLFLOW_TRACKING_URI=http://host.docker.internal:5000

CMD ["uvicorn", "src.serve:app", "--host", "0.0.0.0", "--port", "8000"]
Add a .dockerignore to keep the image lean:
.venv/
__pycache__/
*.pyc
.git/
mlruns/
mlflow.db
.dvc/
data/
models/
Build and run:
docker build -t breast-cancer-api:v1 .
docker run -p 8000:8000 \
  -e MLFLOW_TRACKING_URI=http://host.docker.internal:5050 \
  -v "$(pwd):$(pwd)" \
breast-cancer-api:v1Gotcha:host.docker.internalresolves to your host machine from inside Docker Desktop on Mac and Windows. On Linux, add--add-host=host.docker.internal:host-gatewayto yourdocker runcommand. This is the most common stuck-point for first-time builders.
Test the containerized service:
curl http://localhost:8000/healthThe same image now runs anywhere, your laptop, a CI runner, ECS, Cloud Run, or a Kubernetes pod. The "works on my machine" gap is closed.
Stage 7 - Monitoring with Prometheus
A model in production without monitoring is a liability. You won't know when it drifts, when latency spikes, or when prediction distributions shift. prometheus-fastapi-instrumentator adds a /metrics endpoint in one line.
You already installed it. Now update src/serve.py - add these two imports at the top:
from prometheus_fastapi_instrumentator import Instrumentator
from prometheus_client import Counter, Histogram
Below the app = FastAPI(...) line, add custom MLOps-specific metrics and wire up the instrumentator:
# Custom metrics for MLOps observability
prediction_counter = Counter(
    "model_predictions_total",
    "Total predictions by class",
    ["model_version", "predicted_class"],
)
prediction_confidence = Histogram(
    "model_prediction_confidence",
    "Distribution of prediction probabilities",
    ["model_version"],
    buckets=[0.5, 0.6, 0.7, 0.8, 0.9, 0.95, 0.99, 1.0],
)

# Auto-instrument FastAPI (HTTP latency, request counts, status codes)
Instrumentator().instrument(app).expose(app)
Then update the /predict endpoint to record these metrics , add these lines just before the return statement:
prediction_counter.labels(
    model_version=state["model_version"],
    predicted_class=str(prediction),
).inc()
prediction_confidence.labels(
    model_version=state["model_version"],
).observe(probability)
Rebuild and rerun:
docker build -t breast-cancer-api:v2 .
docker run -p 8000:8000 breast-cancer-api:v2
Hit /predict a few times, then check /metrics:
curl http://localhost:8000/metrics | grep model_You'll see counters incrementing per predicted class and a histogram of prediction confidences, labeled by model version. Point a Prometheus server at :8000/metrics, plug Grafana into Prometheus, and you have real model observability. Drift detection becomes querying rate(model_predictions_total[1h]) and alerting when the per-class ratio shifts beyond a threshold.
For deeper drift detection (feature distribution shifts, statistical tests), production teams add Evidently AI or Arize on top of this baseline. The Prometheus layer catches operational signals; drift libraries catch statistical ones.
Tying It All Together with a DVC Pipeline
Right now you run the stages by hand. The final piece is orchestration, defining the pipeline as code so anyone can reproduce the whole thing with one command. DVC's dvc.yaml is purpose-built for this. Think of it as a Makefile that understands ML.
First, untrack the manually-added dataset. In Stage 1 we used dvc add to track data/raw.csv as a standalone file. Now that the pipeline owns it as an output of the prepare stage, both can't claim the same file, DVC will refuse with an "output is specified in multiple places" error. Remove the manual tracking:
dvc remove data/raw.csv.dvc
git add data/raw.csv.dvc .gitignore
git commit -m "Hand off raw.csv ownership to the pipeline"
This is the natural graduation point: from per-file tracking to pipeline-as-code. The data is still versioned, just by dvc.lock instead of raw.csv.dvc.
Now create dvc.yaml in your project root:
stages:
  prepare:
    cmd: python src/prepare_data.py
    deps:
      - src/prepare_data.py
    outs:
      - data/raw.csv

  train:
    cmd: python src/train.py
    deps:
      - src/train.py
      - data/raw.csv
    params:
      - train.test_size
      - train.random_state
      - train.n_estimators
      - train.max_depth
      - train.min_samples_split

  register:
    cmd: python src/register_model.py
    deps:
      - src/register_model.py
Now reproduce the entire pipeline with:
dvc reproDVC computes the dependency graph, runs only the stages whose inputs changed, and tracks outputs automatically. Change a parameter in params.yaml, run dvc repro, and only the affected stages re-execute. Push to Git with dvc.lock committed and any teammate can reproduce your exact pipeline state.
This is the same pattern Airflow, Kubeflow Pipelines, and Vertex AI Pipelines implement, just at orchestration platforms designed for clusters instead of laptops. The mental model transfers directly.
What You've Actually Built
In ninety minutes you've stood up:
- Versioned data (DVC tracking with a configured remote)
- Reproducible training (parameterized, deterministic, seed-controlled)
- Experiment tracking (every run logged to MLflow with metrics, params, artifacts)
- A model registry using MLflow 3's modern alias-and-tag workflow
- A production-pattern API (FastAPI, lifespan-based model loading, Pydantic validation)
- A portable container (single Docker image, environment-driven config)
- MLOps observability (Prometheus metrics, custom prediction counters and confidence histograms)
- Pipeline-as-code orchestration (DVC stages with dependency tracking)
That's the same architecture used by teams running models at companies you've heard of. The difference between this and their setup is scale, not structure.
Where to Take It Next
Five concrete upgrades, ranked by impact:
- Move DVC to cloud storage. Replace the local remote with S3, GCS, or Azure Blob. One config change, real collaboration unlocked.
- Add CI/CD with GitHub Actions. Trigger
dvc reproon every PR; gate merges onroc_auc > threshold. This is what "MLOps Level 1" looks like. - Deploy to Kubernetes with KServe. Replace the Docker container with a KServe
InferenceServicefor autoscaling, canary rollouts, and built-in metrics. - Add drift detection with Evidently AI. Log production predictions, compare distributions to the training set, alert on statistically significant shifts.
- Schedule retraining. When drift fires or new data arrives, trigger the pipeline automatically via Airflow, Prefect, or a GitHub Actions cron schedule.
Each of these is a weekend project on top of what you've already built. None of them require rewriting what you have.
Common Gotchas
Real issues you'll hit, with fixes:
- "FAILED to load model: no registered model named..." - You're hitting the file-based MLflow store instead of the SQLite-backed server. The model registry only works with a database backend. Run the
mlflow servercommand exactly as shown in Stage 3. signaturewarnings onlog_model- MLflow 3 requires (or strongly recommends) a model signature for clean registry workflows. Always passsignature=infer_signature(X_train, model.predict(X_train)).- Docker container can't reach MLflow on localhost -
localhostinside the container means the container itself, not the host. Usehost.docker.internalon Mac/Windows; on Linux, add--add-host=host.docker.internal:host-gateway. - FastAPI loading the model on every request - Symptom: slow predictions, high memory churn. Cause: model loaded inside the endpoint function instead of
lifespan. Always load once at startup. - DVC permission errors on macOS - If
dvc pushcomplains about permissions on/tmp/dvc-remote, recreate the directory withsudo chown -R $(whoami) /tmp/dvc-remote. transition_model_version_stagedeprecation warning - You copied from an old tutorial. Useset_registered_model_alias()instead (Stage 4).- Scikit-learn pickle security warning on every
log_model- MLflow 3 emits a warning recommending theskopsformat over pickle for sklearn models. It's informational, not an error, and the model loads and serves correctly. For production deployments handling untrusted model artifacts, consider switching tomlflow.sklearn.save_model(..., serialization_format="skops").
One pipeline is the start. The job is the system around it.
The 100 Days of MLOps challenge on KodeKloud Engineer drops you into the messier scenarios - broken retraining loops, drift incidents at 2 AM, multi-model deployments - that turn a pipeline-builder into an MLOps engineer.
Start the Challenge →FAQ
Can I use this pipeline for deep learning models like PyTorch or TensorFlow?
Yes - every tool in this stack is framework-agnostic. Swap mlflow.sklearn.log_model for mlflow.pytorch.log_model (or mlflow.tensorflow.log_model), update the training script, and the registry, FastAPI server, Docker container, and monitoring layer all work unchanged. Inference latency will be the bigger consideration; for large models, consider GPU-backed serving with NVIDIA Triton or vLLM rather than vanilla FastAPI.
Do I need Kubeflow if I have this setup?
Not initially. Kubeflow shines when you have multiple teams, multiple models, and need cluster-native orchestration at scale. For a single project or a small team, this DVC + MLflow + Docker stack handles the same lifecycle with a fraction of the operational overhead. The natural upgrade path is: this setup → add CI/CD → move serving to Kubernetes with KServe → bring in Kubeflow Pipelines if you outgrow dvc repro.
Why use MLflow aliases instead of stages?
MLflow 3 deprecated stages because the fixed four-stage model (None → Staging → Production → Archived) was inflexible. Aliases let you have multiple named pointers (@champion, @challenger, @experiment-a) per model, work across environments, and decouple deployment from rigid lifecycle names. Tags handle metadata (validation status, owning team, approval timestamps) separately from deployment routing. The new model is strictly more powerful, tutorials still using stages are working against a deprecated API.
What's the cheapest path from this to a real cloud deployment?
Move DVC's remote to S3 (~$1/month for a small project), run MLflow on a t4g.small EC2 instance with EFS for artifact storage (~$15/month), and deploy the Docker container to AWS ECS Fargate or Google Cloud Run (~$5-10/month for low traffic). You're under $30/month for a production-grade MLOps stack with versioned data, tracked experiments, a registry, a deployed model, and monitoring. For learning, Databricks Community Edition gives you a hosted MLflow free.
References used: MLflow 3 documentation, MLflow Model Registry workflow, DVC pipelines documentation, FastAPI lifespan events, prometheus-fastapi-instrumentator 7.1.0.





Discussion