


Kubernetes has become increasingly popular in recent years due to its ability to automate the deployment, scaling, and management of containerized applications. The need for engineers with Kubernetes skills has also grown significantly as more and more businesses adopt cloud-based infrastructure. That’s why learning it is a smart investment for anyone looking to improve their skills and stay competitive in the ever-evolving world of technology.
If you are an absolute beginner, this article will help you get started with Kubernetes. If you are not new to Kubernetes, this piece will help you polish your skills and guide you on how to easily gain practical experience working on real project tasks on real systems.
By the end of this tutorial, you’ll have learned what Kubernetes does, its architecture, and how to get started with it.
Prerequisites
To work with Kubernetes, you must have an understanding of how the Docker images work. This includes how the Docker images are created and how to run containers. If you don’t already know this, check out our blog: How to Create Docker Images.
Try the Kubernetes Deployments Lab for free
What is Kubernetes?
Kubernetes is an open-source container orchestration platform that automates the deployment, scaling, and management of containerized applications. It provides a highly scalable and reliable way to manage containerized workloads and services, making it easier to deploy and manage applications in production environments.
Kubernetes helps in maximizing the benefits of microservice architecture, a practice that involves breaking an application down into smaller, more modular components (Containers) that can be deployed independently.
This approach contradicts the traditional monolithic architecture, which involves building an entire application as a single unit, with all its components tightly integrated and dependent on one another.
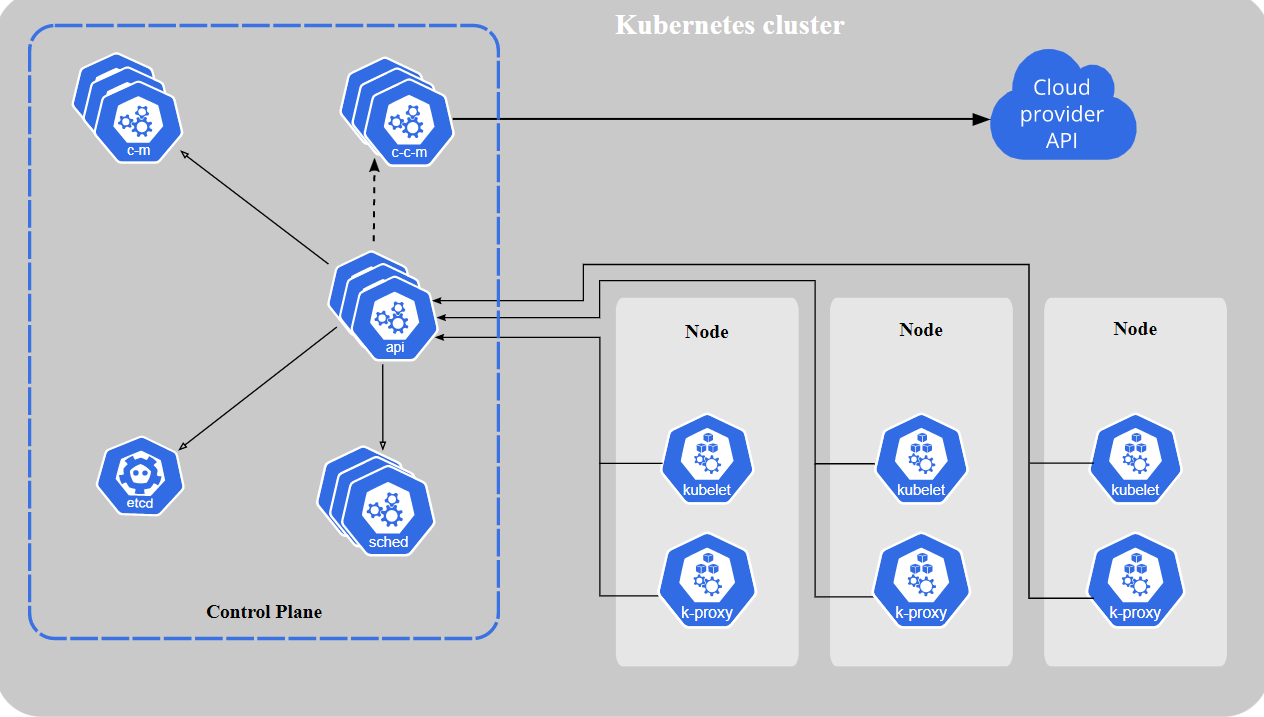
Kubernetes architecture
Kubernetes runs in the form of a cluster where multiple nodes are connected to each other. These nodes are simply machines running a Linux operating system with some Kubernetes components. Each node in the cluster can have the role of a master or a worker node.
The master is the control plane responsible for the management of the Kubernetes objects. It is where the interaction usually happens between the administrator and the cluster. Objects are resources that Kubernetes creates to handle a specific task related to the application.
For example, a Service object enables network connectivity between Pods running inside the cluster. The worker node is where the actual workloads run. It is the node responsible for running the containers. It communicates with the master to create, terminate, or report the health of containers.
Master node components
There are some Kubernetes components that must be installed on the node for it to act as a master:
- API server: This component receives the requests sent to the cluster. Requests can be to create a new object or query the state of current objects. It is the entry point for communicating with the cluster for any management tasks.
- etcd: This is a key-value database for the cluster. It contains the desired state configuration of the cluster.
- Scheduler: This component selects the best node to run a specific Pod. It watches for newly created Pods and decides the node it should start on based on some criteria.
- Controller manager: This component is responsible for starting higher-level controllers. These controllers implement control loops to monitor the state of the cluster and keep it in the desired state.
Worker node components
Below are the components of a worker node:
- kubelet: this is the main Kubernetes agent installed on all nodes. It manages containers created by Kubernetes and ensures they are healthy.
- kube-proxy: This component creates some networking rules on each node. These rules enable network communication to pods.
Kubernetes cluster installation
This section briefly describes how to create a Kubernetes cluster. If you want a more detailed step-by-step guide on Kubernetes cluster installation, visit our blog: How to Setup a Kubernetes Cluster with Minikube & Kubeadm.
Now that we’ve covered the main components of a Kubernetes cluster, let’s discuss some of the installation options.
1. Minikube: This is a local, single-node Kubernetes installation. It’s suitable for learning and development. Just a quick way to get a mini Kubernetes cluster on your personal computer. Install minikube.
2. Kubeadm: This is the main tool for bootstrapping and initializing Kubernetes. It is used to manually deploy a Kubernetes cluster on an existing infrastructure. Install kubeadmin.
3. Automatic cluster installation: This method deploys a Kubernetes cluster using automation tools or scripts. It is a quick way to get a production-grade Kubernetes cluster ready. One of the most commonly used tools for this method is kubespray.
4. Managed Clusters: This is suitable for people who want to use Kubernetes but don't want to set up and manage the cluster themselves. Cloud platforms usually offer this service. Simply put, they create and manage the cluster for you. You get access to the final product, a usable Kubernetes cluster. But you don't care about the servers involved, software configuration, security upgrades, and so on. They do all of that for you. The most known managed cluster services are EKS, GKE, and AKS.
5. Playgrounds: They allow you to get access to a working Kubernetes cluster right on your browser. They are suitable for learners to test what they have just learned without going through complex installations. At Kodekloud, we have multiple Kubernetes Playgrounds - single node, multi-nodes, and the latest version - to suit your different learning needs. Enroll here to start learning using our playgrounds.
Interacting with the cluster
After you have your cluster up and running, it’s time to start working with it.
Kubernetes exposes an HTTP REST API for clients to interact with. It is exposed through the API server component. However, users rarely use this API directly. They usually use a tool called kubectl.
Kubectl is a command-line tool used to run commands against the Kubernetes cluster. It allows you to create Kubernetes objects and monitor the cluster's health and configuration.
For information on installing kubectl, you can check the Kubernetes documentation.
After installing kubectl, you can start interacting with the cluster through kubectl commands.
controlplane ~ ➜  kubectl get nodes
NAME           STATUS   ROLES           AGE   VERSION
controlplane   Ready    control-plane   90m   v1.25.0
node01         Ready    <none>          89m   v1.25.0
Interacting with the cluster using kubectl
Check out the KodeKloud Engineer platform. An environment for students to gain hands-on experience by working on real Kubernetes project tasks on real systems. Try it here for free.
Kubernetes YAML manifests
The main task when interacting with the cluster is creating Kubernetes objects. Kubernetes objects are created using YAML files called manifests. These files act as templates describing the object to be created. The YAML file is sent to the cluster using the kubectl command. Then, the cluster creates this object with the specifications provided in the YAML file.
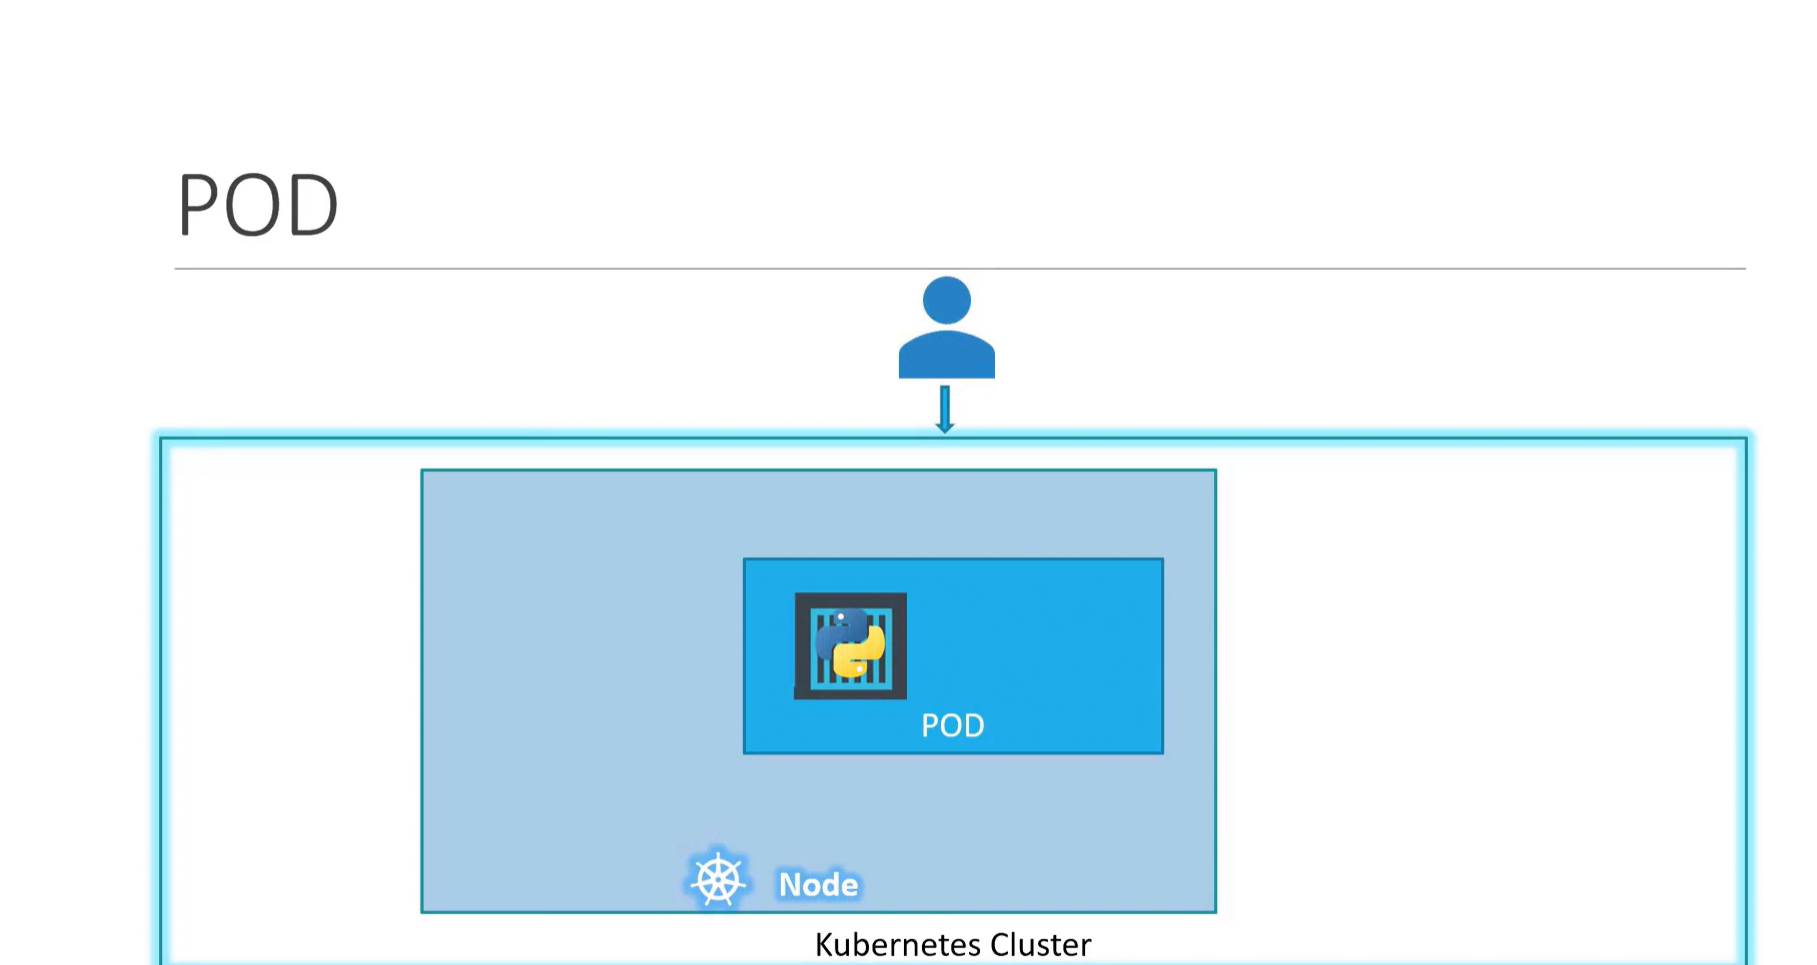
Let’s create a simple Pod using a YAML file. A Pod is the smallest unit of workload in Kubernetes. It runs one or more containers inside it which hold the application code. You can think of a Pod as an execution environment for the application.
Here's an example of a Pod definition .yaml file:
apiVersion: v1
kind: Pod
metadata:
  name: nginx
spec:
  containers:
  - name: nginx
    image: nginx:1.14.2
    ports:
    - containerPort: 80
nginx.yaml
Copy the above code snippet and paste it into a file named nginx.yaml
The YAML file is divided into four sections :
#1. apiVersion
Kubernetes defines each resource under a specific apiVersion or group. To create a resource, you have to specify its apiVersion in the YAML file.
To get a list of available apiVersions use the command kubectl api-versions.
controlplane ~ ➜  kubectl api-versions

admissionregistration.k8s.io/v1
apiextensions.k8s.io/v1
apiregistration.k8s.io/v1
apps/v1
authentication.k8s.io/v1
authorization.k8s.io/v1
autoscaling/v1
autoscaling/v2
autoscaling/v2beta2
----- OUTPUT TRIMMED -----
#2. kind
This is the type of resource you want to create. Here, we're creating a Pod.
To get a list of available resources, use the command kubectl api-resources.
controlplane ~ ➜  kubectl api-resources
NAME                              SHORTNAMES   APIVERSION                             NAMESPACED   KIND
bindings                                       v1                                     true         Binding
componentstatuses                 cs           v1                                     false        ComponentStatus
configmaps                        cm           v1                                     true         ConfigMap
endpoints                         ep           v1                                     true         Endpoints
events                            ev           v1                                     true         Event
limitranges                       limits       v1                                     true         LimitRange
namespaces                        ns           v1                                     false        Namespace
nodes                             no           v1                                     false        Node
persistentvolumeclaims            pvc          v1                                     true         PersistentVolumeClaim
persistentvolumes                 pv           v1                                     false        PersistentVolume
pods                              po           v1                                     true         Pod
----- OUTPUT TRIMMED -----
#3. metadata
This is some information that identifies the resource. You can set a name and a label for the resource here.
#4. spec
This is the required configuration for the resource. You can see here that this Pod is going to run a container from the nginx:1.14.2 image.
How to Deploy a Pod to a Cluster
Now, let's deploy that Pod to the cluster.
To deploy a resource to a cluster, we use the command kubectl apply -f followed by the YAML file name.
controlplane ~ ➜  kubectl apply -f nginx.yaml
pod/nginx created
If we check the Pods on the cluster now, we'll see our Pod and its status.
controlplane ~ ➜  kubectl get pods
NAME    READY   STATUS    RESTARTS   AGE
nginx   1/1     Running   0          8m40s
We can get more details about our resources using the kubectl describe command.
controlplane ~ ➜  kubectl describe pod nginx
Name:             nginx
Namespace:        default
Priority:         0
Service Account:  default
Node:             node01/10.51.210.6
Start Time:       Wed, 09 Nov 2022 10:49:52 -0500
Labels:           <none>
Annotations:      <none>
Status:           Pending
IP:
IPs:              <none>
Containers:
  nginx:
    Container ID:
    Image:          nginx:1.14.2
    Image ID:
    Port:           80/TCP
----- OUTPUT TRIMMED -----
Now that we've covered the basics of creating an object using YAML files. Let's explore the Kubernetes resources required to run an application.
Kubernetes resources
Kubernetes' main goal is to run containerized applications using created resources. Some of these resources include Replicasets, Deployments, Services, and Ingress.
ReplicaSets
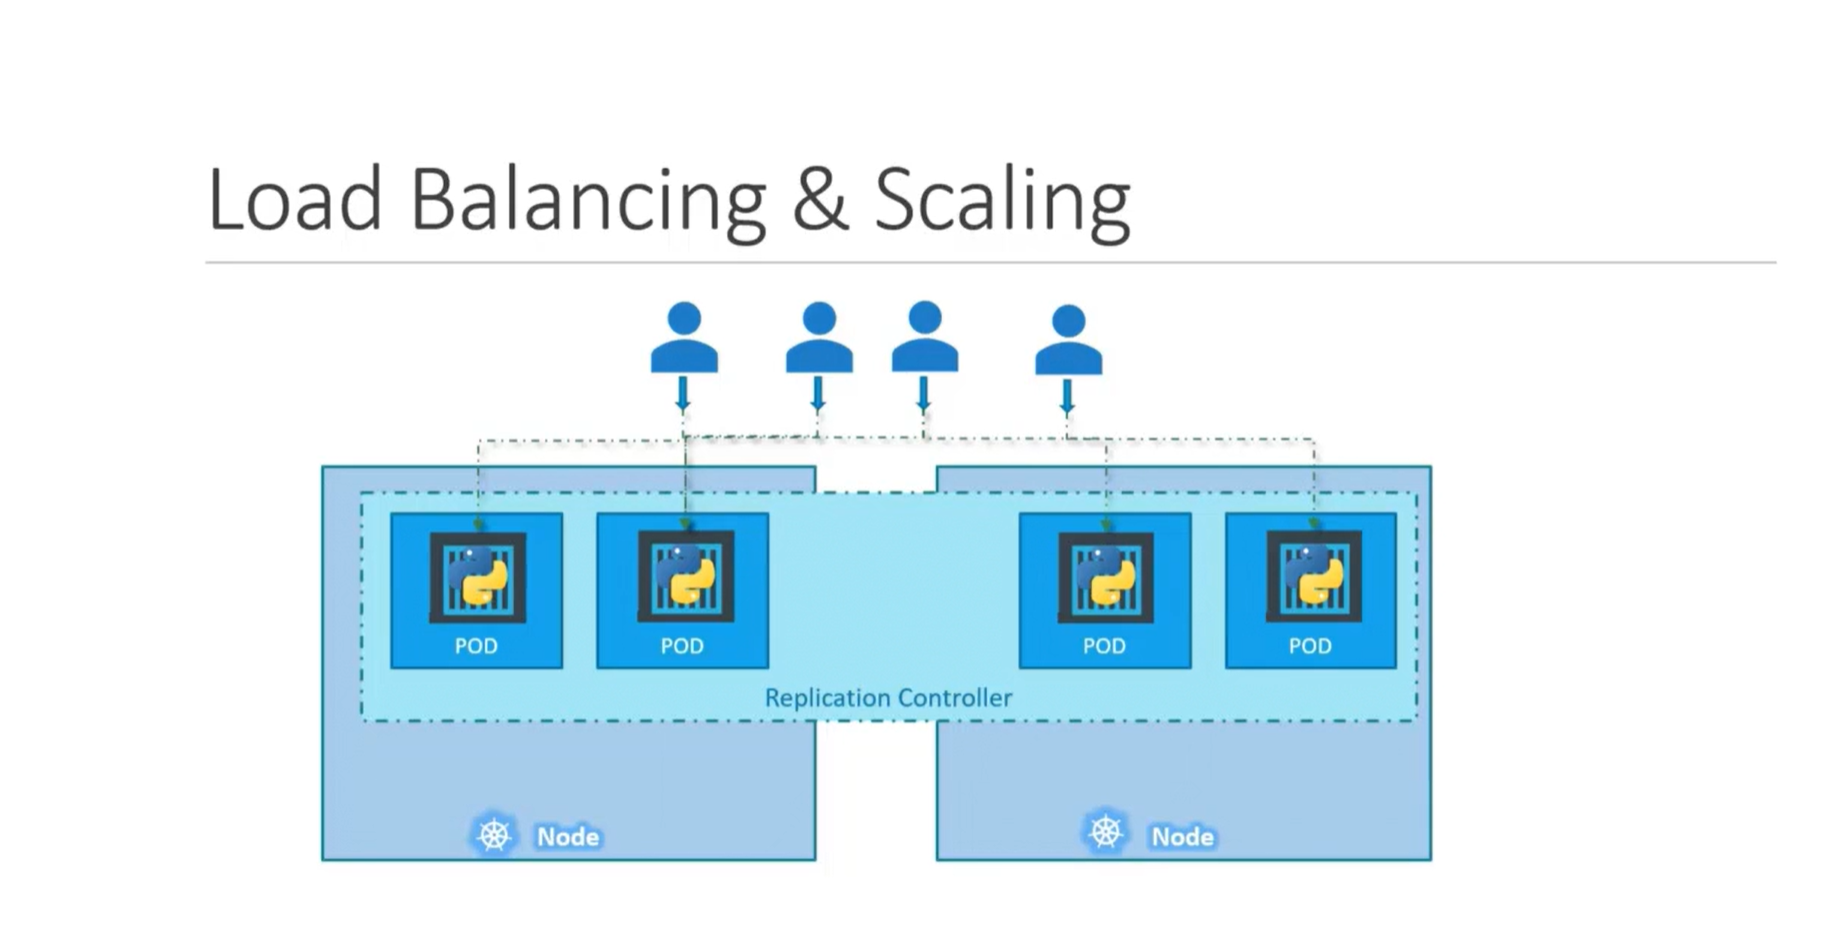
Running an application on a single Pod is not that great in terms of availability. If this Pod fails, the whole application will fail. So, we usually want to keep multiple copies/replicas of the application running. This is where the ReplicaSet comes into play.
ReplicaSets ensure that a specified number of replicas of a Pod are running. It keeps monitoring the current number of replicas and compares it with the desired number that we want. If there's any difference, the ReplicaSet will automatically fix it.
For example, we create a ReplicaSet for a specific Pod. We told the ReplicaSet that we wanted 3 replicas of this Pod. The ReplicaSet will then create 3 Pods to match this desired number. If, at any given time, one of the Pods fails, the ReplicaSet will automatically detect this and replace it with a new one.
We can also use ReplicaSets to scale our application. We do this by increasing the desired number of replicas in the ReplicaSet. This will automatically adjust the number of running Pods in the application.
Let's inspect a YAML file for a Replicaset and deploy it to the cluster.
Create a file named frontend.yaml and paste the code below.
apiVersion: apps/v1
kind: ReplicaSet
metadata:
  name: frontend
  labels:
    app: NewApp
spec:
  replicas: 3
  selector:
    matchLabels:
      tier: frontend
  template:
    metadata:
      labels:
        tier: frontend
    spec:
      containers:
      - name: php-redis
        image: gcr.io/google_samples/gb-frontend:v3
frontend Replicaset
There are some fields here that we need to focus on:
- replicas: this is the number of Pods we need to run at any given time.
- selector: this field ties the ReplicaSet with its Pods. The Replicaset monitors the Pods that have the same label as the one specified in this selector field. Here, this ReplicaSet will monitor Pods with the label tier: frontend.
- template: here we specify the specs of the Pods to be created by this ReplicaSet. When we deploy this ReplicaSet it will create 3 Pods from this template. And each time a Pod will be recreated by the ReplicaSet it will use this template.
We use the kubectl apply -f command to deploy our resources, as shown below:
controlplane ~ ➜  kubectl apply -f frontend.yaml
replicaset.apps/frontend created
Deploy Replicaset to the cluster
To check the ReplicaSets in the cluster, we use the command kubectl get rs, as shown below:
controlplane ~ ➜  kubectl get rs
NAME       DESIRED   CURRENT   READY   AGE
frontend   3         3         3       2m3s
listing available replicasets
We can also see the Pods that this ReplicaSet created by running the command kubectl get pods.
controlplane ~ ➜  kubectl get pods
NAME             READY   STATUS    RESTARTS   AGE
frontend-cglf8   1/1     Running   0          51s
frontend-ll99r   1/1     Running   0          51s
frontend-r89l8   1/1     Running   0          51s
Pods created by frontend replicaset
Now, let's try to delete one of those Pods and see what happens.
controlplane ~ ➜  kubectl delete pod frontend-cglf8
pod "frontend-cglf8" deleted

controlplane ~ ➜  kubectl get pods
NAME             READY   STATUS    RESTARTS   AGE
frontend-9vjzz   1/1     Running   0          6s
frontend-ll99r   1/1     Running   0          3m15s
frontend-r89l8   1/1     Running   0          3m15s
Replicaset replaces the removed Pod
You can see that a new Pod was automatically created by the ReplicaSet. frontend-cglf8 was deleted, but frontend-9vjzz quickly appeared and took its place. The ReplicaSet maintains the desired number of replicas.
You can also check this from the logged events of the ReplicaSet.
controlplane ~ ➜  kubectl describe rs frontend
Name:         frontend
Namespace:    default
Selector:     tier=frontend
Labels:       app=NewApp
Annotations:  <none>
Replicas:     3 current / 3 desired
Pods Status:  3 Running / 0 Waiting / 0 Succeeded / 0 Failed
Pod Template:
  Labels:  tier=frontend
  Containers:
   php-redis:
    Image:        gcr.io/google_samples/gb-frontend:v3
    Port:         <none>
    Host Port:    <none>
    Environment:  <none>
    Mounts:       <none>
  Volumes:        <none>
Events:
  Type    Reason            Age    From                   Message
  ----    ------            ----   ----                   -------
  Normal  SuccessfulCreate  6m11s  replicaset-controller  Created pod: frontend-r89l8
  Normal  SuccessfulCreate  6m10s  replicaset-controller  Created pod: frontend-ll99r
  Normal  SuccessfulCreate  6m10s  replicaset-controller  Created pod: frontend-cglf8
  Normal  SuccessfulCreate  3m2s   replicaset-controller  Created pod: frontend-9vjzz
This approach of simply recreating a new Pod to replace the destroyed one is perfect for stateless applications. Stateless applications don't store any data or configuration. They don't need persistent storage to keep their state. Otherwise said, they don't need to "remember" anything. Hence, they can easily be terminated and replaced at any time.
Stateful applications, on the other hand, need some type of persistent storage to write data. This data can be used by other applications, clients, or processes. An example of this would be a database server or key-value store.
Stateful applications are typically not good candidates for ReplicaSets. They can be managed by another type of Kubernetes resource called a StatefulSet.
That's it for the basics of ReplicaSets. Now, let's check another important Kubernetes resource, Deployment.
Deployments
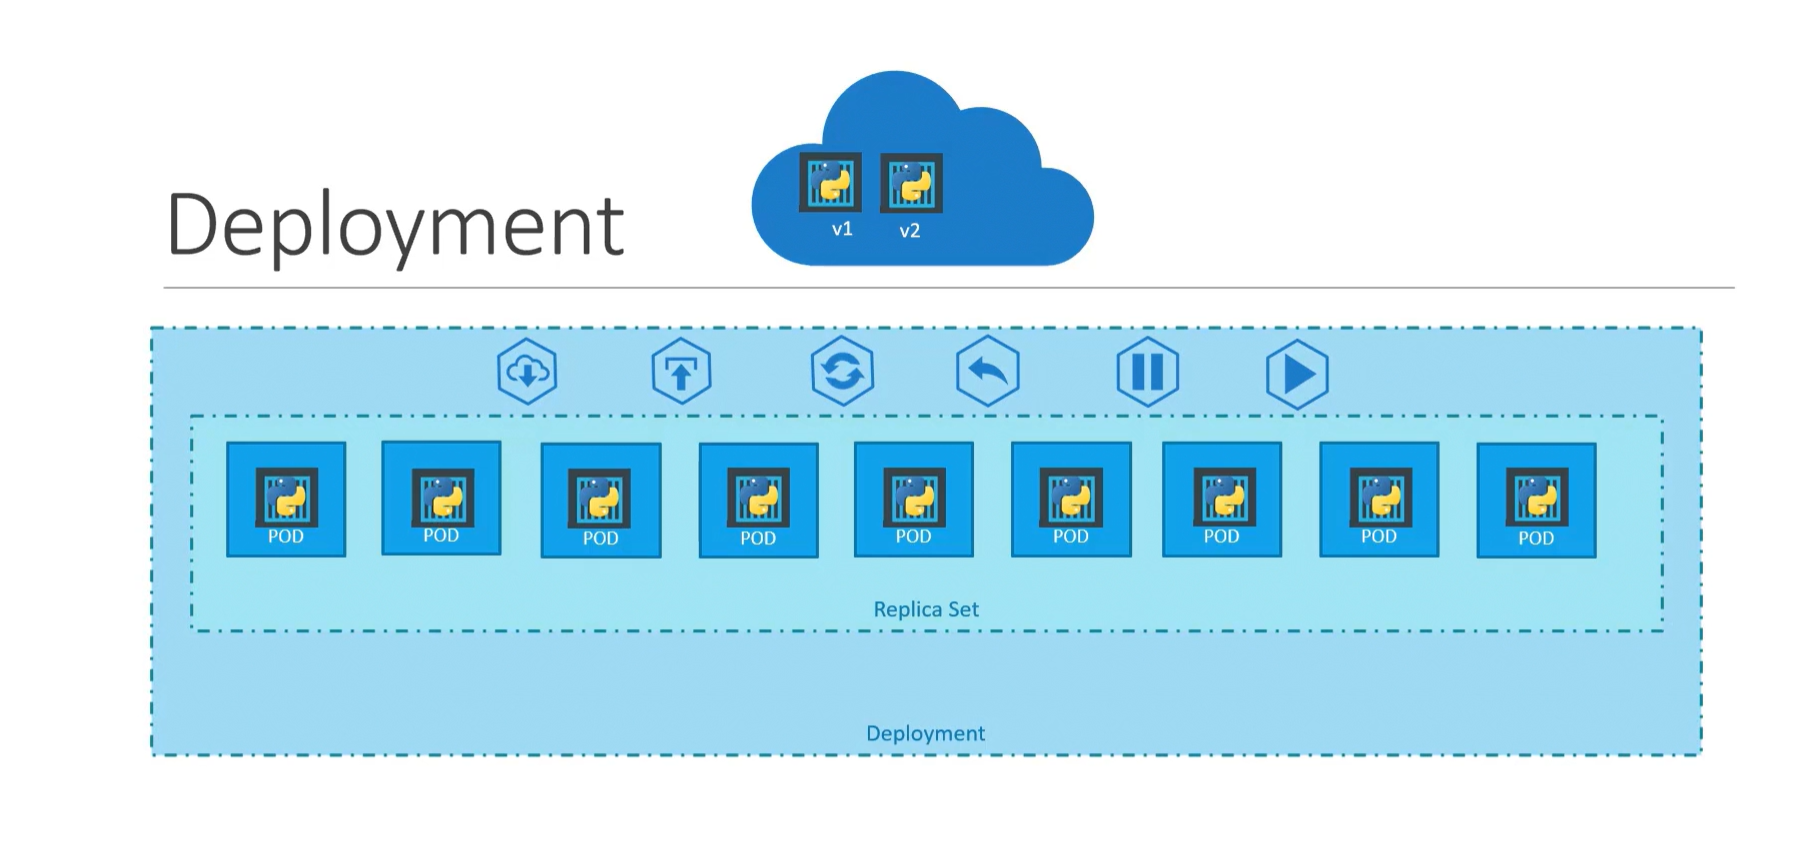
Releasing new versions of an application is an important part of its lifecycle. And apps are updated periodically. We either introduce new features or fix some issues in each version. And as Kubernetes hosts our application, it needs a way to manage the rolling out of new application versions. This is what Deployments do.
Deployments are high-level controllers that manage updates to Pods. This means that you set which version of your application you currently want. And then the Deployment takes care of ensuring this version is released.
Let's explain how this works in more detail.
When you create a Deployment, it automatically creates a ReplicaSet object. The number of replicas in this ReplicaSet is specified in the Deployment YAML file. Also, the template used to create the Pods will be specified in the Deployment YAML file. When this ReplicaSet is created, the desired number of pods from the template will be started.
Now this ReplicaSet and its Pods are managed by the Deployment. The Deployment will keep monitoring the Pod template for changes.
Now, let's say you want to release a newer version of the application. You build your new container image with your new code. Then all that you have to do is replace the image specification in the Pod template, inside the deployment YAML file. When the Deployment detects this change, it will understand that new Pods need to be created with this newer version.
The Deployment will then create a new ReplicaSet. New Pods will now be created under this ReplicaSet, and the old Pods will be terminated. The termination of old Pods and creation of new Pods is controlled by a Strategy.
Let's create a file, name it nginx-deployment.yaml, and add this content to it:
apiVersion: apps/v1
kind: Deployment
metadata:
  name: nginx-deployment
  labels:
    app: nginx
spec:
  replicas: 3
  selector:
    matchLabels:
      app: nginx
  template:
    metadata:
      labels:
        app: nginx
    spec:
      containers:
      - name: nginx
        image: nginx:1.14.2
        ports:
        - containerPort: 80
nginx-deployment.yaml
Here, the Deployment will create a ReplicaSet with 3 Pods. Each Pod runs a single container from the image nginx:1.14.2.
Let's deploy this to the cluster.
controlplane ~ ➜  kubectl apply -f nginx-deployment.yaml
deployment.apps/nginx-deployment created
creating a deployment on the cluster
You can check the status of rolling out the new Pods with the rollout status command.
controlplane ~ ➜  kubectl rollout status deployment/nginx-deployment
deployment "nginx-deployment" successfully rolled out

controlplane ~ ➜
rollout status of the deployment
Listing the available Deployments, we can see our Deployment there.
controlplane ~ ➜  kubectl get deployments
NAME               READY   UP-TO-DATE   AVAILABLE   AGE
nginx-deployment   3/3     3            3           7m17s

controlplane ~ ➜
listing available deployments
Now, let's check if we have any ReplicaSets created.
controlplane ~ ➜  kubectl get rs
NAME                          DESIRED   CURRENT   READY   AGE
nginx-deployment-7fb96c846b   3         3         3       8m55s

controlplane ~ ➜
listing available Replicasets
We can see the ReplicaSet created by our Deployment here.
If we check the details of our Deployment, we can also find the ReplicaSet there.
controlplane ~ ➜  kubectl describe deployment nginx-deployment
Name:                   nginx-deployment
Namespace:              default
CreationTimestamp:      Sat, 12 Nov 2022 08:42:12 -0500
Labels:                 app=nginx
Annotations:            deployment.kubernetes.io/revision: 1
Selector:               app=nginx
Replicas:               3 desired | 3 updated | 3 total | 3 available | 0 unavailable
StrategyType:           RollingUpdate
MinReadySeconds:        0
RollingUpdateStrategy:  25% max unavailable, 25% max surge
Pod Template:
  Labels:  app=nginx
  Containers:
   nginx:
    Image:        nginx:1.14.2
    Port:         80/TCP
    Host Port:    0/TCP
    Environment:  <none>
    Mounts:       <none>
  Volumes:        <none>
Conditions:
  Type           Status  Reason
  ----           ------  ------
  Available      True    MinimumReplicasAvailable
  Progressing    True    NewReplicaSetAvailable
OldReplicaSets:  <none>
NewReplicaSet:   nginx-deployment-7fb96c846b (3/3 replicas created)
checking deployment details
Let's check the available Pods.
controlplane ~ ➜  kubectl get pods
NAME                                READY   STATUS    RESTARTS   AGE
nginx-deployment-7fb96c846b-7x66b   1/1     Running   0          10m
nginx-deployment-7fb96c846b-s7gd8   1/1     Running   0          10m
nginx-deployment-7fb96c846b-wsvvr   1/1     Running   0          10m
listing available Pods
These are the 3 Pods created by our Deployment.
Now, let's try to update the image in the Deployment to nginx:1.16.1.
controlplane ~ ➜  kubectl edit deployment nginx-deployment
----- OUTPUT TRIMMED -----
  template:
    metadata:
      creationTimestamp: null
      labels:
        app: nginx
    spec:
      containers:
      - image: nginx:1.16.1
        imagePullPolicy: IfNotPresent
        name: nginx
        ports:
        - containerPort: 80
Editing the nginx-deployment
If we check the available ReplicaSets now, we can find the new one that has been created.
controlplane ~ ➜  kubectl get rs
NAME                          DESIRED   CURRENT   READY   AGE
nginx-deployment-68fc675d59   3         3         3       24s
nginx-deployment-7fb96c846b   0         0         0       26m
New Replicaset created by deployment
This new ReplicaSet is now running the new version of the Nginx image inside its Pods. You can also see that the Pods in the old ReplicaSet are being terminated. This is how a new version of an application replaces an old version.
You can see the new image and new ReplicaSet in the Deployment details now.
controlplane ~ ➜  kubectl describe deployment nginx-deployment
Name:                   nginx-deployment
Namespace:              default
CreationTimestamp:      Sat, 12 Nov 2022 08:42:12 -0500
Labels:                 app=nginx
Annotations:            deployment.kubernetes.io/revision: 2
Selector:               app=nginx
Replicas:               3 desired | 3 updated | 3 total | 3 available | 0 unavailable
StrategyType:           RollingUpdate
MinReadySeconds:        0
RollingUpdateStrategy:  25% max unavailable, 25% max surge
Pod Template:
  Labels:  app=nginx
  Containers:
   nginx:
    Image:        nginx:1.16.1
    Port:         80/TCP
    Host Port:    0/TCP
    Environment:  <none>
    Mounts:       <none>
  Volumes:        <none>
Conditions:
  Type           Status  Reason
  ----           ------  ------
  Available      True    MinimumReplicasAvailable
  Progressing    True    NewReplicaSetAvailable
OldReplicaSets:  <none>
NewReplicaSet:   nginx-deployment-68fc675d59 (3/3 replicas created)
checking deployment details
The newly created Pods should be running now.
controlplane ~ ➜  kubectl get pods
NAME                                READY   STATUS    RESTARTS   AGE
nginx-deployment-68fc675d59-5pndc   1/1     Running   0          19m
nginx-deployment-68fc675d59-ksbvw   1/1     Running   0          19m
nginx-deployment-68fc675d59-zcw27   1/1     Running   0          19m
listing available Pods
You can also check the history of a deployment using the rollout history command.
controlplane ~ ➜  kubectl rollout history deployment/nginx-deployment
deployment.apps/nginx-deployment
REVISION  CHANGE-CAUSE
1         <none>
2         <none>
Checking deployment history
Services and Ingress
After we've deployed our application, we need to enable network access to it. When Pods run on Kubernetes, they are automatically assigned an IP address. However, this IP doesn't persist when a Pod is terminated and recreated - the IP changes. So, we need an object to provide a stable IP for clients to connect to.
This is where the Service comes into play.
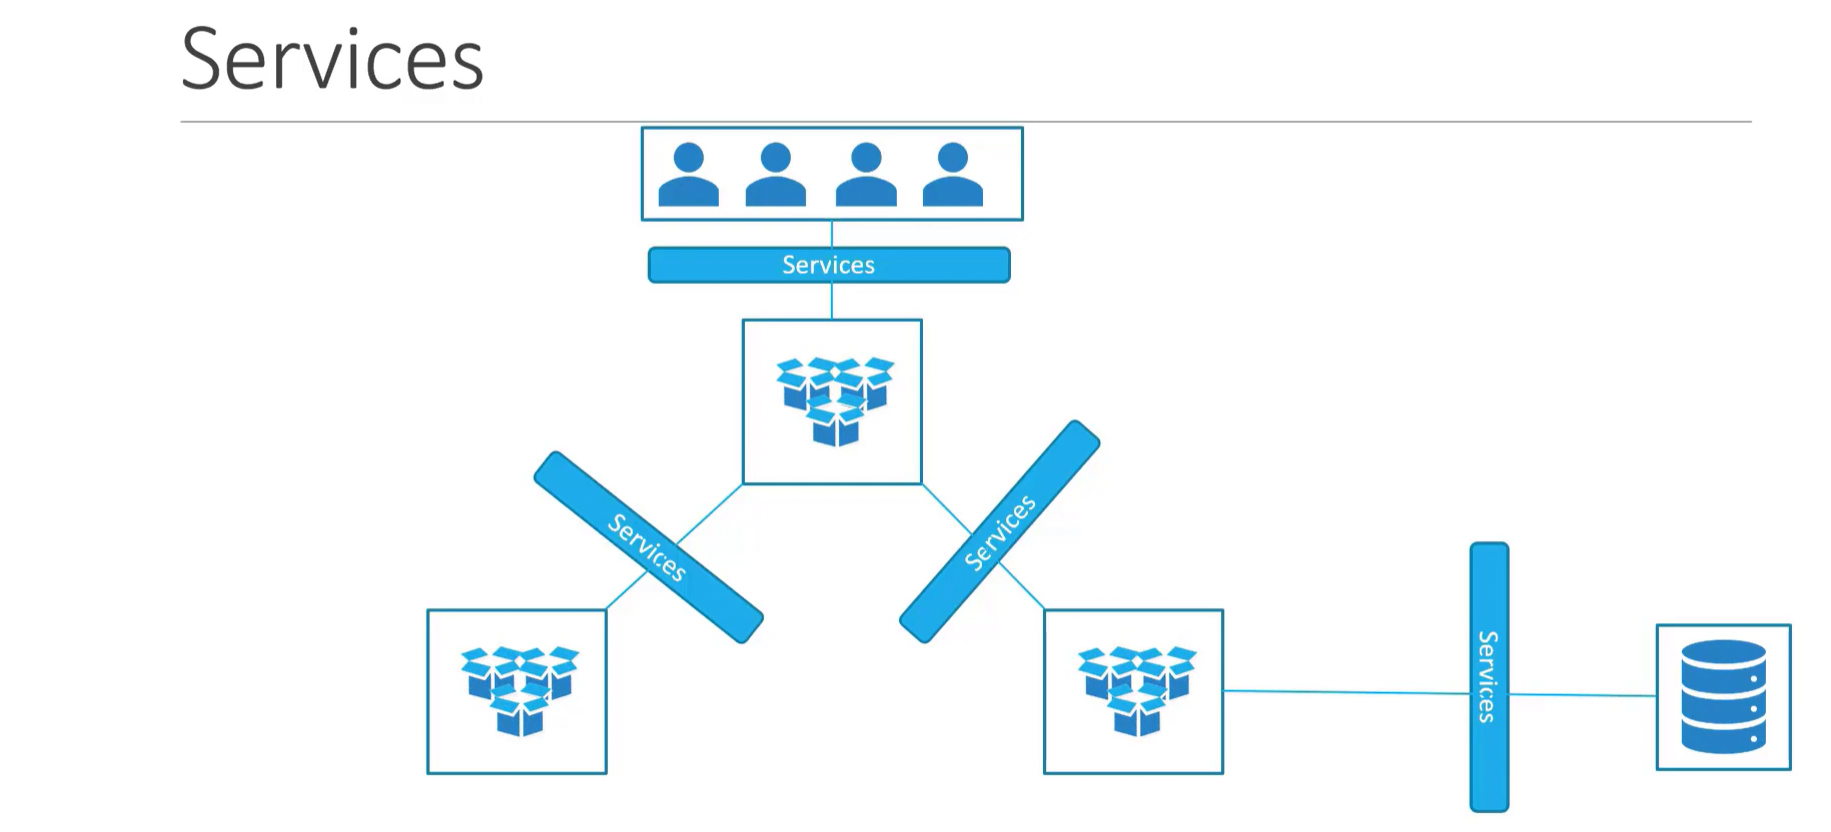
What is a service in Kubernetes?
Service is a Kubernetes resource that provides a stable IP to connect to. Traffic received on this IP is then forwarded to backend Pods. This way, Services enable reliable network connectivity to applications.
Network connectivity to Pods can be internal or external. Internal connections happen within the cluster, between Pods. External connections are received from clients outside the cluster. And for each type of connection, there is a different type of Service.
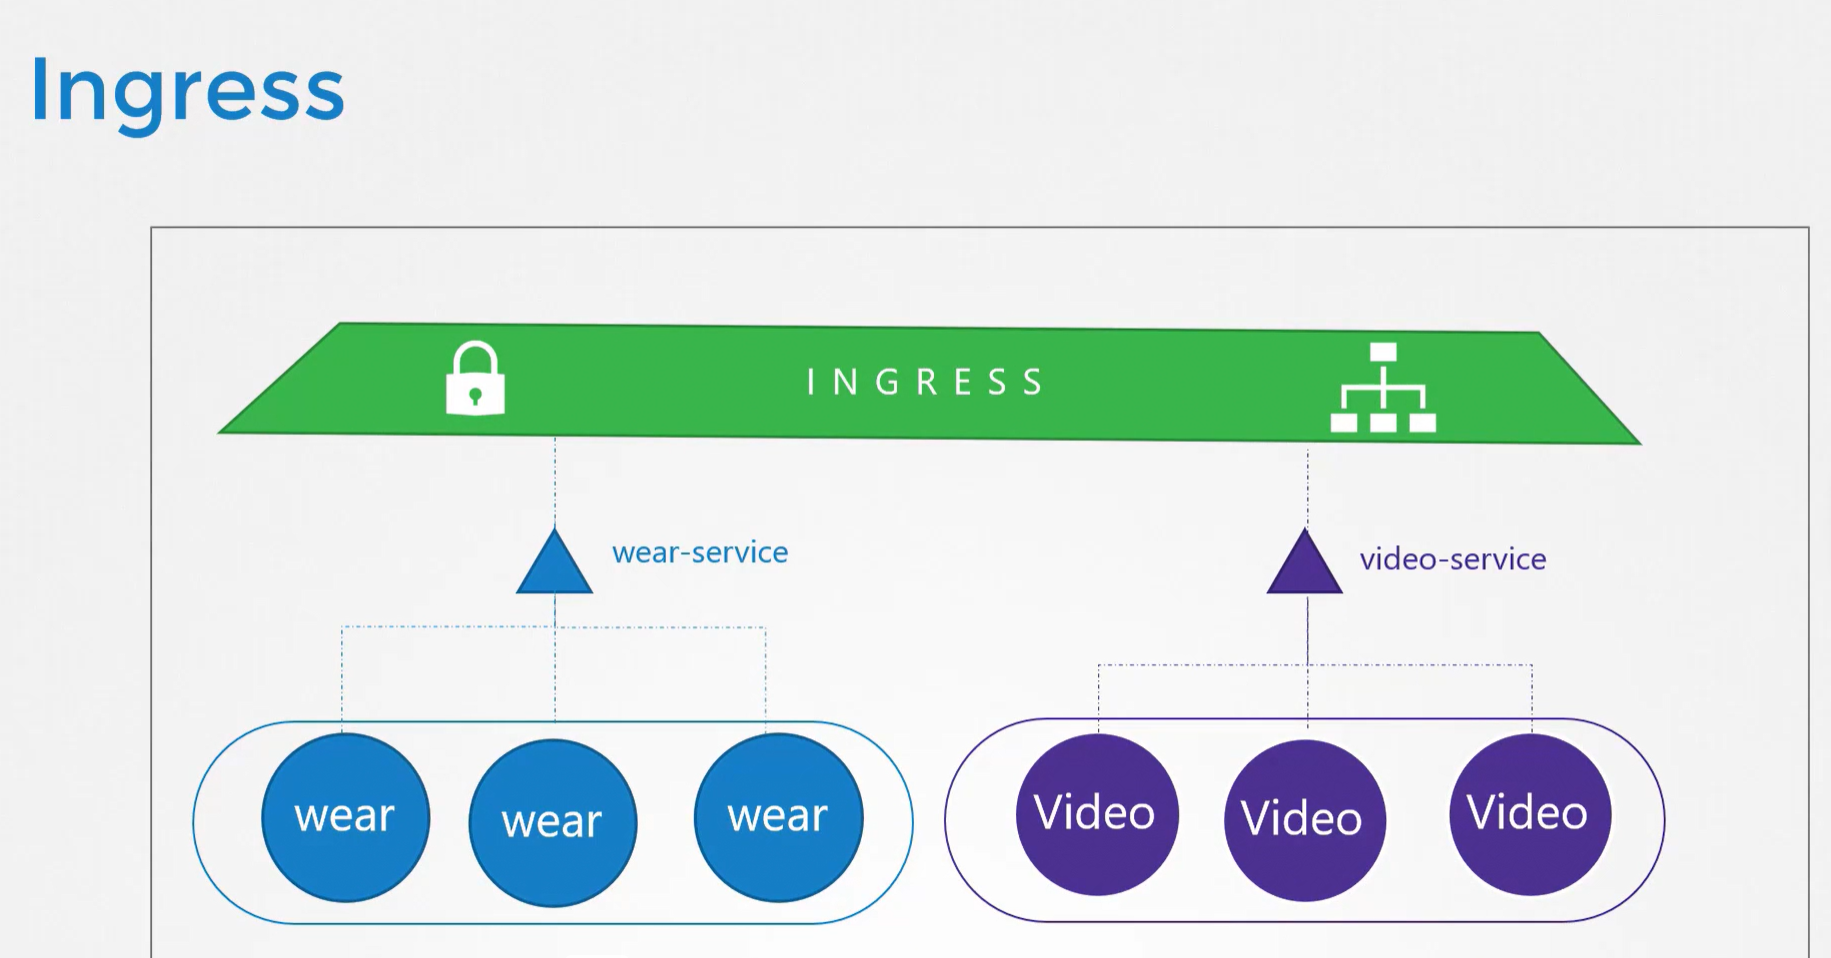
What is ingress?
Ingress allows for more intelligent external network access. It can make more complex decisions. It uses the hostname, path, or other application content encoded in the network traffic. This enables more flexibility in the routing decisions.
You can find more details about Services and Ingress here.
Now, let's create a simple Service of the type called ClusterIP. We'll create a file called frontend-service.yaml and add this content to it:
apiVersion: v1
kind: Service
metadata:
name: frontend
spec:
type: ClusterIP
ports:
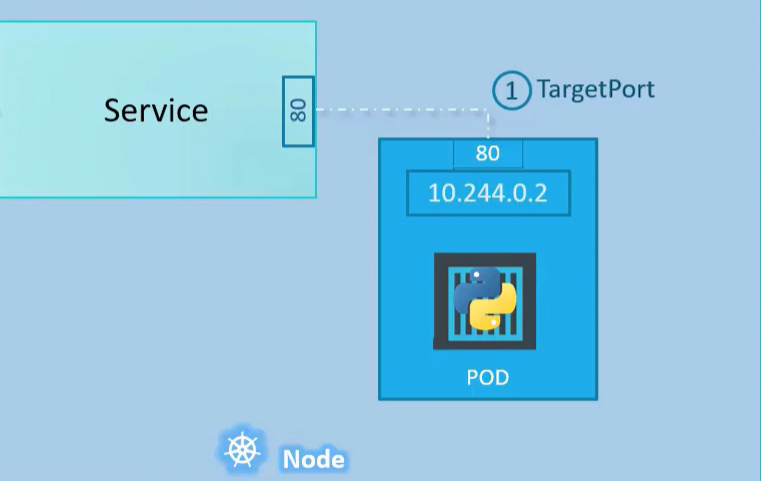
- targetPort: 80
port: 80
selector:
name: simple-webapp frontend Service yaml file
Here, you can see the kind of resource called service. And the type of Service is ClusterIP.
targetPort is the port on which the backend Pods listen for incoming connections. The service will forward traffic to this port. Ultimately, network traffic will reach the application running inside the Pod.
port is the port that the Service itself will receive traffic on selector is what ties the Service to its backend Pods. The Service checks for Pods with similar labels and forwards the traffic to them.
Let's deploy this manifest file to the cluster.
controlplane ~ ➜  kubectl apply -f frontend-service.yaml
service/frontend created
Create Service from manifest file
Listing available Services, we can see the frontend Service there.
controlplane ~ ➜  kubectl get svc
NAME         TYPE        CLUSTER-IP      EXTERNAL-IP   PORT(S)   AGE
frontend     ClusterIP   10.106.36.168   <none>        80/TCP    48s
kubernetes   ClusterIP   10.96.0.1       <none>        443/TCP   8m35s
Listing available Services
Let's check the details of the Service.
controlplane ~ ➜  kubectl describe svc frontend
Name:              frontend
Namespace:         default
Labels:            <none>
Annotations:       <none>
Selector:          name=simple-webapp
Type:              ClusterIP
IP Family Policy:  SingleStack
IP Families:       IPv4
IP:                10.106.36.168
IPs:               10.106.36.168
Port:              <unset>  80/TCP
TargetPort:        80/TCP
Endpoints:         <none>
Session Affinity:  None
Events:            <none>

controlplane ~ ➜
Checking Service endpoints
The important thing to notice here is the Endpoints. Endpoints are the backend pods to which this service forwards traffic. It shows <none> because we didn't deploy any Pods with a label that matches the Service selector.
Now, let's create a Deployment for the backend Pods. We'll create a file called frontend-deployment.yaml and add this content to it:
apiVersion: apps/v1
kind: Deployment
metadata:
  name: frontend-deployment
  labels:
    app: frontend
spec:
  replicas: 3
  selector:
    matchLabels:
      name: simple-webapp
  template:
    metadata:
      labels:
        name: simple-webapp
    spec:
      containers:
      - name: frontend
        image: yeasy/simple-web:latest
        ports:
        - containerPort: 80
Simple webapp yaml file
Let's add this Deployment to Kubernetes:
controlplane ~ ➜  kubectl apply -f frontend-deployment.yaml
deployment.apps/frontend-deployment created
deploying simple webapp to the cluster
And we can check the details of the Service now:
controlplane ~ ➜  kubectl describe svc frontend
Name:              frontend
Namespace:         default
Labels:            <none>
Annotations:       <none>
Selector:          name=simple-webapp
Type:              ClusterIP
IP Family Policy:  SingleStack
IP Families:       IPv4
IP:                10.106.36.168
IPs:               10.106.36.168
Port:              <unset>  80/TCP
TargetPort:        80/TCP
Endpoints:         10.244.0.4:80,10.244.0.5:80,10.244.0.6:80
Session Affinity:  None
Events:            <none>
Checking Service endpoints
Notice the difference. Now we can see 3 Endpoints, which are the 3 Pods created by the Deployment.
However, if we tried to connect to this Service on the node, it would fail.
controlplane ~ ➜  curl http://localhost:80
curl: (7) Failed to connect to localhost port 80: Connection refused
Connection to ClusterIP service fails
The reason for this is that ClusterIP services are only internal to the cluster. They can't be reached from outside the node.
For outside traffic to be able to enter through a node, we need a NodePort Service. Let's create a file called nodeport-frontend.yaml and add this content to it:
apiVersion: v1
kind: Service
metadata:
  name: nodeport-frontend
spec:
  type: NodePort
  ports:
    - targetPort: 80
      port: 80
      nodePort: 30008
  selector:
      name: simple-webapp
NodePort yaml file
You can see an additional nodePort field here. This is the entry Port on the node. All traffic coming to the node on that port will be forwarded to the proper place. In this case, traffic will be forwarded to some Pod on port 80.
controlplane ~ ➜  kubectl apply -f nodeport-frontend.yaml
service/nodeport-frontend created
Creating a NodePort Service
Checking the details of the NodePort Service:
controlplane ~ ➜  kubectl describe svc nodeport-frontend
Name:                     nodeport-frontend
Namespace:                default
Labels:                   <none>
Annotations:              <none>
Selector:                 name=simple-webapp
Type:                     NodePort
IP Family Policy:         SingleStack
IP Families:              IPv4
IP:                       10.103.178.61
IPs:                      10.103.178.61
Port:                     <unset>  80/TCP
TargetPort:               80/TCP
NodePort:                 <unset>  30008/TCP
Endpoints:                10.244.0.4:80,10.244.0.5:80,10.244.0.6:80
Session Affinity:         None
External Traffic Policy:  Cluster
Events:                   <none>
Checking details of the NodePort
Now, trying to connect to the NodePort should succeed:
controlplane ~ ➜ curl http://localhost:30008
<!DOCTYPE html> <html> <body><center><h1><font color="blue" face="Georgia, Arial" size=8><em>Real</em></font> Visit Results</h1></center><p style="font-size:150%" >#2022-11-18 18:27:08: <font color="red">2</font> requests from <<font color="blue">LOCAL: 10.244.0.1</font>> to WebServer <<font color="blue">10.244.0.6</font>></p></body> </html>
controlplane ~ ➜ Connecting to the NodePort
We've basically "entered" a node through port 30008. After that, the Service forwarded our network traffic to a Pod on port 80. And just like that, from the outside world, we reached an internal Kubernetes Pod.
Connecting from a browser:

That's it for the basics of Services.
Learn Kubernetes
Enroll in our Kubernetes for the Absolute Beginner course. It includes video lectures, interactive exercises, and hands-on labs to help you internalize concepts and commands.

.png)
How can I Certify my Kubernetes Skills?
According to recent data, job searches related to Kubernetes have increased by over 173%, making it the fastest-growing IT field. To boost your professional credibility, you can earn certifications such as CKAD, CKA, and CKS, which will attest to your expertise in Kubernetes. The courses below will help you understand what to expect and how to prepare for these three in-demand certifications.
- Certified Kubernetes Administrator (CKA)
- Certified Kubernetes Application Developer (CKAD)
- Certified Kubernetes Security Specialist (CKS)
Conclusion
We hope this article was helpful in getting you started with this amazing technology. The Key to mastering Kubernetes is practicing using different configurations and deployments.
More on DevOps:
- 4 DevOps Metrics You Need To Track Quality And Performance
- Which Certifications Should You Complete for Your Next Kubernetes Job in 2024?
- Top 15 DevOps Automation Tools You Should Learn in 2024
- Cloud Computing And DevOps: What You Need to Know
- How To Scale DevOps: People, Processes, and Platforms
- Navigating the Everest of Logs - A Guide to Understanding Kubelet Logs
- 17 DevOps Monitoring Tools to Learn in 2024


Discussion