


Highlights
- Virtual Clusters: Namespaces provide Kubernetes resource isolation, allowing you to securely separate environments like development and production within a single cluster.
- Basic Command: The standard Kubernetes namespace command to generate a new environment is kubectl create namespace followed by your chosen name.
- Default Environment: If no namespace is specified, standard K8s CLI commands will automatically deploy objects into the
defaultnamespace. - Targeted Deployment: To launch a pod or deployment into your new namespace, simply append the
-nor--namespaceflag (as seen in our kubectl namespace example below). - Safe Deletion: Deleting a namespace will automatically remove all resources within it, ensuring a complete and clean removal.
In this blog post, we'll learn how to create a custom Namespace in Kubernetes using the kubectl create namespace command. But before we do so, let's take a step back and understand what a Namespace is and why it's useful.
What Is Kubernetes Namespace?
A Kubernetes Namespace is a way to create virtual clusters within a larger Kubernetes cluster.
By using Namespaces, you can separate your cluster into different groups that are isolated from one another. For instance, you can create two separate Namespaces for an application — one for development and one for production. The development Namespace can be used for testing, debugging, and experimentation purposes, while the production Namespace can be used for hosting the stable and publicly accessible version of the application.
When you Create namespace in K8s, any Kubernetes objects such as Pods, Deployments, and DaemonSets that you launch in it will exist exclusively within that Namespace. More importantly, all operations you perform, such as scaling and deleting resources, will only affect the objects in that specific Namespace. With this approach, you can rest assured that operations performed against the resources in the development environment will not accidentally impact the application in production.
Why Use Kubernetes Namespace?
Imagine a Kubernetes cluster with hundreds or even thousands of applications running inside Pods. Each of these Pods has its own set of Kubernetes objects, such as Deployments, Services, ConfigMaps, Secrets, and more. When all these resources are deployed in the same Namespace, it can be difficult to know which resource belongs to which application.
In such a scenario, there is a high risk of accidentally updating the wrong resource and breaking a running application.
Namespaces provide a solution to this problem. By grouping resources into logically isolated groups, Namespaces help reduce the chance of making mistakes when managing resources. They ensure that operations launched against resources in a particular Namespace don't impact the resources in other Namespaces, offering excellent Kubernetes resource isolation.
You can separate your resources based on their function, ownership, or environment, and apply different policies and access controls to each Namespace as needed. This makes it easier to maintain and troubleshoot your cluster over time.
Now that we understand what Namespaces are and their benefits, let's learn how to create a custom Namespace in Kubernetes.
Prerequisites
To make it easier for you to follow along with the example in this post, we recommend using KodeKloud’s Kubernetes playground. This playground will provide you instant access to a running Kubernetes cluster with kubectl already installed. No need for you to install any software. With just one click, you'll be ready to run the example code snippets and start experimenting right away.
Alternatively, you can use a tool such as minikube to set up your own Kubernetes cluster. Just make sure you have kubectl installed and configured to communicate with the running cluster.
Please note that the commands and their outputs provided in the examples below have been tested on KodeKloud’s Kubernetes playground.
Try the Kubernetes Deployments Lab for free

How to Create a Custom Kubernetes Namespace?
With the prerequisites taken care of, creating a custom Namespace in Kubernetes is a simple process. Here's how you can do it:
Step 1: Check available Namespaces
Open a terminal and run the following Kubernetes namespace command to list all the Namespaces in your cluster:
kubectl get namespacesThis will list all the Namespaces in your cluster, along with their status and age:

You will see a lot of Namespaces listed. Note that the Namespaces you’ll see besides the "default" Namespace will vary depending on your cluster configuration.
For example, if you run the "kubectl get namespaces" command on a Kubernetes cluster set up using minikube, you’ll get the following output:

You may notice that in addition to the "default" Namespace, some Namespaces appear in both outputs while others are unique to each one. These additional Namespaces are not relevant to our discussion, so you can ignore them. However, understanding the "default" Namespace is important.
By default, all Kubernetes resources are created in the "default" Namespace if no Namespace is specified. The "default" Namespace is created automatically when Kubernetes is installed.
Step 2: Create a custom Namespace
Run the following command to create a new Kubernetes Namespace called "production". You can name your Namespace anything you like.
kubectl create namespace production
The output shows that the "production" Namespace has been created successfully. We can verify this by executing the "kubectl get namespaces" command.
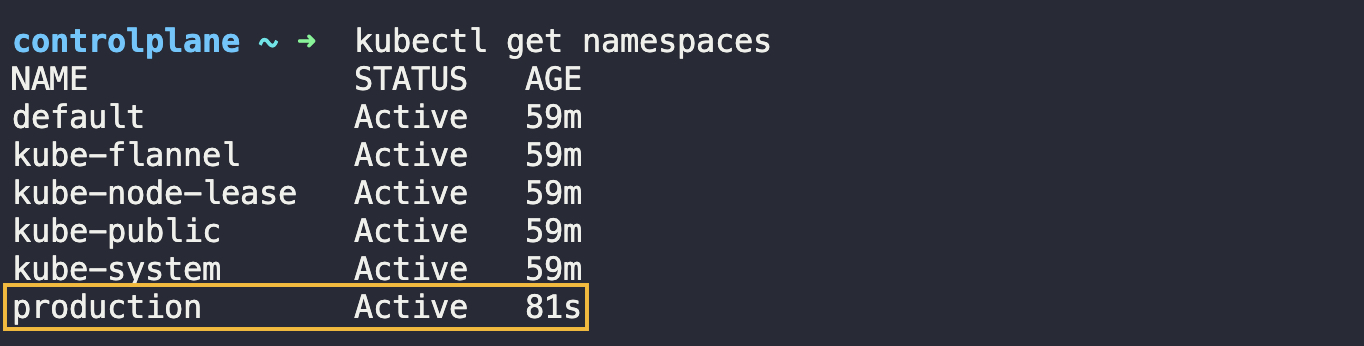
As you can see, the new Namespace named "production" is now listed along with the other Namespaces in the cluster. We can now use this Namespace to deploy applications and manage resources.
How to Create a Deployment in a Custom Namespace?
In the previous section, we created a custom Namespace named "production".
Now, let's create a Deployment that runs an "nginx" web server inside this Namespace. We can use the kubectl create deployment command for this purpose. However, we need to specify the Namespace using the -n or --namespace flag. This is a common kubectl namespace example, as shown below:
kubectl create deployment mynginx --image=nginx -n=production In this command, we have specified the "nginx" image and the "production" Namespace using the "-n" flag. We have also given the Deployment the name "mynginx".

The output shows that the Deployment has been created successfully.
Next, let's verify that the "mynginx" Deployment has been created inside the "production" Namespace. We can use the "kubectl get deployments" command with the "-n" flag to list the Deployments in the "production" Namespace. The complete command looks like this:
kubectl get deployments -n=productionHere is the output we get after executing the command:

As you can see, the "mynginx" Deployment is now running inside the "production" Namespace.
How to Delete a Custom Kubernetes Namespace?
Now that we have created a custom Namespace called "production", let's see how we can delete it.
Deleting a Namespace is a simple operation in Kubernetes. We can use the "kubectl delete namespace" command followed by the name of the Namespace we want to delete. Run the following command to delete the "production" Namespace:
kubectl delete namespace productionHere is the output we get after executing the command:

The output shows that the "production" Namespace has been deleted.
To verify that the "production" Namespace has been successfully deleted, we can list the available Namespaces in our cluster using the command below:
kubectl get namespaces
The output does not include the "production" Namespace in the list of Namespaces, indicating that it has been successfully deleted.
What Happens When You Delete the Namespace in Kubernetes?
Remember that deleting a Namespace also deletes all the resources created inside it. In our case, we had created a Deployment called "mynginx" inside the "production" Namespace. Now that we have deleted this Namespace, we have also deleted this "mynginx" Deployment.
Remember to be careful when deleting Namespaces, as it can result in the loss of important resources. Always double-check before performing such operations.
Master Kubernetes with our Kubernetes Learning Path:

.webp)
Conclusion
In this blog post, we learned what Namespaces are, why they are useful, and how to create one using the "kubectl create namespace" command. We also learned how to deploy Kubernetes resources inside a custom Namespace and how to delete a custom Namespace.
Whether you're working with a small-scale or large-scale Kubernetes cluster, Namespaces is a key feature that can help you better organize your cluster and manage your resources.
More on Kubernetes:
- How to Collect Kubernetes Events and Extract Values
- How to Use Kubectl Config Set-Context
- How to Restart a Pod in Kubernetes
- How to Use Kubectl Delete Deployment (With Examples)
- How to Copy File From Pod to Local (With Examples)
- How to Use Kubectl Delete Deployment (With Examples)
- Optimizing Kubernetes Clusters for Cost & Performance: Part 1 - Resource Requests
- Security & Containerization
- Deploying, Maintaining, and Scaling Kubernetes Clusters
FAQs
Q1: Is it better to Create namespace in K8s imperatively or declaratively?
While the imperative kubectl create namespace command is quick and easy for testing, it is generally recommended to define your namespaces in a YAML file (kind: Namespace) for production environments to maintain infrastructure as code.
Q2: Does Kubernetes resource isolation provide network security by default?
No. Namespaces provide logical isolation for object naming and management. For true network isolation between namespaces, you must configure Kubernetes Network Policies.
Q3: What is the standard Kubernetes namespace command to list all active namespaces?
You can use either kubectl get namespaces or the shorter alias kubectl get ns.
Q4: Can you provide a quick kubectl namespace example for running a pod?
Certainly. To run a single pod in a specific namespace, use the -n flag: kubectl run my-pod --image=nginx -n my-custom-namespace.
Q5: What happens to my resources if I delete a namespace using K8s CLI commands?
When you delete a namespace, Kubernetes will permanently delete all resources (Pods, Services, Deployments, Secrets, etc.) running inside that specific namespace.


Discussion