


Highlights
- Core Definition: Learn exactly what is Kubernetes service and how it provides a stable, permanent address for dynamic Pods.
- Networking Foundations: Understand the core Kubernetes networking basics to see how internal and external traffic is routed safely.
- Service Selection: Compare ClusterIP vs NodePort vs LoadBalancer to figure out which routing mechanism fits your application's architecture.
- Visibility: Learn the proper mechanisms to expose pods Kubernetes manages to both internal microservices and external clients.
- Practical Configuration: Review a practical Kubernetes service example (with YAML definitions) for every major service type.
Kubernetes is a platform that helps you run your containerized applications on a massive scale. A key aspect of this is ensuring that different parts of your apps can easily communicate. Kubernetes does this by using Kubernetes Services. These Services allow smooth communication between components within the cluster and between the cluster and the outside world.
This blog post will first discuss what problem Kubernetes services solve and clarify exactly what is Kubernetes service. We will then dive into the different service types Kubernetes offers, their use cases, and how to configure them while creating Service resources. Let's get started!
Try the Kubernetes Services Lab for free
What Problems Do Kubernetes Services Solve?
In Kubernetes, Pods are non-permanent resources; they appear and disappear as needed. This is because Kubernetes constantly checks to make sure the cluster is running the desired number of replicas (copies) of your app. Pods are created or destroyed to match this desired state.
Think of it this way: if you need more replicas of your app because of an increase in incoming traffic (more demand), Kubernetes will spin up some new Pods to handle it. If a Pod fails for some reason, no worries - Kubernetes will quickly create a new one to replace it. If you want to update your app, Kubernetes can destroy old Pods and create new ones with the updated code. So, the set of Pods running at one moment could be totally different from the set running a moment later.
But here's the thing - a fundamental challenge in Kubernetes networking basics, if you want to access your app, how do you keep track of which Pod to connect to with all these changing IP addresses of Pods?
That's where Services come in. They provide an unchanging location for a group of Pods. So even though the Pods themselves are dynamic, the Services make sure you always have a central location to access your app.
Now that we understand one purpose of Kubernetes services, let’s examine the different types of available Services.
ClusterIP Service
ClusterIP Services are used for communication between Pods within the same Kubernetes cluster.
The Service gets exposed on a static IP that's unique within the cluster. When you make a request to that IP, the Service takes care of redirecting traffic to one of the Pods it's associated with. And if there's more than one Pod, the Service will automatically balance the traffic, so no single Pod gets bogged down by too many requests.
Note that ClusterIP Services are meant for Pod-to-Pod communication only. They aren't accessible from outside the cluster.
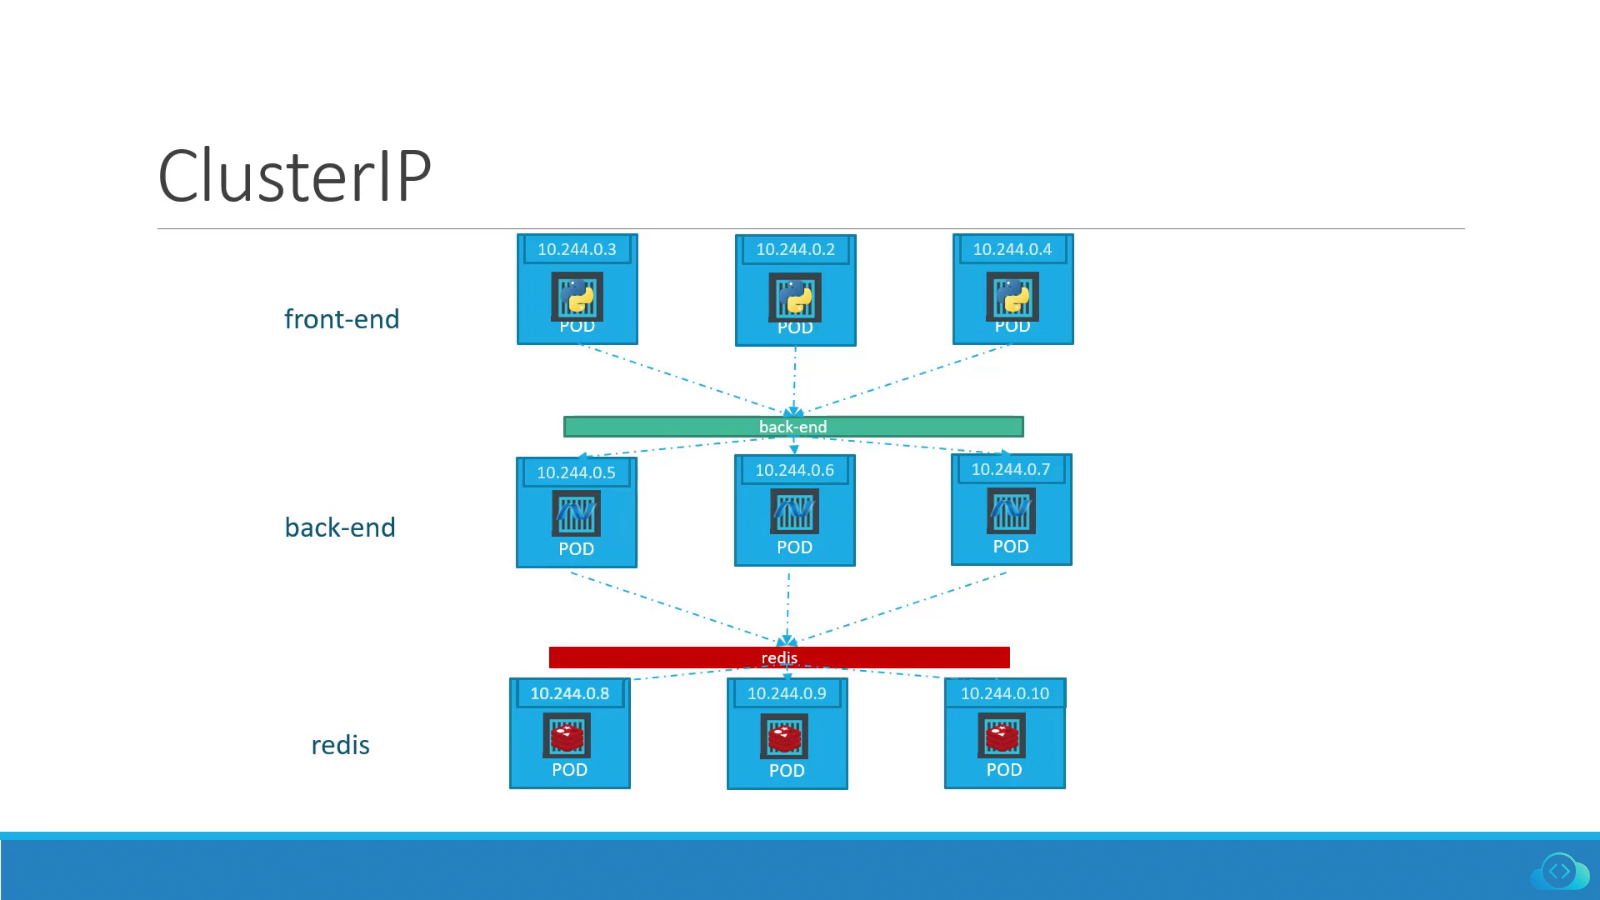
In the image above, the green bar titled "back-end" represents a ClusterIP Service. It sits in front of all the Pods labeled "back-end" and redirects incoming traffic to one of them.
Here is a Kubernetes service example of a .yaml file describing a ClusterIP Service object:
apiVersion: v1
kind: Service
metadata:
 name: nginx-clusterip
spec:
 type: ClusterIP
 selector:
   run: app-nginx
 ports:
 - port: 80
   protocol: TCP
This YAML file defines a Kubernetes Service object of type ClusterIP. Below is an explanation of the important fields in the file:
- kind: Specifies the type of Kubernetes object that is being defined. Here, we are defining a Service.
- name: Specifies the name of the Service, in this case, "nginx-clusterip."
- type: Specifies the type of Service, in this case, a ClusterIP Service.
- selector: Specifies a label selector that defines which Pods should be exposed by this Service. In this example, the Service will expose all Pods that have the label "run" with the value "app-nginx". It's a way of telling Kubernetes: "This Service should sit 'in front' of this collection of Pods. All incoming traffic to this Service should be redirected to one of these Pods."
- port: Specifies the network port that the Service should expose. In this example, the Service exposes port 80.
NodePort Service
The NodePort Service is useful when you need to expose your application to external clients. This means all traffic that is coming from outside of the cluster.
When you create a NodePort Service, Kubernetes opens a port (in the range of 30000 and 32767) on all of its worker nodes. Note that the same port number is used across all of them. All traffic incoming to the worker node's IP address and that specific port is redirected to a Pod linked with that Service.
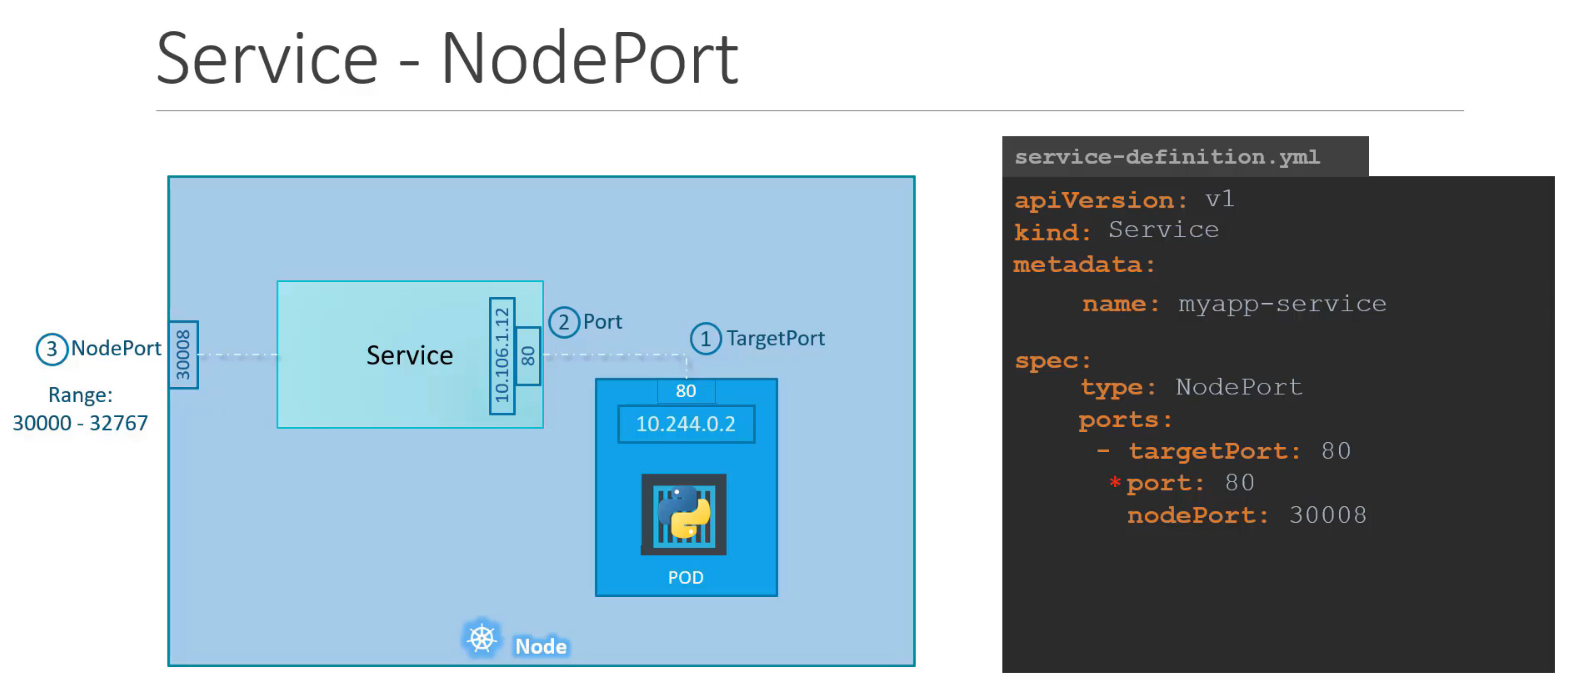
Keep in mind that a NodePort Service doesn't do any kind of load balancing across multiple nodes. All the incoming traffic goes straight to the node to which the external client is connected. This can result in some nodes getting hit hard with traffic while others are barely used.
Below, we have a Kubernetes service example of a .yaml file describing a NodePort Service object:
apiVersion: v1
kind: Service
metadata:
 name: nginx-nodeport
spec:
 type: NodePort
 selector:
   run: app-nginx
 ports:
 - nodePort: 30001
   port: 80
   targetPort: 80
This YAML file defines a Kubernetes Service object of type "NodePort". The "selector" block instructs the NodePort Service to send incoming traffic to one of the Pods with this label. In this case, the "run: app-nginx" label.
In the "ports" block, we have defined three ports:
- nodePort: Tells Kubernetes which port to "open" to the outside world on all of the worker nodes. This makes them accept incoming connections from outside the cluster on the port we chose here, 30001.
- port: Specifies the port that should be "open" to the cluster, internally. Incoming connections will be accepted on this port only if they come from within the cluster. External connections won't be accepted on this port.
- targetPort: The Service will forward incoming connections to one of the Pods it exposes. "targetPort" specifies on which port of the Pod to send traffic to. E.g., with this config, even if traffic comes to port 30001 on the node, it will be sent to port 80 of the Pod (the "targetPort").
LoadBalancer Service
A LoadBalancer Service is another way you can expose your application to external clients. However, it only works when you're using Kubernetes on a cloud platform that supports this Service type.
When evaluating the ClusterIP vs NodePort vs LoadBalancer options for production workloads, the LoadBalancer is typically the most robust choice. The LoadBalancer Service detects the cloud computing platform on which the cluster is running and creates an appropriate load balancer in the cloud provider’s infrastructure. The load balancer will have its own unique, publicly accessible IP address. For example, if the cluster is running on Amazon Web Services (AWS), the Service will create an Elastic Load Balancer (ELB) to distribute incoming traffic across multiple nodes in the cluster.
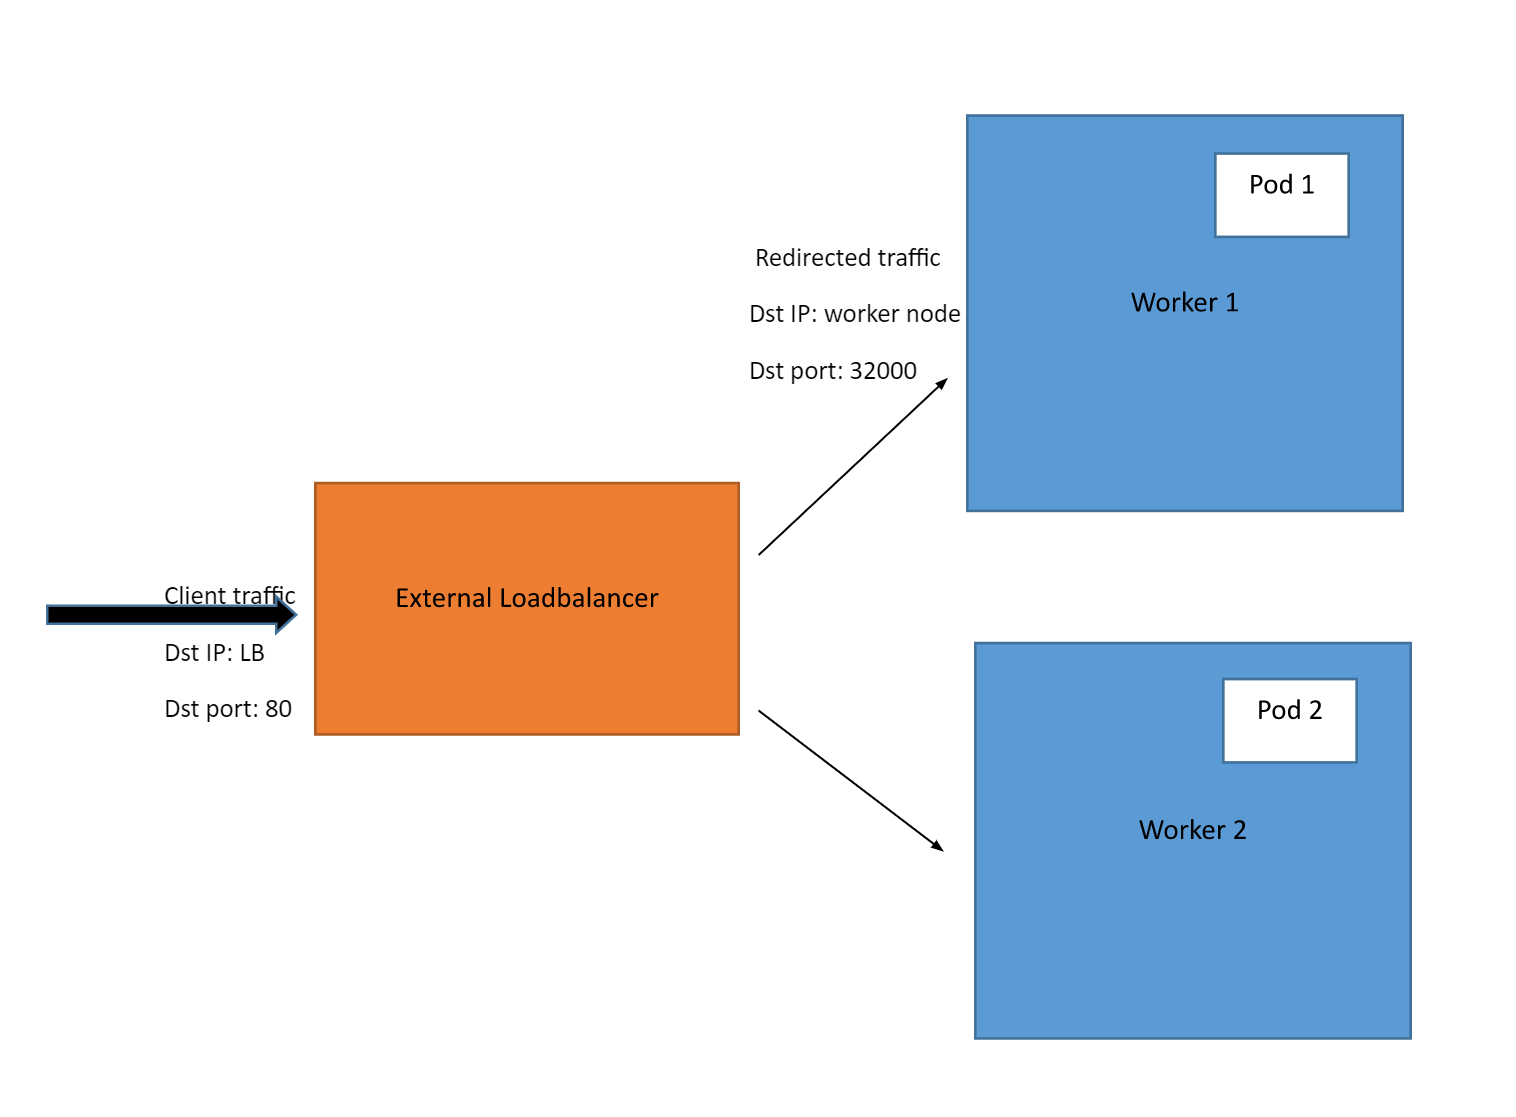
For example, say you have a web application running on a Kubernetes cluster and exposed using the LoadBalancer Service. External users can access the application by visiting the external IP address of the load balancer in their web browser. The load balancer will then forward their request to a node.
If another user connects, their connection will be forwarded to a different node. This way, traffic gets distributed evenly across multiple nodes so that none gets overloaded with too many requests. Finally, the connection gets forwarded from node to Pod through a Service that sits in front of them. Each user will then get the response in their web browser. But users won't hit the same node because of our LoadBalancer. So our worker nodes will have an easier time responding to requests.
Below, we have an example of a .yaml file describing a LoadBalancer Service:
apiVersion: v1
kind: Service
metadata:
 name: nginx-load-balancer
spec:
 type: LoadBalancer
 selector:
   run: app-nginx
 ports:
 - port: 80
   targetPort: 80
This LoadBalancer Service will be named "nginx-load-balancer". The traffic it receives on port: 80 will be sent to one of the Pods labeled run: app-nginx, on targetPort: 80 of those Pods.
ExternalName Service
Among the various service types Kubernetes has, an ExternalName Service is uniquely useful when you have a service that is running outside your Kubernetes cluster, such as a database, and you want to access it from within your cluster.
For example, let's say you have an app in a Pod that needs to access an external database running at the domain name "db-prod.example.com". For this database, you can create an ExternalName Service named, say, "db-prod". Then, when the app wants to connect to the database, it will send a request to the local name "db-prod".
Next, Kubernetes will look up the ExternalName Service for "db-prod" and see that it has an external name of "db-prod.example.com". Kubernetes will then use DNS to resolve the external name to an IP address and route the request to the appropriate external service outside the Kubernetes cluster. This process happens automatically and seamlessly. The app doesn’t need to be aware of the details of the external service.
Note: DNS lookup is like looking up a phone number in a directory. When you type in a website address or domain name, your computer sends a request to a special directory called a DNS server to find the IP address of the server hosting that website. This helps your computer connect to the website you want to visit.
We now understand what an ExternalName Service is, but what are the benefits of using one?
One of the key benefits of ExternalName Service in Kubernetes is that it helps you keep the details of your external service separate from your application. Instead of hard-coding IP addresses or domain names, you can give these services a nickname using an ExternalName Service. If the service provider moves to a new IP address or gets a new domain name, you can simply update the ExternalName Service definition to point to the new location.
Kubernetes will handle the DNS resolution of the new address so that the application can continue to access the external service using the same local name. No modifications are required in the application code. This makes managing your external services much easier as you don't have to update the application code each time the external service changes.
Below, we have an example of .yaml file defining an ExternalName Service:
apiVersion: v1
kind: Service
metadata:
 name: db-prod
spec:
 type: ExternalName
 externalName: db-prod.example.com
Note that an ExternalName Service does not have a selector, as it does not map to any Pods.
In this example, we’re creating an ExternalName Service called "db-prod" that maps to a database running at the domain name "db-prod.example.com". Once this Service is created, our application can simply use the Service name "db-prod" to access this database running outside the Kubernetes cluster.
The following is an explanation of the key fields:
- name: This field specifies the name of the Service object, in this case, "db-prod".
- type: This field specifies the type of Service. In this case, the value is "ExternalName", indicating that this Service maps to an external service, not a service inside the Kubernetes cluster.
- externalName: This field specifies the location at which that external service can be reached at, in this case, "db-prod.example.com".
Conclusion
Kubernetes services help us connect all of the components we have running on our Pods. They provide a stable front gate where Pods can be reached, allowing for reliable communication both within the cluster and between the cluster and external clients. I hope this article has helped you understand how Services fit into the overall Kubernetes ecosystem.
After getting a good handle on Kubernetes Services, you can explore more advanced networking objects, such as Kubernetes Ingress. It is a powerful feature that enables you to selectively route external traffic to the Services within the cluster.
Whether you're a developer, DevOps engineer, or system administrator, knowledge of Kubernetes Services is a must. Understanding different types of Services, including ClusterIP, NodePort, LoadBalancer, and ExternalName, and how to use them in different scenarios is crucial for effectively utilizing Kubernetes.
Want a quick Kubernetes services guide? Check out this video.
If you want to further improve your understanding of Kubernetes, be sure to check out our comprehensive courses:
- Kubernetes for the Absolute Beginner.
- Certified Kubernetes Administrator (CKA)
- Certified Kubernetes Application Developer (CKAD)
FAQs
Q1: Exactly what is Kubernetes service?
A Kubernetes Service is an abstraction layer that provides a stable, permanent IP address and DNS name for a dynamic set of Pods, ensuring reliable network connections even when Pods are created or destroyed.
Q2: Why do I need to understand Kubernetes networking basics to use Services?
Because Pods are ephemeral, understanding Kubernetes networking basics helps you realize why you cannot rely on a Pod's direct IP address. Services act as the essential bridge that masks these changing IP addresses from the rest of your application.
Q3: In the ClusterIP vs NodePort vs LoadBalancer debate, which should I use?
Use ClusterIP for internal, backend communication between Pods. Use NodePort for basic external access (often during testing). Use LoadBalancer for production applications that require a cloud-native, scalable public entry point.
Q4: How do I effectively expose pods Kubernetes orchestrates to the internet?
To securely expose pods Kubernetes manages, you should wrap those Pods with a LoadBalancer Service (which automatically provisions a cloud LB) or use a ClusterIP Service paired with a Kubernetes Ingress controller.
Q5: How many service types Kubernetes currently provides?
There are four primary service types Kubernetes offers: ClusterIP, NodePort, LoadBalancer, and ExternalName. Each serves a specific routing purpose, and writing a basic Kubernetes service example in YAML for each is the best way to master them.


Discussion