


Highlights
- Layer Immutability: Once a layer is created, it cannot be changed. Any modifications create a new layer on top, preserving the history and stability of the image.
- Caching Mechanism: Docker caches layers during the build process. If an instruction hasn't changed, Docker reuses the existing layer, significantly speeding up builds.
- Union Filesystem: Docker uses a union filesystem (like Overlay2) to merge separate layers into a single cohesive view for the container.
- Layer Efficiency: Only instructions that modify the filesystem (like
RUN,COPY,ADD) create new layers. Metadata instructions (likeLABEL,CMD,EXPOSE) create intermediate layers with zero size. - Size Optimization: Understanding layers helps you minimize image size by combining commands (e.g., chaining
RUNinstructions) to reduce the number of layers.
Docker is a widely used containerization platform that enables developers to run and manage applications inside containers. One of the key components of Docker is the Docker image, which acts as a blueprint for creating containers.
Essentially, a Docker image is a static file that contains everything needed to run an application, including the application code, libraries, dependencies, and the runtime environment. It's like a snapshot of a container that, when executed, creates a Docker container.
A Docker image is composed of multiple layers stacked on top of each other. Each layer represents a specific modification to the file system (inside the container), such as adding a new file or modifying an existing one. Once a layer is created, it becomes immutable, meaning it can't be changed. The layers of a Docker image are stored in the Docker engine's cache, which ensures the efficient creation of Docker images.
In this blog post, we’ll take an in-depth look at Docker image layers, how they work, and how they can help us make efficient use of Docker. Let’s get started!
Prerequisites
To follow along with the examples in this post, you need a code editor. You also need to have Docker Desktop installed and running on your system. If you don’t have it already, you can download it from the link: Get Docker.
Try our Docker Images Lab for free

Building a Docker Image
Before diving into the concept of Docker image layers, let’s first build a Docker image. Open your code editor, create a new directory, and inside this directory, create a file named Dockerfile. Note that you can choose any name you prefer for the directory, but the file must be named Dockerfile. Then, copy and paste the following content into the Dockerfile.
FROM alpine
LABEL maintainer=kodekloud
RUN apk update && apk add curl
ENTRYPOINT ["curl"]
CMD ["--version"]
A Dockerfile is a text file that contains a set of instructions for building a Docker image. Our example Dockerfile specifies the following instructions:
FROM alpine: Sets the base image asalpine, a lightweight Linux distribution.LABEL maintainer=kodekloud: Assign metadata to the image with amaintainerkey, which in this case is set tokodekloud.RUN apk update && apk add curl: Updates the package list and installs thecurlcommand-line tool using theapkpackage manager.ENTRYPOINT ["curl"]: Sets the default executable for the container ascurl.CMD ["--version"]: Specifies the default argument for theENTRYPOINT, which, in this case, is--version.
Next, save the Dockerfile, open a terminal, and make sure it’s in the directory where you saved the file. Now, run the following command to create an image named demo-app:v1 (you can name the image anything you prefer):
docker build . -t demo-app:v1In the command above, the dot (.) after the build command indicates that the current directory (i.e. docker) is the build context. The -t flag tags the Docker image with a given name, demo-app:v1 in this case.
After executing the command above, you’ll see an output similar to this:
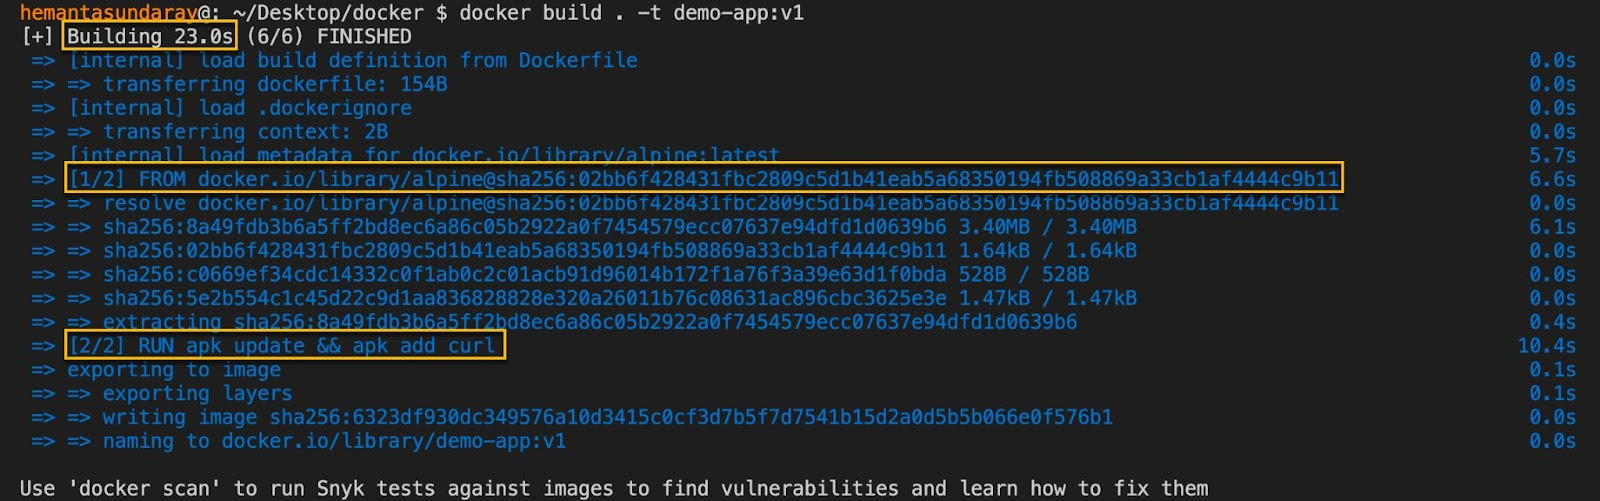
Analyzing Docker Image Build Steps
Now, pay attention to the highlighted lines in the output above. As you can see in the first line, Docker took 23 seconds to build the demo-app:v1 image. We will discuss this build time further in an upcoming section on the Docker image layer cache.
Next, notice the two lines that start with [1/2] and [2/2]. The numbers indicate the current step and the total number of build steps involved in the build process. In our case, we had a 2-step build process. In step 1, Docker fetched and set up the base image alpine as specified in our Dockerfile by the FROM alpine command. In step 2, Docker executed the RUN apk update && apk add curl command as specified in our Dockerfile. This command updated the package list and installed the curl utility in the image.
But why are we talking about the build steps when we should be discussing image layers?
The two build steps above created two separate image layers. This is a fundamental concept where dockerfile layers correspond directly to impactful instructions. What about the other instructions in our Dockerfile? Didn't they create any image layers? Yes, they did, but they created intermediate layers. Intermediate layers are 0B in size and don't add to the image size (more on this later).
Now, you might be wondering, how do I know which instruction creates image layers and which doesn’t? Here’s the answer: As a general rule, any Dockerfile instruction that modifies the file system creates a new layer. In our case, the instructions that started with LABEL, ENTRYPOINT, and CMD directives didn’t modify the file system (they just added metadata or configuration to the image), so they didn’t add any layers that increased the file size of the Docker image.
Let’s now explore all the layers that our demo-app:v1 image is made up of. But before we do so, let’s confirm that the docker build command that we executed earlier indeed created the demo-app:v1 image. Run the following command to see the list of Docker images on your system:
docker image lsExecuting the command above will display an output like this:

As you can see, the demo-app:v1 image is displayed in the list, confirming that we have the image in our system.
Viewing Docker Image Layers
In this section, we’ll explore how to view and analyze the layers of a Docker image using two commands: docker history and docker inspect.
Using the docker history command
To view the commands that create the image layers and the sizes they contribute to the Docker image, execute the following command:
docker history demo-app:v1Upon executing the command, you’ll see an output like this:

Focus on two column headers: CREATED BY and SIZE. The CREATED BY column shows the commands that were executed to generate the layers. And the SIZE column indicates the size of each layer. As you can see, only two layers (as highlighted above) contributed to the image size. The remaining layers created intermediate layers and are 0B in size.
It’s worth noting that the bottom two commands in the output correspond to the FROM alpine instruction. For the other commands, there is a one-to-one mapping between the command and the instruction in the Dockerfile.
In summary, the demo-app:v1 image has two layers, equal to the number of build steps we saw in the output of the docker build command. We can verify this using the docker inspect command.
As a side note, the buildkit.dockerfile.v0 comment in the output indicates that the image layers were created using BuildKit, Docker's next-generation build system.
Using the docker inspect command
To confirm that the demo-app:v1 image has two layers, execute the following command:
docker inspect --format '{{json .RootFS.Layers}}' demo-app:v1In this command, we’re using a Go (Golang) template to extract the layers' information. After running the command, you’ll get an output similar to the following:

We see the two layers of the demo-app:v1 image in the form of SHA256 hashes. These hashes represent how the union filesystem docker uses manages and stacks these layers.
Note: All Docker images get a cryptographic content hash. This hash is referred to as the digest. The digest is based on the contents of the image layers and helps ensure the integrity and consistency of the image. When a Docker image is pulled or pushed, the digest is used to verify that the image has not been corrupted or tampered with.
Understanding Docker Image Layer Cache
In the previous two sections, we built a Docker image and examined its layers. But why should you care about these layers? Do they offer any benefits? To answer this question, we need to understand the concept of image layer caching and how it helps reduce build time.
Recall the time it took for Docker to build the demo-app:v1 image — 23 seconds. Now, ensure that your terminal is in the directory containing the Dockerfile, and then run the following command (note that we have not made any changes to the Dockerfile) to create an image called demo-app:v2:
docker build . -t demo-app:v2Executing the command above will display the following output:

Notice the highlighted section on the first line. The build time is just 4 seconds, significantly lower than the original build time of 23 seconds. How did Docker manage to build the demo-app:v2 image so quickly?
When we attempted to build a Docker image for the second time without making any changes to the Dockerfile, Docker intelligently realized that it already had copies of the image layers it was trying to build. Therefore, Docker didn’t rebuild any image layers it had previously built. Instead, it utilized the docker image layers stored in the cache, accelerating the build process.
Now you understand how Docker utilizes cached image layers to significantly reduce build times and improve overall efficiency. This is especially useful when working with large Docker images, where the build process can take a considerable amount of time.
If you're interested in learning more about Docker and how it can help you streamline your development workflow, be sure to check out the following Docker Learning path.

Conclusion
In this blog post, you learned about Docker image layers, docker image layer cache, and how Docker leverages caching to speed up the build time. Armed with this understanding, you're now well-equipped to use Docker more efficiently. With the concepts of docker layers explained, you can now optimize your build pipelines effectively.
More on Docker:
- How to Pass Environment Variables to Docker Containers
- How to Build a Docker Image With Dockerfile From Scratch
- How to Clear Docker Logs for a Container
- How to Keep Docker Container Running
- How to Fix Docker Build Requires Exactly 1 Argument
- How Dockerfile Works
- How to Use Docker CP Command With Examples
- How to Tag a Docker Image
- Docker Entrypoint vs. CMD: What Is the Difference and How to Choose
FAQs
Q1: What happens if I change a line in the middle of my Dockerfile?
Docker builds layers sequentially. If you change an instruction, Docker will rebuild that layer and all subsequent layers. This invalidates the cache for those steps, potentially increasing build time.
Q2: How do I delete unused image layers?
You can use the command docker system prune to remove unused data, including dangling images (layers not referenced by any tagged image). To remove all unused images, not just dangling ones, use docker system prune -a.
Q3: Does every instruction in a Dockerfile create a new layer?
Historically, yes. However, in modern Docker versions (using BuildKit), only instructions that modify the filesystem (like RUN, COPY, ADD) create layers that add size. Metadata instructions like CMD, LABEL, ENV, and EXPOSE create intermediate layers with zero size.
Q4: How can I reduce the number of layers in my image?
You can combine multiple commands into a single RUN instruction using && and backslashes \ for readability. This reduces the number of filesystem layers and often results in a smaller image size.
Q5: What is the difference between an image layer and a container layer?
Image layers are read-only and shared among containers. When you start a container, Docker adds a thin, writable "container layer" on top. All changes made by the running container are written to this writable layer, leaving the underlying image layers untouched.


Discussion