


Highlights
- Identity & Versioning: A Docker tag is a label (like
v1.0orstable) that points to a specific image ID, allowing for easy version control. - The "Latest" Trap: The
latesttag is simply a default string applied by Docker if you don't specify one; it does not automatically track the most recent stable version unless manually maintained. - Dual Methods: You can apply tags during the build process (
docker build -t) or to an existing image (docker tag). - Multi-Tagging: A single image ID can have multiple tags (e.g.,
v1.2,v1, andprod), enabling flexible deployment strategies.
Learning to properly tag Docker images in a production environment is crucial. Meaningful and consistent image tags not only help users easily identify and select the appropriate image versions for their needs but also enhance clarity and streamline workflows within the team.
In this blog post, we’ll learn why and how to tag a Docker image. Let’s get started!
What Is Docker Image Tag?
A tag is essentially a label assigned to a Docker image to help identify it. It typically consists of two components:
- Image name (also known as repository name): This is the name of the image.
- Tag: This is an optional identifier commonly used to represent a specific version or variant of the image. If no tag is specified, Docker automatically assigns the
latesttag to the image by default (more on this later).
For instance, consider the tag Ubuntu:18.04. In this case, Ubuntu is the name of the Docker image, and 18.04 is the tag representing a specific version of Ubuntu. By using this tag, we can pull or run this specific version of the Ubuntu Docker image.
Why Tag a Docker Image?
When you're working with Docker images on your local machine for your personal projects, you might not think too much about their tags. But in a real-world situation where you have a big development team and tens or hundreds of Docker images floating around, it's crucial to have a consistent and meaningful tagging strategy in place.
Here are some reasons and benefits of tagging Docker images:
- Version control: Tagging Docker images allows you to maintain different versions of the same application, making it easier to roll back to a previous version if needed. This can be especially useful in cases where a new release introduces a bug or breaks compatibility with other components.
- Traceability and accountability: Tags provide a way to track the origin and history of an image, which is important for understanding the evolution of an application. This can help you identify when a particular change was introduced or who is responsible for a specific update.
- Simplified deployment and automation: A consistent tagging strategy makes it easier to automate deployment processes and manage the application lifecycle. For example, a continuous integration and continuous deployment (CI/CD) pipeline can automatically build, test, and deploy new versions of the application based on the tags assigned to the Docker images.
- Easier troubleshooting: A well-defined tagging strategy can help quickly identify the correct version of an application when issues arise. This can significantly reduce the time and effort needed to diagnose and resolve problems.
Now that you understand the importance of tagging Docker images, let’s dive into how to actually do it.
Prerequisites
To follow along with the examples in this post, you need a code editor. You also need to have Docker Desktop installed and running on your system. If you don’t have Docker Desktop, you can download it from the link: Get Docker.
Try our Docker Images Lab for free

How to Tag a Docker Image?
We can tag a Docker image during its build process or afterward. Let’s see how.
Tag a Docker image during the build process
Open your code editor, create a new directory, and inside that directory, create a file named Dockerfile. Note that you can choose any name you prefer for the directory, but the file must be named Dockerfile. Then, copy and paste the following content into the Dockerfile:
FROM alpine
LABEL maintainer=kodekloud
RUN apk update && apk add curl
ENTRYPOINT ["curl", "--version"]
Now, run the following command to create an image tagged my-app:1.0.0:
docker build . -t my-image:1.0.0Above, the dot (.) after the build command indicates that the current directory (containing the Dockerfile) is the build context. We’re using the -t flag to tag the Docker image with the name my-image and version 1.0.0.
Note: There's no special reason I went with 1.0.0 as the version number in this example. This is solely for demonstration purposes. In practice, you can select a versioning convention that aligns with your specific requirements. For instance, you might opt for a release name like my-image:alpha or include the base image in the version, such as my-image:1.0.0-alpine. The bottom line is, your tag choice depends on your own tagging strategy. There's no one-size-fits-all approach.
After executing the command above, you’ll see an output similar to this:
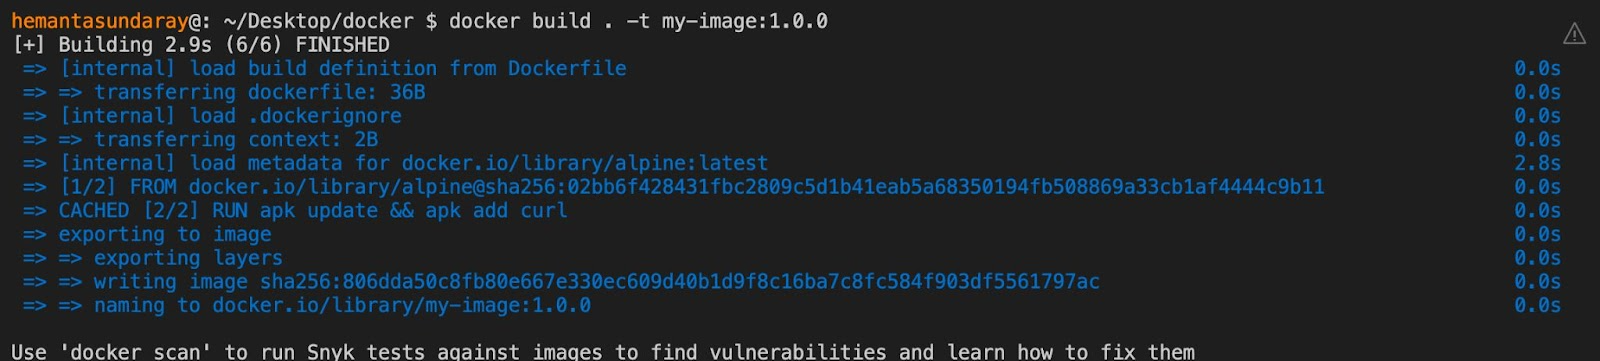
Next, let’s confirm that the image tagged my-image:1.0.0 has really been created. Run the following command to see the list of Docker images on your system:
docker image lsExecuting the command above will display an output like this:

Notice that the image name my-image appears under a column titled REPOSITORY. In Docker terminology, a repository is a collection of different versions of an image with the same name but tagged with different versions. You may come across the terms "image name" and "repository name" being used interchangeably, so don’t get confused. They represent the same concept.
Next, let’s learn how to tag a Docker image that has already been built.
Tag a Docker image after the build process
In certain cases, you may want to assign a new tag to an existing Docker image. This new tag can indicate various aspects of your software. For example, it could specify a specific version or a particular environment like development or production. To do this, you can use the docker image tag command, which has the following syntax:
docker image tag SOURCE_IMAGE[:TAG] TARGET_IMAGE[:TAG]docker image tag: This is the base command that tells Docker you want to tag an image.SOURCE_IMAGE[:tag]: This is the name of the existing Docker image that you want to tag.TARGET_IMAGE[:tag]: This is the name you want to apply to the image.
We already have an image tagged my-image:1.0.0 in our system. Let’s assign it another tag by running the following command:
docker image tag my-image:1.0.0 my-image:1.0.0-alpineIn this example, we have appended the base image name ("alpine") to the version name.
To confirm that the new tag has been successfully applied to the image, we need to list the existing images on our system. Run the following command:
docker image lsAfter running the above command, you’ll get an output similar to this:

As you can see, the image with the ID 806dd150c8fb is now associated with two different tags: my-image:1.0.0 and my-image:1.0.0-alpine. Both tags are just pointers to the same Docker image (with ID "806dd150c8fb").
Tagging a Docker image for Docker Hub
If you want to push a Docker image to Docker Hub, you need to tag it appropriately. Specifically, you need to prefix your image name with your Docker Hub username. Here’s the syntax:
docker push <DOCKER_HUB_USERNAME/IMAGE_NAME[:tag]>Build an image with multiple Docker tags
It’s also possible to build a Docker image with multiple tags during the image building process itself. All you need to do is pass as many -t flags as the number of tags you want for your image. Let’s see how.
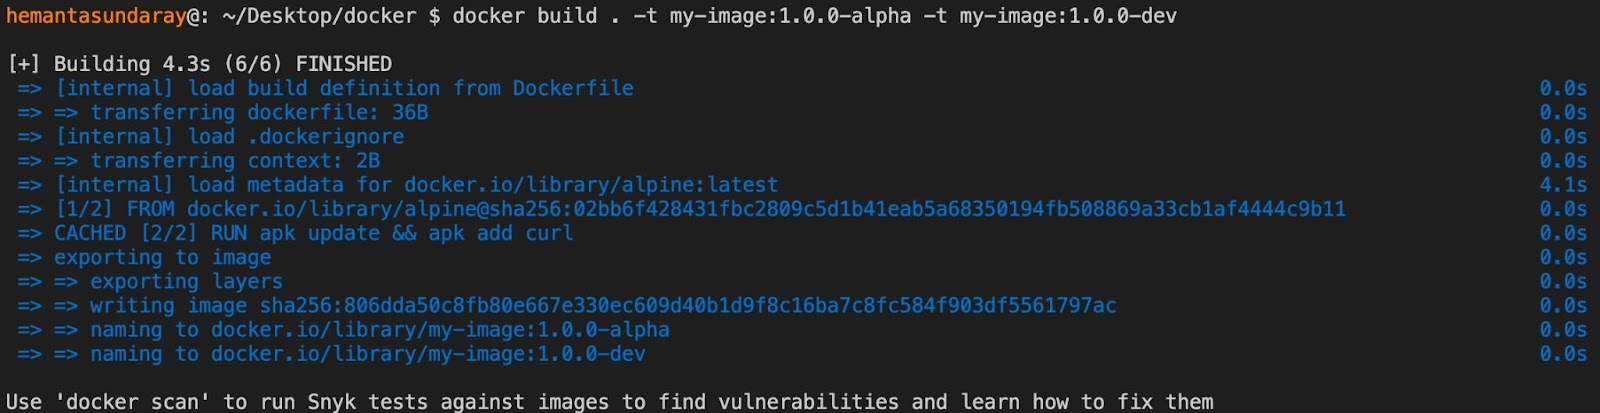
Make sure your terminal is inside the repository containing the Dockerfile. Now, run the following command to build an image with two tags: my-image:1.0.0-alpha and my-image:1.0.0-dev:
docker build . -t my-image:1.0.0-alpha -t my-image:1.0.0-devRunning the command above will print the following output:
Next, let’s list the images on our system by running the following command:
docker image ls
As you can see from the listed images, we have successfully tagged our image with multiple tags. This is particularly useful when working with Jenkins CI/CD pipelines that involve Docker Hub and YAML files for deployment creation. Here’s how it works:
Let’s say you’re creating an image, and you tag it with two custom tags: john/my-image:1.0.0, and john/my-image:latest. After tagging, you push both images to Docker Hub. The new image tagged john/my-image:1.0.0 will be stored there. If there already exists an image tagged john/my-image:latest, the newly uploaded image with the same tag will replace the existing one.
This allows you to pull the latest image that has just been pushed to Docker Hub using a deployment.yaml file. All you have to do is set the image as john/my-image:latest, as shown in the example below:
spec:
  template:
    spec:
      containers:
      - name: my-app
        image: john/my-image:latest
When the deployment.yaml is applied, it automatically deploys containers with your latest build, thereby enabling continuous deployment.
Understanding the "latest" image tag
In the previous section, we learned how to assign a tag to an image by specifying both the image name and an optional tag. Now, let's explore what happens if we assign a tag without including the optional tag. Execute the following command:
docker image tag my-image:1.0.0 my-imageNext, let’s list the existing images on our system by running the following command:
docker image lsYou’ll receive an output similar to this:

You may notice an unexpected detail in the output. Docker has automatically created a new tag named my-image:latest. You might be wondering where the latest tag originated from. When you don’t provide the optional tag, Docker will provide latest by default.
However, the latest tag can be misleading. Some repositories use this tag to refer to the most up-to-date stable version, but it might not be true for all repositories.
So, it's important to remember that latest is just a tag, like any other tag. It doesn’t carry any particular meaning. It's simply a default tag assigned to an image when no other tag is specified.
Docker Image Tagging Best Practices
As I have said before, there is no single correct method for tagging your images. That being said, there are some best practices that you should adhere to. Here we discuss two key practices:
#1 Incorporate a detailed and overlapping tagging scheme
When we develop new versions of software, we can label them with tags that are very specific and also make them overlap. For example, you can have version 1.4.1 as a specific tag, and version 1 as an overlapping tag that could include version 1.4.1, version 1.4.2, and so on.
By doing this, users of your software can choose exactly how they want to update their software. If they only want small updates, they can choose a very specific tag. If they want all the updates, they can choose a more general, overlapping tag. This way, they have full control over their updates.
#2 Ensure that the "latest" tag refers to the latest stable build of the software instead of "true latest".
"true latest" refers to the most recent build or version of the software, regardless of its stability. This could be a version that is still in development or a "release candidate" that is being tested for potential issues before it becomes the official, stable release. "Latest", on the other hand, refers to the most recent version of the software that has been thoroughly tested and is deemed stable for general use.
As we have already discussed, the latest tag in a Docker repository could be misleading. Users might assume it refers to the "latest stable build" when it could actually refer to the "true latest" version. This could lead to users using a version of the software that is not fully stable or tested. To avoid this misunderstanding, always ensure that the latest tag in your repository refers to the latest stable build of the software rather than the "true latest" version.
Interested in learning more about images and containers? Check out our Docker Learning Path.

Conclusion
In this blog post, you learned about Docker image tags, their purpose, and how to tag your images during and after the build process. You also gained insights into some best practices for tagging Docker images.
With this understanding, you now understand the importance of proper tagging, especially when working in production environments. By effectively tagging your Docker images, you enable users to easily find and use different software versions. This practice enhances clarity and streamlines workflows, contributing to a more efficient and organized development process.
More on Docker:
- How to Fix Docker Build Requires Exactly 1 Argument
- How to Keep Docker Container Running
- How to Build a Docker Image With Dockerfile From Scratch
- How to Pass Environment Variables to Docker Containers
- How to Use Docker CP Command With Examples
- How to Remove Unused and Dangling Docker Images
- How to Create Docker Image From a Container
- How to Create Docker Images
- How to Run a Docker Image as a Container
FAQs
Q1: Are Docker tags mutable?
Yes, unlike the image Digest (SHA), tags are mutable. You can move a tag like latest or v1 to point to a new image ID at any time. This is why using specific version numbers is recommended for production stability.
Q2: Can I delete a tag without deleting the image?
Yes. If you run docker rmi my-image:old-tag, it simply removes that specific pointer (alias). The underlying image layer data is only deleted if there are no other tags pointing to it.
Q3: Is there a limit to how many tags an image can have?
There is no hard limit enforced by Docker on the number of tags you can assign to a single image ID.
Q4: How does Docker distinguish between a tag and a port number?
In a string like localhost:5000/my-image:v1, Docker parses the first part (localhost:5000) as the registry location because of the domain/port structure, and the last part (:v1) as the tag.


Discussion