


Highlights
- The Core Issue: CrashLoopBackOff is not an error itself, but a status indicating a continuous Pod restart issue where an application repeatedly crashes and Kubernetes backs off before restarting it.
- Common Causes: Factors like application bugs, insufficient memory, missing configurations, or port conflicts frequently trigger this state.
- Initial Diagnosis: Use
kubectl describe podto inspect the Events section and determine if the kubelet is encountering a back-off state. - Deep Inspection: Use
kubectl logsas a reliable K8s troubleshooting guide to view the application's internal errors (e.g., missing environment variables). - The Fix: Identifying the root cause (like a missing password) is the first step to applying a successful Kubernetes CrashLoopBackOff fix.
When trying to get your containerized application up and running in a Kubernetes cluster, you may run into errors that prevent the application from running. One such error is CrashLoopBackOff.
In this K8s troubleshooting guide, we’ll learn how to debug CrashLoopBackOff status of a Pod. Our approach? We’ll create a Pod and intentionally leave out certain configuration details to trigger a CrashLoopBackOff state. Then, we'll explore various troubleshooting mechanisms to formulate a reliable Kubernetes CrashLoopBackOff fix and get the Pod working again. Let's get started!
What Is CrashLoopBackOff?
In Kubernetes, a Pod enters a state known as CrashLoopBackOff when an application inside the Pod keeps crashing repeatedly. When this severe Pod restart issue happens, the kubelet – an agent that operates on each worker node – steps in. It attempts to restart the failing application after each crash, creating a cycle of crash, loop (restart), and back off (wait and try again); hence the name, CrashLoopBackOff.
Below are some factors that can get a Pod into a CrashLoopBackOff state:
- Bugs within the application: If the software inside the Pod contains errors, it might crash, causing the Pod to enter a
CrashLoopBackOffstate. - Insufficient resources: Lack of adequate memory or other system resources can prevent the application from running smoothly, causing it to crash.
- Missing or incorrect configuration details: The application may require certain configurations to run correctly. If these details are incorrect or not provided, it can lead to application failure.
- Port conflicts: If multiple applications attempt to bind to the same port, it can cause a conflict, leading to application failure and, thus the
CrashLoopBackOffstate.
Prerequisites
To follow along with the example in this post, you’ll need access to a running Kubernetes cluster. If you don’t have access to one, you can use a tool such as minikube to set up a Kubernetes cluster. Also, you’ll need to have kubectl installed on your local machine to interact with the Kubernetes cluster.
Try the Kubernetes Pods Lab for free
Create a Pod
Start by launching your code editor. Next, create a new directory. Within this directory, make a new file with a .yaml extension. Copy and paste the following content into the new .yaml file:
apiVersion: apps/v1
kind: Deployment
metadata:
 name: mysql-deployment
spec:
 replicas: 1
 selector:
   matchLabels:
     app: mysql
 template:
   metadata:
     labels:
       app: mysql
   spec:
     containers:
     - name: mysql-container
       image: mysql:8.0
In this file, we have defined a Deployment named mysql-deployment that is responsible for managing a single Pod. With this Pod, there will be one container running the mysql:8.0 image. The deployment will ensure that the pod always keeps running. If the Pod crashes for some reason, the Deployment will automatically recreate the Pod, maintaining the desired count (which, in this case, is set to 1).
Now run the command below to create the Deployment:
kubectl apply -f <YOUR-FILE-NAME>.yamlReplace <YOUR-FILE-NAME> with the name of your file.
Executing the command above will produce the following output:

As you can see, a Deployment named mysql-deployment has been created. Next, let’s check the Pod status by running the following command:
kubectl get podsThis will generate an output similar to the following:

As you can see, the Pod has a CrashLoopBackOff status as highlighted above.
kubectl get pods command immediately after creating the Deployment may not display the CrashLoopBackOff status. Instead, you might see a different status like Error, for example. This variation occurs because the Pod goes through different states during its lifecycle as it starts up, runs, and potentially encounters issues. So, wait for up to five minutes or so before running the kubectl get pods command again, to see the CrashLoopBackOff status.Now, let's focus on the following three columns of the output above and examine their meaning:
READY: This indicates the number of containers in the Pod that are ready.0/1means there is 1 container in the Pod, and 0 of them are ready. This suggests that the container is not yet running as expected.STATUS: This shows the current status of the Pod.CrashLoopBackOffmeans the container in this Pod is failing and being restarted, over and over again.RESTARTS: This indicates how many times the container within the Pod has been restarted. The number 5 suggests that the container has crashed and been restarted five times.
The CrashLoopbackOff status is a clear indication that something has gone wrong with the Pod. Let’s troubleshoot to find out the cause of this problem.
Debugging CrashLoopBackOff
Kubernetes offers various mechanisms for troubleshooting issues. In this section, we'll explore two steps that will guide you through the process to effectively Debug CrashLoopBackOff and help you resolve the problem.
Step 1: Using kubectl describe pod to get Pod details
To address the issue with our Pod, the first step is to get detailed Pod information. We might find some helpful clues that can guide us in the right direction.
Run the following command to fetch Pod details:
kubectl describe pod <POD-NAME>Replace the <POD-NAME> with the name of your Pod.
Running the command above will produce an output similar to the following:
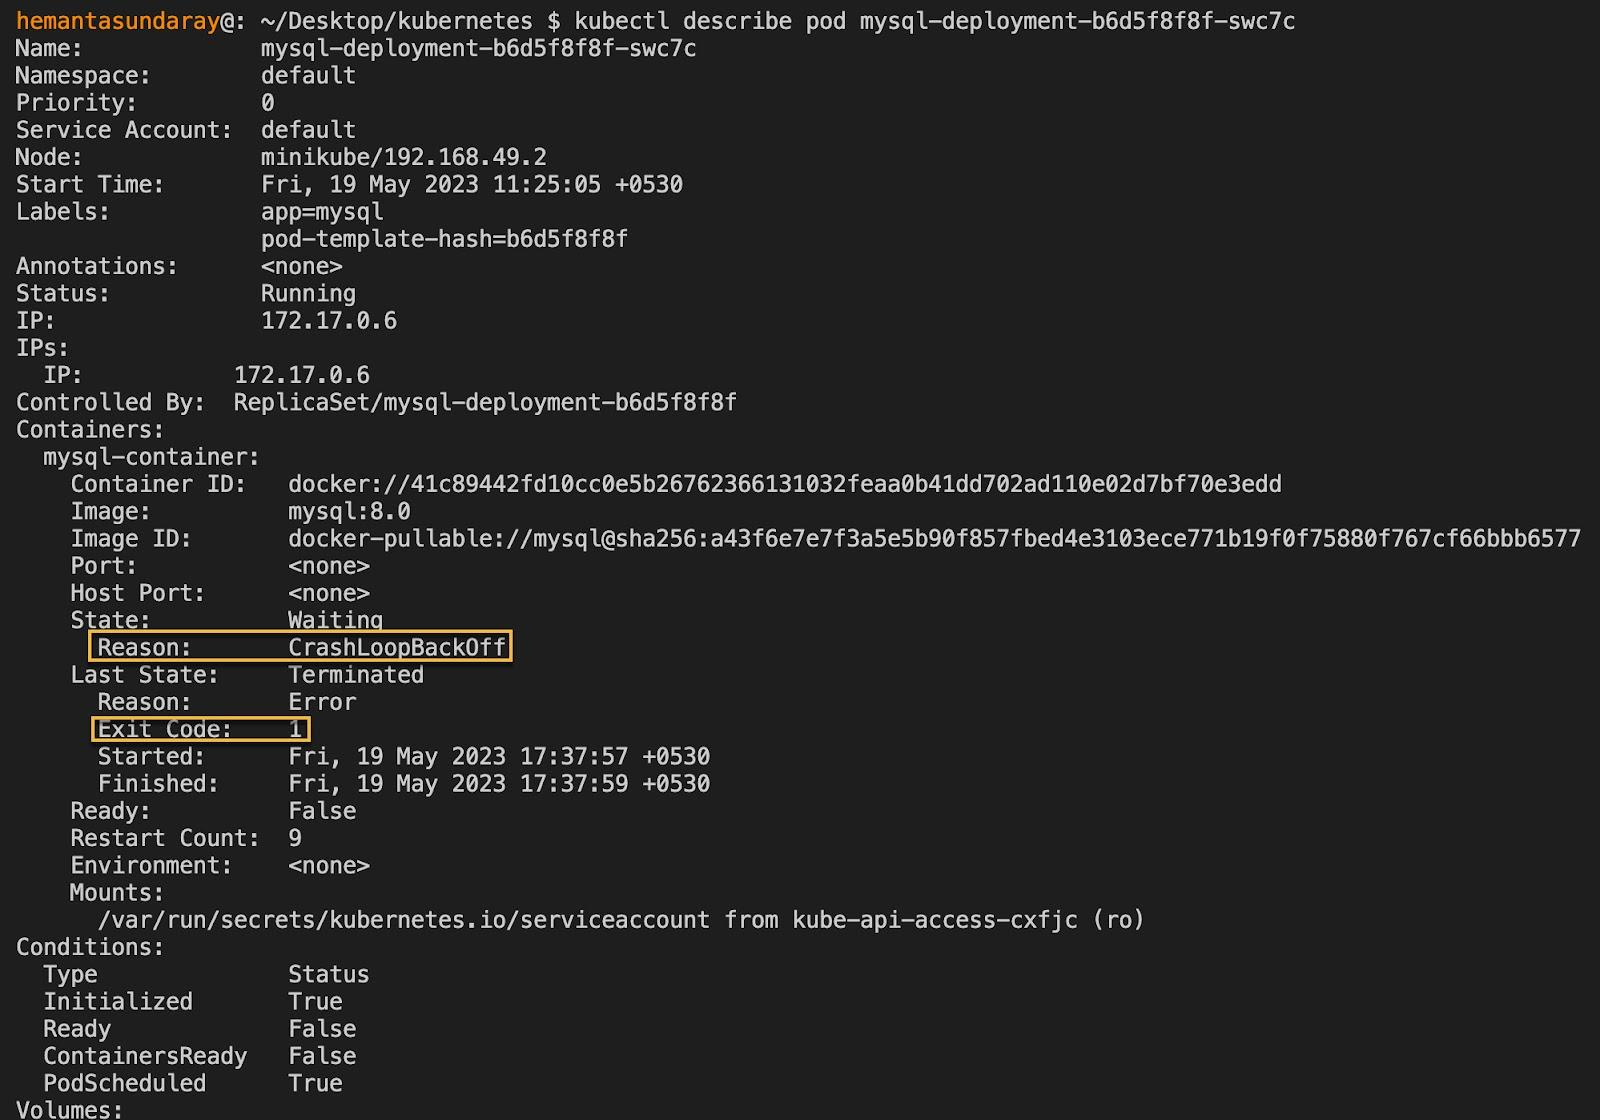
Note that the screenshot above shows only a partial section of the complete output.
Within the Containers section of the output, we see that the container is in a Waiting state due to CrashLoopBackOff, with an exit code of 1. Typically, an exit code of 0 means that the process ran successfully without errors, while a non-zero exit code indicates some sort of error. However, in this case, the exit code does not provide us with sufficient information to tell us what we should do next.
To gather more insights, scroll down to the Events section.

In the last line of the Events section, we find the statement Back-off restarting failed container. This means that the kubelet attempted to restart the container after a failure but was unsuccessful. As a result, the kubelet will make another attempt to restart the container. Now, you might wonder, what does "Back-off" mean?
Kubernetes, by default, restarts a Pod when it crashes. If the application doesn’t recover after the restart, Kubernetes doesn’t immediately attempt to restart the Pod again. Instead, it waits for some time.
Why? Because it hopes the waiting time resolves any temporary issue the application may have. If the issue still persists, Kubernetes increases the waiting time between restart attempts by up to a certain limit. This approach is referred to as the back-off strategy.
Unfortunately, the Events section does not have any helpful information regarding why the container fails to start. Therefore, our next step is to inspect the Pod logs for any potential clues regarding the issue.
Step 2: Using kubectl logs to get Pod logs
Pod logs are records of events within an application. They can often provide valuable insights into any issues the application is facing.
To learn more about Pod Logs, check out our blog post: How to Get Pod Logs in Kubernetes.
To fetch the logs, run the following command:
kubectl logs <POD-NAME>Running the command above will produce the following output:

The logs clearly indicate the reason for the error — we have not set the password in our Deployment configuration. To resolve this issue, one of the options is to define the MYSQL_ROOT_PASSWORD the environmental variables section of our Deployment configuration. Let’s do that now.
Add the following details to the containers block of the template.spec in your configuration file. Note that you can provide any value you prefer for the password.
env:
- name: MYSQL_ROOT_PASSWORD
  value: secret-password
The final configuration file should look like this:
apiVersion: apps/v1
kind: Deployment
metadata:
 name: mysql-deployment
spec:
 replicas: 1
 selector:
   matchLabels:
     app: mysql
 template:
   metadata:
     labels:
       app: mysql
   spec:
     containers:
     - name: mysql-container
       image: mysql:8.0
       env:
       - name: MYSQL_ROOT_PASSWORD
value: secret-passwordAfter updating the Deployment configuration file, run the following command to apply the changes:
kubectl apply -f <your-file-name>.yaml After running the command above, you’ll see the following output:

As you can see, Kubernetes has updated the existing Deployment with the new configuration. Next, let’s run the following command to check the Pod status:
kubectl get pods
From the output above, the Pod is up and running as expected. We have resolved the CrashLoopbackOff state of the Pod.
Master container orchestration by enrolling in our Kubernetes Learning path:
Conclusion
In this blog post, you learned how to successfully Debug CrashLoopBackOff states of a Pod and resolve the frustrating Pod restart issue. By checking the Pod descriptions and logs, you can implement a permanent Kubernetes CrashLoopBackOff fix.
While troubleshooting application errors, you might sometimes need to get a shell to the running container so that you can run commands and interact with the container’s environment. To learn how to open and access a container’s shell, read our blog post: Kubectl Exec: How to Execute Shell Commands Into a Running Container (With Examples)?
More on Kubernetes:
- How to Restart a Pod in Kubernetes
- How to Get Pod Logs in Kubernetes
- How to Copy File From Pod to Local
- How to Use Kubectl Delete Deployment (With Examples)
- How to Execute Shell Commands Into a Container (With Examples)
- Kubernetes Readiness Probe: A Simple Guide with Examples
- 10 Kubernetes Security Best Practices to Secure K8 Clusters
- Optimizing Kubernetes Clusters for Cost & Performance: Part 1 - Resource Requests
- Deploying, Maintaining, and Scaling Kubernetes Clusters
FAQs
Q1: What exactly does CrashLoopBackOff mean?
CrashLoopBackOff means your Pod is experiencing a severe Pod restart issue. The container starts, crashes immediately, and Kubernetes tries to restart it, backing off (waiting) longer after each subsequent crash.
Q2: How do I start to Debug CrashLoopBackOff?
The best starting point in any K8s troubleshooting guide is to run kubectl describe pod <pod-name> to check the Events, followed closely by kubectl logs <pod-name> to see the exact application crash output.
Q3: Will the Pod ever stop trying to restart?
By default, the kubelet will keep trying to restart the container indefinitely, but the back-off delay increases exponentially (up to a maximum of 5 minutes) to prevent overloading the node.
Q4: How do I apply a Kubernetes CrashLoopBackOff fix if the logs are empty?
If kubectl logs returns nothing, the container might be failing before the application even starts logging. In that case, check if your Docker image is built correctly, if your command or args in the Pod spec are valid, or if you have a failing Liveness probe.
Q5: Can memory limits cause this?
Yes. If your application exceeds the memory limits defined in the container spec, it will be OOMKilled (Out of Memory Killed), which eventually leads to a continuous CrashLoopBackOff cycle.


Discussion