


Highlights
- Restart means Recreate: Unlike a virtual machine reboot, restarting a Pod usually involves terminating the existing instance and scheduling a fresh one.
- Three Main Methods: You can restart pods by deleting them directly, updating their configuration (like the image version), or using the
rollout restartcommand. - Zero Downtime: Using Deployments allows you to restart applications without downtime via Rolling Updates.
- Restart Policies: Kubernetes uses
Always,OnFailure, andNeverpolicies to determine when a Pod should automatically restart.
Restarting a Pod is a common operation in Kubernetes. There are several reasons why you might want to restart a Pod. For example, you might want to update the container image to a newer version or modify the environment variables to adjust how your application works.
In this blog post, we’ll explore three different methods to perform a kubernetes pod restart. It’s important to note that in Kubernetes, "restarting a pod" doesn't happen in the traditional sense, like restarting a service or a server. When we say a Pod is "restarted," it usually means a Pod is deleted, and a new one is created to replace it. The new Pod runs the same container(s) as the one that was deleted.
Prerequisites
To follow along with the examples in this post, you’ll need a code editor. In addition, you’ll need access to a running Kubernetes cluster. If you don’t have access to one, you can use a tool such as minikube to set up a Kubernetes cluster. Also, you’ll need to have kubectl installed on your local machine to interact with the Kubernetes cluster.
Try the Kubernetes Pods Lab for free
Understanding Kubernetes Pod Restart Policy
In Kubernetes, a Deployment manages the lifecycle of one or more Pods. When we define a Deployment using a YAML file, the spec field of the Pod template contains the configuration for the containers running inside the Pod. The restartPolicy field is one of the configuration options available in the spec field. It allows you to control how the Pods hosting the containers are restarted in case of failure.
Here's an example of a Deployment configuration file with a restartPolicy field added to the Pod spec:
apiVersion: apps/v1
kind: Deployment
metadata:
 name: demo-deployment
spec:
 replicas: 1
 selector:
   matchLabels:
     app: alpine-demo
 template:
   metadata:
     labels:
       app: alpine-demo
   spec:
     restartPolicy: Always
     containers:
     - name: alpine-container
       image: alpine:3.15
       command: ["/bin/sh","-c"]
       args: ["echo Hello World! && sleep infinity"]
You can set the restartPolicy field to one of the following three values:
Always: Always restart the Pod when it terminates.OnFailure: Restart the Pod only when it terminates with failure.Never: Never restart the Pod after it terminates.
Note that if you don’t explicitly specify the restartPolicy field in a Deployment configuration file, Kubernetes sets the restartPolicy to Always by default.
Creating a Pod
To restart a Pod, we must create one first. Follow these steps to create a Pod:
- Open your code editor and create a new folder.
- Within this folder, create a new file with a
.yamlextension. - Copy and paste the following content into the new
.yamlfile.
apiVersion: apps/v1
kind: Deployment
metadata:
 name: demo-deployment
spec:
 replicas: 1
 selector:
   matchLabels:
     app: alpine-demo
 template:
   metadata:
     labels:
       app: alpine-demo
   spec:
     restartPolicy: Always
     containers:
     - name: alpine-container
       image: alpine:3.15
       command: ["/bin/sh","-c"]
       args: ["echo Hello World! && sleep infinity"]
In this file, we have defined a Deployment named demo-deployment that manages a single Pod. The Pod has one container running the alpine:3.15 image. When the container starts, it prints Hello World! to the standard output (stdout) stream and then sleeps indefinitely.
Now run the following command to create the Deployment:
kubectl apply -f <FILE-NAME>.yamlReplace <FILE-NAME> with the name of your file.
Running the command above will produce an output similar to the following:

As you can see, the Deployment named demo-deployment has been created. Next, check the Pod status by running the following command:
kubectl get podsThis command will display a list of all the Pods running in your Kubernetes cluster, as shown below:

Look for the Pod with a name starting with demo-deployment and ensure that it's in the Running state. Note that Kubernetes creates unique Pod names by adding unique characters to the Deployment name. Hence, your Pod name will be different from mine.
Next, let’s view the message Hello World! printed by the container by running the following command:
kubectl logs <POD-NAME>Replace <POD-NAME> with the name of your Pod.
After running the command above, you should see the output displaying Hello World! as shown below:

3 Methods to Restart Kubernetes Pod
In this section, we’ll explore three methods you can use to perform a kubernetes pod restart.
Method 1: Deleting the Pod
One of the easiest methods to restart a running Pod is to simply delete it. Run the following command to see the Pod restart in action:
kubectl delete pod <POD-NAME>After running the command above, you will receive a confirmation that the Pod has been deleted, as shown in the output below:

The job of a Deployment is to ensure that the specified number of Pod replicas (in our case, 1) is running at all times. Therefore, after deleting the Pod, Kubernetes will automatically create a new Pod to replace the deleted one.
To check if Kubernetes has created a new Pod, run the following command:
kubectl get podsThis command will list all the Pods in your system:

As you can see, Kubernetes has created a new Pod. It’s worth noting that although it’s a new Pod, it still runs the same container as the deleted Pod. How can we confirm this? One way would be to check the container logs. If it’s indeed the same container running, we should see the output Hello World!.
To fetch the container logs, run the following command:
kubectl logs <POD-NAME>
The output displays Hello World!, which confirms that the new Pod runs the same container as the deleted Pod.
Method 2: Modifying the fields in spec.template.spec.containers
In a Deployment configuration file, the spec.template.spec.containers field describes the container(s) that should exist in a Pod overseen by the Deployment. This field holds various specifications about the container, such as its image, any necessary environment variables, and any required volumes, among others. Any modification to the value of these fields effectively changes the Pods' definition, triggering a Pod restart.
To see the Pod restart in action, let’s change the alpine image version from 3.15 to 3.16. Run the following command:
kubectl set image deployment/demo-deployment alpine-container=alpine:3.16After running the command, you’ll receive the following output:

As you can see, the container image has been updated. Next, immediately run the following command:
kubectl get pods
You should see an output, as shown above, where the previous Pod is in a Terminating state while the new Pod is already up and running. If you run the kubectl get pods command again after a minute or so, you will only see the new Pod in the running state, as shown below:

The reason I wanted you to run the kubectl get pods immediately after updating the container image, I wanted you to see the Pod rollout process in action. During this process, Kubernetes creates Pods with the updated image and gradually phases out the old Pods.
Next, as we did earlier, let’s ensure that the new Pod is indeed running the same container as the terminated Pod. Run the following command to fetch the container logs:
kubectl logs <POD-NAME>
As you can see, Hello World! is displayed in the terminal, confirming that the new Pod is indeed running the same container as the deleted Pod.
Note that we only changed the alpine image version to trigger a Pod restart in this example. Depending on your configuration file, you could modify other fields such as the env entries, volumeMounts, and resources fields to trigger Pod restart.
Method 3: Using the "kubectl rollout restart" command
You can restart a Pod using the kubectl rollout restart command without making any modifications to the Deployment configuration. To see the Pod restart in action, run the following command:
kubectl rollout restart deployment/demo-deploymentAfter running the command, you’ll receive an output similar to the following:

As you can see, the Deployment has been restarted. Next, let’s list the Pods in our system by running the following command:
kubectl get pods
As you can see in the output above, the Pod rollout process is in progress. If you run the kubectl get pods command again, you’ll see only the new Pod in a Running state, as shown below:

To verify that the new Pod is running the same container as the deleted Pod, retrieve the container logs by running the following command:
kubectl logs <POD-NAME>
The terminal will display, Hello World!, confirming that the new Pod is indeed running the same container as the terminated Pod.
How Do I Restart Kubernetes Pod Without Downtime?
The Deployment resource in Kubernetes has a default rolling update strategy, which allows for restarting Pods without causing downtime. Here's how it works: Kubernetes gradually replaces the old Pods with the new version, minimizing the impact on users and ensuring the system remains available throughout the update process.
To restart a Pod without downtime, you can choose between two methods: using a Deployment (Method 2) or using the kubectl rollout restart command (Method 3). Note that manually deleting a Pod (Method 1) to restart it won't work effectively because there might be a brief period of downtime. When you manually delete a Pod in a Deployment, the old Pod is immediately removed, but the new Pod takes some time to start up.
Note: You can confirm that Kubernetes uses a rolling update strategy by fetching the Deployment details using the following command:
kubectl describe deployment/demo-deploymentAfter running the command above, you’ll see the following output:
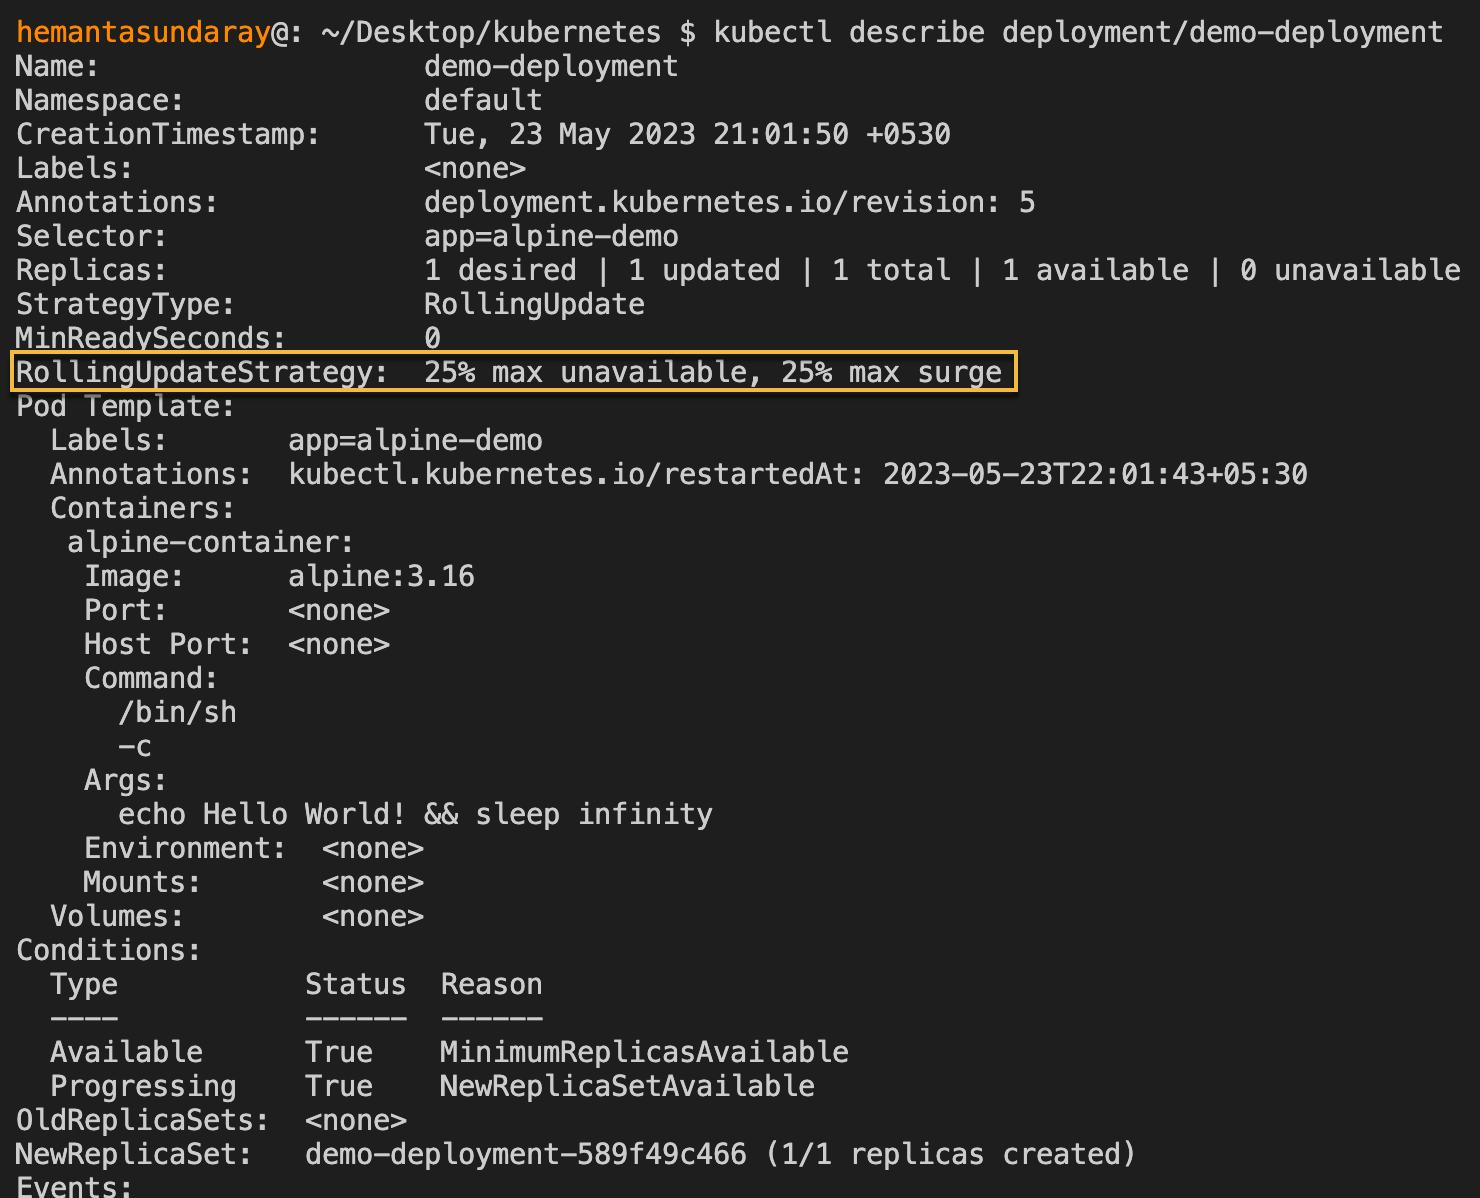
Notice the highlighted section in the output above. The RollingUpdateStrategy field has a default value of 25% max unavailable, 25% max surge. 25% max unavailable means that during a rolling update, 25% of the total number of Pods can be unavailable. And 25% max surge means that the total number of Pods can temporarily exceed the desired count by up to 25% to ensure that the application is available as old Pods are brought down.
Master container orchestration with our Kubernetes Learning path:
Conclusion
Knowing how to handle a kubernetes pod restart is an important skill when managing containerized applications on a Kubernetes cluster. In this blog post, you learned about three different methods you can use to restart a Kubernetes Pod. You also learned about how Kubernetes uses the rolling update strategy to restart Pods without causing any interruptions, keeping the application up and running for your users even during the update process.
More on Kubernetes:
- How to Fix ImagePullBackOff & ErrImagePull in Kubernetes
- How to Manage Your K8s with K9s Kubernetes CLI
- How to Use Kubectl Scale on Deployment
- How to Use Kubectl Config Set-Context
- How to Get Pod Logs in Kubernetes (With Examples)
- How to Copy File From Pod to Local (With Examples)
- How to Execute Shell Commands Into a Container (With Examples)
- Optimizing Kubernetes Clusters for Cost & Performance: Part 1 - Resource Requests
- Deploying, Maintaining, and Scaling Kubernetes Clusters
FAQs
Q1: Does restarting a Pod change its IP address?
Yes. Since restarting a Pod essentially deletes the old one and creates a new one, the new Pod will be assigned a new IP address from the cluster's network pool.
Q2: What is a CrashLoopBackOff?
If your Pod restarts continuously and fails immediately after starting, Kubernetes will place it in a CrashLoopBackOff state. This prevents the system from overwhelming resources by constantly trying to restart a broken container.
Q3: Can I restart a specific Pod within a Deployment?
Yes, you can restart a specific Pod by deleting it using kubectl delete pod <pod-name>. The ReplicaSet will notice the missing Pod and create a new one to replace it, effectively restarting that specific instance.
Q4: Will kubectl rollout restart cause downtime?
No, provided you have multiple replicas and a proper RollingUpdate strategy configured. Kubernetes will bring up new Pods one by one (or in batches) and only terminate the old ones once the new ones are ready.


Discussion