


Highlights
- Targeted Deletion: You can delete a specific deployment by specifying its name, e.g.,
kubectl delete deployment my-app. - Namespace Awareness: Deletions are scoped to the current namespace unless you specify a different one using the
-nor--all-namespacesflags. - Cascade Deletion: Deleting a deployment automatically removes its associated ReplicaSets and Pods, cleaning up the application resources.
- Batch Operations: You can delete multiple deployments at once by listing their names or using the
--allflag to clear a namespace. - Declarative Removal: You can delete resources by referencing the original YAML configuration file used to create them.
Kubernetes is a popular container orchestration tool used to deploy and manage containerized applications at scale.
In Kubernetes, a Deployment describes a deployed application. It is a higher-level abstraction that manages an application’s desired state, such as the number of replicas (copies), the container image to use for the Pods and the resources required. When you create a Deployment, Kubernetes automatically creates and manages the underlying ReplicaSets and Pods to achieve the desired state.
In this blog post, we’ll learn how to use the "kubectl delete deployment" command to delete Deployments.
Prerequisites
To make it easier for you to follow along with the example in this post, we recommend using KodeKloud’s Kubernetes playground. This playground will provide you instant access to a running Kubernetes cluster with kubectl already installed. No need for you to install any software. With just one click, you'll be ready to run the example code snippets and start experimenting right away.
Alternatively, you can use a tool such as minikube to set up your own Kubernetes cluster. Just make sure you have kubectl installed and configured to communicate with the running cluster.
Try the Kubernetes Deployments Lab for free
Creating Deployments
Before we proceed, let’s create the Deployments we’ll be using to demonstrate the "kubectl delete deployment" command.
Let's create four different Deployments that run four different web servers.
Open a terminal and run the following commands to create 4 Deployments: "mynginx", "myapache", "mycaddy", and "mytomcat".
kubectl create deployment mynginx --image=nginx
kubectl create deployment myapache --image=httpd
kubectl create deployment mycaddy --image=caddy
kubectl create deployment mytomcat --image=tomcat
Running the commands above will give you the following output, which shows that the Deployments have been created.
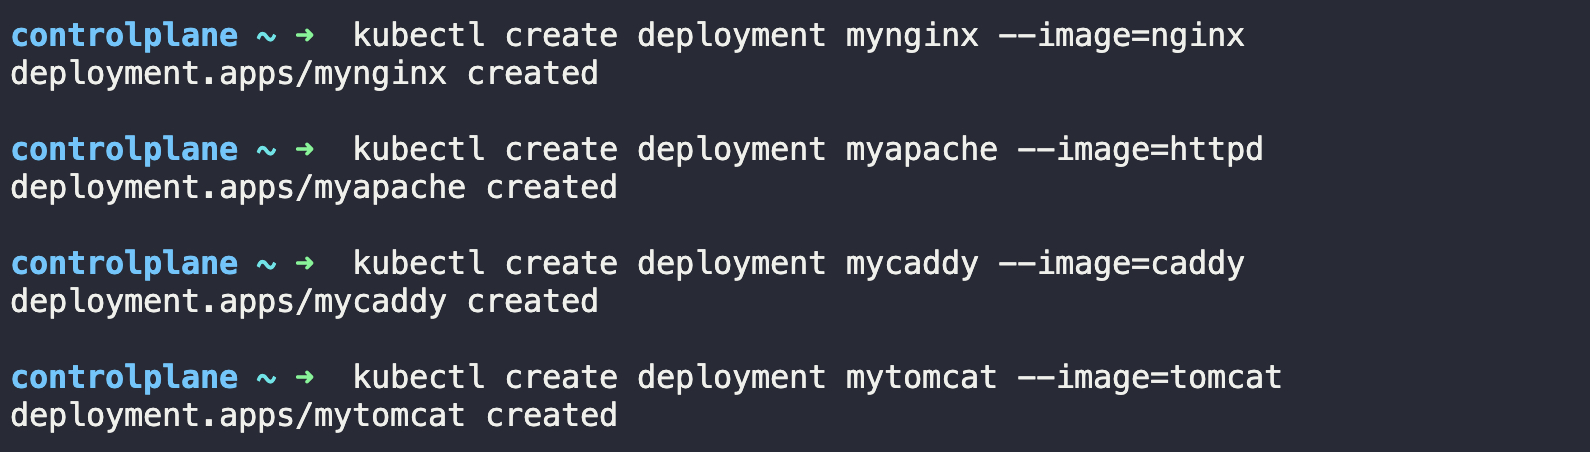
Note that because we didn't specify any Namespace in the "kubectl create" commands, all 4 Deployments will be created inside the "default" Namespace.
Creating Deployments in Specific Namespaces
Before we can create Deployments inside specific Namespaces, we must create those Namespaces first. For the purposes of this example, we will create two Namespaces: "development" and "production". You can name your Namespaces anything you like.
To create the "development" and "production" Namespaces, run the following commands:
kubectl create namespace development
kubectl create namespace production
Running these commands will give you the following output, which shows that the Namespaces have been created.

Now that the Namespaces have been created, we can create Deployments inside each of them. Let's create two Deployments inside the "development" Namespace and one inside the "production" Namespace.
Run the following commands to create two Deployments - "busybox-dev" and "alpine-dev" - inside the "development" Namespace.
kubectl create deployment busybox-dev --image=busybox -n=development
kubectl create deployment alpine-dev --image=alpine -n=development
Executing the commands above will result in the following output, which shows that the Deployments have been created.

Finally, we’ll create a Deployment named "arch-prod" inside the "production" Namespace. To do so, run the following command:
kubectl create deployment arch-prod --image=archlinux -n=productionThe output shows that the "arch-prod" Deployment has been created.

Note that "busybox", "alpine", and "archlinux" are lightweight Linux distributions.
In summary, we have created a total of 7 deployments in 2 different Namespaces. We have 4 Deployments inside the "default" Namespace:

We have 2 Deployments inside the "development" Namespace:

And we have one Deployment inside the "production" Namespace:

Now that we have created the Deployments let’s learn how to delete them.
Delete a Single Deployment
To delete a single Deployment, we can use the "kubectl delete deployment" command followed by the name of the Deployment we want to delete. For example, to delete the "mynginx" Deployment, we can run the following command:
kubectl delete deployment mynginxIt's important to note that if we don't specify a Namespace in the command, the delete operation will affect the specified resource only in the "default" Namespace.
After running the command, we’ll see the following output, confirming that the Deployment has been deleted.

We can verify this by running the "kubectl get deployments" command and checking that "mynginx" is no longer listed.

The output confirms that the "mynginx" Deployment has been deleted and now, we are left with 3 Deployments in the "default" Namespace.
Delete Multiple Deployments
In the previous section, we learned how to delete a single Deployment. But what if we want to delete multiple Deployments with a single command? No worries; it's possible to delete multiple Deployments at once by specifying their names.
Let's say we want to delete the "myapache" and "mytomcat" Deployments with a single command. We can do so using the following command:
kubectl delete deployment myapache mytomcatAfter executing the command, you'll see an output like the following:

The output shows that the "myapache" and "mytomcat" Deployments have been deleted. We can verify this using the following command:
kubectl get deploymentsThe execution of the command will give the following output:

The output shows that the "myapache" and "mytomcat" Deployments have been deleted successfully. We now have only 1 Deployment named "mycaddy" left in the "default" Namespace.
Delete All Deployments Inside the Default Namespace
In the previous sections, we learned how to delete individual and multiple Deployments using the "kubectl delete deployment" command. But what if we want to delete all the Deployments in the "default" Namespace with a single command? It's simple: We just need to add the "--all" flag to the "kubectl delete deployment" command.
To delete all Deployments inside the "default" Namespace (we have only one left), run the following command:
kubectl delete deployment --allAfter running this command, you’ll see the following output:

The output shows that the "mycaddy" Deployment has been deleted. With this, we should now have 0 Deployments in the "default" Namespace. Let’s verify this by running the following command:
kubectl get deploymentsAfter running the command above, you’ll get the following output:

The output confirms that we don’t have any Deployments left inside the "default" Namespace.
Delete Deployment(s) in a Specific Namespace
Until now, we have seen how to delete a single Deployment, multiple Deployments, and all Deployments from the "default" Namespace.
What if we want to delete Deployments from specified Namespaces? We can do so using the same commands we studied in the previous sections, with just one simple addition. We need to specify the Namespace we want to delete the Deployment(s) from using the "-n" or "--namespace" flag.
For example, to delete the "alpine-dev" Deployment inside the "development" Namespace, run the following command:
kubectl delete deployment alpine-dev -n=developmentAfter running the command, you'll see the following output:

The output shows that the "alpine-dev" Deployment has been deleted. Let's verify this by listing the available Deployments inside the "development" Namespace. Run the following command:
kubectl get deployments -n=developmentRunning the command above will give you the following output:

The output confirms that the "alpine-dev" Deployment has been successfully deleted. Now, we are left with only 1 deployment in the "development" namespace.
Delete All Deployments in All Namespaces
Is there a way to delete all Deployments from all Namespaces at once?
Yes, there is.
By using the "--all-namespaces" flag, we can target all Namespaces in the cluster. This is a very powerful command when you want to perform a comprehensive kubernetes delete resources operation across your entire cluster. The command to delete all Deployments in all Namespaces is shown below:
kubectl delete deployment --all --all-namespacesAfter running this command, all Deployments in all Namespaces will be deleted, as shown in the output below:

Note: We can also use the shortcut "-A" instead of "--all-namespaces". It will work the same way, deleting all Deployments regardless of the Namespace they belong to.
Delete a Deployment Using its YAML Configuration File
In all the previous sections, we learned to delete Deployments using their names. However, it’s also possible to delete a Deployment by specifying its YAML configuration file.
To demonstrate this, let's create a simple Deployment that runs an "nginx" web server. Create a file called "nginx-deployment.yaml". Then copy and paste the following code snippet into the file:
apiVersion: apps/v1
kind: Deployment
metadata:
  name: nginx-deployment
spec:
  replicas: 1
  selector:
    matchLabels:
      app: nginx
  template:
    metadata:
      labels:
        app: nginx
    spec:
      containers:
      - name: nginx
        image: nginx:latest
        ports:
        - containerPort: 80
To create a Deployment from this YAML configuration, run the following command:
kubectl apply -f nginx-deployment.yamlAfter executing the command above, we can verify that the Deployment has been created using the following command:
kubectl get deploymentsExecuting the command above will give the following output, which shows that the "nginx-deployment" Deployment is up and running.

Now, let's delete the Deployment using its YAML configuration file. We can do this by specifying the file name using the kubectl delete command, as shown below:
kubectl delete -f nginx-deployment.yamlExecuting the command will give you the following output:

We can verify that the Deployment has been deleted using the "kubectl get deployments" command:

As you can see, the Deployment named "nginx-deployment" has been successfully deleted using its YAML configuration file.
What Happens When You Delete a Deployment in Kubernetes?
When you delete a Deployment, the ReplicaSets and Pods associated with the Deployment are deleted.
Note: In Kubernetes, Deployments don’t manage Pods directly. That’s the job of the ReplicaSet object. When you create a Deployment in Kubernetes, a ReplicaSet is created automatically. The ReplicaSet ensures that the desired number of replicas (copies) are running at all times by creating or deleting Pods as needed.
Master Kubernetes with our Kubernetes Learning Path:

.webp)
Conclusion
In conclusion, we learned how to use the "kubectl delete deployment" command to delete Deployments in a Kubernetes cluster — both in the default Namespace and specific Namespaces. We also learned how to delete Deployments using their YAML configuration file.
More on Kubernetes:
- How to Copy File From Pod to Local (With Examples)
- How to Get Pod Logs in Kubernetes (With Examples)
- How to Restart a Pod in Kubernetes
- How to Use Kubectl Config Set-Context
- How to Use Kubectl Scale on Deployment
- How to Fix ImagePullBackOff & ErrImagePull in Kubernetes
- How to Collect Kubernetes Events and Extract Values
- Optimizing Kubernetes Clusters for Cost & Performance: Part 1 - Resource Requests
- Deploying, Maintaining, and Scaling Kubernetes Clusters
FAQs
Q1: Does deleting a deployment delete its pods?
Yes. When you delete a Deployment, Kubernetes automatically deletes the associated ReplicaSet and all the Pods managed by it. You generally do not need to manually kubectl delete pod resources if they are managed by a controller like a Deployment.
Q2: How do I delete everything in a namespace?
You can delete all resources within a namespace (including deployments, services, and pods) by deleting the namespace itself using kubectl delete namespace <namespace-name>. Alternatively, you can kubectl delete namespace resources specifically by running kubectl delete all --all -n <namespace-name>.
Q3: Can I delete a deployment but keep the pods running?
Yes, you can use the --cascade=orphan flag. For example: kubectl delete deployment my-app --cascade=orphan. This deletes the Deployment object but leaves the pods running (orphaned).
Q4: What happens if I delete a deployment by mistake?
If you delete a deployment, the pods will be terminated. Unless you have a backup of the YAML manifest or use a GitOps workflow (where the configuration is stored in Git), the configuration is lost. It is best practice to keep your manifests version-controlled.
Q5: Is there a dry-run option for deletion?
Yes. You can use the --dry-run=client flag to see what would be deleted without actually performing the action. For example: kubectl delete deployment my-app --dry-run=client.


Discussion