


Highlights
- Zero Downtime: The command performs a rolling restart, ensuring that new Pods are ready before old ones are terminated, keeping the application available.
- Resource Support: It works natively with Deployments, DaemonSets, and StatefulSets.
- Configuration Updates: It is the standard way to reload applications after updating ConfigMaps or Secrets without changing the Deployment manifest itself.
- Trigger Mechanism: Unlike
kubectl apply, which requires a change in the manifest to trigger a rollout, this command forces a restart even if the Pod spec hasn't changed. - Safe Recovery: It is an effective method to reset applications stuck in a bad state or to clear memory leaks.
In Kubernetes, kubectl rollout restart is a command used to start a new rollout process for three specific Kubernetes objects: Deployment, DaemonSet, and StatefulSet. A rollout process essentially means a gradual, step-by-step recreation of Pods — The old Pods are not removed entirely until the new Pods are running successfully. This process ensures that your application remains available throughout the restart process.
One of the key advantages of the kubectl rollout restart command is that it enables you to recreate the Pods associated with the aforementioned objects, regardless of whether their configuration has been modified or not.
There can be several reasons why you would want to use the kubectl rollout restart command. Some of them are:
- Updating ConfigMaps or Secrets: If you've updated a Secret or ConfigMap, and you want your application to pick up the updated values, restarting your Pods becomes necessary. This is a common scenario where you need to perform a rolling restart kubernetes workload.
- Troubleshooting and recovery: If you're troubleshooting a problem with your application or if your application has entered a bad state and needs to be restarted, triggering a new rollout can be a quick way to restart kubernetes deployment resources and recreate all the Pods.
In this blog post, we’ll learn how to use the kubectl rollout restart command. We’ll start by creating a Deployment that is linked to a Secret object. Following that, we’ll make changes to the Secret. Lastly, we’ll use the kubectl rollout restart command to trigger a new rollout so that the changes are picked up by the Deployment. Let’s get started!
Prerequisites
To follow along with the examples in this post, you’ll need a code editor. In addition, you’ll need access to a running Kubernetes cluster. If you don’t have access to one, you can use a tool such as minikube to set up a Kubernetes cluster. Also, you’ll need to have kubectl installed on your local machine to interact with the Kubernetes cluster.
Try the Kubernetes Rolling Updates and Rollback Lab for free
How to Use kubectl rollout restart
Open your code editor and create a folder. Within this folder, create two files with the .yaml extension — one for a Deployment object and another for a Secret object. You can choose any name you prefer for your folder and files. Now, follow the steps below:
Step 1: Defining a Secret
Go to the Secret object file and paste the following content:
apiVersion: v1
kind: Secret
metadata:
   name: mysql-root-pass
type: Opaque
stringData:
   password: mysql_secret_password
The Secret object contains a key-value pair where the key is password , and the value is the actual password for the MySQL root account.
Step 2: Defining a Deployment
Go to the Deployment object file and paste the following content:
apiVersion: apps/v1
kind: Deployment
metadata:
  name: mysql-deployment
spec:
  replicas: 1
  selector:
    matchLabels:
      app: mysql
  template:
    metadata:
      labels:
        app: mysql
    spec:
      containers:
      - name: mysql-container
        image: mysql:8.0
        env:
        - name: MYSQL_ROOT_PASSWORD
          valueFrom:
            secretKeyRef:
              name: mysql-root-pass
              key: password
In this file, we have defined a Deployment named mysql-deployment. The Deployment manages a single Pod, which has a container running a MySQL database server.
MySQL Docker images need a root password to run successfully. We have taken care of this requirement by storing the root password securely in the Secret object. We then mount this Secret as an environment variable named MYSQL_ROOT_PASSWORD in the Deployment so that the environment variable is automatically populated with the password when the container is launched.
Now that we have all the necessary files, let's proceed with creating Kubernetes objects.
Step 3: Creating the Secret
The first step is to create the Secret object. Run the following command:
kubectl apply -f <FILE-NAME>.yamlIn this command, replace <FILE-NAME> with the name of your file that contains the Secret object.
Running the command above will create a Secret named mysql-root-pass, as shown in the following output:

Step 4: Creating the Deployment
Next, create a Deployment object by running the following command:
kubectl apply -f <FILE-NAME>.yamlAs we did in the previous command, replace <FILE-NAME> with the name of your file that contains the Deployment object.
Running the command above will create a Deployment named mysql-deployment, as shown in the output below:

Step-5: Checking the Pod status
After the Deployment is created, check the Pod status by running the following command:
kubectl get podsThis command will display a list of all the Pods running on your Kubernetes cluster, as shown below:

Look for the Pod with a name starting with mysql-deployment and ensure that it's in the Running state. Note that Kubernetes creates unique Pod names by adding unique characters to the name of the Deployment. Hence, your Pod name may differ from mine.
Step-6: Updating the Secret with a new root password
We’ll now change the password stored in the Secret from mysql_secret_password to mysql_super_secret_password, as shown below:
apiVersion: v1
kind: Secret
metadata:
 name: mysql-root-pass
type: Opaque
stringData:
 password: mysql_super_secret_password
After updating the password, save the file. Then, run the following command to apply the changes:
kubectl apply -f <FILE-NAME>.yamlExecuting the command above will return the following output, which says the Secret has been configured.

Step 7: Checking the environment variable
We changed the password and then updated the Secret. But the Deployment is still using the old password. How can we confirm this? We can open a shell to the running container and then use the printenv command to find the value of the MYSQL_ROOT_PASSWORD environment variable. Let’s do that now.
Firstly, run the following command to open and access the shell of the container:
kubectl exec -it <POD-NAME> -- /bin/bashReplace <POD-NAME> with the name of your Pod.
Running the command above will open an interactive shell session, as shown in the output below:

At the command prompt, run the following command to see the value of the environment variable available to the container:
printenv MYSQL_ROOT_PASSWORD
As you can see, the container has not picked up the new password that we set in the Secret. How can we ensure that the container uses the updated password? The solution is to recreate the Pods using the kubectl rollout restart command. Before we can run this command, press ctl+d or type exit and hit enter at the command prompt to come back to your local terminal.
Step 8: Initiating a new rollout
Now that we are back at our local terminal run the following command to initiate a new rollout process:
kubectl rollout restart deployment/mysql-deploymentRunning the command above will give you the following output:

As you can see, the deployment has been restarted. The new rollout process will remove the old Pod and create a new one that will run the same container as the previous Pod, but with the updated password.
Note that we restarted the Deployment, thereby recreating the Pods, without having to make any changes to the Deployment file. This is an important point to keep in mind when working with the kubectl rollout restart command.
Step-9: Check the Pod status
Again, check the Pod status by running the following command:
kubectl get podsRunning the command above will give you an output similar to the following:

As you can see, a new Pod is running.
Step 10: Checking the environment variable
Now that we have a new Pod running, the container should be using the updated password. Let’s confirm this. Open a shell to the running container by running the following command:
kubectl exec -it <POD-NAME> -- /bin/bashNext, check the value of the MYSQL_ROOT_PASSWORD environment variable by running the following command:
printenv MYSQL_ROOT_PASSWORD
As you can see, the new password is now available to the container running the MySQL database server.
Before we proceed to the next section, make sure to exit the container shell either by pressing ctrl+d or typing exit and then hitting enter.0
To learn about other Kubernetes concepts, enroll in our Kubernetes Learning path:
Does kubectl rollout restart cause downtime?
By default, Kubernetes uses a rolling update strategy for Deployments. You can confirm this by running the following command:
kubectl describe deployment/mysql-deploymentRunning the command above will display an output similar to the following:
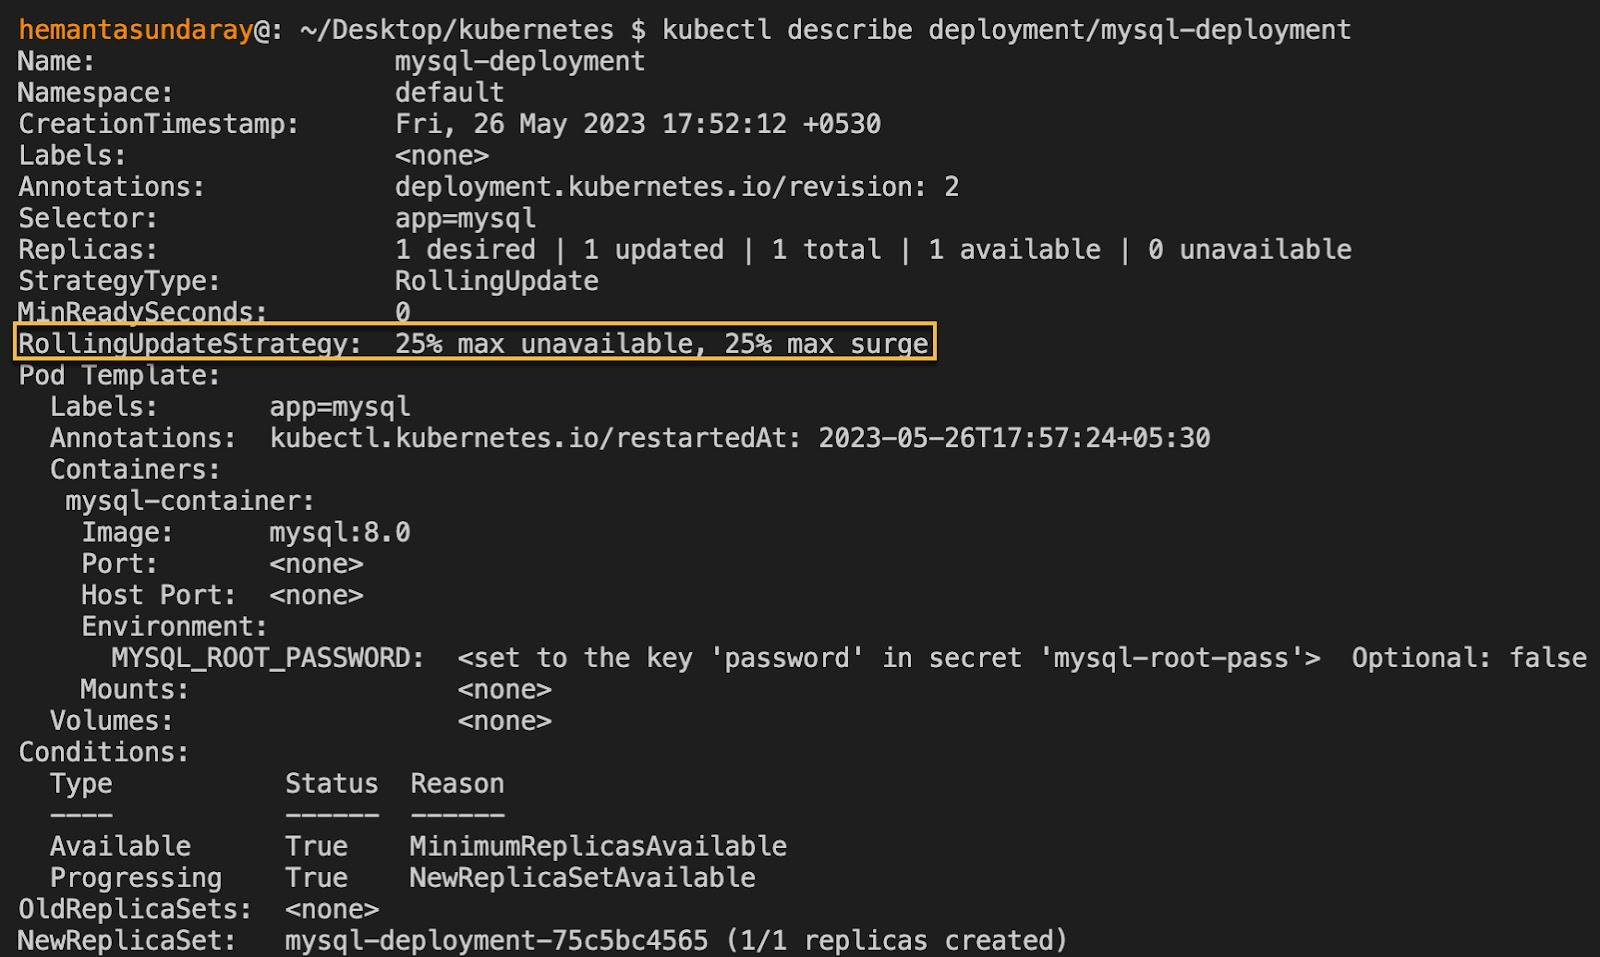
Highlighted in the screenshot above is the RollingUpdateStrategy field. This strategy ensures that Pods are replaced gradually instead of all at once. Before terminating the old Pod, Kubernetes creates a new Pod with the updated version of the application. This way, the application runs without any interruption throughout the update process.
Therefore, the answer is: No, the kubectl rollout restart command does not cause downtime.
Conclusion
In this blog post, you learned about the kubectl rollout restart command, its purpose, and practical usage. Now, you have equipped yourself with a valuable tool for effectively managing and updating Kubernetes Deployments.
More on Kubernetes:
- How to Use Kubectl Scale on Deployment
- How to Use Kubectl Config Set-Context
- How to Restart a Pod in Kubernetes
- How to Get Pod Logs in Kubernetes (With Examples)
- How to Copy File From Pod to Local (With Examples)
- How to Use Kubectl Delete Deployment (With Examples)
- How to Execute Shell Commands Into a Container (With Examples)
- How to Create a Custom Namespace
FAQs
Q1: Is there a direct kubectl restart pod command?
No, there is no native kubectl restart pod command. In Kubernetes, Pods are managed by controllers like Deployments. To restart a pod managed by a Deployment, you use kubectl rollout restart deployment <name>. If you manually delete a pod (kubectl delete pod <name>), the controller will recreate it, which effectively acts as a restart.
Q2: Can I use rollout restart on a specific Pod?
No, rollout restart works at the controller level (Deployment, DaemonSet, StatefulSet), not on individual Pods. It triggers a restart for all Pods managed by that controller in a rolling fashion.
Q3: What other kubectl rollout commands are available?
Besides restart, there are several useful kubectl rollout commands:
kubectl rollout status: Checks the progress of a rollout.kubectl rollout history: View the revision history of a deployment.kubectl rollout undo: Roll back to a previous revision.
Q4: Why use kubectl rollout restart instead of deleting pods?
Using kubectl rollout restart is safer because it honors the RollingUpdate strategy configured in your Deployment. It ensures that new Pods are ready before terminating old ones, preventing downtime. Manually deleting pods might cause service interruption if not handled carefully.
Q5: Does rollout restart change the image version?
No, it does not change the container image or the Deployment manifest. It simply forces the controller to create new Pods with the existing configuration, which is useful for picking up external changes like updated Secrets or ConfigMaps.


Discussion