


Highlights
- Kube proxy runs on every node and translates Services into networking rules.
- It enables stable Service IPs despite ephemeral Pod IPs.
- kube-proxy modes determine whether IPtables, IPVS, or user-space rules are used.
- IPtables and IPVS differ significantly in performance and scalability.
- kube proxy is a core Kubernetes component for service networking Kubernetes relies on.
Networking is a crucial part of Kubernetes. Understanding how different network components work will help you configure your cluster to meet your application’s needs.
Behind a Kubernetes network, there is a component called Kube-Proxy that works under the hood, translating your Services into usable networking rules.
In this article, we’ll explore what a Kube-Proxy is, how it works, and its different modes. We’ll also demonstrate how to inspect IPtables rules for a ClusterIP Service.
What is Kube-Proxy
Kube-Proxy is a Kubernetes agent installed on every node in the cluster. It monitors changes to Service objects and their endpoints and translates them into actual network rules inside the node.
Kube-Proxy usually runs in your cluster as a DaemonSet, but it can also be installed directly as a Linux process on the node.
If you use kubeadm, it will install Kube-Proxy as a DaemonSet. If you manually install the cluster components using official Linux tarball binaries, it will run directly as a process on the node.
Try the Kubernetes Services Lab for free

The Role of Kube-Proxy
We know that Pods in Kubernetes are ephemeral, which means they are easily terminated and recreated. When a Pod is recreated, it gets a new IP address different from its predecessor. The lack of IP permanency is why we cannot rely on a Pod’s IP address for communication.
This is where a Service object comes into play. To learn more about Kubernetes Services, check out our blog post: Kubernetes Services: Definitions & Examples (2023).
Services play an important role in pod networking by providing a stable IP address and DNS name for a set of pods. This enables other applications to communicate with the pods using a consistent address, even as the pods themselves are terminated and recreated.
Services can also load balance traffic between pods, ensuring that requests are evenly distributed and that individual pods do not become overwhelmed. By using Services in conjunction with pods, developers can create highly available and scalable applications that can handle a wide range of network traffic.
For Service-to-Pod mapping to work, you need continuous re-mapping at the networking level. This is precisely what Kube-proxy does.
Kube-proxy helps with Service to pod mapping by maintaining a network routing table that maps Service IP addresses to the IP addresses of the pods that belong to the Service. When a request is made to a Service, kube-proxy uses this mapping to forward the request to a Pod belonging to the Service.
How Kube-Proxy Works
After Kube-proxy is installed, it authenticates with the API server. When new Services or endpoints are added or removed, the API server communicates these changes to the Kube-Proxy.
Kube-Proxy then applies these changes as NAT rules inside the node. These NAT rules simply map the Service IP to the Pod IP. When a request is sent to a Service, it is redirected to a backend Pod based on these rules.
Now, let’s get into more detail with an example.
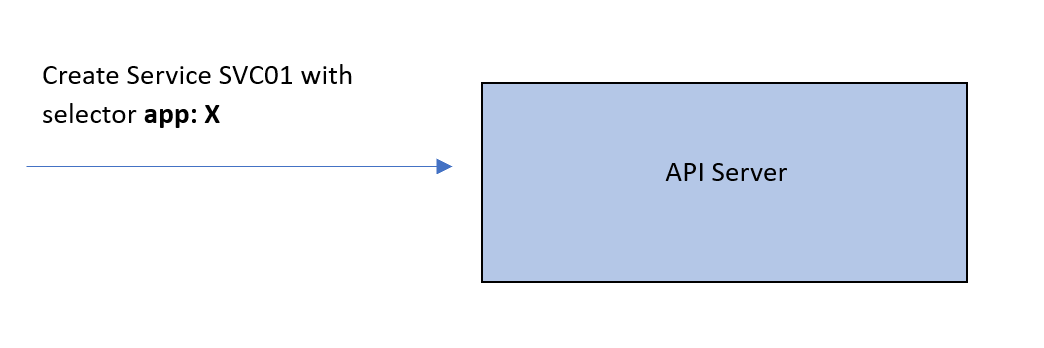
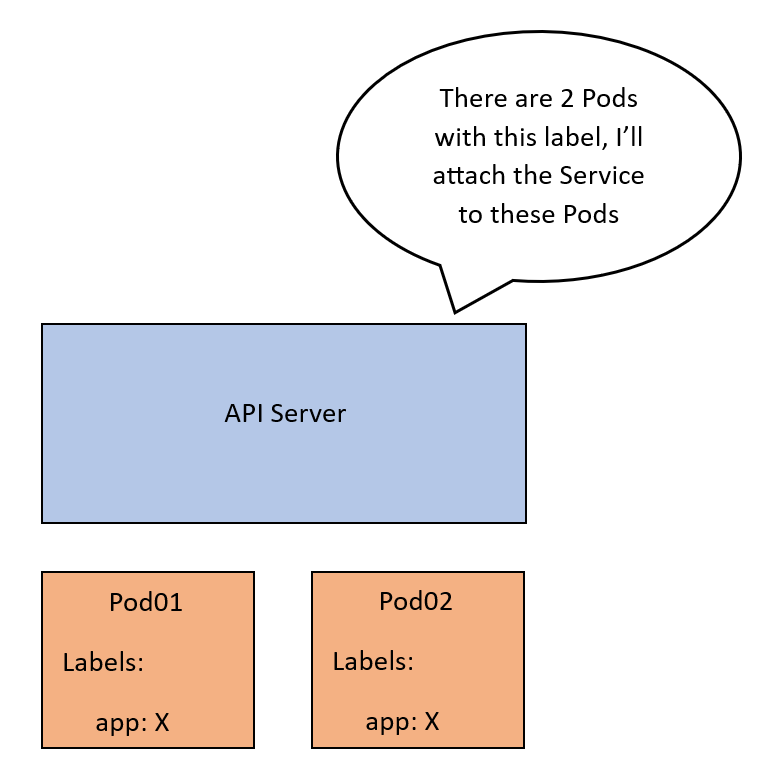
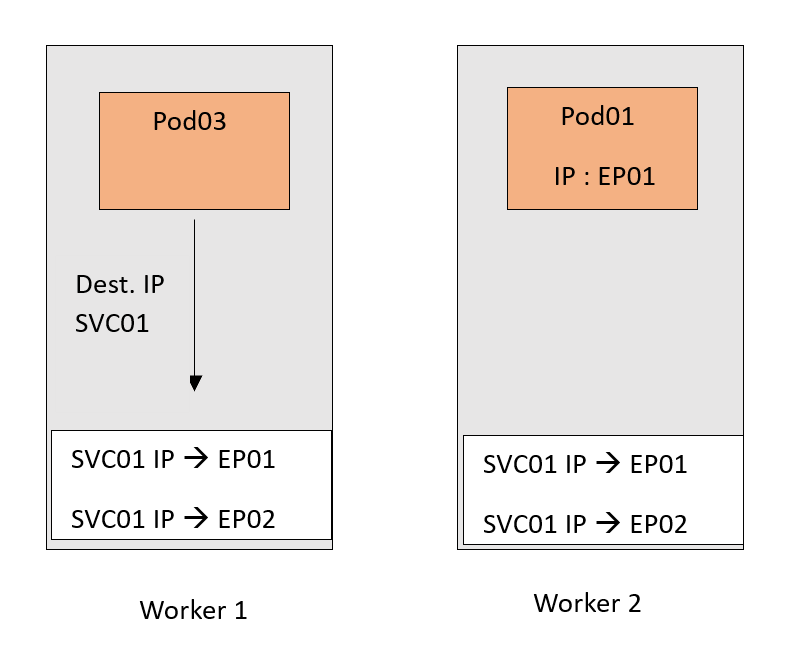
Assume we have a Service SVC01 of type ClusterIP. When this Service is created, the API server will check which Pods to be associated with this Service. So, it will look for Pods with labels that match the Service’s label selector.
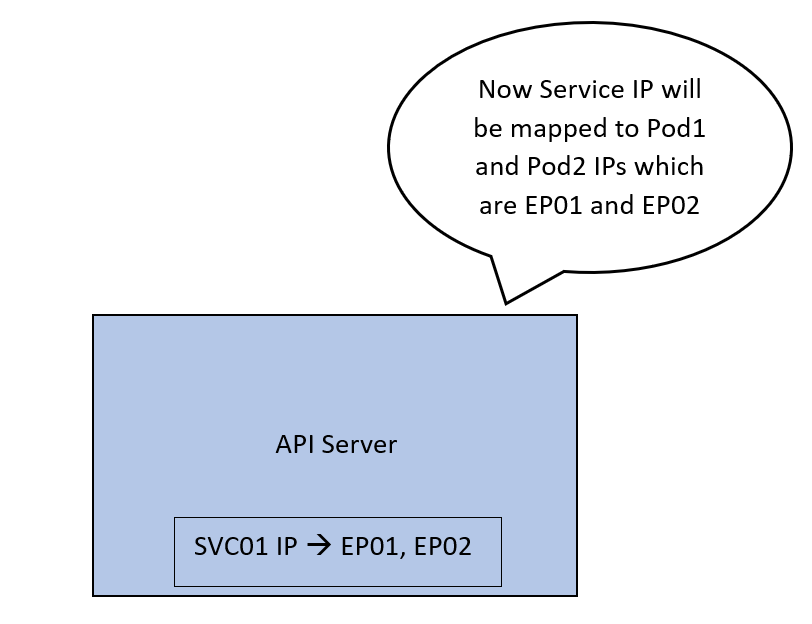
Let’s call these Pod01 and Pod02. Now, the API server will create an abstraction called an endpoint. Each endpoint represents the IP of one of the Pods. SVC01 is now tied to 2 endpoints that correspond to our Pods. Let’s call these EP01 and EP02.
Now the API server maps the IP address of SVC01 to 2 IP addresses, EP01 and EP02.
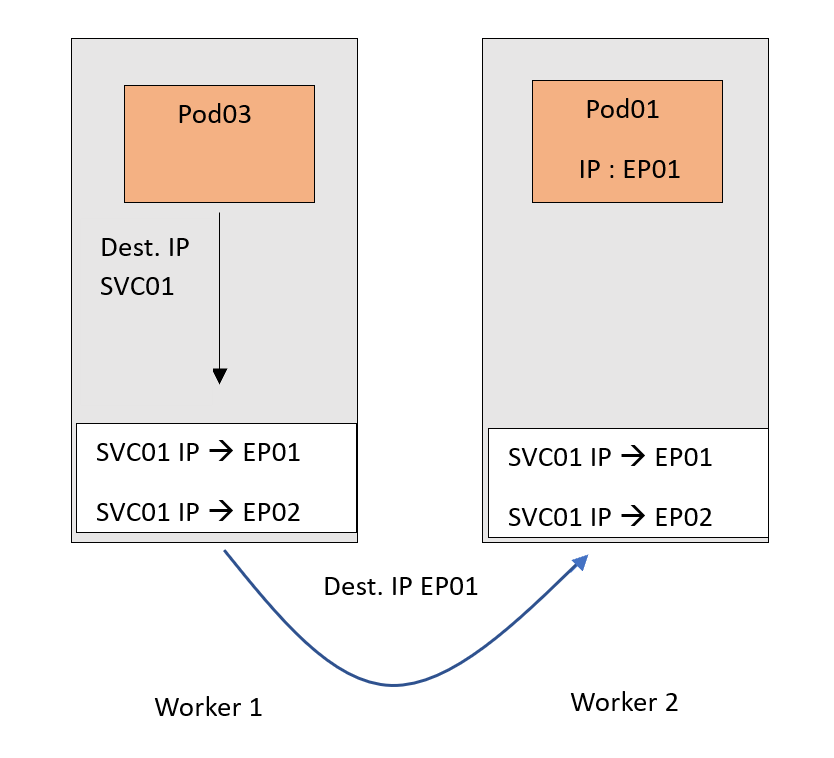
We want this mapping to be implemented on the network so that traffic coming to the IP of SVC01 can be forwarded to EP01 or EP02.
To achieve that, the API server advertises the new mapping to the Kube-proxy on each node, which then applies it as an internal rule.
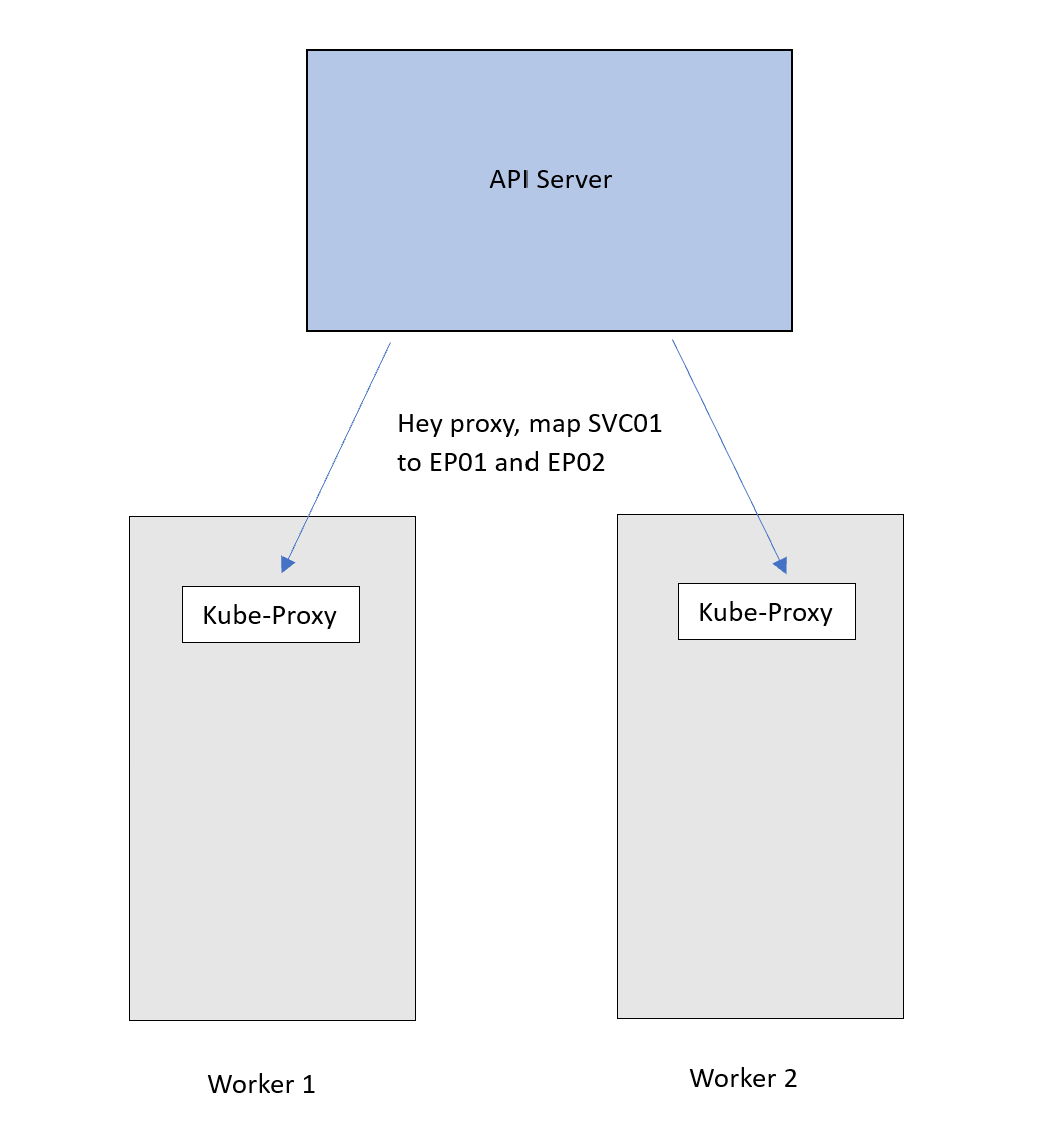

Now traffic destined for the SVC01 IP will follow this DNAT rule and get forwarded to the Pods. Remember that EP01 and EP02 are basically the IPs of the Pods.
Now, of course, we tried to keep the scenario as simple as possible. We just focused on the main roles of a Kube-Proxy. However, there are a couple of points that are worth mentioning :
- The Service and endpoint are IP and Port mappings, and not only an IP. Here is an example of IP and Port mapping, 10.10.30.21:80.
- The DNAT translation in the example happened on the source node. This is because we used a ClusterIP type of Service - an internal-only NAT rule - which can’t be routed outside the cluster. Therefore, no one outside the cluster knows about this IP.
- If another type of Service is used, other rules are installed differently inside the nodes.
Kube-Proxy modes
Kube-Proxy can operate in three different modes, user-space mode, IPtables mode, and IPVS mode. The mode determines how Kube-Proxy implements the NAT rules. Let’s see how each of them works.
User-space mode
This is a legacy mode that’s rarely used. In this mode, Kube-Proxy relies on a Linux feature called IPtables. IPtables work as an internal packet processing and filtering component. It inspects incoming and outgoing traffic to the Linux machine and applies specific rules against packets that match specific criteria.
Kube-Proxy in user-space mode makes use of this and inserts a NAT rule inside IPtables. This rule redirects traffic to a local port of the Kube-Proxy itself. Kube-Proxy listens for connections on this port and forwards them to the respective backend Pods.
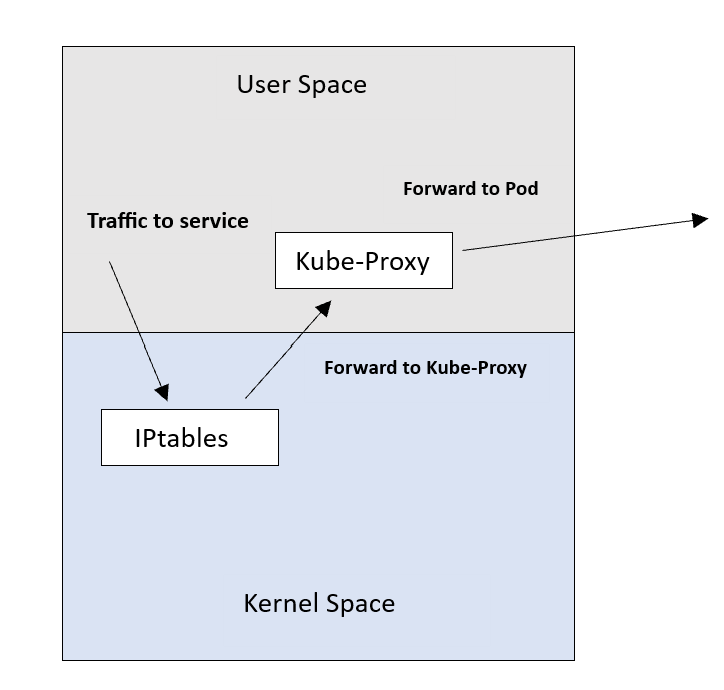
The downside of this mode is that traffic needs to be redirected twice. It gets from the kernel space back to the user space and then gets routed to the Pod. This is because Kube-Proxy is sitting in the path of the traffic. This negatively impacts the latency and throughput. That’s why this mode is unpopular.
IPtables mode
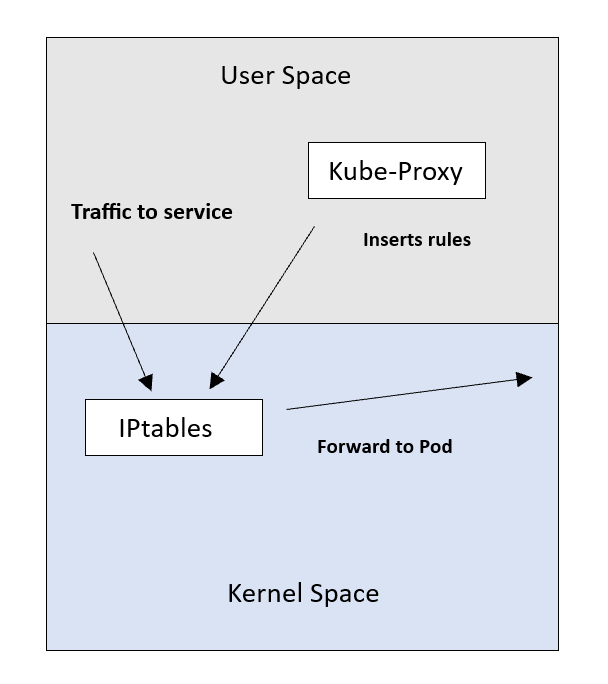
This is the default and most widely used mode today. It also relies on the IPtables feature to insert rules into the nodes. However, it works differently from the user-space mode.
Instead of inserting a rule to forward connections to Kube-Proxy itself, this mode inserts the Service-to-Pod rules directly into the IPtables. By doing this, Kube-Proxy frees itself from getting in the way of the traffic. This saves the extra latency associated with the user-space mode.
This changes the Kube-Proxy role from being an actual proxy to being only the “installer” of rules.
The downside of this mode is that IPtables uses a sequential approach when performing a table lookup. So it goes through each rule in the table until it finds a match and applies it.
This sequential algorithm is not suitable when the number of rules increases. In our scenario, this will be the number of Services and endpoints. Taking this at a low level, the algorithm will follow O(n) performance. This means that the number of lookups increases linearly as the rules increase.
Another downside is that IPtables don’t support load-balancing algorithms. As mentioned in our first example, they use a random equal-cost distribution method.
IPVS mode
IPVS is a Linux feature designed specifically for load balancing, making it a perfect choice for Kube-Proxy. In this mode, Kube-Proxy inserts rules into IPVS instead of IPtables.
IPVS has an optimized lookup algorithm with a complexity of O(1). This means that it provides almost consistent performance regardless of how many rules are inserted.
In our case, this means a more efficient connection processing for Services and endpoints.
IPVS also supports load-balancing algorithms such as round robin, least connections, and other hashing approaches.
IPVS might not be present in all Linux systems today despite its advantages. In contrast, IPtables are a core feature of almost every Linux operating system.
Also, if you don’t have that many Services, IPtables should work perfectly.
How to Check Kube-Proxy Mode
By default, Kube-proxy runs on port 10249 and exposes a set of endpoints that you can use to query Kube-proxy for information.
You can use the /proxyMode endpoint to check the kube-proxy mode.
First, connect to one of the nodes in the cluster through SSH. If you are using minikube, you can connect to the node by running the minikube ssh -n minikube command.
Once connected, run the command:
curl -v localhost:10249/proxyModeRunning the command gives the following output:
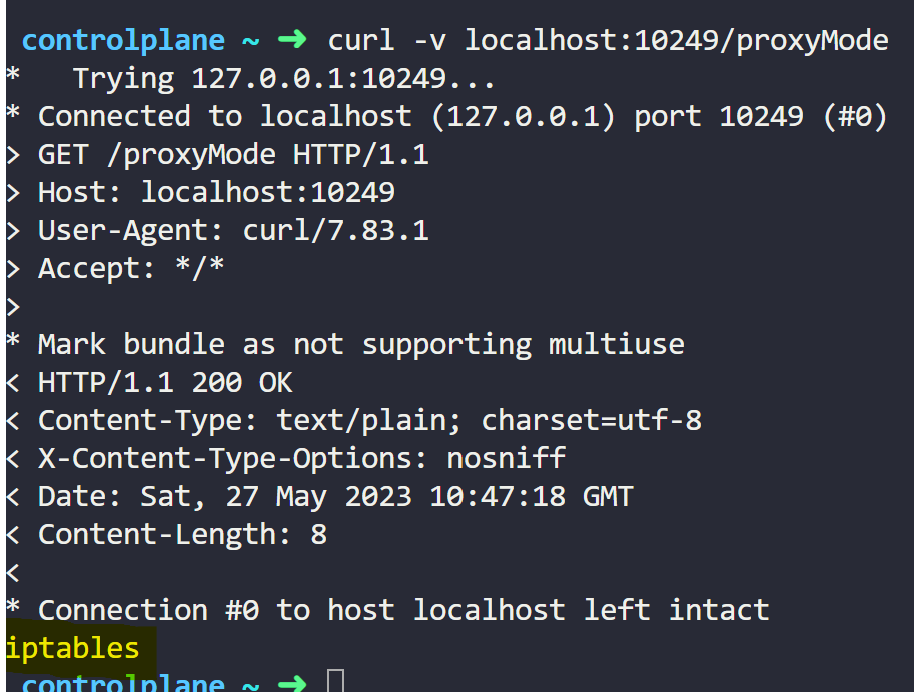
Here, you can see that Kube-Proxy is in IPtables mode.
Explore Kubernetes, containerization, and cloud-native strategies with our Kubestronaut Learning Path:

How to Check IPtables Rules for a ClusterIP Service
Let’s now take a closer look at IPtables rules. We’ll do that by creating a ClusterIP Service and checking the rules created.
Prerequisites:
- A working Kubernetes cluster (single or multi-node)
- Have a code editor installed.
- Have kubectl installed and configured to connect to the cluster
- SSH enabled to one of the nodes where we’ll check the rules
Step 1: Creating a Redis deployment
First, we’ll create a Redis deployment with two replicas. Open your code editor, create a directory, and inside that directory, create a file named redis.yaml
Then, copy and paste the following content into the redis.yaml
apiVersion: apps/v1
kind: Deployment
metadata:
name: redis
labels:
app: redis
spec:
replicas: 2
selector:
matchLabels:
app: redis
template:
metadata:
labels:
app: redis
spec:
containers:
- name: redis
image: redis
ports:
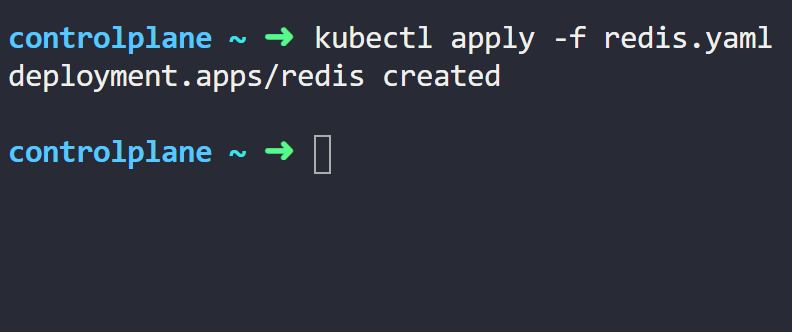
- containerPort: 6379Now, let’s deploy it to the cluster with the following command:
kubectl apply -f redis.yamlExecuting this command gives us an output similar to this:
Now let’s check the Pods created with the following command:
kubectl get pods -o wideExecuting this command gives us an output similar to this:
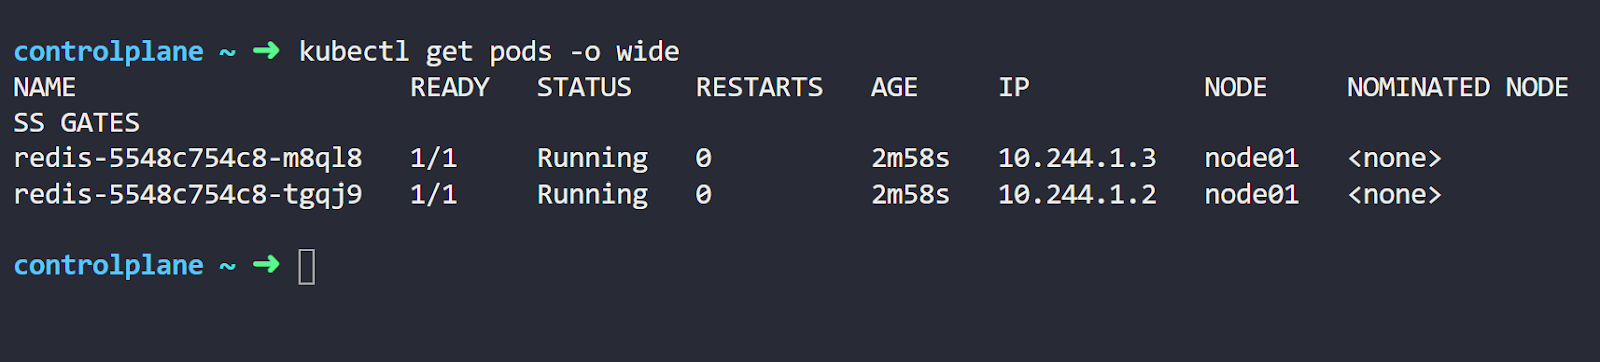
You can see we have two running Pods with different IP addresses.
Let’s create a Service that is attached to these Pods. Create a file named redis-service.yaml and paste the following code into it.
apiVersion: v1
kind: Service
metadata:
name: redis
spec:
ports:
- protocol: TCP
targetPort: 6379
port: 6379
selector:
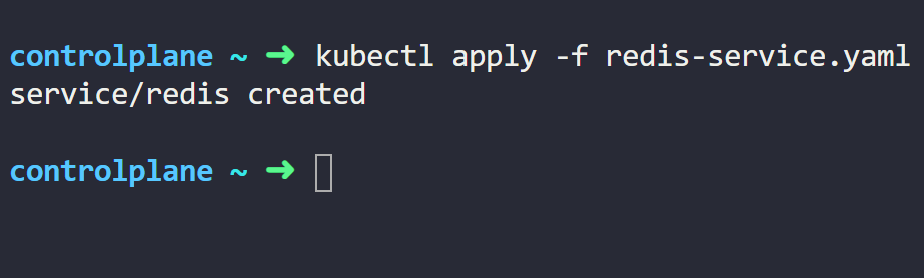
app: redisNote that the service has a selector that matches the Pods labels. Let’s deploy it by executing the following command:
kubectl apply -f redis-service.yamlRunning the command will give an output similar to this:
Let us now see the list of available services. We do that by running the following command:
kubectl get svcFrom the output below, we can see our redis Service with its IP address.
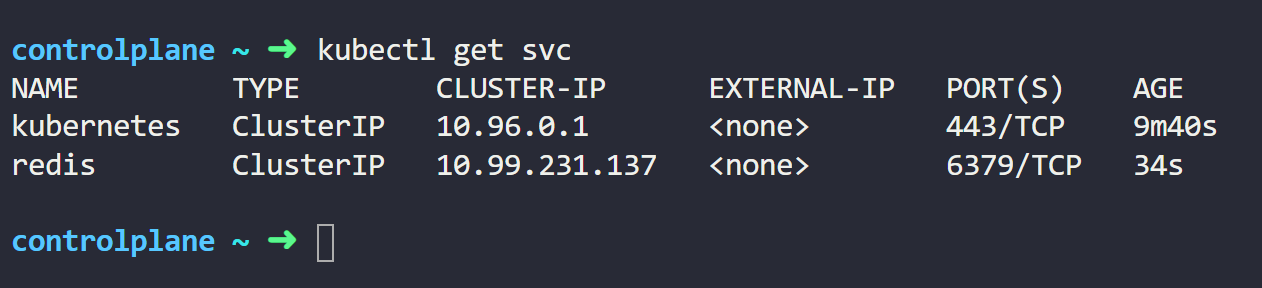
Since we didn’t specify the service type in the YAML manifest, the default type, ClusterIP, has been assigned.
Now, let’s check the endpoints available using the following command:
kubectl get epRunning this command will give an output similar to this:
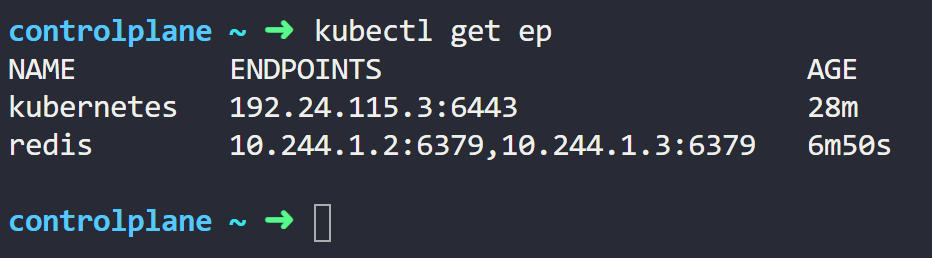
You’ll notice that our Service has 2 endpoints that represent the IP addresses of the Pods.
Let us now explore the magic under the hood.
We’ll list the IPtables rules on one of the nodes.
Note: You need to SSH into the node first to run the following commands.
iptables -t nat -L PREROUTINGRunning this command will give an output similar to this:
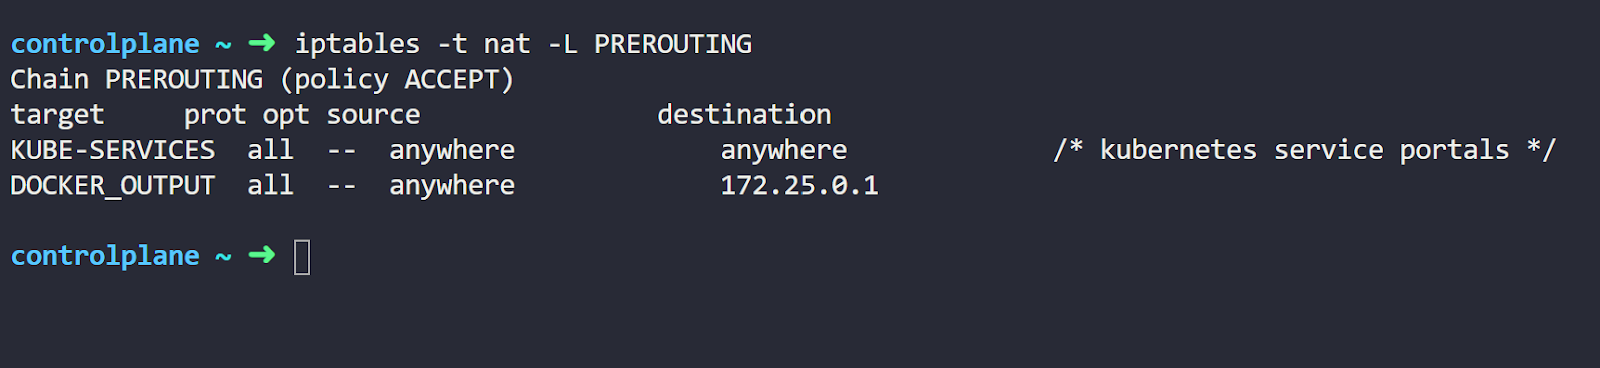
We’ll not dive into all the details of IPtables here. We’ll try to highlight only the important information for our scenario.
Let’s explain our command options first. The “-t nat” refers to the type of table we want to list. IPtables include multiple table types; Kube-Proxy uses the NAT table mainly for translating Service IPs.
The “-L PREROUTING” here refers to the name of the chain in the table. A chain is a group of rules that are applied to packets. The PREROUTING is a chain that exists by default in the IPtables. Kube-Proxy hooks its rules into that chain.
Here, we want to list the nat rules inside the PREROUTING chain. Now, let’s move to the command output. The most important part of the output here is the KUBE-SERVICES line. This is a custom chain created by Kube-Proxy for the Services.
So, this rule directs packets going through the PREROUTING chain to the KUBE-SERVICES chain.
Let’s check what’s inside this KUBE-SERVICES with the following command:
iptables -t nat -L KUBE-SERVICESRunning this command will give an output similar to this:
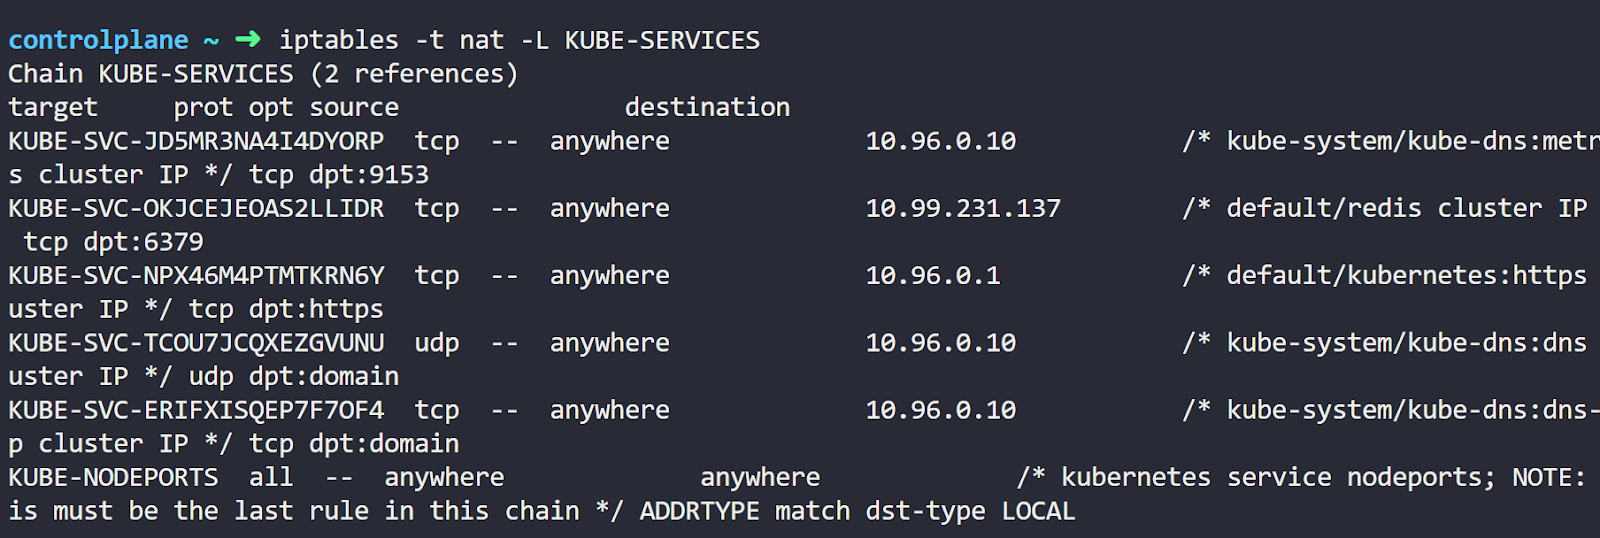
Now, what’s this cryptography here? Well, these are a couple more chains.
The IP addresses matter to us here. You’ll notice a specific chain created with a rule for the service's destination IP. This means that traffic destined for the service will enter that chain.
You can also see some information to the right of the IP address. These represent the Namespace, Service name, Service type, and port.
All of this ensures that we’re looking at the correct section of IPtables. Now, let’s get into this chain by running the command:
iptables -t nat -L <CHAIN-NAME>Executing this command gives us this output:
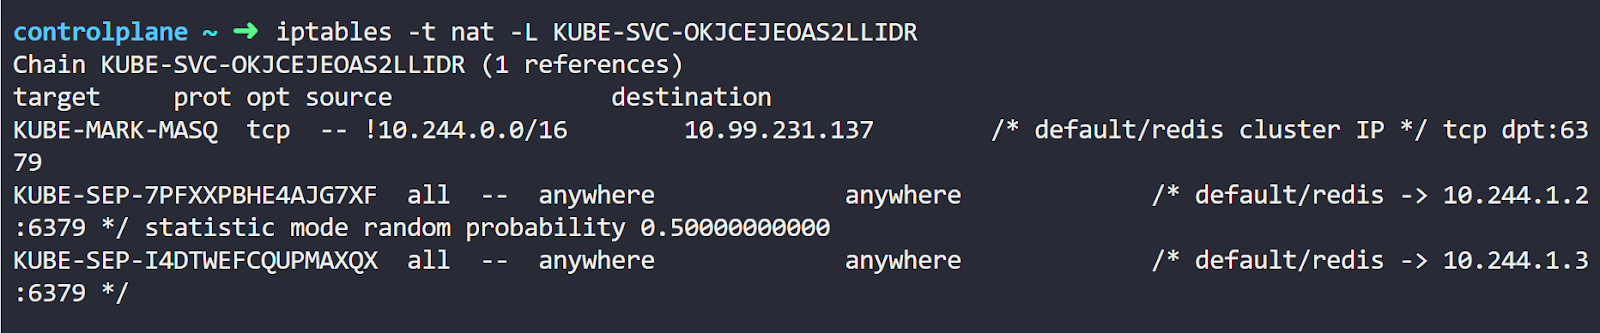
Finally, we’ve arrived at our NAT rules. You’ll find 2 additional chains created. Each starts with KUBE-SEP and then a random id. These correspond to the Service endpoints (SEP). You can see the IP address of each Pod listed for each chain.
Notice this statistic mode random probability line in the middle? This is the random load balancing rule that the IPtables make between the Pods.
Going into any of these KUBE-SEP chains, we can see it’s basically a DNAT rule.

So that’s it. We’ve seen the IPtables rules for the Service. You can now start exploring more of these rules in your environment.
Want to master container orchestration? Check out our Kubernetes Learning path:

Conclusion
In sum, we’ve seen that Kube-Proxy is a Kubernetes agent responsible for translating Service definitions into networking rules. It runs on every node in the cluster and communicates with the API server to receive updates. The Kube-Proxy inside the node populates these updates.
By creating these rules, Kube-Proxy allows traffic sent to a Service to be forwarded to the correct Pods. This enables the decoupling of Pod IP from clients connecting to it.
More on Kubernetes:
- How to Fix ImagePullBackOff & ErrImagePull in Kubernetes
- How to Collect Kubernetes Events and Extract Values
- How to Use Kubectl Scale on Deployment
- How to Restart a Pod in Kubernetes
- How to Copy File From Pod to Local (With Examples)
- How to Use Kubectl Delete Deployment (With Examples)
- How to Create a Custom Namespace
- Optimizing Kubernetes Clusters for Cost & Performance: Part 1 - Resource Requests
FAQs
Q1: Is a Kubernetes Service a Proxy?
Yes, a Kubernetes Service works a lot like a proxy.
It provides a stable IP that clients can connect to. Traffic received on this IP is redirected to a backend Pod IP. This overcomes the problem of Pods’ IPs being changed each time a Pod is recreated.
Q2: Can Kube-Proxy perform load balancing?
It depends on which part of Kube-Proxy.
The answer is no if we’re talking about the Kube-Proxy agent itself. The Kube-Proxy agent doesn’t receive the actual traffic or perform load balancing. It is only part of the control plane that creates the Service rules.
The answer is yes if we’re talking about the rules that Kube-Proxy creates. Kube-Proxy creates Service rules that load-balance traffic across multiple Pods.
Q3: Is a Kubernetes Service a proxy?
Conceptually yes. A Service provides a stable IP and forwards traffic to Pods, similar to a proxy.
Q4: Does kube proxy perform load balancing?
kube-proxy itself does not handle traffic. The load balancing is performed by IPtables or IPVS rules it installs.
Q5: What is the difference between iptables vs ipvs?
IPtables uses sequential rule matching, while IPVS uses constant-time lookups and supports advanced algorithms.


Discussion