What is a Helm Chart? An Absolute Beginners' Guide - with Examples
Managing Kubernetes deployments can be a challenging task for developers. Manually undertaking tasks such as managing application updates, rollbacks, dependencies, and configurations is time-consuming and error-prone. This is the challenge that a Helm chart solves.
In this blog, we will cover what Helm is, the role of Helm charts, and its main components.
What is a Helm?
Helm is a powerful tool that allows developers to package and deploy their applications quickly and easily. It also provides a standardized way of managing dependencies and configurations.
Helm is rather easy to use as a command-line tool. You just tell it to install this, uninstall that, upgrade something, roll back to a previous state, and so on, and it proceeds to do all the heavy lifting behind the scenes. It’s an automation tool where we, the human operators, specify our desired end result, the destination.
With Helm, it doesn’t matter if 5, 10, 20, or 50 actions are necessary to achieve that end result; it will go through all the required steps without bothering us with the details. Helm does its job with the help of charts.
What are Helm Charts?
Charts are like Helm's instruction manual. They provide a way to define, install, and upgrade complex applications consistently and repeatedly. With Helm charts, you can easily manage dependencies, release versions, and configure your application using YAML files.
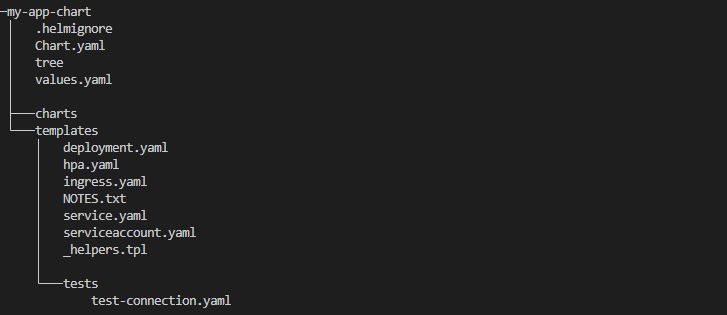
For example, in the values.yaml file, we’ll find parameters to pass to the chart so that everything gets installed with the configuration options set as we desire. In Chart.yaml we’ll find info about the chart itself, like version numbers for the components we used, dependencies, emails of the maintainers, a description of what the chart does, and so on.
How to Create a Helm Chart
We create a Helm chart using the command helm create. For instance, to create a chart for an app named my-app-chart, we use this command:
helm create my-app-chartThe helm chart created has the following structure:

Helm Chart Dependencies
Helm Chart dependencies are other Helm charts that a main chart relies on to function properly. These dependencies are stored in the charts directory (see the helm chart structure above) and will be installed by Helm along with the main chart. By using dependencies, Helm charts can be easily composed and reused, as individual charts can be updated and maintained independently.
For example, WordPress could depend on a MariaDB/MySQL chart. In such a case, WordPress can be deployed as part of the parent chart and MariaDB/MySQL as a parent chart dependency. This way, a database server can be available before your other chart components are installed.
This nesting of charts in charts makes our life a lot easier. Without it, we would have to first install the database chart, then maybe some other charts, one by one, until, finally, we could install our main app. In practice, for something like WordPress, we would have to enter these three commands:
helm install some_database_server ...
helm install wordpress_with_http_server ...
helm install memcached ...
By nesting charts, we can now install everything that is needed with a single command instead of three. This also means a single command to upgrade all of these components and a single command to uninstall all of them (instead of three).
It also makes it easier to write instructions in our chart to make sure that all components interconnect so that our app package works perfectly without any extra effort on our part (after installing).

Helm Chart Templates
Another important directory in a chart's structure is the templates folder, which stores Helm Chart templates - Kubernetes manifest files describing resources to be included in the cluster.
At the end of the day, Helm does all its magic and installs an app into our cluster by deploying many different Kubernetes objects, one by one. The core information on how to do this is stored in the templates folder.
For example, for a chart to deploy a WordPress website, it would need to launch an Nginx deployment, a service, maybe a configmap, add some secrets to store passwords, etc. Helm reads files in the templates directory, passes them through its templating engine, and finally generates the object’s declaration (or manifest), the regular kind of output that you would see in a .yaml file. The kind you would add to Kubernetes with a kubectl apply -f deployment.yaml command.
Here’s an example of what files a WordPress helm chart contains in the templates folder:
controlplane ~/wordpress/templates ➜  ll
total 120
drwxr-xr-x 2 root root  4096 Jan 27 08:55 ./
drwxr-xr-x 5 root root  4096 Jan 27 08:55 ../
-rw-r--r-- 1 root root  5721 Jan 26 18:24 NOTES.txt
-rw-r--r-- 1 root root  9774 Jan 26 18:24 _helpers.tpl
-rw-r--r-- 1 root root   716 Jan 26 18:24 config-secret.yaml
-rw-r--r-- 1 root root 19749 Jan 26 18:24 deployment.yaml
-rw-r--r-- 1 root root   770 Jan 26 18:24 externaldb-secrets.yaml
-rw-r--r-- 1 root root   117 Jan 26 18:24 extra-list.yaml
-rw-r--r-- 1 root root  1276 Jan 26 18:24 hpa.yaml
-rw-r--r-- 1 root root   727 Jan 26 18:24 httpd-configmap.yaml
-rw-r--r-- 1 root root  2785 Jan 26 18:24 ingress.yaml
-rw-r--r-- 1 root root  1145 Jan 26 18:24 metrics-svc.yaml
-rw-r--r-- 1 root root  1216 Jan 26 18:24 networkpolicy-backend-ingress.yaml
-rw-r--r-- 1 root root  1300 Jan 26 18:24 networkpolicy-egress.yaml
-rw-r--r-- 1 root root  3440 Jan 26 18:24 networkpolicy-ingress.yaml
-rw-r--r-- 1 root root   883 Jan 26 18:24 pdb.yaml
-rw-r--r-- 1 root root  2007 Jan 26 18:24 postinit-configmap.yaml
-rw-r--r-- 1 root root  1251 Jan 26 18:24 pvc.yaml
-rw-r--r-- 1 root root  1098 Jan 26 18:24 secrets.yaml
-rw-r--r-- 1 root root   826 Jan 26 18:24 serviceaccount.yaml
-rw-r--r-- 1 root root  2073 Jan 26 18:24 servicemonitor.yaml
-rw-r--r-- 1 root root  2705 Jan 26 18:24 svc.yaml
-rw-r--r-- 1 root root  1649 Jan 26 18:24 tls-secrets.yaml
These filenames indicate the same Kubernetes objects we are used to launching with kubectl apply -f commands. We can see a pvc.yaml file, indicating a Persistent Volume Claim, a deployment.yaml file, indicating a Deployment, and so on. But if we open one of these files, we see they’re written in a pretty weird way. Here’s a section from a deployment.yaml file:
      containers:
        - name: wordpress
          image: {{ template "wordpress.image" . }}
          imagePullPolicy: {{ .Values.image.pullPolicy | quote }}
          {{- if .Values.command }}
          command: {{- include "common.tplvalues.render" ( dict "value" .Values.command "context" $) | nindent 12 }}
          {{- end }}
          {{- if .Values.args }}
          args: {{- include "common.tplvalues.render" ( dict "value" .Values.args "context" $) | nindent 12 }}
          {{- end }}
          {{- if .Values.containerSecurityContext.enabled }}
          securityContext: {{- omit .Values.containerSecurityContext "enabled" | toYaml | nindent 12 }}
          {{- end }}
Instead of a line like imagePullPolicy: we see the weird-looking line imagePullPolicy: {{ .Values.image.pullPolicy | quote }}. This is because Helm uses the Go templating engine by default. In this case, the line imagePullPolicy: {{ .Values.image.pullPolicy | quote }} assigns to imagePullPolicy the value that users provided in their values.yaml file.
User-Defined Preferences in values.yaml File
The values.yaml file contains the chart's default configurations. If you want to customize your chart's behavior, you adjust the values in this file. Here is a sample values.yaml file:
## @section WordPress Image parameters

## Bitnami WordPress image
## ref: https://hub.docker.com/r/bitnami/wordpress/tags/
## @param image.registry WordPress image registry
## @param image.repository WordPress image repository
## @param image.tag WordPress image tag (immutable tags are recommended)
## @param image.pullPolicy WordPress image pull policy
## @param image.pullSecrets WordPress image pull secrets
## @param image.debug Enable image debug mode
##
image:
  registry: docker.io
  repository: bitnami/wordpress
  tag: 5.7.2-debian-10-r13
  ## Specify a imagePullPolicy
  ## Defaults to 'Always' if image tag is 'latest', else set to 'IfNotPresent'
  ## ref: http://kubernetes.io/docs/user-guide/images/#pre-pulling-images
  ##
  pullPolicy: IfNotPresent
  ## Optionally specify an array of imagePullSecrets.
  ## Secrets must be manually created in the namespace.
  ## ref: https://kubernetes.io/docs/tasks/configure-pod-container/pull-image-private-registry/
  ## e.g:
  ## pullSecrets:
  ##   - myRegistryKeySecretName
  ##
  pullSecrets: []
  ## Enable debug mode
  ##
  debug: false
So, whatever value we assign to pullPolicy here gets passed along to the template file. Helm interprets everything and turns a line like imagePullPolicy: {{ .Values.image.pullPolicy | quote }} to imagePullPolicy: "Always" if the user selected Always as his preferred policy in his values.yaml file.
Instead of having fixed values here, as we do in the regular yaml files we usually deploy into Kubernetes, we have templatized values. Sounds mysterious? Let’s see what this means; it’s actually easy to understand, but the technical term is a bit cryptic.
ENROLL in our Helm for Beginners course to dive deeper into these and more Helm concepts.

Importance of Helm Templating
The team that builds WordPress can also create charts so users can easily install their software product in Kubernetes clusters. But this presents a problem. You can’t make a WordPress install with some fixed settings that would be perfect for thousands of people.
Instead, you can create a template - a sort of default install - with adjustable settings that users can easily tweak to meet their own needs.
Helm's templating language is incredibly versatile and allows us to create very intelligent templates. Besides the simple stuff like taking user-supplied values from the values.yaml file and using it in templates to customize Kubernetes objects that get created; we can even make our templates dynamically generate values themselves.
For instance, we can make the chart automatically adjust some installation parameters. We can also take user-supplied values and transform them in some way. Additionally, one can dynamically generate values based on dynamic things, like today’s date.
Check out this step-by-step guide on how to install a WordPress website using Helm: Helm Chart Tutorial: A Quick Guide to Working With Helm.

Conclusion
Helm charts provide a standardized way of packaging and deploying applications, making it easier for teams to collaborate and share their work. It allows for easy versioning and rollback, ensuring you can always return to a previous version if necessary.
Overall, using Helm charts can save you time and effort while also helping you avoid errors and ensure the stability of your applications.
Check out our Kubernetes Learning Path to better understand Kubernetes tools such as Linode, Kustomize, Lens, etc.
More on Helm:


