


Highlights
- Environment variables allow configuration without rebuilding container images.
- The
ENVdirective embeds default variables into Docker images. - Runtime variables passed with
--envoverride Dockerfile values. - The
--env-fileflag simplifies managing multiple variables. - Choosing between build-time and runtime variables depends on mutability and security.
Containerized applications can run seamlessly across various environments, including development, testing, and production. As they move from one environment to another, they often require adjusting some configurations to meet each environment's unique needs.
For example, in a development environment, enabling verbose debugging can provide developers with detailed feedback. On the other hand, in a production environment, it's often beneficial to minimize debugging verbosity to save system resources.
A common and flexible way to manage these configuration differences is through docker environment variables, which are values in the form of key-value pairs. In this blog post, we’ll explore the three methods of passing environment variables to Docker containers. Let’s dive in!
Prerequisites
To follow along with the examples in this post, you need a code editor. You also need to have Docker Desktop installed and running on your system. If you don’t have a Docker Desktop, you can download it from this link.
Pass Environment Variables Using the ENV Directive in Dockerfile
In this method, we specify the environment variable(s) in the Dockerfile using the ENV directive. Once set, these variables become accessible to all Docker containers that are initiated from the corresponding Docker image (which is built from this Dockerfile). Let's see how this works.
Try the Docker Environment Variables Lab for free

Defining a single environment variable
Start by launching your preferred code editor. Next, create a directory, and within the newly created directory, create a file named Dockerfile. Note that this Dockerfile mustn’t have an extension.
Within this Dockerfile, paste the following content:
FROM alpine
ENV MY_ENV=development
CMD [ "/bin/sh", "-c", "export"]
The Dockerfile in this example specifies the following key instructions:
ENV MY_ENV=development: This line uses theENVdirective to define an environment variable. It follows the syntaxENV <key>=<value>. Note that the equal sign between the<key>and the<value>is optional. An alternative valid syntax isENV <key> <value>, where there is a space between<key>and<value>.CMD ["/bin/sh", "-c", "export"]: ThisCMDinstruction launches a shell inside the Docker container. Subsequently, it executes theexportcommand within that shell. Thisexportcommand prints a list of all environment variables present in the container, includingMY_ENV.
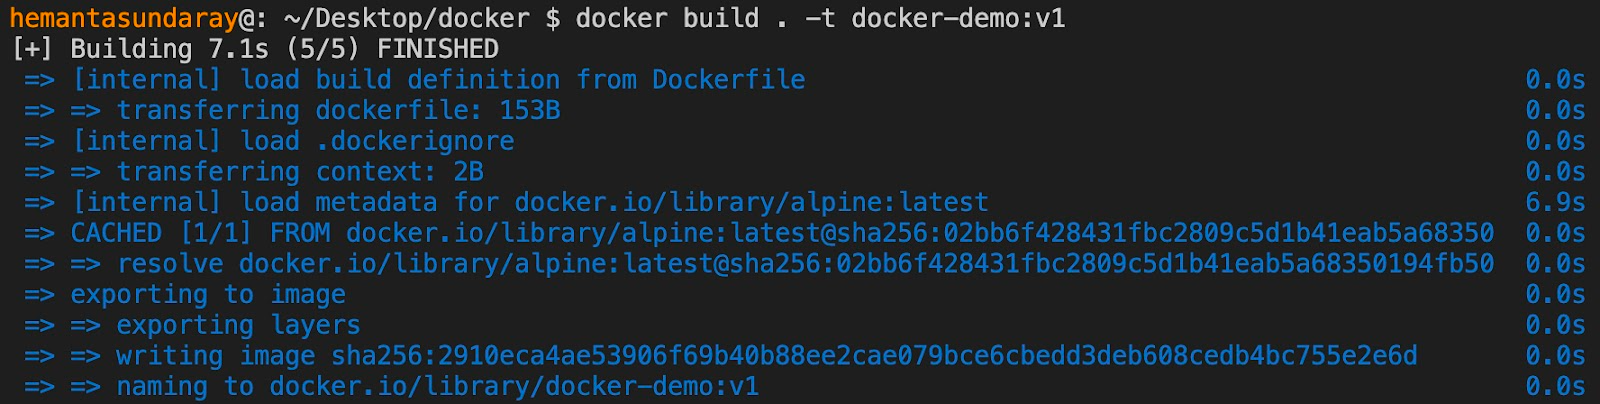
Once you have saved your Dockerfile, open a terminal and navigate to the directory containing your Dockerfile. Next, run the following command to create an image named docker-demo:v1:
docker build . -t docker-demo:v1In the above command, the dot (.) signifies that Docker should use the current directory (which contains your Dockerfile) as the build context. The -t flag is used to assign a tag to the created Docker image; in this case, it's docker-demo:v1.
After executing the command, you’ll see an output similar to this:
To ensure the docker-demo:v1 image was created successfully, list all Docker images on your system by running the following command:
docker image lsYou should see an output with a list of Docker images, including docker-demo:v1, as shown in the output below:

Next, run the docker-demo:v1 image as a container by executing the following command:
docker container run docker-demo:v1You’ll see an output similar to the following displayed in your terminal window.

As you can see, the environment variable that we defined in the Dockerfile is accessible to the running container.
Defining multiple environment variables
It’s also possible to specify multiple environment variables in a Dockerfile using individual ENV directives for each variable.
Let's introduce an additional environment variable named LOG_LEVEL. In the Dockerfile, add the following instructions:
ENV LOG_LEVEL=errorThe final Dockerfile should look like this:
FROM alpine:latest
ENV MY_ENV=development
ENV LOG_LEVEL=error
CMD [ "/bin/sh", "-c", "export" ]Note: You can also consolidate multiple environment variables in a single ENV instruction, as such: ENV MY_ENV=development LOG_LEVEL=error.
Once you've modified the Dockerfile, save it and build a new Docker image tagged as docker-demo:v2 using the following command:
docker build . -t docker-demo:v2After executing the command, you should see an output like this:

Next, confirm that the image tagged docker-demo:v2 has been created successfully by listing the Docker images on your system. Run the following command:
docker image lsExecuting the command above will display an output like this:

You should see docker-demo:v2 listed in the result.
Now, run the docker-demo:v2 image as a container by executing the following command:
docker container run docker-demo:v2Executing the command above will produce an output like this:
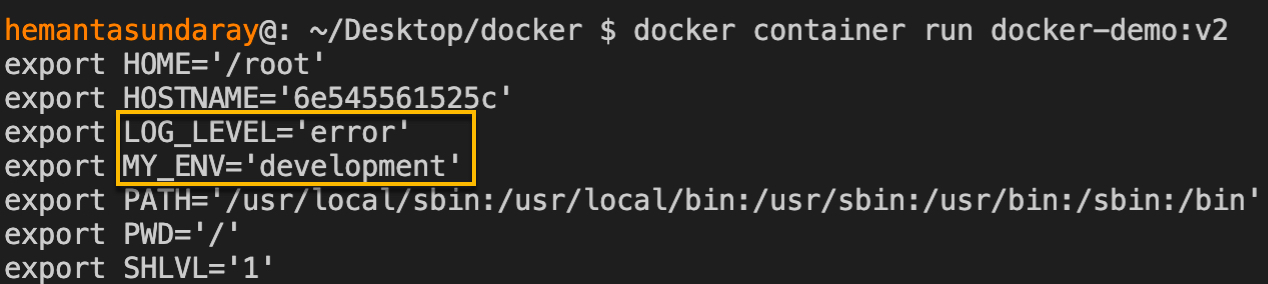
As you can see, the environment variables defined in the Dockerfile are available to the running container.
Overriding the environment variables defined in the Dockerfile
Environment variables defined within the Dockerfile can be modified at runtime. During the Docker container's initiation using the docker container run command, you can use the --env flag to assign a different value to an existing environment variable. This new value will take precedence over the one defined in the Dockerfile.
For instance, let's suppose we want to change the MY_ENV variable from development to production. This can be achieved with the following command:
docker container run --env MY_ENV=production docker-demo:v2 Executing the command above will produce an output like this:

As you can see, the value of the MY_ENV variable has been overridden to production.
Furthermore, we can modify multiple environment variables at the same time. Suppose we want to change MY_ENV to testing and LOG_LEVEL to debug. We can accomplish this by using the command:
docker container run --env MY_ENV=testing --env LOG_LEVEL=debug docker-demo:v2.Executing the command above will show an output like this:

As you can see, the values of both MY_ENV and LOG_LEVEL have been changed to testing and debug, respectively.
Pass Environment Variables Using the --env flag
We can not only define environment variables in the Dockerfile and make them available to a container but also pass them directly to a container during its initialization using the --env flag.
Let's demonstrate this process by starting a container in interactive mode, using the alpine image, and passing the MY_ENV environment variable. Run the following command:
docker container run -it --env MY_ENV=development alpine /bin/shI have used backslash (\) to enhance readability by distributing the command across multiple lines. If you prefer, you can choose to omit the backslashes and run the command in a single line. Here’s the above command in a single line:
docker container run -it --env MY_ENV=development alpine /bin/shOnce the command executes, you’ll see the shell prompt as shown below:

Then, at the shell prompt, run the following command to list all the environment variables available to the container:
export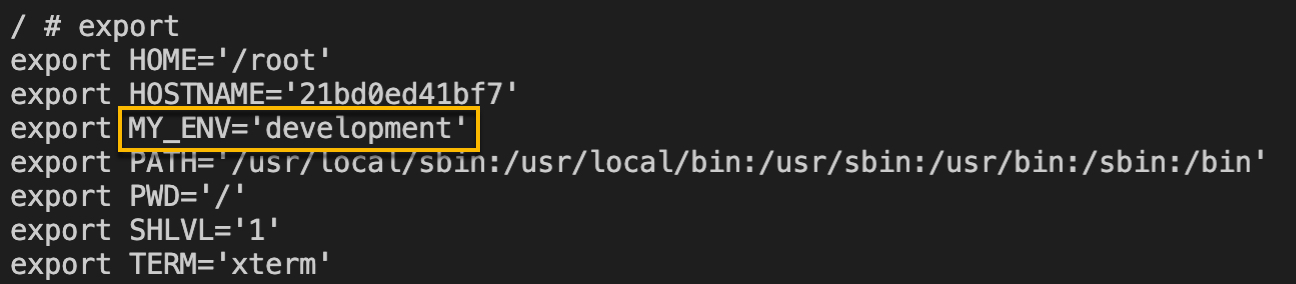
As you can see, the MY_ENV environment variable is present and is accessible within the running container.
Before we proceed, press ctrl+d to exit the container shell and return to your local terminal.
We can also pass multiple environment variables using multiple --env flags. Let’s pass two environment variables - MY_ENV and LOG_LEVEL - by running the following command:
docker container run -it \
--env MY_ENV=development \
--env LOG_LEVEL=error \
alpine /bin/sh
Note that you can also run this command in a single line, as shown below:
docker container run -it --env MY_ENV=development --env LOG_LEVEL=error alpine /bin/sh After running the command, you’ll find yourself at the shell prompt. At the prompt, run the export command to list the environment variables available to the container. You’ll see an output like this:
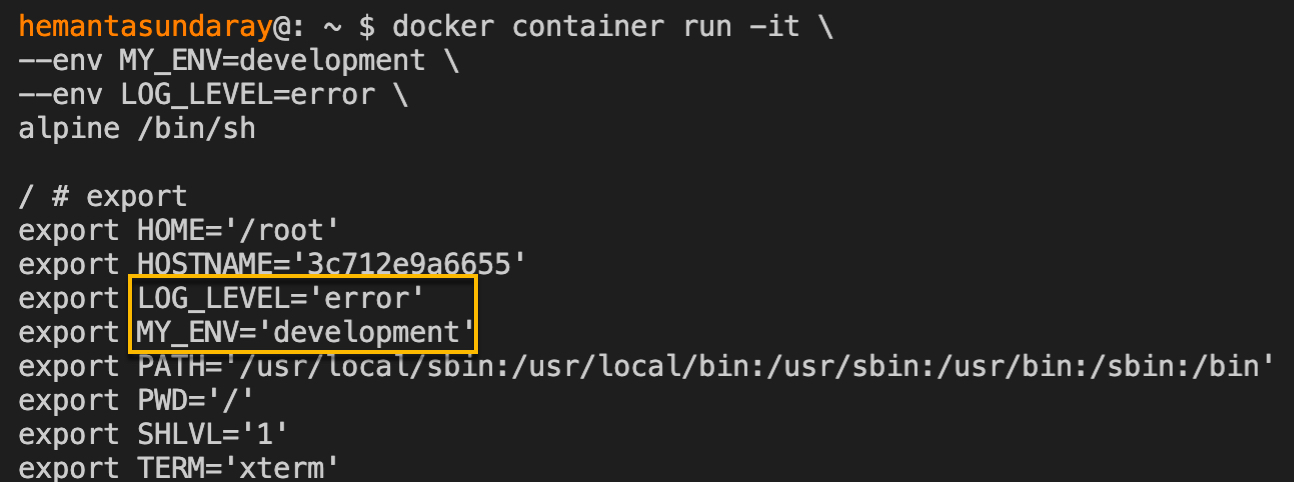
As you can see, both MY_ENV and LOG_LEVEL environment variables are accessible to the container during its runtime.
Before we proceed to the next section, press ctrl+d to exit the container shell and return to your local terminal.
Pass Environment Variables Using the --env–file flag
Complex applications can require a large number of environment variables. Passing these environment variables using individual --env flags can be cumbersome.
For such scenarios, Docker provides the --env-file flag to simplify the process. You create a file containing all the required environment variables and then pass that file using the --env-file flag. This allows the container to access the environment variables defined in the file. Let's see how this works.
First, run the following command to create a directory named config, navigate into it and then create a file named app.config within it. You can choose any name for the directory and the file. Also, note that the .config extension is not mandatory; it could even be .text.
mkdir config && cd config && touch app.configNext, change to the config directory and run the ls command to confirm that the app. config file has been successfully created.

If the file was created, you should see app.config listed, as shown above.
Now that we have the file created, the next step is to define the environment variables inside it. Use the following command to write three pairs of environment variables to the app.config file:
echo MY_ENV=development >> app.config && echo LOG_LEVEL=error >> app.config && echo DEBUG=true >> app.configIn this command, the redirection operator (>>) takes the input from the command to its left and appends it to the app.config file.
After running the command above, run the following command to confirm that the three environment variables have indeed been written to the app.config file:
cat app.config
If the variables were written successfully, you’ll see them listed in the output, as shown above.
Note: The steps above can also be carried out in a code editor. Simply follow the instructions below:
- Launch your code editor.
- Create a new folder named
config. - Inside the "config" folder, create a new file named
app.config. - Paste the three pairs of environment variables -
MY_ENV=development,LOG_LEVEL=error, andDEBUG=true- into theapp.configfile.
Next, let’s pass this file to a container using the --env-file flag. Ensure that your terminal is in the config directory, which contains the app.config file. Then, run the following command:
docker container run -it --env-file ./app.config alpine /bin/shNote that you can also run this command in a single line, as shown below:
docker container run -it --env-file ./app.config alpine /bin/sh In this command, we pass the relative path of the app.config file to the --env-file flag.
After running the command above, you will see the shell prompt. At the prompt, run the export command to list the environment variables available to the container. You should see an output like this:
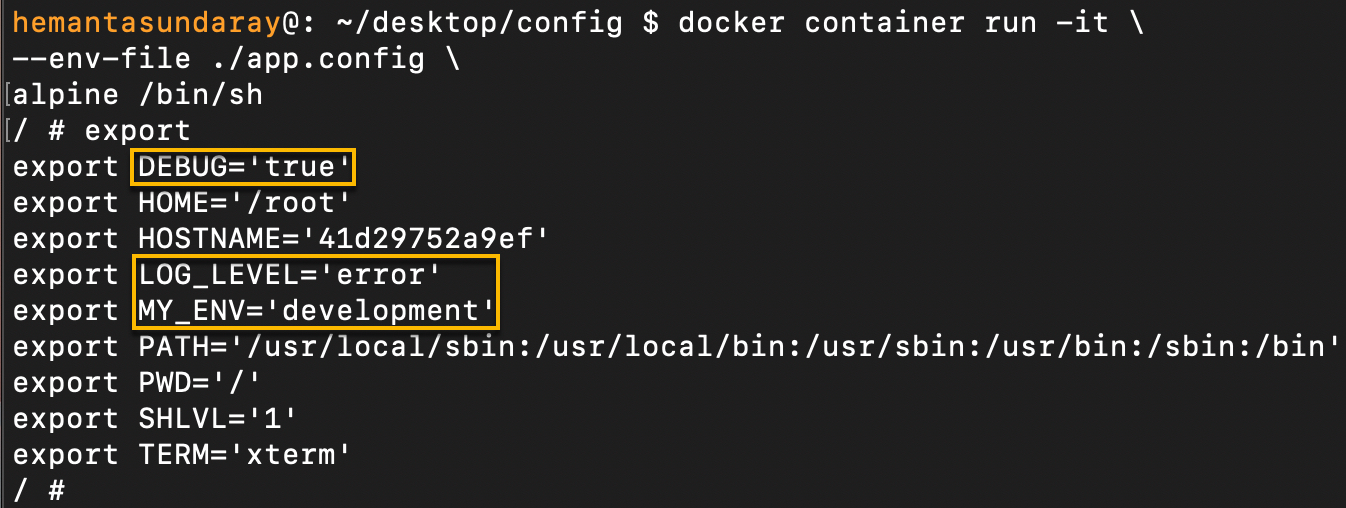
As you can see, all three environment variables are accessible to the container.
By going through the steps outlined in the three sections of this blog post, you should now have a clear understanding of how to pass environment variables to containers. However, an important question remains: should you define environment variables within the Dockerfile or pass them during a container's initialization?
Each approach has its pros and cons. As a rule of thumb, if an environment variable remains constant across all environments, it's best to include it in the Dockerfile via the ENV directive. On the other hand, if an environment variable varies depending on the environment or, for security purposes, it shouldn't be embedded in the image, it’s wise to supply it during the container's startup.
Enroll on our Docker Learning path to master containerization:

Conclusion
In this blog post, we explored three key methods for passing environment variables to Docker containers. First, we learned how to define environment variables using the ENV directive in a Dockerfile. Next, we learned how to pass environment variables during a container’s initialization process using the --env and --env-file flags.
Understanding how to work with docker environment variables is essential for building portable, configurable, and environment-aware containerized applications.
More on Docker:
- How to Keep Docker Container Running
- How to Clear Docker Logs for a Container
- How to Build a Docker Image With Dockerfile From Scratch
- How to Pass Environment Variables to Docker Containers
- How to Use Docker CP Command With Examples
- How to Tag a Docker Image
- How to Create Docker Image From a Container
- How to Remove Unused and Dangling Docker Images
FAQs
Q1: What are docker environment variables used for?
They provide configuration values to containers without changing application code.
Q2: Do runtime variables override Dockerfile variables?
Yes. Variables passed with --env or --env-file take precedence.
Q3: When should ENV be used in a Dockerfile?
Use it for default values that are consistent across environments.
Q4: Is --env-file better than multiple --env flags?
Yes, for managing many variables or keeping configuration files organized.
Q5: Are environment variables secure?
They should not be used for sensitive secrets unless combined with proper security controls.
Q6: Can docker-compose env variables be handled the same way?
Yes. Docker Compose supports both inline variables and .env files.


Discussion