


Helm chart is used to install, define, and upgrade Kubernetes applications. With Helm, it's easy to manage and install Kubernetes applications without manual creation and configuration of Kubernetes resources. One of Helm’s most important features is the chart hooks.
In this article, we’ll look at what a chart hook is, how to write it, and how to manage the resources it creates.
What is Helm Chart Hook?
A Helm chart hook is a nifty way of executing a script or command at a specific point during the lifecycle of a Kubernetes object created from a Helm chart. You can find hooks defined in a Helm chart's templates/hooks directory, and they can be used to perform a variety of tasks, such as initializing a database, running tests, or updating a configuration file.
Imagine we have a Helm chart for WordPress installed. Our WordPress website would use the Apache web server and the MySQL or MariaDB database server behind the scenes, plus the WordPress files themselves, that hold the code for our website. It’s a fairly complex structure, where all of the pieces need to fit together to ensure the website works smoothly.
Most upgrades should go smoothly, but it’s not a guarantee. After running a helm upgrade, we might notice our website mysteriously stops working. But Helm, being so good at automation, provides us with yet another tool that we can use. With a chart hook, Helm can automatically take some actions at certain points.
For example, in this case, we could use a chart hook to make Helm automatically back up the WordPress database before the helm upgrade starts doing its thing. Now, if anything goes wrong, we have an easy way to restore it.
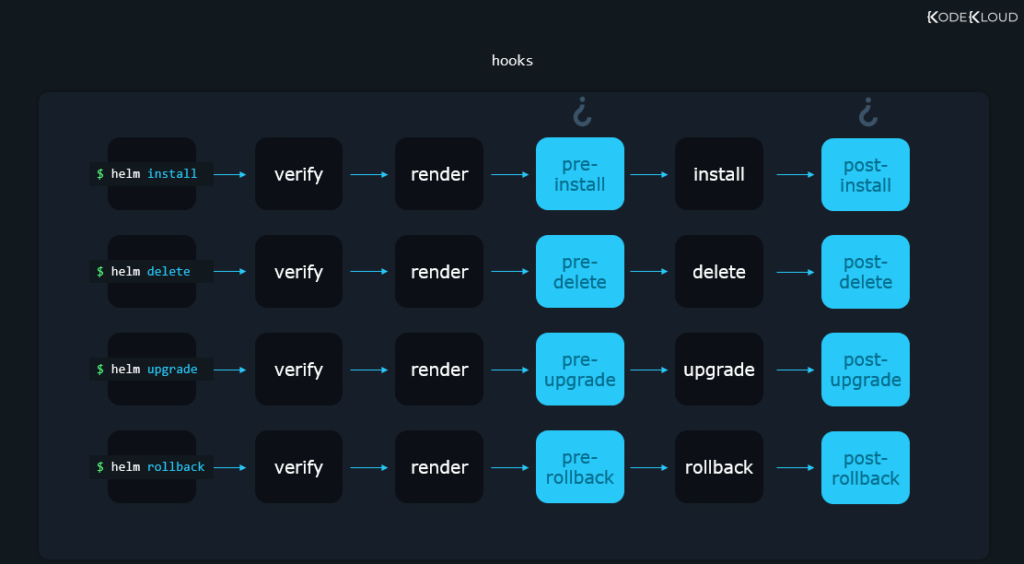
We can define Helm hooks that will be executed at these points in the release’s lifecycle:
- pre-install – Before the release is installed.
- post-install – After the release is installed
- pre-delete – Before the release is uninstalled.
- post-delete – After the release is uninstalled.
- pre-upgrade – Before the release is upgraded.
- post-upgrade – After the release is upgraded.
- pre-rollback – Before the release is rolled back to a previous version.
- post-rollback – After the release is rolled back to a previous version.
As an example, when a pre-install hook is used, something along these lines happens:
- A user enters a command such as `helm install my-website ./nginx`
- Helm starts rendering the template files, BUT
- The final manifests are NOT yet sent to Kubernetes
- Instead, the pre-install hook gets executed with the actions defined in the chart. For example, a pre-install hook might simply create a Kubernetes object. It could be an object of the type Job that executes some kind of action in Kubernetes. Or it could be a simple container that does something.
- After the pre-install hook has been executed, our chart finally gets installed, meaning that whatever Helm has rendered, at this point, it sends the manifests to Kubernetes, and our objects get installed.
With a post-install hook, it’s easy to imagine that the only thing that changes is that the hook gets executed AFTER the chart installs all of its rendered objects into Kubernetes.
It’s easy to imagine that the story is similar when using a pre/post-upgrade hook or a pre/post-rollback one. The hook gets executed before the command does its normal operations, or after. When we would use one or the other depends on what we are trying to achieve. For example, we might use a pre-upgrade hook to back up a database and a post-upgrade hook to perform some checks that our website still works after the upgrade.
It’s worth mentioning that Helm will wait until the hook finishes its execution. Also, if something like a pre/post-install hook fails, the entire operation fails. Which, in this case, would mean that the installation of the release fails entirely (or, more precisely, it is abandoned since the hook failed).
How to Write a Chart Hook
Hooks are pretty much regular template files that we can add to the templates/ directory as we did up until now throughout our exercises. What makes them special is the annotation we add to the metadata: section. Here’s an example of such an annotation:
apiVersion: batch/v1
kind: Job
metadata:
  name: {{ .Release.Name }}-nginx
  labels:
    {{- include "nginx.labels" . | indent 4 }}
  annotations:
    "helm.sh/hook": post-install
    "helm.sh/hook-weight": "-5"
    "helm.sh/hook-delete-policy": hook-succeeded
spec:
  template:
    metadata:
      name: {{ .Release.Name }}-nginx
      labels:
        {{- include "nginx.labels" . | indent 8 }}
    spec:
      restartPolicy: Never
      containers:
      - name: post-install-job
        image: "some-image:3.3"
        command: ["/bin/some-special-backup-command"]
This simply defines a post-install hook that would create a Kubernetes Job to do something in our cluster after the helm install command succeeds.
To use this in our chart, we’d create a file with a command like nano ~/nginx/templates/do-something-post-install.yaml and paste the contents above to it. But we won’t be doing that as it wouldn’t generate any interesting practical results in our scenario. Instead, let’s study how to use the annotations section, the line:
"helm.sh/hook": post-installThis defines what kind of hook this is: post-install, pre-install, post-rollback, etc.
Making Hooks Run in a Certain Order
We can have multiple hooks in a chart. Even multiple hooks of the same type. For example, we could have a pre-upgrade hook to backup our database, and another pre-upgrade hook to also backup our files. In this case, the order in which the hooks get executed doesn't really matter.
But imagine we have a hook that archives some files and another hook uploads them to some cloud service that stores backups reliably. In this case, it’s important that hooks run in a specific order. First, the files should be archived, and only afterward can they be uploaded by the other hook. So, how can we ensure they’re executed in this order? With hook weights.
"helm.sh/hook-weight": "-5"Weights are numbers that can be both negative or positive and should be written as strings (ensure you have quotes" " around the number ). If we have three hooks, with the weights “-5”, “0” and “7”, first the “-5” one would be executed, then “0” and finally “7.” It’s pretty straightforward how these work.
Delete Resources Created by Hooks
When you install a chart, Helm tracks what objects your template files added to Kubernetes. When you uninstall the chart, Helm automatically removes those objects. But in the case of hooks, Helm doesn’t track this. So if a post-install hook creates a pod that did something, that pod will still be left around after the chart finishes installing - even when you later remove the chart completely. To automatically delete these resources, we can make use of the delete policy annotation.
In our example, we used the line:
"helm.sh/hook-delete-policy": hook-succeededThis would make Helm delete the resources created by the hook if and only if the hook succeeded. Of course, this means that if the hook fails, resources won’t be deleted. This might actually be useful as maybe we’d want to debug such a failure, so it’s advantageous that we still have the resources around.
The delete policy supports the following values:
- before-hook-creation – This is the default behavior. The resource is deleted when the hook executes. The first time this runs, there won’t be a resource that needs to be deleted, so it doesn’t matter. But, say, a post-upgrade hook creates a Kubernetes object. The next time we upgrade, the post-upgrade hook will delete the old Kubernetes object that was left hanging around after the last upgrade. After it deletes the old object, the new object is created, and this, too, is left hanging around until the next upgrade command is run. This also helps avoid situations where the hook would try to create a duplicate object with the same name, and Kubernetes might complain that “Object/Resource X already exists.”
- hook-succeeded – Delete the resource if the hook is executed successfully.
- hook-failed – Delete the resource if the hook failed.
It’s also possible to use multiple deletion policies. We just enumerate them on the same line and separate the values with commas , . Here is an example:
"helm.sh/hook-delete-policy": before-hook-creation,hook-succeeded,hook-failed
Such a policy would delete the resources created by the hook every time after it finishes executing.
Enroll in our Helm for the Absolute Beginners course to learn more Helm concepts.


Conclusions
Hooks allow you to run a set of predefined commands before or after certain actions are taken during the Helm chart lifecycle. Mastering them helps you easily perform operations such as creating or modifying Kubernetes resources, running database migrations, or sending notifications.
More on Helm:
- Helm Flow Control with Conditional Control Structures
- What are Template Function and Pipeline in Helm?
- Writing a Helm Chart: A Comprehensive Guide for Beginners
- Helm Chart Tutorial: A Quick Guide to Working With Helm
- Helm Components (Charts, Release, Repositories, & More)
- What is Helm in Kubernetes? (Role & Benefits Explained)


Discussion