


In the previous blog of this 10-part series, we discussed Core Concepts. This blog deep dives into the processes and explores every aspect, from manual scheduling to the role of resource requirements in cluster scheduling.
Here are the eight other blogs in the series:
- Certified Kubernetes Administrator Exam Series (Part-3): Logging & Monitoring
- Certified Kubernetes Administrator Exam Series (Part-4): Application Lifecycle Management
- Certified Kubernetes Administrator Exam Series (Part-5): Cluster Maintenance
- Certified Kubernetes Administrator Exam Series (Part-6): Security
- Certified Kubernetes Administrator Exam Series (Part-7): Storage
- Certified Kubernetes Administrator Exam Series (Part-8): Networking
- Certified Kubernetes Administrator Exam Series (Part-9): Troubleshooting
- Certified Kubernetes Administrator Exam Series (Part-10): Practice Topics
Introduction
In Kubernetes clusters, Schedulers are the control plane elements that ensure pods are assigned to the right nodes where they will run on the Kubelet service. The Scheduler process monitors newly created pods and allocates them to nodes based on specific scheduling requirements. Scheduling was introduced in the previous section by creating a scheduler service.
Manual Scheduling
Every pod has a property called nodeName that is typically unfilled when creating the YAML configuration file. Kubernetes automatically adds this when assigning the Pod to a node. The scheduler process inspects all Pod configuration files to check for this property.
Pods in which the nodeName property is unassigned, and they are the right candidates for scheduling. The scheduler will run an algorithm to determine the most appropriate node based on resource requirements. Once the right node has been identified, the scheduler updates the nodeName tag, creating a binding object.
If there are no schedulers in a cluster, Pods will be constantly in PENDING state. In this case, you can schedule a Pod by setting the nodeName property in the manifest file. This can only be done during Pod creation since Kubernetes does not allow the modification of the nodeName property while a Pod is already running.
For a running pod, nodes can be assigned by creating a binding object and then sending a POST request to the Pod's binding API. The binding object mimics a scheduler since you specify a nodeName of the target node:
apiVersion: v1
kind: Binding
metadata:
  name: nginx1
target:
  apiVersion: v1
  kind: Node
  name: node01
The POST request’s data should be set to the binding object in JSON format:
kubectl run nginx --image=nginx
# Check all possible clusters, as you .KUBECONFIG may have multiple contexts:

kubectl config view -o jsonpath='{"Cluster name\tServer\n"}{range .clusters[*]}{.name}{"\t"}{.cluster.server}{"\n"}{end}'

# Select name of cluster you want to interact with from above output:

export CLUSTER_NAME="some_server_name"

# Point to the API server referring the cluster name

export APISERVER="https://master-ip:6443"

# Gets the token value:

TOKEN=$(kubectl get secrets -o jsonpath="{.items[?(@.metadata.annotations['kubernetes\.io/service-account\.name']=='default')].data.token}"|base64 --decode)

#Send the post request
curl -H "Content-Type:application/json" --request POST --data '{
  "apiVersion": "v1",
  "kind": "Binding",
  "metadata": {
    "name": "nginx"
  },
  "target": {
    "apiVersion": "v1",
    "kind": "Node",
    "name": "node01"
  }
}' $APISERVER/api/v1/namespaces/default/pods/nginx/binding/  --header "Authorization: Bearer $TOKEN" --insecure
Labels & Selectors
In Kubernetes, clusters, labels, and selectors offer a standard method of categorizing and filtering objects based on various criteria. When creating an object, labels are included in a manifest file to give them distinguishing characteristics so they can be identified easily.
Selectors help filter these groups for Kubernetes operations. Production-grade Kubernetes clusters typically consist of thousands/hundreds of objects. Labels group objects by application, type, functionality, or other distinguishing characteristics. As a best practice, using as many selectors and labels as possible is important to make object filtering and management easier.
A label is created as a child of labels under metadata in an object’s manifest file:
apiVersion: v1
kind: Pod
metadata:
  name: darwin-webapp
  labels:
    app: App1
    function: Front-End
spec:
  containers:
  - name: darwin-webapp
    image: darwin-webapp
    ports:
      - containerPort: 8080
To filter objects by label, you specify the condition along with the kubectl get command:
kubectl get pods --selector app=App1The pod with the label specified will be returned.
NAME            READY   STATUS             RESTARTS   AGE
darwin-webapp   0/1     ImagePullBackOff   0          46s
Kubernetes also uses labels internally to connect various objects. For instance, a ReplicaSet can be configured to manage a specific set of Pods using labels:
apiVersion: apps/v1
kind: ReplicaSet
metadata:
  name: frontend
  labels:
    app: frontend
spec:
  replicas: 2
  selector:
    matchLabels:
      app: frontend
  template:
    metadata:
      labels:
        app: frontend
    spec:
      containers:
      - name: nginx
        image: nginx
Additionally, labels can attach cluster nodes to Pods with specific computing requirements. A label selector is also important in pointing cluster services to specific Pods.
Annotations are used to record cluster data for informatory purposes. These include object details such as names, versions, or contact details that may be used for cluster management purposes.
Methods for Kubernetes Pod Scheduling
Taints and Tolerations
In Kubernetes, Taints and Tolerations are used to set restrictions on pod-node scheduling. A taint is a restriction on a node that keeps any unwanted Pods from attaching. A Toleration is a condition on a Pod that allows it to bypass a specific node’s taint.
To create a taint on a node, we use the command:
kubectl taint nodes node-name key=value:taint-effectThe taint effect property describes what happens to Pods that don’t tolerate the taint, and there can be three options:
NoScheduleentirely skips scheduling the Pod on the node.PreferNoScheduletries to schedule the Pod on any other node.NoExecutedeclines any new Pods from attaching while also expelling any intolerant Pods already present in the node.
To make a node1 tolerate only those Pods running a blue app, for instance, we’ll use the command:
kubectl taint node node1 app=blue:NoScheduleTo add tolerations in a Pod, add them to the spec section, as shown:
apiVersion: v1
kind: Pod
metadata:
  name: darwin-webapp
  labels:
    app: App1
    function: Front-End
spec:
  containers:
  - name: nginx-controller
    image: nginx
  tolerations:
  - key: "app"
    Operator: "Equal"
    Value: "blue"
    Effect: "NoSchedule"
Taints and tolerations do not instruct the scheduler to attach a Pod to a particular node; instead, they instruct Nodes to reject Pods based on certain criteria. When setting up a Kubernetes cluster, a taint is automatically applied to the master node, preventing any workloads from being deployed in the control plane. These taints can be viewed using the command:
kubectl describe node master-node | grep TaintWhich displays an output including the Taints section as shown:
Taints: node-role.kubernetes.io/master:NoScheduleTo remove the taint
kubectl taint node node1 app=blue:NoSchedule-Node Selectors
In a default cluster setup, any Pod can be deployed on any available node. Node Selectors are used to impose limits on Pods so that they can only run on particular nodes.
When using this method, we add a new section called nodeSelector to the Pod’s definition file. The selector is a label given to the Node so that a Pod can find the right one to attach itself to. It is important to label the node before creating the Pod. To add a label to a node, run the command:
kubectl label nodes [node-name] [label-key]=[label-value]For instance, to label Node1 as size large:
kubectl label nodes node1 size=largeThe Pod definition file should be as follows:
apiVersion: v1
kind: Pod
metadata:
  name: darwin-webapp
spec:
  containers:
  - name: darwin-webapp
    image: darwin-webapp
    ports:
      - containerPort: 8080
  nodeSelector:
    size: large
The selector is then enforced when the Pod is created:
kubectl create -f pod-definition.ymlTo view on which node the pod was deployed, run the command:
kubectl get pods -o wideWhile the node selector serves its purpose, it has limitations, especially when it comes to complex requirements such as multiple sizing options. Other methods, like Node Affinity, help overcome these limitations.
Node Affinity
Node Affinity is a feature that ensures Pods are run on particular nodes by providing advanced placement capabilities. Node Affinity uses a more expressive language with more matching rules and logical operations to expand the type of constraints applied to node scheduling. You can also specify requirements as both hard and soft rules, and the language allows labels on Pods running in other nodes to be constrained.
To demonstrate this, first add a label to one of your nodes using this command:
kubectl label nodes node01 size=largeThe pod affinity rules are specified within the Pods YAML definition file, as shown in the sample Pod below:
apiVersion: v1
kind: Pod
metadata:
  name: with-node-affinity
spec:
  affinity:
    nodeAffinity:
      requiredDuringSchedulingIgnoredDuringExecution:
        nodeSelectorTerms:
        - matchExpressions:
          - key: size
            operator: In
            values:
            - large
            - medium
  containers:
  - name: nginx
    image: nginx
In this case, the operator will allow the Pod to run in a node whose size is either large or medium. The Affinity rules take effect when the Pod is run using the kubectl apply command.
Verify that the Pod is running on your chosen node node01:
kubectl get pods --output=wideNode Affinity Types
Currently, there are two types of Affinity rules available:
requiredDuringSchedulingIgnoredDuringExecutionWith this, the scheduler will try to attach the pod to a node with the specified affinity rules; if it is not found, the pod will not be scheduled. This method is mostly used in cases where pod placement is extremely crucial.preferreddDuringSchedulingIgnoredDuringExecutionIf running the workload is more important than Pod placement, then this rule is used. If a matching node is not found, the scheduler ignores affinity rules and places the Pod on any node.
In both these methods, all newly created affinity rules are ignored once a pod is scheduled.
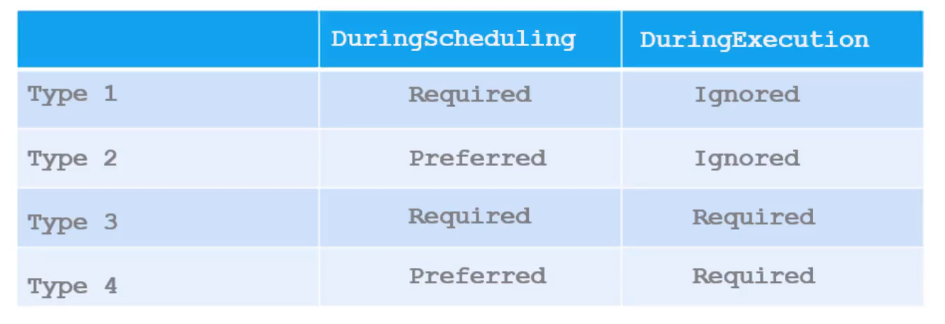
Two affinity types are expected to be available in future releases:
requiredDuringSchedulingRequiredDuringExecutionandpreferredDuringSchedulingRequiredDuringExecution
The above affinities are expected to expel any Pods running in the node that do not have affinity rules. If a label is removed from a node, all Pods with these affinity rules will be evicted from the node.
Taints and Tolerations vs. Node Affinity
Taints and tolerations are built to repel unwanted Pods from attaching to nodes, while Node Affinity attracts a certain set of Pods to a node. Applying toleration to a node allows the Pod to schedule onto a node with a matching taint; however, this is not a requirement.
Node affinity, on the other hand, does not guarantee that Pods won’t schedule onto a different node. We can use a combination of Taints and Tolerations and Node Affinity to dedicate Pods to specific nodes.
Resource Limits
Once a Pod is created, it consumes resources on the node it is attached to. The scheduler takes note of each Pod’s resource requirements and checks those available on the node. If a node lacks sufficient resources, the scheduler will ignore it and find one with enough power to satisfy a Pod’s needs. If there is no node with sufficient resources, the scheduler will hold off on creating the Pod, and it will be left in a PENDING state.
The container darwin-webapp has a request of 1 CPU and 1024MiB of memory.
apiVersion: v1
kind: Pod
metadata:
  name: darwin-webapp
spec:
  containers:
  - name: darwin-webapp
    image: darwin-webapp
    ports:
      - containerPort: 8080
    resources:
      requests:
        memory: 1Gi
        cpu: 1
The memory and CPUs provided can be of any number so long as the node can handle it.
A Docker container is not limited in the resources it consumes from a node. It can use as many resources as it requires, and this may end up suffocating other native processes running on the node. The resource limits can be specified by adding them to the resources section in the pod’s YAML specification file:
apiVersion: v1
kind: Pod
metadata:
  name: darwin-webapp
spec:
  containers:
  - name: darwin-webapp
    image: darwin-webapp
    ports:
      - containerPort: 8080
    resources:
      requests:
        memory: 1Gi
        cpu: 1
      limits:
        memory: "1Gi"
        cpu: 1
Kubernetes then sets these limits when the Pod is created. Kubernetes uses these limits to manage the container’s resource consumption. When the Pod tries to exceed these limits, Kubernetes throttles the CPU, ensuring the container does not consume more resources than needed. Containers can, however, consume more memory than stated, and this may lead to Pod termination.
To get the value of both the request and limit, run this command:
kubectl describe pod darwin-webapp #Check the Limits and Requests sectionDaemonSets
In Kubernetes, DaemonSets help run multiple instances of a Pod by creating a copy of the Pod on various nodes in the cluster. Whenever a new node joins the cluster, this Pod is automatically attached to it. When a node exits the cluster, this Pod is also expelled. This ensures that at least a copy of a Pod is present within the cluster in production.
DaemonSets can, therefore, be used to deploy services that need to run across multiple nodes in the cluster. Examples of this include running a cluster storage daemon on every node and running a logs collection daemon on every node.
A DaemonSet is created by stating its specifications in a manifest file, as shown in the below sample of a monitoring agent:
apiVersion: apps/v1
kind: DaemonSet
metadata:
  name: monitoring-daemon
spec:
  selector:
    matchLabels:
      app: monitoring-agent
  template:
    metadata:
      labels:
        app: monitoring-agent
     spec:
      containers:
      - name: monitoring-agent
        image: monitoring-agent
The DaemonSet is created by running the command:
kubectl create -f daemon-set-definition.ymlTo display DaemonSets running in the cluster, use the command:
kubectl get daemonsetsTo view the properties of monitoring-daemon, run the command:
kubectl describe daemonsets monitoring-daemonStatic Pods
The Kubelet service is important in Kubernetes clusters since it loads Pods on its assigned node based on instructions from the kube-API-Server. These instructions are provided by the kube-scheduler and are stored on the ETCD database.
If there are no Control Plane Elements (no master node), kubelet can still manage a node independently by running a Pod definition file from a directory specified when configuring the service. The kubelet service will periodically check the directory, creating Pods from definition files placed in this folder.
Kubelet will also ensure that the Pod stays alive by attempting to restart it any time the application crashes. Any changes made to the file will be updated on the application as soon as the kubelet service recreates the Pod. The service automatically deletes the Pod once the definition file is erased from the directory. Pods created this way by the kubelet service are known as Static Pods.
Since the Kubelet service only understands and manages Pods, it cannot create static replicaSets, deployments, or DaemonSets. The static directory can be any folder on the host and is parsed into the kubelet as an option when running the service, as shown:
ExecStart=/usr/local/bin/kubelet \\
  --container-runtime=remote \\
  --container-runtime-endpoint=unix:///var/run/containerd/containerd.sock \\
  --pod-manifest-path=/etc/kubernetes/manifests \\
  --kubeconfig=/var/lib/kubelet/kubeconfig \\
  --network-plugin=cni \\
  --register-node=true \\
  --v=2
An alternative would be parsing the path to a specific configuration file using the config option:
ExecStart=/usr/local/bin/kubelet \\
  --container-runtime=remote \\
  --container-runtime-endpoint=unix:///var/run/containerd/containerd.sock \\
  --config=kubeconfig.yml \\
  --kubeconfig=/var/lib/kubelet/kubeconfig \\
  --network-plugin=cni \\
  --register-node=true \\
  --v=2
Then on the kubeconfig.yml file, the static Pod path is stated as:
staticPodPath: /etc/kubernetes/manifestsThis is the approach used by the kubeadm tool to deploy static Pods. Pods created in this manner can only be viewed using the docker ps command. The kubectl tool only works in a cluster with an active kube API server.
When running in a cluster, the kubelet service creates both static Pods and those created by the API Server. In this case, all the Pods can be inspected by running the kubectl get pods command. This is because when Kubelet creates static Pods as part of a cluster, it creates a mirror copy of the Pods in the kube-API-server. These Pods are read-only and cannot be edited or deleted using the kubectl command. This can only be achieved by editing or erasing the file in the manifests folder.
Static Pods can be used to deploy control plane elements since they are independent of the master node components. The process of deploying these elements is as follows:
- Install the
kubeletservice on a master node. - Create Pod definition files with docker images of the various control plane components.
- Copy these files to the manifests folder.
- The Kubelet service automatically runs these elements as static Pods on the master nodes.
This is the process the kubeadm tool follows when setting up clusters. This can be verified by running the kubectl get pods -n kube-system command which brings up Pods installed in the control plane.
Static Pods differ from DaemonSets in that Static Pods are created by the kubelet service while DaemonSets are created by the kube API Server and are handled by a daemonSet Controller. Static Pods are used to deploy control plane elements on the master nodes, while DaemonSets are used to deploy monitoring agents, networks, logging agents, and other services across multiple nodes. Both DaemonSets and Static Pods are ignored by the kube-scheduler.
Multiple Schedulers
The default scheduler uses an algorithm to distribute Pods evenly across all cluster nodes. However, some applications may need some extra checks and conditions before attaching to a node. In these cases, developers can specify their own algorithm to schedule certain Pods on nodes. The default scheduler can be written, packaged, and deployed in a custom definition file, making the Kubernetes cluster highly extensible.
The custom scheduler can also be used as an additional scheduler in the cluster. Some applications can be configured to pass through the custom scheduler, while the rest use the default scheduler. This means Kubernetes clusters can run optimally with multiple schedulers working simultaneously.
The custom scheduler can be created by editing the name and contents of a default scheduler or with the YAML file written entirely from scratch, depending on the levels of customization needed. Once the new scheduler has been created, it is linked to specific Pods as a specification in the definition file as shown:
apiVersion: v1
kind: Pod
metadata:
  name: darwin-webapp
spec:
  containers:
  - name: darwin-webapp
    image: darwin-webapp
    ports:
      - containerPort: 8080
  schedulerName: my-custom-scheduler
When this Pod is created, it will be scheduled by my-custom-scheduler. If my-custom-scheduler is not properly configured, the Pod will be in PENDING state, and if the scheduler is properly configured, the Pod will be in RUNNING state.
Viewing the events log ascertains which scheduler ran which Pod. The log can be accessed using the command:
kubectl get eventsThis concludes the Scheduling section of the CKA certification exam.
You can now proceed to the next part of this series: Certified Kubernetes Administrator Exam Series (Part-3): Logging & Monitoring.
Here is the previous part of the Certified Kubernetes Administrator Exam Series: Certified Kubernetes Administrator Exam Series (Part-1): Core Concepts.
Research Questions
Below are a few sample questions and tasks to help you assess your knowledge. The tasks are followed by the correct steps/configurations, so it is advised that you first try them on your own and validate them with the given steps/configurations to check if yours is correct. You can also leave your answers in the comments below and tag us back.
Quick Tip – Questions below may include a mix of DOMC and MCQ types.
1. How do you manually schedule the pod Nginx on node01 with the following details:
PODName: nginx
Image: nginx
Solution: The manifest file pod-definition.yaml should be of the form:
apiVersion: v1
kind: Pod
metadata:
  name: nginx
spec:
  nodeName: node01
  containers:
  -  image: nginx
     name: nginx
Then run the command
kubectl apply -f pod-definition.yaml
2. Which is the command to get all nodes inside your cluster?
[A] kubectl get nodes
[B] kubectl get node
[C] kubectl list node
[D] kubectl list nodes
3. Create a taint on node01 with a key spray, value of mortein and effect of NoSchedule.
Solution: Use the following command:
kubectl taint nodes node01 spray=mortein:NoSchedule
4. Create a pod named bee with the NGINX image, which has toleration set to the taint mortein.
Image name: nginx
Key: spray
Value: mortein
Effect: NoSchedule
Solution: Create the manifest file bee-definition.yaml with the following configuration:
apiVersion: v1
kind: Pod
metadata:
  name: bee
spec:
  containers:
  - image: nginx
    name: bee
  tolerations:
  - key: spray
    value: mortein
    effect: NoSchedule
    operator: Equal
Then run the command:
kubectl apply -f bee-definition.yaml
5. What is the command to apply a label color=blue to node node01?
Solution: Use the following command:
kubectl label node node01 color=blue
6. Set Node Affinity to the deployment blue to place the pods on node01 only.
- Name: blue
- Replicas: 3
- Image: nginx
- NodeAffinity: requiredDuringSchedulingIgnoredDuringExecution
- Key: color
- values: blue
Solution: Create the manifest file blue-definition.yaml with the following specifications:
apiVersion: apps/v1
kind: Deployment
metadata:
  name: blue
spec:
  replicas: 3
  selector:
    matchLabels:
      run: nginx
  template:
    metadata:
      labels:
        run: nginx
    spec:
      containers:
      - image: nginx
        imagePullPolicy: Always
        name: nginx
      affinity:
        nodeAffinity:
          requiredDuringSchedulingIgnoredDuringExecution:
            nodeSelectorTerms:
            - matchExpressions:
              - key: color
                operator: In
                values:
                - blue
Then run the command:
kubectl apply -f blue-definition.yaml
7. Deploy a pod called elephant that consumes 128Mi of memory.
- Pod Name: elephant
- Image Name: nginx
- Memory Limit: 128Mi
Solution: Create the manifest file with the following specifications:
apiVersion: v1
kind: Pod
metadata:
  name: elephant
spec:
  containers:
  - image: nginx
    name: nginx
    resources:
      limits:
        memory: 128Mi
8. Deploy a DaemonSet for FluentD Logging with the given specifications:
- Name: elasticsearch
- Namespace: kube-system
- Image: k8s.gcr.io/fluentd-elasticsearch:1.20
Solution: Create the manifest file daemonset-definition.yaml with the following specifications:
apiVersion: apps/v1
kind: DaemonSet
metadata:
  labels:
    app: elasticsearch
  name: elasticsearch
  namespace: kube-system
spec:
  selector:
    matchLabels:
      app: elasticsearch
  template:
    metadata:
      labels:
        app: elasticsearch
    spec:
      containers:
      - image: k8s.gcr.io/fluentd-elasticsearch:1.20
        name: fluentd-elasticsearch
Then run the command:
kubectl apply -f daemonset-definition.yamlConclusion
This part delved into various areas needed to understand scheduling in Kubernetes. It is important to understand all the processes required for different use cases, including manual scheduling, daemonSets, static Pods, and multiple schedulers. Coupling these lessons with the Kubernetes documentation is a sure way to get ready for the CKA exam’s Scheduling section.
Exam Preparation Course
Our CKA Exam Preparation course explains all the Kubernetes concepts included in the certification’s curriculum. After each topic, you get interactive quizzes to help you internalize the concepts learned. At the end of the course, we have mock exams that will help familiarize you with the exam format, time management, and question types.
Explore our CKA exam preparation course curriculum.


Discussion