


This is the first blog of a 10-part series focused on CKA exam preparation. This article goes through the basic Kubernetes concepts. Think of it as a beginner’s guide to Kubernetes and an absolute necessity if this CKA course is your first brush with Kubernetes.
Here are the nine other blogs in the series:
- Certified Kubernetes Administrator Exam Series (Part-2): Scheduling
- Certified Kubernetes Administrator Exam Series (Part-3): Logging & Monitoring
- Certified Kubernetes Administrator Exam Series (Part-4): Application Lifecycle Management
- Certified Kubernetes Administrator Exam Series (Part-5): Cluster Maintenance
- Certified Kubernetes Administrator Exam Series (Part-6): Security
- Certified Kubernetes Administrator Exam Series (Part-7): Storage
- Certified Kubernetes Administrator Exam Series (Part-8): Networking
- Certified Kubernetes Administrator Exam Series (Part-9): Troubleshooting
- Certified Kubernetes Administrator Exam Series (Part-10): Practice Topics
If you have taken up any other Kubernetes course, feel free to gloss over the contents of this section.
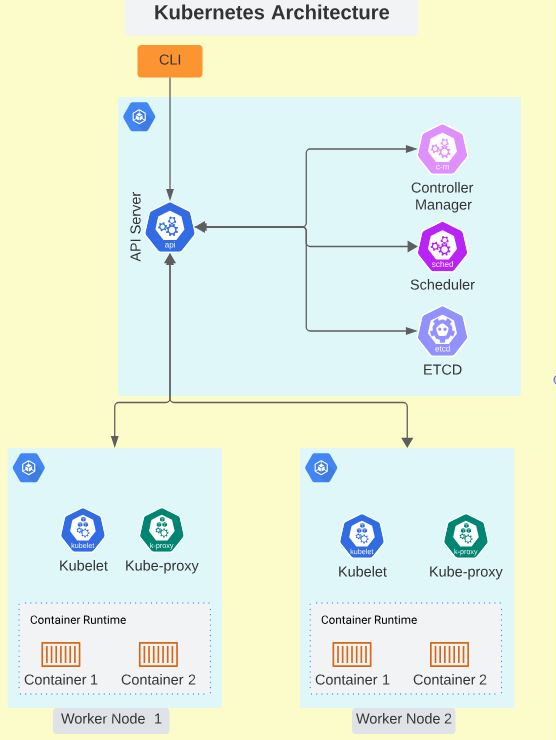
Cluster Architecture
This section introduces you to a high-level abstraction of how Kubernetes orchestrates applications hosted on machines, whether virtual or on-premises.
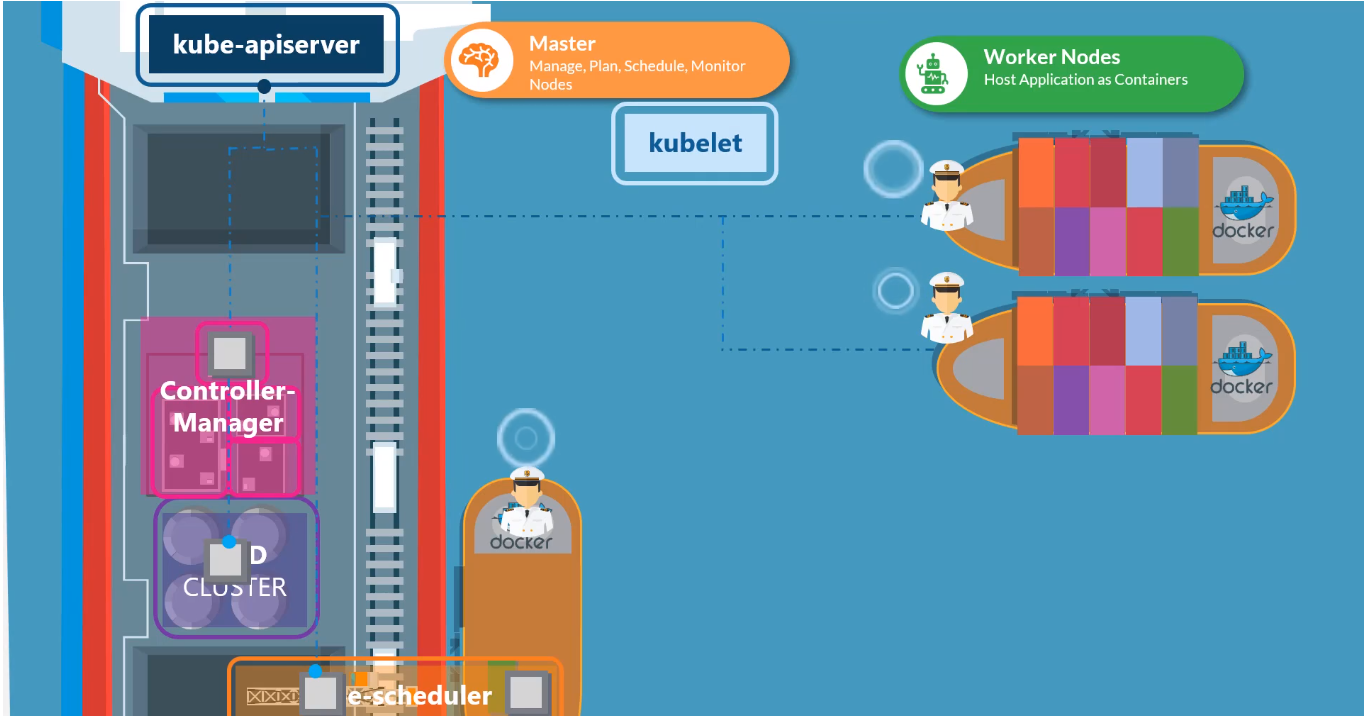
Kubernetes helps automate the management, deployment, and scaling of applications hosted in containers. These containers run on a Kubernetes cluster of hosts called nodes. Kubernetes Clusters are composed of several nodes, so you can deploy and manage as many instances of the application as your workload requires. In Kubernetes clusters, there are two kinds of nodes: worker nodes and master nodes.
Master Node
The Master nodes host the Kubernetes control plane elements that make all scheduling and allocation decisions for a Kubernetes cluster. These elements are:
ETCD
This distributed database stores all Kubernetes cluster data in key-value pairs. In a highly distributed application with multiple instances of the control plane, the leader is chosen through a raft algorithm, and this becomes the single source of truth for the entire Kubernetes cluster.
Schedulers
The kube-scheduler is the control plane component that assigns nodes to newly created Kubernetes Pods. The scheduling decisions are made based on a number of factors, including deadlines, interference, and resource requirements, among others.
Controllers
These elements monitor the cluster state and make adjustments in a bid to get them to the desired state. Some controllers you’ll encounter with your Kubernetes clusters include:
- Node Controller: Notices and responds to changes in node availability.
- Replication Controller: Maintains the correct number of Pods for all Kubernetes cluster objects.
- Endpoints Controller: Connects Pods with services.
The Kube-API Server
The API server is the main entry point for all the communications between the nodes and the control plane. It exposes the Kubernetes API, which allows you to interact with your cluster using the kubectl CLI, the Kubernetes dashboard, or other tools and clients.
Worker Nodes
Worker nodes run the application workloads. These machines host application containers and are managed by control plane elements on master nodes. The components of a worker node include:
The Kubelet
This agent runs on each machine of a Kubernetes cluster, ensuring that every container has been given a Pod. The kubelet doesn’t manage containers that Kubernetes create. Instead, it uses various Pod Specifications (PodSpecs) to make sure containers run healthy.
The Kube-Proxy
This component runs on each node in your Kubernetes cluster and enforces network rules on all nodes, ensuring PODs can communicate with other PODs within and outside the cluster.
The Container Runtime
The operating software that hosts and runs containers. Kubernetes supports most container runtimes, including Docker, CRI-O, containerd, and any custom solution that implements Kubernetes Container Runtime Interface (CRI).
Below is a graphical representation of Kubernetes architecture.
ETCD
Beginner’s Guide to ETCD
ETCD is a simple, secure, fast, and reliable distributed storage that stores small bits of data that need fast read/write times. To read, write, and store Kubernetes cluster information, ETCD uses key-value declarations. The format for key-value declarations is:
Command [Key1] [Value1]There are various methods of installing etcd on your machine. One way is to use a simple Chocolatey installation to bring all the packages to the local machine by running the command:
choco install etcdAdditionally, a simple curl command extracts the binary packages on a local machine by running the command:
curl -L https://storage.googleapis.com/etcd/v3.4.15/etcd-v3.4.15-linux-amd64.tar.gz -o etcd-v3.4.15-linux-amd64.tar.gz
  % Total    % Received % Xferd  Average Speed   Time    Time     Time  Current
                                 Dload  Upload   Total   Spent    Left  Speed
100     9  100     9    0     0      8      0  0:00:01  0:00:01 --:--:--     8
To extract the etcd service from the archive using the following command:
tar xzvf etcd-v3.4.15-linux-amd64.tar.gzThe etcd service is launched by initializing the executable file:
./etcd
This will bring up etcd listening on port 2379 for client communication and on port 2380 for server-to-server communication.
Run ./etcdctl to display a list of commands that can be used with etcd, along with ensuring the service is running.
NAME:
        etcdctl - A simple command line client for etcd3.

USAGE:
        etcdctl [flags]

VERSION:
        3.4.14

API VERSION:
        3.4


COMMANDS:
        alarm disarm            Disarms all alarms
        alarm list              Lists all alarms
        auth disable            Disables authentication
        auth enable             Enables authentication
        check datascale         Check the memory usage of holding data for different workloads on a given server endpoint.
We input a simple key-value pair to check that the service is running. To enter a key-value pair into the database we use the put command as shown below:
./etcdctl put name darwinTo access the values, we use the get command as shown below:
./etcdctl get nameThe results are as shown:
./etcdctl put name darwin
OK

./etcdctl get name
name
darwin
ETCD for Kubernetes
In Kubernetes, the ETCD server stores all information regarding the cluster, including the states of Pods, Nodes, Configs, roles, bindings, accounts, and secrets. With the kubectl get command, you get information that is always extracted from the ETCD storage. All changes made to the cluster are updated on the ETCD server. Changes can only become valid when the server approves them as complete.
When creating your clusters from scratch, you must configure ETCD as a service in your master node. On the other hand, if you use kubeadm, the ETCD server is set up as a static POD in the kube-system namespace.
To access all keys stored in the server, run the following command:
./etcdctl get / --prefix --keys-onlyETCD stores cluster data in a very specific structure. The root directory is the registry, which is then subdivided into functional Kubernetes objects such as minions, Pods, ReplicaSets, Roles, Secrets, Deployments, and many more.
If you are building a High Availability application, you will have several ETCD clusters spread across various master nodes. These instances are specified during the initial creation of your Kubernetes cluster.
Kube API Server
The API Server is the primary management component in a Kubernetes cluster. It is the only control plane element that communicates directly with the ETCD server. The API Server is also responsible for returning requests made by the kubectl utility. Upon receiving an incoming request, the API Server authenticates and then validates the request.
After validating, the API Server fetches data from the ETCD server and comes back with a response. It is also possible to interact directly with the API server using a POST request:
curl -X POST /api/v1/namespaces/default/podsThe Cluster Scheduler constantly monitors the API Server to look for new unassigned Pods. It then finds the most appropriate node to host the new Pod and updates the API Server, which in turn updates the ETCD database on the new configuration.
The ETCD then passes this information to a Kubelet on the worker node, which instructs the container runtime to update the application in the image. Once the changes are effected, the Kubelet service communicates the changes to the API Server, which updates the information on ETCD storage.
If you installed your cluster using kubeadm, the API server is installed as a static Pod in the kube-system namespace. Therefore, you can view your server’s options by running the command:
kubectl get pods -n kube-systemIf you deployed your cluster this way, you can access API-Server configurations by inspecting the service file, ie:
cat /etc/systemd/system/kube-apiserver.serviceKube Controller Manager
The kube-controller-manager helps to administer the functions of controllers- processes designed to watch the state of your Kubernetes cluster and adjust it until it reaches the desired state. There are several types of controllers under the manager:
Node Controller periodically checks the status of running nodes. If it stops receiving a signature from a node, the node is marked as unavailable but is kept running for a period of time known as the Grace Period, after which it is evicted from the Kubernetes cluster. The controller will then provision the Pods on this node to a healthier one if the Pods are within the active ReplicaSet.
Replication Controller- Ensures that the desired number of Pods is always available within a ReplicaSet.
Depending on your application, you can have many more types of controllers monitoring and controlling different Kubernetes objects. The Kubernetes Controller Manager is the single package encapsulating all controller processes, allowing you to view and manage them seamlessly. All the controller processes are installed when you install the Kube control manager.
When running a cluster using kubeadm, the manager comes pre-configured as a static Pod in the kube-system namespace.
- To view your kube-controller-manager server options, run the following command:
kubectl get pods -n kube-system- Pods can be inspected using the following command:
cat /etc/kubernetes/manifests/kube-controller-manager.yaml- In a cluster that has been set up from scratch, the settings can be viewed by inspecting the file using the following command:
cat /etc/systemd/system/kube-controller-manager.service- It is possible to list the controller manager process to view its properties using the command:
ps -aux | grep kube-controller-managerKube Scheduler
This is the control plane process responsible for assigning Pods to Nodes. The scheduler identifies the most suitable node to host a Pod based on resource requirements, application dependencies, and the Pod destination. When a Scheduler sees a new Pod, it will assign a Node in two steps:
- Filtering - Here, all the nodes that do not meet the Pods resource requirements are eliminated, leaving only viable nodes.
- Ranking - Viable nodes are ranked according to how much they satisfy the various Pod requirements. The scheduler uses a priority function to assign a score for each requirement on a 1-10 scale, and the highest-ranking node gets assigned the Pod. Schedulers can be customized to execute specific rankings for different applications.
Installing the Kubernetes scheduler is a 2-step process:
1. Downloading the binaries from the Kubernetes release page:
wget https://storage.googleapis.com/kubernetes-release/release/v1.13.0/bin/linux/amd64/kube-scheduler2. Extracting, then running the scheduler as a service:
kube-scheduler.serviceIf the cluster was set up using kubeadm kube-server options can be viewed by checking the kube-scheduler.yaml folder in the Kubernetes manifest sub-folder:
cat /etc/kubernetes/manifests/kube-scheduler.yamlListing and searching for kube-scheduler on the master node also shows the running process and specifications:
ps -aux | grep kube-schedulerKubelet
In the worker nodes, the Kubelet is the process responsible for registering the nodes within the Kubernetes cluster. It uses a template known as PodSpec (Pod Specification) to register the node to the Kube-API Server using logs, hostnames, or flags.
It receives instructions from the kube-scheduler through the API Server on how to load a container. It then requests the container runtime on the worker node to run an application instance by pulling the required image. It then continuously monitors the Pod and containers, periodically reporting to the API server.
Kubelet is not installed automatically when creating a cluster with kubeadmin; it must be manually installed for every node. It needs to first be downloaded using the following command:
sudo apt-get install -y kubeletTo list and search for kubelet on the master node, use the following command; it shows the running processes and effective options:
ps -aux | grep kubeletKube Proxy
This is a DaemonSet that runs on every node and is responsible for creating rules that balance workloads and forward traffic to Pod service backends. The proxy reflects these services as they are deployed on every node and can forward traffic using simple or round-robin TCP and UDP streams. These network rules allow network communication to your Pods from network sessions inside or outside of your Kubernetes cluster.
The kubeadm tool deploys kube-proxy as a Pod/DaemonSet on all nodes in the cluster. These can be accessed by listing all Pods within the cluster by running this command:
kubectl get pods -n kube-systemSince kube-proxy is deployed as a DaemonSet on every node, it can also be accessed using this command:
kubectl get daemonset -n kube-systemPods
A Pod is the smallest object you can create in Kubernetes. It is the basic object that encapsulates containers as they are deployed on a node. A Pod, therefore, represents one instance of an application, and they typically share a 1:1 relationship with containers. When scaling an application, Pods are added or removed to meet the workload by deploying new instances of the application.

Creating a Kubernetes Pod depends on the following prerequisites:
- A working Kubernetes cluster
- An application developed and built within a docker image and available through the docker repository
- All Kubernetes cluster services should be running.
While containers typically share a 1:1 relationship with Pods, a Pod can have more than one container, provided they are of different types. A single Pod could, for instance, house an application container and a helper container that runs services. These are called multi-container Pods. Containers in the same Pod can refer to each other as localhost since they share network and storage space.
While it is possible to run simple applications on Docker directly using containers, it is required to run Kubernetes applications on Pods, simplifying scaling and load balancing.
Pods are created using the run command as shown below:
kubectl run pod-name --image image-nameFor instance:
kubectl run nginx --image nginxOnce the Pod is created, you get the following message:
pod/nginx createdWhen creating a Pod using this process, the application image (Nginx) is downloaded from the Docker hub repository and is then run within the cluster.
The get command can be used to access information on running PODs as shown below:
kubectl get podsThis gives an output similar to this:
NAME    READY   STATUS    RESTARTS   AGE
nginx   1/1     Running   0          10s
ReplicaSets
A ReplicaSet is a higher-level abstraction that helps manage the deployment and scaling of a set of identical Pods. It ensures that a specified number of replicas of a Pod are running at any given time. ReplicaSets are commonly used to ensure high availability and to scale up or down based on demand.
A ReplicaSet is responsible for keeping a specified number of replicas of a Pod running at all times. If a Pod is deleted or fails, the ReplicaSet replaces it with a new one to maintain the desired number of replicas. ReplicaSets use labels to identify the Pods they manage and can be used in conjunction with other Kubernetes objects to provide a complete deployment solution.
ReplicaSets are similar to ReplicationControllers, which were the original way to manage Pod replication in Kubernetes. However, ReplicaSets offer more advanced features and are generally considered to be the preferred way to manage Pod replication in most cases.
To create a ReplicaSet/Replication Controller, we define its specifications in a YAML file. The header contents of this file should describe the ReplicaSet/Replication Controller, and the specification should include the specifications of the Pod to be replicated. For instance, the specifications for a Replication Controller named myapp-replicaset running 3 replicas of the myapp-pod POD are shown below:
apiVersion: apps/v1
kind: ReplicaSet
metadata:
  name: frontend
  labels:
    tier: frontend
spec:
  replicas: 3
  selector:
    matchLabels:
      tier: frontend
  template:
    metadata:
      labels:
    tier: frontend
    spec:
      containers:
      - name: nginx
        image: nginx
This replica controller can then be deployed using the kubectl create command:
kubectl create -f replicaset-definition.ymlTo display the working ReplicaSet, run the following command:
kubectl get replicasetTo check the Pods deployed by the ReplicaSet, run the following command:
kubectl get pods -l tier=frontendReplicaSets monitor existing Pods in the Kubernetes cluster. They use Selectors and Labels to identify Pods they can monitor and replicate. These labels are provided in the Pod definition files and act as a filter for the ReplicaSet, which is why we use the matchLabels filter in the replicaset definition file.
When we need to scale the application using the ReplicaSet, we can update the number of replicas in the definition file and then use the kubectl replace command to replace the existing set.
Alternatively, we can scale directly by specifying the number of Replicas alongside the scale command
kubectl scale --replicas=6 replicaset-definition.ymlThis can also be represented in the type-name format as shown:
kubectl scale --replicas=6 replicaset frontendDeployments
In Kubernetes, Deployments are a higher-level abstraction that manages ReplicaSets and Pods. Deployments are responsible for ensuring that the desired state of the application is maintained by creating and managing ReplicaSets. They provide a way to manage the application's state declaratively, rolling out updates and rolling back changes if necessary. Deployments also provide features like scaling, rolling updates, and rollback.
Deployments are created by first defining their specifications in a YAML definition file. Below is an example of a file specifications for a deployment named deployment-definition:
---
apiVersion: apps/v1
kind: Deployment
metadata:
  name: myapp-deployment
  labels:
    app: web
spec:
  replicas: 2
  selector:
    matchLabels:
      app: web
  template:
    metadata:
      labels:
        app: web
    spec:
      containers:
        - name: front-end
          image: nginx
          ports:
            - containerPort: 80
        - name: rss-reader
          image: nickchase/rss-php-nginx:v1
          ports:
            - containerPort: 88
The deployment is then launched by running the command:
kubectl create -f deployment-definition.yml- To display running deployments, run this command:
kubectl get deployments- To update a deployment, make changes to the deployment file by using the
kubectl applycommand:
kubectl apply -f deployment-definition.yml- To check the status of the rollout, run the command below:
kubectl rollout status deployment/myapp-deployment- To display the history of rollouts, run this command:
kubectl rollout history deployment/myapp-deployment- To change the image name of the container front-end, use this command:
kubectl set image deploy myapp-deployment front-end=nginx:1.19- To roll back changes, execute this command:
kubectl rollout undo deployment/myapp-deploymentNamespaces
In Kubernetes, a namespace is a way to partition resources within a cluster logically. It allows you to create virtual clusters within a physical cluster. Namespaces are commonly used to allocate resources and isolate workloads from each other. By default, Kubernetes comes with three namespaces: default, kube-system, and kube-public.
The default namespace is where most workloads are deployed, while kube-system is reserved for system-level resources, and kube-public is used for public resources that are accessible by all users. You can create your own namespaces to organize your resources and apply policies to them. Namespaces also allow you to limit the scope of resource names, which can help avoid naming conflicts.
For instance, to communicate to db-service within the same namespace:
mysql.connect(“db-service”)To connect to a different namespace, we’ll need to specify the cluster and service domains along with the service name:
mysql.connect(“db-service.dev.svc.cluster.local”)In the above command, cluster.local is the cluster’s domain, svc is the service path while dev refers to the namespace.
Namespaces are created by specifying the configurations in a YAML file with Kind. Below are the specifications for a namespace called dev in a specification file named namespace-dev.yml.
apiVersion: v1
kind: Namespace
metadata:
name: dev- The namespace can then be created by running the command:
kubectl create -f namespace-dev.yml- Another way of creating a namespace is by running the command:
kubectl create namespace dev- To list the Pods in another namespace, run the command:
kubectl get pod --namespace=dev- Likewise, this command line specification can be used to create a Pod in another namespace:
kubectl create -f pod-definition.yml --namespace=devTo ensure that a Pod is created in the namespace by default without having to specify on the command line, the namespace can be included as a child specification of metadata in the Pod’s YAML definition file, as shown below.
apiVersion: V1
kind: pod
Metadata:
  namespace: dev
  name: myapp
To switch to a different namespace, the kubectl config command is invoked as shown below:
kubectl config set-context $(kubectl config current-context) --namespace=dev
A successful switch is acknowledged with the message:
Context "kubernetes-admin@kubernetes" modified.Namespaces can also be used to assign resource quotas and limits to instances of an application. This is first done by creating a YAML definition file for the resource quota with specifications as shown below:
apiVersion: v1
kind: ResourceQuota
metadata:
    name: compute-quota
    namespace: dev
spec:
  hard:
    pods: "10"
    requests.cpu: "4"
    requests.memory: 5Gi
    limits.cpu: "10"
    limits.memory: 10Gi
This quota can then be enforced on the cluster by running the command:
kubectl create -f compute-quota.yamlTo get the current resource quota in the dev namespace:
kubectl get resourcequotas -n devServices
In Kubernetes, a service is an abstraction layer that provides a logical way to group pods and access them. It allows you to expose an application running on a set of pods as a network service. A service provides a stable IP address and DNS name that other applications can use to communicate with the pods.
Services can be exposed either within a cluster or outside of it, depending on the configuration. There are several types of services in Kubernetes, such as ClusterIP, NodePort, and LoadBalancer, each with its own use case and configuration options.
I. NodePort
The NodePort service helps users access cluster resources by mapping a port on a Pod to a port on a node. NodePort, therefore, creates a connection using three ports:
- TargetPort: This is the port on the Pod receiving requests from the service.
- Port: The port in the service establishing communication between the Pod and the node.
- NodePort: The port on the node through which we can access the cluster externally.
The service itself has an IP address called ClusterIP. The NodePort service can be created by declaring its specifications in a definition file, as shown below.
#service-definition.yml

apiVersion: v1
kind: Service
metadata:
  name: my-service
spec:
  type: NodePort
  selector:
    app: myapp
  ports:
    - port: 80
      targetPort: 80
      nodePort: 30008
  selector:
    app: myapp
- This service can then be launched using the following command:
kubectl create -f service-definition.yml- To list the services running in a cluster, run this command:
kubectl get service- The application can then be accessed via SSH using the command:
curl http://192.168.1:30008- Alternatively, if the web application has a GUI, it can be accessed by typing
http://192.168.1:30008 into a browser
If there are 3 Pods with the same application instance, they all qualify as an endpoint for the request made with the address above. NodePort will use a random algorithm to determine which Pod will return the request.
If the Pods are situated in different nodes, Kubernetes will create a NodePort service spanning across all nodes and map a targetPort to the same nodePort on all nodes. Now the application can easily be accessed by combining the IP address of a node with the nodePort for high availability.
ClusterIP
A full-stack application is typically composed of several Pods running different layers of services in a cluster. Some Pods could run the front-end, others run the back-end, while others host the SQL database and key-value storage. These layers need to communicate with each other. While all Pods have an IP address assigned, the Pods are periodically added and subtracted, so these addresses aren’t static.
The ClusterIP service is responsible for grouping Pods with the same functionality into a single interface and assigning it an IP address so that other Pods can access its services.
The ClusterIP address is created by first composing a YAML definition file, as shown below:
#service-definition.yml

apiVersion: v1
kind: Service
metadata:
  name: my-service
spec:
  type: ClusterIP
  selector:
    app: myapp
  ports:
    - port: 80
      targetPort: 80
The service is then launched by running the command:
kubectl create -f service-definition.ymlTo inspect the services running in a cluster, run this command:
kubectl get servicesTo expose your app directly using the kubectl, run these commands:
kubectl create deployment nginx --image=nginxkubectl expose deployment nginx --type=ClusterIP --name=my-service --port=80
To test it, run these commands:
kubectl run curl --image=radial/busyboxplus:curl -i --ttycurl http://my-service:80LoadBalancer
While the NodePort service makes an application’s services accessible to external users, it does not specify which Pod services a user's request. The LoadBalancer service takes care of this by managing the services’ IP addresses. Major cloud platforms offer support for native load balancing, allowing for the autonomous distribution of workloads among hosted containers.
The LoadBalancer is created by declaring its properties in a YAML definition file:
#service-definition.yml

apiVersion: v1
kind: Service
metadata:
  name: my-service
spec:
  selector:
    app: myapp
  ports:
    - protocol: TCP
      port: 80
      targetPort: 80
  type: LoadBalancer
The service is then activated using the command:
kubectl create -f service-definition.ymlImperative vs. Declarative
In Kubernetes, we can create objects either using definition files or Kubernetes commands. The two approaches to managing objects in Kubernetes are Imperative and Declarative.
With Imperative commands, the developer tells Kubernetes what to do and enlists the steps required to achieve the result. With declarative programming, the developers will specify the object requirements, and the software figures out how to achieve them.
Both methods have inherent merits depending on the use case.
Imperative commands require the definition of object specification through flags that increase command length. Imperative commands are best suited for quick, simple applications that do not require extensive configuration.
In this method, the developers use –
create,run, andexposecommands to create objects, and,edit,scale, andsetcommands to update objects.
Imperative commands also offer no logs, so it is difficult to keep track of changes made to cluster objects. When using the edit command, changes are not made to the local manifest file, but to a version of the file in Kubernetes memory. The changes made to an object are difficult to track since updates are lost once new ones are made.
When making changes using the replace command, a non-existent file returns an error. Similarly, when trying to create a file that already exists, an error is returned.
Manifest files help to describe the behavior of Kubernetes objects using YAML definitions. It is best to make changes to the configuration files and then enforce these updates using the kubectl apply command. If the file doesn’t exist, Kubernetes will automatically create one. If a file already exists, it is updated to the latest version. This reduces the tedium involved in the administration of Kubernetes applications.
It is also possible to create multiple objects by pointing the kubectl apply command to a file folder with manifest files:
kubectl apply -f /path/to/config-filesKubectl Apply Command
This command is used to manage Kubernetes objects declaratively. It considers the local configuration file and the last applied configuration before deciding what changes to make. It creates a live configuration file within Kubernetes memory that includes the configuration data and status of the object.
When the command is run, it converts the definition file into JSON format and stores this as the last applied configuration. Moving forward, it will compare the local manifest file, the live object on Kubernetes, and the JSON file to decide on the changes. It compares the local file with the running version to see which fields are missing/have been added, then writes these onto the last known configuration file.
This concludes the core concepts section of the CKA certification exam.
You can now proceed to the next part of this series: Certified Kubernetes Administrator Exam Series (Part-2): Scheduling.
Sample CKA Questions
Here is a quick quiz to help you assess your knowledge. Leave your answers in the comments below and tag us back.
Quick Tip – Questions below may include a mix of DOMC and MCQ types.
1. Which command can be used to get the replicasets in the namespace default?
[A] kubectl get replicasets
[B] kubectl get replicasets -n default
[C] kubectl get pods
[D] kubectl get rc
2. Which command can be used to get the number of Pods in the namespace dev?
[A] kubectl get pods
[B] kubectl get pods -n dev
[C] kubectl get pods --namespace dev
[D] kubectl get pods -n default
3. Which command can be used to get the image used to create the pods in the frontend deployment?
[A] kubectl get deployments
[B] kubectl describe deployments frontend
[C] kubectl inspect deployments frontend
[D] kubectl describe pod frontend-56d8ff5458-6d7jt
4. Inspect the below pod-definition file and answer the following questions.
apiVersion: apps/v1
kind: Deployment
metadata:
  name: deployment-1
spec:
  selector:
    matchLabels:
      name: busybox-pod
  template:
    metadata:
      labels:
        name: busybox
    spec:
      containers:
      - name: busybox-container
        image: busybox888
        command:
        - sh
        - "-c"
        - echo Hello Kubernetes! && sleep 3600
- This YAML is valid.
[A] True
[B] False
- By default, if we didn’t specify the replicas, the replica count will be 2
[A] True
[B] False
5. Which command can be used to create a pod called nginx and its image nginx?
[A] kubectl run nginx --image=nginx
[B] kubectl create nginx --image=nginx
[C] kubectl apply nginx --image=nginx
[D] kubectl create nginx --image=nginx
6. What does the READY column in the output of the kubectl get pods command indicate?
[A] Running Containers in POD/Total containers in POD
[B] Running Pods / Total Pods
[C] Total Pods / Running Pods
[D] Total Containers in Pod / Running containers in POD
7. In the current(default) namespace, what is the command to check how many Services exist on the system?
[A] kubectl get svc
[B] kubectl get svc -n default
[C] kubectl get services
[D] kubectl get services -n default
8. What is the type of the default Kubernetes service?
[A] ClusterIP
[B] LoadBalancer
[C] External
[D] NodePort
9. Which command can be used to create a service redis-service to expose the Redis application within the cluster on port 6379? The service should only be accessible from the cluster and not exposed externally.
[A] kubectl create service nodeport redis-service --tcp=6379:6379
[B] kubectl create service loadbalancer redis-service --tcp=6379:6379
[C] kubectl create service clusterip redis-service --tcp=6379:6379
[D] kubectl create service externalname redis-service --tcp=6379:6379
10. Select the right command to create a namespace called staging.
[A] kubectl apply namespace staging
[B] kubectl create namespace staging
[C] kubectl replace namespace staging
[D] kubectl get namespace staging
11. Which command can be used to create a deployment webserver with image httpd and namespace production?
[A] kubectl create deployment webserver --image=httpd -n default
[B] kubectl create deployment webserver --image=httpd
[C] kubectl create deployment webserver --image=httpd -n production
[D] kubectl apply deployment webserver --image=httpd -n production
12. Which is the best description of TargetPort?
[A] Exposes the Kubernetes service on the specified port within the cluster.
[B] Is the port on which the service will send requests to, that your pod will be listening on.
[C] Exposes a service externally to the cluster by means of the target nodes IP address and the NodePort.
[D] None of the above.
13. Which is the command to get all the namespaces inside your cluster?
[A] kubectl get ns
[B] kubectl get namespaces
[C] kubectl list ns
[D] kubectl list namespaces
14. What is the FQDN of service nginx in the default namespace?
[A] nginx
[B] nginx.default
[C] nginx.default.pod.cluster.local
[D] nginx.default.svc.cluster.local
15. … is a consistent and highly-available key value store used as Kubernetes’ backing store for all cluster data.
[A] kube API
[B] kube scheduler
[C] kube manager
[D] etcd
Conclusion
This core concepts article is a helpful introduction to all aspects candidates need to know about running production-grade Kubernetes clusters. The section is divided carefully into chapters to provide even the basic beginner with a high-level understanding of the components in a Kubernetes cluster.
CKA Preparation
Even for those with experience in Kubernetes, this section is a great crash course and reference guide when working on real-world projects. Once the concepts of this section are well understood, the upcoming chapters will be a breeze since they build on the knowledge introduced in this chapter. This Core Concepts section is, therefore, a must-have guide for any practicing and prospective certified Kubernetes administrator.
On KodeKloud, you also get a learning path with recommendations, sample questions, and tips for clearing the CKA exam.
Exam Preparation Course
Our CKA Exam Preparation course explains all the Kubernetes concepts included in the certification’s curriculum. After each topic, you get interactive quizzes to help you internalize the concepts learned. At the end of the course, we have mock exams that will help familiarize you with the exam format, time management, and question types.
Explore our CKA exam preparation course curriculum.


Discussion