How to Setup a Kubernetes Cluster with Minikube & Kubeadm
Do you want to learn Kubernetes but feel overwhelmed by its complexity? Or maybe you are looking for a way to test your Kubernetes applications without deploying them to a production environment.
Okay, we all agree that in the world of containerization and microservices, Kubernetes has been the champion for staging and managing containers. However, navigating its complexity can be overwhelming for DevOps beginners looking to harness its power.
That’s where Minikube and Kubeadm come in. They make it easy to set up and manage Kubernetes clusters.
In this blog, I will guide you through setting up a Kubernetes cluster using Minikube and Kubeadm.
Key Takeaway:
- Minikube is a tool that makes it easy to run a single-node Kubernetes cluster locally for development and testing purposes. It can be used to quickly get started with Kubernetes without a major production setup.
- kubeadm is a tool built to provide a simple way to bootstrap a minimum viable Kubernetes cluster that works for development and production environments. It can be used to set up a multi-node Kubernetes cluster.
- The main difference is that Minikube gives you a simple single-node setup on your local machine, while kubeadm allows you to setup a highly available multi-node cluster on the cloud or on-premises.
Try our Kubernetes Familiarize Environment Lab for free
What are Minikube and Kubeadm
Before we start talking about the process of setting up a Kubernetes cluster, let’s first look at what these tools are.
Minikube
Minikube is a tool that allows you to run a single-node Kubernetes cluster on your local machine. It is mainly used for development and testing purposes.
With Minikube, you can easily create a Kubernetes cluster, deploy applications, and test them before deploying them to a production environment.
Minikube supports different virtualization technologies such as VirtualBox, Vmware, and Hyper-V. It also comes with a dashboard that provides a web-based user interface to manage the Kubernetes cluster.
Kubeadm
Kubeadm is a really handy tool that can help you set up a Kubernetes cluster. Essentially, it automates the whole process by initializing the control plane and joining worker nodes to the cluster.
The best part is that it's a command-line tool, so it's super easy to use and works the same way no matter where you're setting up your cluster.
In fact, the Kubernetes community recommends using Kubeadm as the official way to create a cluster. The tool is flexible enough to work on bare metal servers, cloud providers, and virtual machines alike, making it a great choice no matter where you're building your infrastructure.
Benefits and Use Cases of Using Minikube and Kubeadm for Learning and Testing Kubernetes
So you may be wondering why we should use Minikube and Kubeadm, after all, there are many tools out there. Well here are the benefits of using Minikube and Kubeadm for learning and testing Kubernetes
Minikube
- Minikube allows us to easily create and delete clusters without affecting our main environment. This is useful if we want to experiment with different configurations or test new features without affecting our production environment.
- With the Minikube dashboard, we can easily monitor the status of our clusters, view logs, and manage resources.
- Minikube provides an easy way to test and debug our applications in a Kubernetes environment before deploying them to production.
Kubeadm
- Kubeadm allows us to customize and configure our clusters according to our needs and preferences. We can configure things like the network plugin, authentication and authorization mechanisms, and storage solutions.
- Kubeadm is the recommended way to create a Kubernetes cluster, so using it for learning and testing ensures that we are following the best practices recommended by the Kubernetes community.
Both tools are compatible with the standard Kubernetes API and CLI, so we can use the same tools and workflows we would use in a production environment.
How to Install Minikube and Kubeadm
Before we start using Minikube and Kubeadm, we will need to install them on our machines. Here is what we need for this step:
- A computer with a supported operating system (Windows, macOS, or Linux)
- A hypervisor or container runtime installed on our computer (VirtualBox or Docker)
- Kubectl (Kubernetes command-line tool) installed on our computer for managing Kubernetes clusters.
- A reliable internet connection.
For detailed installation instructions, refer to the Minikube and Kubeadm official documentation.
Installation Steps
The steps for installing these tools are not the same in all the operating systems so we will look at them one after the other. Here we will talk about the installation steps for Minikube.
Visit the Kubeadm documentation to see detailed steps on how to install it.
Linux
Let's download the Minikube binary using either curl or wget commands:
curl -LO https://storage.googleapis.com/minikube/releases/latest/minikube-linux-amd64Or
wget https://storage.googleapis.com/minikube/releases/latest/minikube-linux-amd64Now let's make the Minikube binary executable using the following command:
cmod +x minikube-linux-amd64The next thing is to move the binary to our PATH using the following command:
sudo mv minikube-linux-amd64 /usr/local/bin/minikubeWindows
For window users you’ll need to have Chocolatey or Scoop installed on your system.
If you are using Chocolatey, run the following command:
choco install minikubeIf you are using Scoop, run the following command:
scoop install minikubeMac
For Mac users, you’ll need to have Homebrew or MacPorts installed.
If you are using Homebrew, run the following command:
brew install minikubeIf you are using MacPorts, run the following command:
sudo port selfupdate && sudo port install minikubeStarting a Kubernetes Cluster with Minikube
Before we begin, let’s go over some basic concepts of Minikube to help us understand how it works:
- A cluster is a group of nodes that work together to run our applications
- A node is a virtual machine that hosts our containers
- A pod is a group of containers (1 or more) that share storage and network resources and has a defined way of running the containers.
- A service is an abstraction that exposes our pods to other pods or external clients.
Now let's get into steps to actually create a single-node Kubernetes cluster with Minikube
#1. Use Minikube Start to Create and Start a Cluster With Default Settings
To start a single-node Kubernetes cluster with Minikube, we will run the following command in our terminal:
minikube startHere is the output after executing the command:
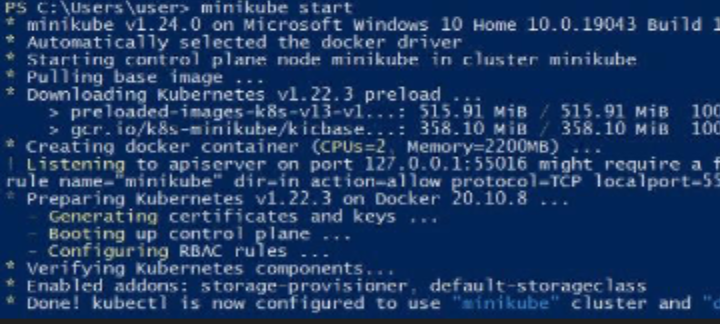
The command will download and start the latest version of Kubernetes and create a single-node cluster with default settings. It may take some time to complete, depending on our internet connection.
#2. Use Minikube Config to Change the Settings Like Driver, Memory, CPU, etc.
We can change the default settings of the cluster using the minikube config command.
For example, to set the Virtualbox driver and allocate more memory to the node, we will run the following commands:
minikube config set driver virtualboxminikube config set memory 4096When we run this command, our output will look like this:

#3. Use Minikube Addons to Enable or Disable Features That May Not be Important Like Dashboard, Ingress, etc.:
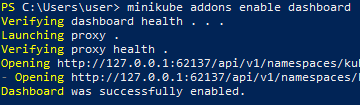
For example, to enable the Kubernetes dashboard, we will run the following command:
minikube addons enable dashboardThis is our output when we run this command:
How to check the status and configuration of the cluster
Once the cluster up is running, we can check its status and configuration using the following commands:
minikube status- to see if the cluster is running and healthyminikube ip- to get the IP address of the clusterminikube logs- to view the logs of the cluster components
That’s it! We now have a single-node Kubernetes cluster up and running with Minikube. Now we can start deploying our applications and services to the cluster and experiment with Kubernetes.
How to interact with the cluster using kubectl and minikube commands
Interacting with the cluster is a very important part of managing a Kubernetes environment. So, let’s look at how to do that with kubectl and minikube commands.
Listing resources in the cluster
To list resources in the cluster, you can use the ‘kubectl get’ command followed by the resource type. For example, to list all the pods in the cluster, we can run the following command:
kubectl get podsOur pods would be listed this way when we run the command above:

And to list all the services, we will run the following command:
kubectl get servicesHere’s our output when we run this command:

Creating, updating, and deleting resources
To create, update, and delete resources in the cluster, we can use the kubectl create, apply, and delete commands followed by the resource type and the YAML or JSON file that describes the resource.
For example, to create a deployment named “Hello World” with a single replica, we can create a YAML file called hello.yaml with the following contents:
apiVersion: apps/v1
kind: Deployment
metadata:
  name: hello-world
spec:
  replicas: 1
  selector:
    matchLabels:
      app: hello-world
  template:
    metadata:
      labels:
        app: hello-world
    spec:
      containers:
      - name: hello-world
        image: gcr.io/google-samples/hello-app:1.0
        ports:
        - containerPort: 8080
Then, we run the following command to create the deployment:
kubectl create -f hello.yamlWe know we have successfully created the deployment when we get the following output:

Say we want to update our deployment, we can edit the YAML file and run the following command:
kubectl apply -f hello.yamlThis will apply the update to the existing deployment.
And to delete the deployment, we run the following command:
kubectl delete deployments hello-worldThe screenshot shows that we have successfully deleted our deployment:

Accessing a service
To access a service in the cluster, we can use the minikube service command followed by the service name.
We'll build a simple service to demonstrate how to access a service.
Create a my-service.yaml file and add the following code:
apiVersion: v1
kind: Service
metadata:
  name: my-service
spec:
  selector:
    app.kubernetes.io/name: MyApp
  ports:
    - protocol: TCP
      port: 80
      targetPort: 8090
Run the following command to create the service:
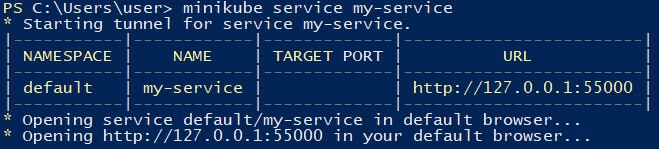
kubectl create -f my-service.yamlWe can now access the service by running the following command:
minikube service my-serviceHere’s what our output would look like when we run this code:
These are just a few examples of how we can use kubectl and minikube commands to interact with our Kubernetes cluster. To see more commands, check out the Kubernetes documentation.
How to start a multi-node Kubernetes cluster with kubeadm
Before diving into kubeadm let’s introduce some common concepts
- Control plane: A set of nodes that run the fundamental components of Kubernetes, such as the API server, scheduler, and controller manager
- Worker node: A node that runs our applications as pods
- etcd: A distributed key-value store that stores the cluster state and configuration data
Now let’s go through the steps:
#1. Preparing Two Machines
Before starting the installation process, we must make sure that we have at least two machines running a supported Linux distribution with Docker and kubeadm installed. The machines should also have a compatible kernel version, container runtime, and network configuration.
#2. Cluster initialization
The next thing we need to do is to initialize the cluster and generate a join token or a configuration file. We do this by running the following command on the control plane node:
kubeadm initThis command will create the necessary certificates and keys, start the API server, controller manager, scheduler, and Etcd. It will also generate a kubeconfig file, which will be used to access the cluster using kubectl.
#3. Customizing Cluster Settings
We can customize the cluster settings by modifying the kubeadm configuration file. The configuration file contains the settings for the cluster, such as the pod network, feature gates, etc. We can modify the file before running kubeadm init or modify it later using the kubeadm config command.
#4. Run specific Steps of The Initialization Process
We can use the kubeadm init phase command to run specific steps of the initialization process. For example, to initialize Etcd on the control plane node, we can run the following command:
kubeadm init phase etcdWe can also use the kubeadm init phase control-plane command to start the control plane components on the control plane node.
#5. Access the cluster using kubectl
The kubeconfig file contains the credentials required to access the Kubernetes API server. We can copy this file to our home directory or another location on our local machine to access the cluster using kubectl.
#6. Enable Pod-to-Pod Communication
After setting up the control plane node, the next thing we will do is join the worker nodes to the cluster. Before doing that, we need to install a pod network add-on to enable pod-to-pod communication.
Calico and Flannel are popular pod network add-ons that we can use.
#7. Join the Cluster Using the Token or the Configuration File
To join the worker nodes to the cluster, we need to run the kubeadm join command on each machine, providing the token or the configuration file generated in step 2. This will join the machine to the cluster and install the necessary components.
#8. Create or List Tokens
The kubeadm token command is used to create or list tokens. We can use it to create a new token if the existing one has expired or to list the available tokens.
#9. Print the Default Configuration File
We can use the kubeadm config print join-defaults command to print the default configurations.
How to check the status and configuration of the cluster
We use the following commands to check the cluster status and configuration:
kubectl get nodes- to see if all nodes are ready and joined.kubectl describe nodes- to see the details of each node.kubectl get pods –all-namespaces- to verify that all pods are running and healthy.kubeadm config view- to see the current configuration of the cluster.
Conclusion
We have covered the basics of Kubernetes, including its main components and concepts, as well as how to create, interact with, and delete a single-node or multi-node cluster using Minikube or Kubeadm.
Kubernetes is a powerful and complex tool for managing containers and applications at scale, but with the proper knowledge and skills, it can be an asset for any organization.
Interested in learning more about Kubernetes? Check out the following courses from KodeKloud:
- Kubernetes for the Absolute Beginner.
- Certified Kubernetes Administrator (CKA)
- Certified Kubernetes Application Developer (CKAD)