


This article will create a simple web application that will interact with your Kubernetes cluster using the Python-based web framework Django. A good use case for this application is when you want to give certain users within your organization an easy and effortless way to access and view cluster resources.
Before we build the applications, Let's first discuss the benefits of such an application.
Benefits of Creating a Web Application to Access Your Kubernetes Cluster
- Reporting - A dedicated team in your company may want to monitor how your pods behave or scale at specific times. A streamlined and user-friendly interface to view the cluster resources can help them track these resources. You can also add other features such as automated email notifications, data exports in a CSV format, and so on.
- Security - You won’t be worried about scenarios where users can accidentally have permission to access restricted parts of your cluster. You have control over actions at the application level which is more secure.
- Troubleshooting and Support - There may be cases where support and troubleshooting are handled by individuals who are not part of your development team. Providing them with a simple-to-use web page allows them to view pod logs to aid with their investigation.
- Customizability - While it's true that there are many 3rd party tools that provide another layer of access to your cluster, there may be a chance that the specific set of features you’re looking for is not supported out of the box. Hence, creating your own web application gives you the freedom to extend and customize functionality depending on your needs.
Try the Kubernetes Pods Lab for free
Why Python?
One of the neat features of Kubernetes is that it allows programmatic access to the Kubernetes API. It provides a client library based on Python which we will use in this article.
How to set up and run a Python Django application to access your Kubernetes cluster
We will take you through a step-by-step guide on how to set up and run a Python web application that interacts with your Kubernetes cluster. We will use the Django web framework, a Python-based web framework that allows you to quickly develop a web page with minimal commands, plugins, and a few lines of code.
Prerequisites
To follow along with the examples in this post, you’ll need to have a code editor installed. In addition, you’ll need access to a running Kubernetes cluster. If you don’t have access to one, you can use a tool such as minikube to set up a Kubernetes cluster. You’ll also need to install kubectl on your local machine to interact with the Kubernetes cluster.
Now, let’s dive in!
1. Setup a Kubernetes cluster using Minikube
Minikube allows us to run an entire single-node Kubernetes cluster on our local computer. In this project, we’ll be setting up a simple minikube cluster that will be later referenced by our Python web application.
Start by running the following command to start our Kubernetes cluster:
:~/kubernetes$ minikube startThis should download and set up the latest version of Kubernetes on your local machine.
😄  minikube v1.25.2 on Debian bookworm/sid
✨  Using the docker driver based on existing profile
👍  Starting control plane node minikube in cluster minikube
🚜  Pulling base image ...
🏃  Updating the running docker "minikube" container ...
🐳  Preparing Kubernetes v1.23.3 on Docker 20.10.12 ...
    ▪ kubelet.housekeeping-interval=5m
🔎  Verifying Kubernetes components...
    ▪ Using image gcr.io/k8s-minikube/storage-provisioner:v5
🌟  Enabled addons: storage-provisioner, default-storageclass
🏄  Done! kubectl is now configured to use "minikube" cluster and "default" namespace by default
Once minikube is up, we can now run kubectl commands to interact with our Kubernetes cluster.
:~/kubernetes$ kubectl get nodes
NAME       STATUS   ROLES                  AGE   VERSION
minikube   Ready    control-plane,master   43h   v1.23.3
Let’s go ahead and create an nginx Pod that we can later fetch from our Python web application.
:~/kubernetes$ kubectl run nginx --image=nginx
pod/nginx created
:~/kubernetes$ kubectl get pods
NAME READY STATUS RESTARTS AGE
nginx 1/1 Running 0 34sWe are now done with the Kubernetes setup. Let’s go ahead and proceed to create our Python web application.
2. Install Python 3
To get started with our web application, you must install the latest Python version on your computer. If you don’t have it yet, visit official Python page to download and install the latest version and the one that matches your operating system.
Once installed, you can verify the version by running the command below:
:~$ python3 --version
Python 3.10.4
3. Install Pip3
In this step, we'll install pip3, the official package manager for Python. It allows you to add different packages and features to our Python project by installing them through pip.
We install pip3 by executing the command:
:~$ sudo apt-get install python3-pipAfter the installation, we can verify the version with this command:
:~$ pip3 --version
pip 22.1.2 from ~/.local/lib/python3.10/site-packages/pip (python 3.10)
Once pip3 is installed, let’s go ahead and install pipenv. Pipenv allows us to package our Python project in its own environment. Any packages that we install in our project would only take effect in the virtual environment that pipenv provides. Thus making our host computer safe from any possible breaking changes.
To install pipenv let’s run this command:
:~$ pip3 install pipenvNote: Once pipenv is installed, you may also need to add the directory where it was installed to your host computer’s $PATH
Let’s verify if pipenv was installed successfully by verifying its version:
:~$ pipenv --version
pipenv, version 2022.6.7
4. Creating our Project
Now, let’s go ahead and create our project folder and name it a cluster.
:~$ cd ~
:~$ mkdir cluster
:~$ cd cluster
:~/cluster$
Then, install the Django package through pipenv.
:~/cluster$ pipenv install djangoThis will create 2 new files, Pipfile and Pipfile.lock. These files keep track of different packages installed in our project as well as list down the versions used at the time of installation. This will also create a virtual environment to enclose the entire project.
Now that the Django package has been installed let’s go inside the virtual environment that Pipenv created for this project. This is necessary so that any commands we execute should only affect the project and not the host computer:
:~/cluster$ pipenv shell
Launching subshell in virtual environment...
:~/cluster$ source ~/.local/share/virtualenvs/cluster-G7emmHve/bin/activate
(cluster) :~/cluster$
We can now use different Django commands. Let’s go ahead and initialize our project with the following command:
(cluster) :~/cluster$ django-admin startproject cluster .This will create all the necessary files to bootstrap your Django project.

One of the created files is called manage.py. This file allows us to interact directly with our Django application. Instead of using django-admin we’ll use manage.py to execute django commands into our project further.
Let’s now run our project through a development server that django-admin provides with the following command:
(cluster) :~/cluster$ python3 manage.py runserverNotice that it mentions migrations. We won’t use any database for this project, so we can ignore this.
Watching for file changes with StatReloader
Performing system checks...

System check identified no issues (0 silenced).

You have 18 unapplied migration(s). Your project may not work properly until you apply the migrations for app(s): admin, auth, contenttypes, sessions.
Run 'python manage.py migrate' to apply them.
June 11, 2022 - 09:23:11
Django version 4.0.5, using settings 'cluster.settings'
Starting development server at http://127.0.0.1:8000/
Quit the server with CONTROL-C.
It should output the URL (i.e. http://127.0.0.1:8000), where our app can be accessible. Now our project is up and running:
5. Creating Our First Application
Now, let’s go and create our first application by running the command:
(cluster) :~/cluster$ python3 manage.py startapp homeThis should create a new folder in our project called home with a different set of files.

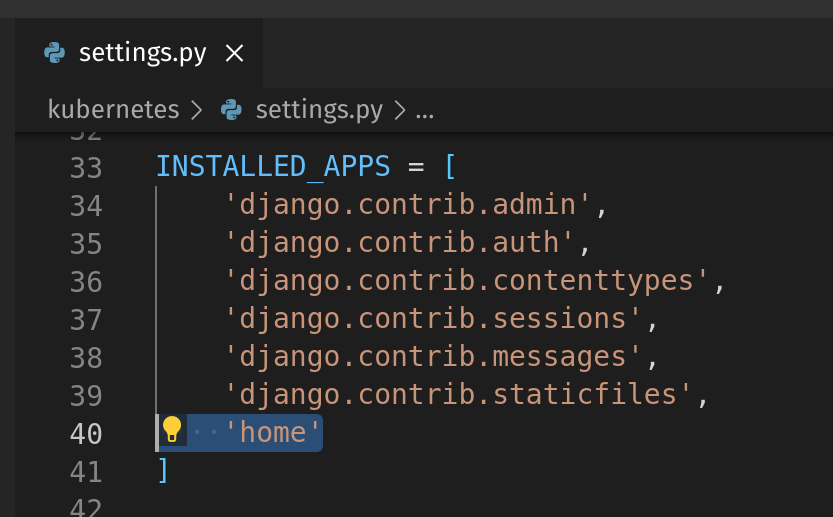
Then, we will need to register our new app in the settings.py file of our project by simply adding the name of the application to the INSTALLED_APPS list, as seen below:
6. Adding a Template
Now, for this project, when a user accesses the URL, /cluster/nodes, it should display details about the nodes in the cluster. In the same vein, when a user goes to /cluster/pods, it should show the details about the pods in the cluster.
Let’s go ahead and create a new directory named templates in the home folder. Then, create two HTML files, nodes.html and pods.html. It should look like this below:

Then, let’s put some content in those two files. We will access these web pages much later:

Next, we’ll update the home/views.py file and add two functions that will point to those HTML files we created earlier:

Next, let’s create a new file called urls.py inside the home folder with the contents below. Notice how we were importing views.py in order for us to reference the function we created earlier:

Then, finally, we update cluster/urls.py and register the new urls.py we created earlier inside the home folder with a path /cluster:

And that's it! Let’s test both routes and see if they’re working correctly:


7. Installing the Kubernetes Package
Now that we’ve completed the initial pages for our web application, it’s time to add the Kubernetes-client package to our project. To do that, we just need to execute the following command:
(cluster) :~/cluster$ pipenv install kubernetes/usr/lib/python3/dist-packages/pkg_resources/__init__.py:116: PkgResourcesDeprecationWarning: 0.1.43ubuntu1 is an invalid version and will not be supported in a future release
warnings.warn(
Courtesy Notice: Pipenv found itself running within a virtual environment, so it will automatically use that environment, instead of creating its own for any project. You can set PIPENV_IGNORE_VIRTUALENVS=1 to force pipenv to ignore that environment and create its own instead. You can set PIPENV_VERBOSITY=-1 to suppress this warning.
Installing kubernetes...
Adding kubernetes to Pipfile's [packages]...
✔ Installation Succeeded
Pipfile.lock (79baf8) out of date, updating to (3c871c)...
Locking [dev-packages] dependencies...
Locking [packages] dependencies...
Building requirements...
Resolving dependencies...
✔ Success!
Updated Pipfile.lock (3c871c)!
Installing dependencies from Pipfile.lock (3c871c)...
🐍 ▉▉▉▉▉▉▉▉▉▉▉▉▉▉▉▉▉▉▉▉▉▉▉▉▉▉▉▉▉▉▉▉ 1/1 -- 00:00:00
To activate this project's virtualenv, run pipenv shell.
Alternatively, run a command inside the virtualenv with pipenv run.
(cluster) :~/cluster$ To verify if it’s been successfully added to the project, you can check out the contents of the Pipfile file. It should add Kubernetes under packages. Once installed, this will now allow us to import Kubernetes modules:

8. Kubernetes Client API endpoints
The Kubernetes client for Python includes a wide array of API endpoints you can use to interact with a Kubernetes cluster. All methods are organized and categorized by class. You can refer to the full list here to see what methods are available, and you can use them in your Python application.
9. Updating the nodes page
Let’s go ahead and add some functionality to our nodes page and actually have it display information about nodes in our cluster. In home/views.py, let’s modify the display_nodes function we created earlier:
from django.shortcuts import render
from django.http import HttpResponse
from kubernetes import client, config

# Create your views here.
def display_nodes(request):
    config.load_kube_config()
    v1 = client.CoreV1Api()
    nodes = v1.list_node().items
    return render(request, 'nodes.html', {'data': nodes})
In the code above, we start by importing the client and config module from the Kubernetes package:
from kubernetes import client, configThen, we loaded the ~/.kubeconfig file, which will then load our local minikube cluster:
config.load_kube_config()Then, we created a new CoreV1Api() object from the client module. Now the reason why we’re using CoreV1Api is If you look at the list of methods and classes from the kubernetes-client documentation, there’s a method called list_node that allows us to pull information related to nodes from our cluster. list_node method is under the CoreV1Api class:
v1 = client.CoreV1Api()Then, we assign the values from the list_node method to a variable named nodes. Afterward, we pass that value in the render function as a data parameter.
return render(request, 'nodes.html', {'data': nodes})If we print the value of the nodes above, we are presented with a dictionary. Inside that dictionary, there’s a list called items. This list contains information about each node in the cluster. Since we’re using minikube, which is a single-node Kubernetes cluster, we should expect to only see 1 node inside this list:
{'api_version': 'v1',
'items': [{'api_version': None,
'kind': None,
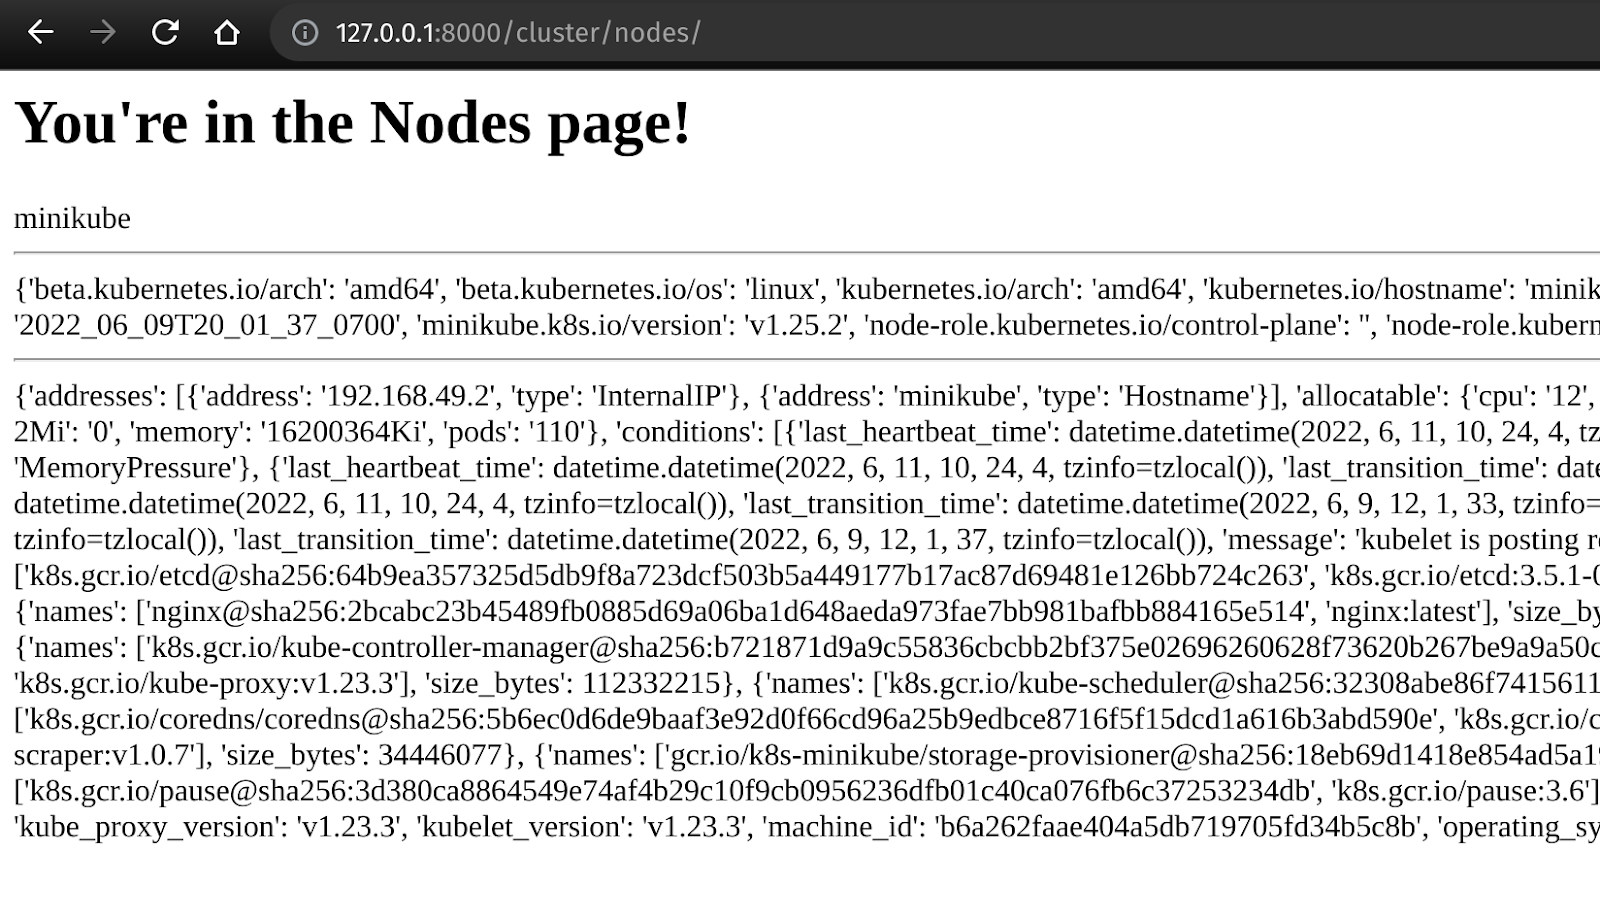
'metadata': {'annotations': {'kubeadm.alpha.kubernetes.io/cri-socket': '/var/run/dockershim.sock'.....Let’s pull some information about the nodes in the cluster via the data variable in home/templates/nodes.html.
<h1>You're in the Nodes page!</h1>
{% for item in data %}
    {{ item.metadata.name }}
    <hr>
    {{ item.metadata.labels }}
    <hr>
    {{ item.status }}
{% endfor %}
Let’s refresh our browser, and now we see that the nodes page displays the name, labels, and status of the only node in the cluster.
10. Updating the Pods Page
For the pods page, we’ll apply the same changes. But instead of using the list_pods method, in order to list pods, we can use the list_pod_for_all_namespaces method, which will allow us to display information for pods in all namespaces.
In home/views.py, add the following code changes for the display_pods function:
def display_pods(request):
    config.load_kube_config()
    v1 = client.CoreV1Api()
    all_pods = v1.list_pod_for_all_namespaces()
    return render(request, 'pods.html', {'data': all_pods.items})
Since the data for all components in Kubernetes shares almost the same data structure, we can also reference data similar to our nodes page.
In home/templates/pods.html, add the following code changes:
<h1>You're in the Pods page!</h1>
{% for item in data %}
    {{ item.metadata.name }}
    <hr>
    {{ item.metadata.labels }}
    <hr>
    {{ item.status }}
{% endfor %}
Our Pods page now displays information on pods currently running in the cluster:

To learn Python, check out KodeKloud's courses:
Conclusion
In this article, we developed a simple web app using Python that fetches data from the Kubernetes cluster. However, there are a ton of functionalities you can add to your web application, such as creating or modifying objects in your Kubernetes cluster. You can find more information on the different APIs you can utilize in the Python Kubernetes client’s GitHub repository.
More on Kubernetes and Python:


Discussion