


In the part 2 of the 7-article series, we covered Kubernetes. This piece tackles the operations involved in creating, running, and managing images in Docker.
Here are the five other parts:
- Docker Certified Associate Exam Series (Part-1): Container Orchestration
- Docker Certified Associate Exam Series (Part-4): Installation and Configuration
- Docker Certified Associate Exam Series (Part-5): Networking
- Docker Certified Associate Exam Series (Part-6): Docker Engine Security
- Docker Certified Associate Exam Series (Part-7): Docker Engine Storage & Volumes
We use images in Docker to package, share, and transport applications in preconfigured server environments. An image is, in essence, a template that contains the set of instructions we use to create and run containers on the Docker platform.
The Docker Image Registry and Operations
In Docker, an image registry is a central repository where you can store and retrieve images. The default repository service for storing and retrieving images is known as the Docker Hub. Here, you will find three kinds of images.
- Official Images that are published and maintained by Docker, and these include Operating Systems, Databases, and other running software.
- Verified Images are created and published by third-party vendors such as Oracle and MySQL.
- User Images are created and published by developers and users globally.
Within an organization, you can create a repository to publish and share images between colleagues using the Docker Trusted Registry Service. Public cloud providers also offer registry services for individuals and organizations. These include Google Container Registry, AWS Elastic Container Registry, and Azure Container Registry.
Image Tags help you to categorize and describe an image, ensuring it conveys important information. This way, users and developers can differentiate the various available images in the registry. If you don’t specify an image tag, it is given the latest tag by default.
Common Used Docker Images Commands
You can download and deploy images using the docker run command. For instance, to download and deploy an Ubuntu image, run this command:
docker run ubuntuYou can also search for an image on the Docker CLI. For instance, to search for the image httpd, run the command:
docker search httpdTo limit your search results to the top 2, run the command:
docker search httpd --limit 2To limit your search results to images with a 10-star rating, run the command:
docker search --filter stars=10 httpdTo limit your search results to verified images with a 10-star rating, run the command:
docker search --filter stars=10 --filter is-official=true httpdTo list the images running in a host, run the command:
docker image lsTo download an image without running it, run the command:
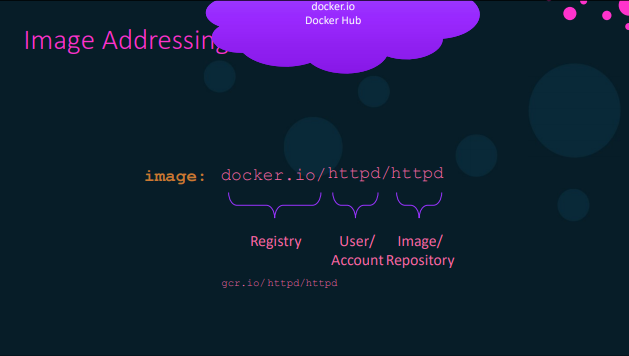
docker image pull httpdImage Addressing Conventions
Below are some image-addressing conventions:
- Image names are typically composed of slash-separated elements. They are typically prefixed by a hostname that complies with standard DNS naming rules but does not need to include underscores.
- Any image name that lacks a hostname is assumed to belong to the default public registry docker.io.
- Other public registry addresses include gcr.io for Google, public.ecr.aws for AWS and azurecr.io for Microsoft Azure.
When specifying a name for your image, you will need to give the user/account (name of your organization on the repository), the name of the image, and the repository to which it belongs, as seen in the screenshot below:
Authenticating to Registries
You don't need to authenticate when pulling an image from a public registry. For instance, to download and run the image for Ubuntu OS from Docker Hub, you only need to run the command:
docker run ubuntuTo pull an image from a private repository, you must provide authentication; otherwise, you will get an access denied error. You must also provide authentication to push (publish) an image into a public or private registry.
First, you will log in to the registry. For instance, to log into the public registry, Docker Hub, run the command below:
docker login docker.ioTo log into a private registry on Google Cloud, run the command:
docker login gcr.ioYou will then be asked for your username and password. For the former, you can use Docker Hub credentials. If you don’t have a Docker Hub account, you can create one here.
For the Google Cloud account, use the credentials set up in your organization’s repository.
You can then push the image into the registry by running the command:
docker image push httpdRetagging an Image Locally
We retag an image so we can create a soft link to an existing image, providing a replica without having to actually create a copy. The following command will retag an image already in the repository:
docker image tag httpd:alpine httpd:customv1This will create a new image tagged customv1 but with the same ImageID as the one tagged alpine. You can check this by listing images in your registry using the command:
docker image listYou may also want to tag this new image into the private registry. To accomplish this, run the command:
docker image tag httpd:alpine gcr.io/company/httpd:customv1You can now publish this image privately by running the command:
docker image push gcr.io/company/httpd:customv1To display the size of all objects running in Docker, type the command:
docker system dfRemoving a Docker Image
You should delete Docker Images that are not in use anymore, as this helps reclaim space and other resources. To remove an image that you no longer use, run the command:
docker image rmTo remove one version of an image, specify its tag in the command, as shown below:
docker image rm httpd:customv1Note that this command only removes an image version but preserves the image layers as other versions use them. When you remove the last version of an image, all these layers are deleted to reclaim space.
You can use the prune command to delete all unused images in the Docker environment.
docker image prune -aInspecting a Docker Image
Various commands allow you to check container information straight from the Docker CLI. The docker image list command lets you view all images running in Docker.
To list all layers/versions linked to an image, run the image history command as follows:
docker image history ubuntuTo check on the configuration details in the Dockerfile used to create an image, run the image inspect command:
docker image inspect httpdYou can use a JSON expression to filter specific configuration details you need from the Dockerfile. For instance, to get the operating system the image runs on, you’ll use the expression:
docker image inspect httpd -f '{{.Os}}'To get information on the architecture supporting the image, run the command:
docker image inspect httpd -f '{{.Architecture}}'To get both the architecture and operating system, run the command:
docker image inspect httpd -f '{{.Os}}{{.Architecture}}'To get nested information, separate the components using a period as shown:
docker image inspect httpd -f '{{.ContainerConfig.ExposedPorts}}'Save and Load the Image
You may need to get images to restricted environments with no access to the internet. To do this, you convert an image file into a .tar file using the save command:
docker image save alpine:latest -o alpine.tarThis creates a .tar bundle that can be transferred to any restricted environment using a network folder or pen drive. In this environment, you can extract the contents of this bundle using the load command:
docker image load -i alpine.tarYou can also convert containers into.tar image bundles to transfer them to other environments. To achieve this, run the export command:
docker export > testcontainer.tarYou can now import this file as an image on any system using the import command:
docker image import testcontainer.tar newimage:latestYou can use the list command to list all the images and check whether your new image has been created.
Building a Custom Image
Sometimes, you may not find a component or service in the repository that offers the necessary functionality. In such cases, you can create a custom image. This is also useful when containerizing your application for easy shipping and deployment.
In this demo, you will containerize an application using Python’s Flask framework.
The general process will involve the following steps:
- Specify the Operating System (Ubuntu).
- Update Repositories using the
aptcommand. - Install Python dependencies using the
pipcommand. - Copying source code to the
/optfolder. - Run the web server using the
flaskcommand.
Here’s a rundown of the actual demo:
- Create a Dockerfile and save it in your project directory as
Dockerfile. The file should have the following attributes:
FROM ubuntu
RUN    apt-get update && apt-get -y install python python3-pip
RUN    pip3 install flask flask-mysql
COPY ./opt/source code
ENTRYPOINT FLASK_APP=/opt/source-code/app.py flask run- The FROM attribute specifies the base OS or image on which the application will run.
- The RUN command specifies dependencies that interact with the application.
- The COPY command copies files from the local folder to the registry.
- The ENTRYPOINT will specify the command to initiate the container once the image has been created.
2. We can now use the Dockerfile to build an image by running the command:
docker build -t account-name/my-custom-app .3. Following the above, publish this image to the registry by running the command:
docker push account-name/my-custom-app- You can check information on your image by running the
historycommand:
docker image history my-custom-appHTTPD Image
In this demo section, you will build a custom httpd image in Docker and publish it in Docker Hub. First, begin by creating a new project directory by running the command:
mkdir firstimageRun the command below to move into the newly created folder:
cd firstimageThen, create a Dockerfile by running the command:
vi DockerfileThen run the cat Dockerfile command to check that this file has been created. You will then create this Dockerfile with the instructions and arguments below:
FROM centos:7
RUN         yum -y update
RUN         yum -y install httpd
COPY        ./index.html /var/www/index.html
EXPOSE      80
CMD         ["httpd","-D","FOREGROUND"]
Now create a file named index.html, which will be a simple web application built to display the words, Welcome to KodeKloud Again. You will create it by running the command:
vi index.htmlThis will be written in HTML format, as shown:
<!DOCTYPE html>
<html lang="en">
<head>
    <meta charset="UTF-8">
    <meta name="viewport" content="width=device-width, initial-scale=1.0">
    <title>Document</title>
</head>
<body>
    Welcome to KodeKloud Again
</body>
</html>
Now, build an image using this file by running the command:
docker image build -t user-account/imagename:v1To verify that the image has been created, run the docker image list command:
docker image lsTo check on this image’s specific layers, use the history command:
docker image historyTo perform a quick test on the health and presence of this image, run the command:
docker container run -itd --name=testimage -p 82:80 user-account/imagename:v1You can now publish this image to Docker Hub by running the command:
docker push user-account/imagename:v1Tomcat Image
This section demonstrates how you can build and publish a Tomcat image. This is a practical Dockerfile with new instructions. To run a Tomcat image, you will need first to clone the Tomcat repository using the command:
git clone https://github.com/user-account/dockertomcat.gitOnce you have successfully cloned the repository, create a Dockerfile using the cat command, with the properties as follows:
FROM        centos:7
ARG         tomcat version=8.5.6
RUN         yum -y epel-release java-1.8.0-openjdk.x86_64
RUN         groupadd tomcat && mkdir /opt/tomcat
RUN         useradd -s /bin/nologin -g tomcat -d/opt/tomcat tomcat
WORKDIR     /
RUN         wget  https://archive.apache.org/dist/tomcat/tomcat-8/v$tomcat_version/bin/apache-tomcat-$tomcat_version.tar.gz
RUN         tar -zxvf apache-tomcat-$tomcat_version.tar.gz -C/opt/tomcat  --strip-components=1
RUN         cd/opt/tomcat && chgrp -R tomcat conf
RUN         chmod g+rwx /opt/tomcat/conf && chmod g+r /opt/tomcat/conf/*
RUN         chown -R tomcat /opt/tomcat/logs/      /opt/tomcat/temp/opt/tomcat/webapps/opt/tomcat/work
RUN         chgrp -R tomcat /opt/tomcat/bin && chgrp -R tomcat /opt/tomcat/lib && chgrp -R tomcat /opt/tomcat/lib && chmod g+rwx /opt/tomcat/bin && chmod g+r /opt/tomcat/bin/*
WORKDIR     /opt/tomcat/webapps
RUN         wget https://tomcat.apache.org/tomcat-7.0-doc/appdev/sample/sample.war
EXPOSE      8080
CMD         ["/opt/tomcat/bin/catalina.sh","run"]
You can now build an image from this Dockerfile by running the command:
docker image build -t user-account/tomcatone:v1Create a test container to check on this image by running the command:
docker container run -itd --name=imagetesting -p 84:8080 user-account/tomcatoneYou can now test this application by inputting its IP address on your browser. To deploy a newer version, use the command:
docker image build -t user-account/tomcatone:v2--build-arg tomcat_version=8.5.8The Docker Commit Method
We can use the Docker Commit method to build images using existing containers. To do this, we’ll first create a container with the image httpd using the command:
docker run -d --name httpd httpdWe’ll now build a custom image version based on the one created in the previous step:
docker exec -it httpd bashYou can also commit a container as it is from an image by running the command:
docker container commit -a "author-name" httpd customhttpdCreating Images using Docker Commit
In this demo lesson, let us build a custom image using the Docker commit method.
- First, you will pull an image for the operating system by running the command:
docker image pull centos:72. Then, create a container named test:
docker container create -it --name=test centos:73. To confirm that you have successfully created this container, run the command:
docker container ls -l 4. To start working inside this container, initiate it with the command:
docker container start test5. Update packages and dependencies. Start by attaching the terminal to the container by running the command:
docker container exec -it test /bin/bashUpdate the packages and dependencies by running this command:
yum -y update6. You can now customize your web page by typing in the HTML code as shown:
echo ' "Hello from KodeKloud" 'You can ascertain that you have properly configured your dependencies and packages by running the docker container ls command.
7. To stop this test container and exit, run the command:
docker container stop test8. Let us go through Docker Hub's various commit options to familiarize ourselves with the method. To commit a version to the current container, run the command:
docker container commit -a "author-name" -c 'CMD ["httpd","-D","FOREGROUND"]' test webtest:v19. Create a container to test whether the new image version is working by running the command:
docker container run -itd --name=webtesting -p 80:80 webtest:v110. Test access to this webpage from your browser. If successful, the container is healthy and has retained your customizations. You can now easily tag this image and push it to Docker Hub. The following command can be used to tag your image:
docker image tag webtest:v1 author-name/image-name11. To push this image to Docker Hub, you’ll need to log into the Docker account by running the command:
docker login12. After providing your details, you can now push your image to the Docker Registry with this command:
docker push author-name/image-nameBuild Contexts
In Docker, a Build Context specifies a path to the directory that contains all the files needed to run your containers. Consider the application we tried to run earlier:
FROM ubuntu
RUN    apt-get update $$ apt-get -y install python python-pip3
RUN    pip3 install flask flask-mysql
COPY ./opt/source code
ENTRYPOINT FLASK_APP=/opt/source-code/app.py flask run
The Docker CLI stores the files in a folder named:opt/source code
The Docker Daemon that runs the containers usually creates a similar directory into which it transfers the files temporarily – /var/lib/docker/tmp/docker-builderxxxxx
Special Note: You should only store the files you need to run your application in the build context, as any more would slow the build process. You can also create the .dockerignore file to tell Docker Daemon which files to ignore during the build process.

You can also specify the URL to a repository to build an image from a remote source. This clones the repository within your Docker environment and then builds images from it. The command for this would be:
docker build https://github.com/my-account/my-appSpecify the branches that your daemon will check out while building the image using the extension:
docker build https://github.com/my-account/my-app#You can also point the builder to a specific folder within the repository if required, as shown below:
docker build https://github.com/my-account/my-app:You may need to create a separate file with instructions on building the image. In such cases, you build a Dockerfile together with the application image as shown:
docker build -f Dockerfile.dev https://github.com/my-account/my-appBuild Cache
When creating an image, each instruction creates a new layer, which then adds some storage to the image based on the instructions' output. Docker builds the layers progressively from first to last, and each layer is cached so that if one fails, Docker will not have to rebuild them from scratch.
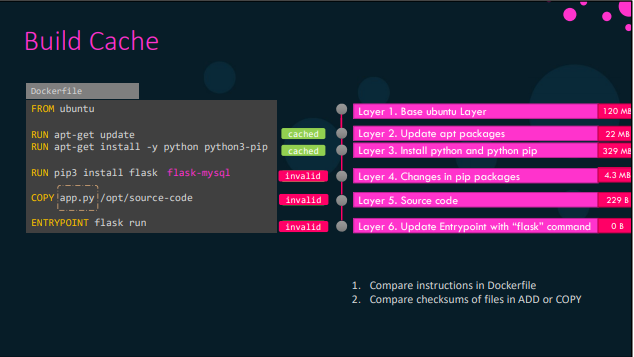
When rebuilding an application, Docker uses various criteria to determine which layers can be rebuilt from the cache and which ones must be rebuilt from scratch. It first checks instructions in the Dockerfile.
If an instruction has changed, the cache from that and the remaining layers are deemed invalid. Docker also compares the checksums of files specified in the COPY and ADD instructions and these caches are deemed invalid if there is a difference.
Cache Best Practices
Below are some of caching best practices:
- Cache Busting: Combine the update and install arguments into one, forcing an update before any installation. To make the files easier to locate, we keep the elements in different lines, separated by a slash, and in alphabetic order.
- Version Pinning: In the build command, specify that you want the build to point to the latest version of the image.
- Bottom listing: List the most frequently modified instructions at the bottom of the Dockerfile. This means fewer caches are invalidated during frequent rebuilds.
COPY vs. ADD
- The
COPYandADDcommands have sometimes been used interchangeably since they both transfer files from local repositories to the image’s file system, but they have fundamental differences. - The
ADDcommand can access a local.tarfile, extract its files, and build an image out of it. - As a best practice, always use the
COPYcommand whenever possible. This instruction easily copies files locally and is straightforward so anyone can understand the file paths. All arguments in theCOPYinstruction can be run on a single line, reducing the number of layers in your image, thus making it small and lean enough. - As an illustration, here are two code snippets of images created with each command: For the
COPYcommand:
FROM centos:7
RUN         curl http://app.tar.xz\|tar -CJ/testdir/file.tar.xz\&&yarn build \ && rm /testdir/file.tar.xz
FROM centos:7
ADD http://app.tar.xz/testdir
RUN tar-xJF/testdir/app.tar.xz -C /tmp/app
RUN make -C /tmp/appThe snippet above shows the Dockerfile configurations for the ADD command.
CMD vs. ENTRYPOINT
Containers are ephemeral, meaning they only stay active when they are running a process. When you run the command:
docker run ubuntuWith this, the container created is exited immediately. This is because containers cannot host Operating Systems. Instead, they are designed to run specific tasks, including application servers, databases, and web servers. Every Dockerfile used to build an image typically comes with a CMD instruction.
This command usually decides the process that runs on a container when it is initialized. A quick point to note here is that Ubuntu uses bash as its running command. Bash is not a process; rather, it is a shell that listens to requests from a terminal. With no terminal running in the environment, this container always exits immediately.
When you run the command:
docker psYou won’t see the Ubuntu container, as it is not listed among the running containers. Instead, use the command:
docker ps -aThe above command will show you all containers, including the Ubuntu file created and exited. You can keep this container running for some time by appending the run command to specify the time it takes before executing the bash command, as shown in the code:
docker run ubuntu sleep 5In this case, the Ubuntu image will initiate, run for 5 seconds, and then execute the bash command, at which point it will exit the container.
We can make this change permanent by enforcing the command in a Dockerfile as shown:
FROM ubuntu
CMD  sleep 5
You can now build a newer version of the application by running the command:
docker build -t ubuntu-sleeperInitiate this application by running the command:
docker run ubuntu-sleeperWhen you launch this application, the command at startup will be sleep 5. To change the waiting time, you could enforce it in the command line as follows:
docker run ubuntu-sleeper sleep 10When you launch this application, the command at startup will be sleep 10. An ENTRYPOINT helps specify how the program runs when the container starts, so you won’t have to specify the sleep command every time by changing this number. This means that all changes to be appended in the command line are written in the container.
FROM ubuntu
ENTRYPOINT ["sleep"]
CMD ["5"]
To overwrite an existing ENTRYPOINT, adjust it within the command line as follows:
docker run --entrypoint sleep2.0 ubuntu-sleeper 10The command at startup will be sleep 2.0 10
Base vs. Parent Image
There are various types of images and dependencies in Docker. A Base Image is one that has been built from scratch. Examples of base images are Ubuntu and debian:buster-slim.
A parent image lends its dependencies to other images, and these include httpd and custom-php. Scratch is the top-most level of image abstraction, and most scratch images are available in the Docker Registry. For instance, the Dockerfile for the debian:buster-slim is:
FROM scratch
ADD  rootfs.tar.xz/
CMD [“bash]
Multi-Stage Builds
When creating an application in your development server, you will always work with multiple files and dependencies. Let’s see this by building a Node.js application.
- Build the application by running the command:
npm run buildWe containerize the application using this Dockerfile:
FROM nginx
COPY dist/usr/share/nginx/html
CMD [“nginx”,”-g”,”daemon off;”]
2. Then use the command below to build the container:
docker build -t my-app .In most production environments, you will need to create multiple versions of applications that share dependencies, and you’ll need to ensure that all development servers are well-matched.
In this case, we use a builder Dockerfile to guide the build process, using the specifications below:
dockerfile.builderFROM node
COPY . .
RUN npm install
RUN npm run buildNow build an image from this Dockerfile by running the command:
docker build -t builderThis gives you a clean, consistent build. You can then copy the distribution file path from the builder using the format:
copy-dist-from-builer.shCreate a container without starting it by executing this command:
docker container create --name builder builderCopy the builder file into the container with this command:
docker container cp builder: dist./distSpecify the Dockerfile using the following command:
docker container -f builder3. This is the third stage in the container-building process, and it helps extract distribution files. You can create a single, multi-stage build by combining the building, extraction, and containerization process into a single Dockerfile. A multi-stage build contains more than one FROM instruction and dependencies are shared by adding a pointer to the COPY instruction, as shown.
FROM node As builder
COPY . .
RUN  npm install
RUN  npm run build

FROM nginx
COPY --from=builder dist/usr/share/nginx/html
CMD [“nginx”,”-g”,”daemon off;”]
The As builder argument creates and names the application builder. The COPY command on the second part then instructs the Docker Daemon to get information from this application using the argument --from=builder.
Multi-stage builds help us:
- Optimize Dockerfiles by making them easy to read and maintain.
- Keep the image size small.
- Avoid having to keep different container files for development and production.
- Eliminate the need for intermediate images.
Dockerfile – Best Practices
Here are a few tips to make the most of your Docker images:
- Do not build images that run multiple containers. Each image should be running a specific task. These images can then communicate with each other and form a single application that runs multiple services. This makes it easy to scale each component independently.
- Do not store data or state in containers since containers are ephemeral. Always store persistent information using external volumes or a caching service (e.g., Redis).
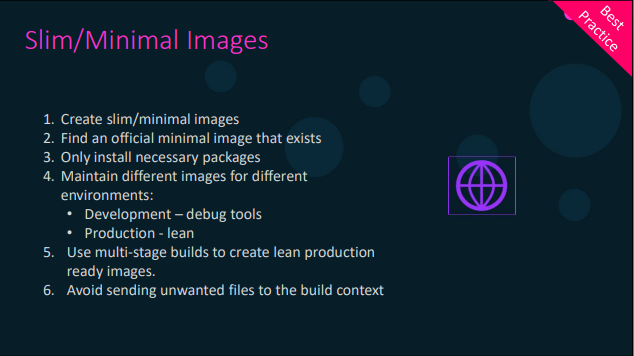
- Try to keep your images as lean and minimal as possible. You can find existing minimal images for Operating Systems, Databases, and other services. Only install the packages necessary to run your application.
- Maintain different images for different environments. For instance, images running in the development environment may require tools like monitoring and debugging. Keep these out of your production environment.
- Use multi-stage builds so you won’t need to create many images.
- Do not send unnecessary files to the build context.
These building patterns are helpful for anyone looking to build applications in Docker. It is also advised that you keep yourself updated with Docker documentation and blogs on recent developments to improve Docker image builds and integrate these into your practice as you go. As you keep practicing with Docker builds, you will also discover workflows and patterns to make your applications lean and minimal.
Explore our Docker Certified Associate Exam preparation course.


Research Questions
This concludes the Image Creation, Management, and Registry chapter of the DCA certification exam.
Here is a quick quiz to help you assess your knowledge. Leave your answers in the comments below and tag us back.
Quick Tip – Questions below may include a mix of DOMC and MCQ types.
1. What is a recommended best practice for installing packages and libraries using the apt-get package manager while building an image?
[A] Download packages on the host and use ADD instructions to add them to the image.
[B] Use the ADD instruction to provide a URL to the package on the remote host.
[C] Use the RUN instruction and have the apt-get update and apt-get install commands on the same instruction
[D] Use the RUN instruction and have the apt-get update and apt-get install commands as separate instructions
2. An application you are developing requires an httpd server as frontend, a Python application as the backend API server, a MongoDB database, and a worker developed in Python. What is the recommended approach in building images for these containers
[A] Build httpd, python API server, MongoDB database, and Python worker into a single image to allow ease of deployment
[B] Build httpd into an image, MongoDB database into another, and Python API and worker together into a single image
[C] Build separate images for each component of the application
3. Which of the following commands may be used to list all images matching the com.example.version label?
[A] docker images --label=”com.example.version”
[B] docker images --filter "com.example.version"
[C] docker images --filter "label=com.example.version"
[D] docker images --format "label=com.example.version"
4. What is the command to change the tag of httpd:latest to httpd:v1
[A] docker container image retag httpd:latest httpd:v1
[B] docker container image tag httpd:latest httpd:v1
[C] docker image retag httpd:latest httpd:v1
[D] docker image tag httpd:latest httpd:v1
5. When you log in to a registry using the docker login command, the credentials are stored locally at…
[A] $HOME/.docker/config.json
[B] /etc/docker/.docker/config.json
[C] /var/lib/docker/.docker/config.json
[D] /var/lib/docker/containers/.docker/config.json
6. Which of the following is the correct docker image address to be used to access an image named payapp hosted under the organization payroll at a private registry registry.company.io?
[A] registry.company.io/payapp/payroll
[B] payroll/registry.company.io/payapp
[C] payapp/registry.company.io/payroll
[D] registry.company.io/payroll/payapp
7. What is the command used to find images with a name containing postgres, with at least 12 stars?
[A] docker find --filter=stars=12 postgres
[B] docker search --filter=stars=12 postgres
[C] docker find --limit=12 postgres
[D] docker search --limit=12 postgres
8. After building the below code with an image named webapp, What will happen when you run docker run webapp sleep 1000?
FROM ubuntu:18.04
COPY . /app
RUN make /app
CMD python /app/app.py
[A] docker overrides the ENTRYPOINT instruction with sleep 1000
[B] docker overrides the CMD instruction with sleep 1000
[C] docker override ENTRYPOINT instruction with sleep and CMD instruction with 1000
9. Choose the correct instruction to add the command instruction with the command echo “Hello World” in the Dockerfile
[A] CMD [echo "Hello World"]
[B] CMD ["echo", "Hello World"]
[C] CMD ["Hello World"]
[D] CMD Hello World
10. What is the right instruction to download a file from https://file.tar.xz and auto-extract it into /testdir in the image
[A] ADD https://file.tar.xz /testdir
[B] COPY https://file.tar.xz /testdir
[C] RUN https://file.tar.xz /testdir
[D] Volume https://file.tar.xz /testdir
11. Which of the below can help minimize the image size?
[A] Only install necessary packages within the image
[B] Avoid sending unwanted files to the build context using .dockerignore
[C] Combine multiple dependent instructions into a single instruction and cleanup temporary files
[D] Move the instructions that are likely to change most frequently to the bottom of the Dockerfile
[E] Use multi-stage builds
12. Which of the following statements best describes Docker Trusted Registry (DTR)?
[A] Docker Trusted Registry (DTR) is Mirantis’s enterprise-grade image storage solution.
[B] Installed behind the firewall only on-premises
[C] DTR provides a secure environment from which users can store and manage Docker images.
[D] Using DTR in Docker EE, we can control who can access and make changes to your cluster and applications
13. A government facility runs a secure data center with no internet connectivity. A new application requires access to docker images hosted on Docker Hub. What is the best approach to solve this?
[A] Get the Dockerfile of the image and build a local version from within the restricted environment.
[B] Establish a secure link between the host in the restricted environment and the Docker Hub
[C] Pull docker images from a host with access to Docker Hub, convert them to a tarball using the docker image save command, copy them to the restricted environment, and extract the tarball
[D] Pull docker images from a host with access to Docker Hub, then push to a registry hosted within the restricted environment.
14. Which of the following is the correct format for CMD instruction?
[A] CMD ["executable", "param1", "param2"]
[B] CMD ["param1","param2"]
[C] CMD command param1 param2
[D] CMD param1 param2
15. Print the value of ‘Architecture’ and ‘Os’ of an image named webapp
[A] docker image inspect webapp -f '{{.Os}}' -f '{{.Architecture}}'
[B] docker image inspect webapp -f '{{.Os}} {{.Architecture}}'
[C] docker image inspect webapp -f '{{.Os}}', -f '{{.Architecture}}'
[D] docker image inspect webapp -f '{{.Os .Architecture}}'
16. While building a docker image from code stored in a remote URL, which command will be used to build from a directory called docker in the branch dev?
[A] docker build https://github.com/kk/dca.git#dev:docker
[B] docker build https://github.com/kk/dca.git#docker:dev
[C] docker build https://github.com/kk/dca.git:dev
[D] docker build https://github.com/kk/dca.gitdev:#docker
17. What are the features of the docker trusted registry (DTR)?
[A] Built-in Access Control
[B] Image and Job Management
[C] Security Scanning
[D] Autoscaling applications
[E] Image Signing
18. Docker Trusted Registry (DTR) is a containerized application that runs on a Docker Universal Control Plane cluster.
[A] True
[B] False
19. What is the command to push the image to a docker private registry?
[A] docker push /username/docke-repo-name
[B] docker push /docker-repo-name
[C] docker upload /username/docker-repo-name
[D] docker upload /docker-repo-name
20. Inspect the following output and answer the following questions:
REPOSITORY          TAG                 IMAGE ID            CREATED             SIZE
nginx               latest              c39a868aad02        4 days ago          150MB
redis               latest              4760dc956b2d        2 years ago         100MB
ubuntu              trusty              f975c5035748        2 years ago         100MB
webapp              latest              c39a868aad02        4 days ago          150MB
alpine              latest              3fd9065eaf02        2 years ago           5MB
I. What command might have generated the above output?
[A] docker container ps
[B] docker ps
[C] docker image ps
[D] docker image list
II. What is the total space consumed by images on this system?
[A] 355 MB
[B] 505 MB
[C] 405 MB
[D] 455 MB
Conclusion
By properly following this study guide until this part of the series, you have prepared yourself to handle all Docker image creation, management, and registry tasks.
Explore our Docker for Absolute Beginner course.


Discussion