


The Docker network is isolated from the host system's network, allowing containers to communicate securely with each other without interfering with other applications on the host. Docker also provides a set of commands and APIs for managing network connections and configuring network settings for individual containers.
This blog explores Docker network types and networking concepts, such as overlay networks, Docker swarm, embedded DNS servers, and routing mesh.
Docker Network Types
Let us first understand the three types of Docker networks:
- Bridge network
- None Network
- Host Network
Below is a graphical elaboration of the three network types:

We bind containers to a network by specifying ---network a flag. Here is the syntax:
docker run --network=[bridge | none | host] [IMAGE]Let us now look at how each of the three network types works.
I. Bridge Network
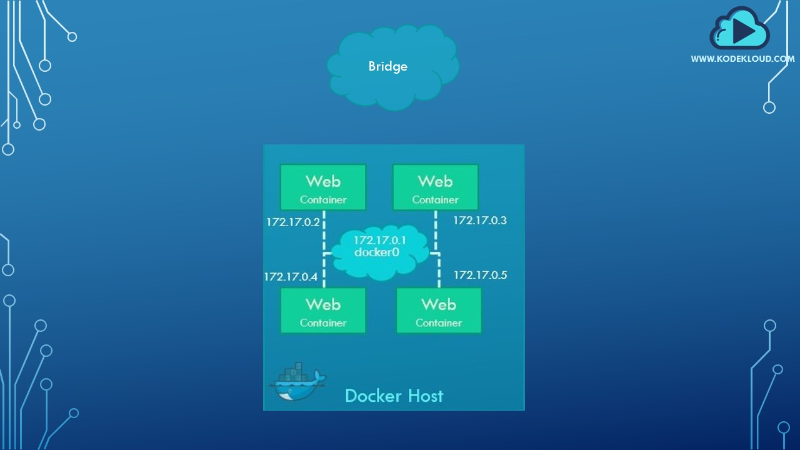
A bridge is the default Docker network to which a container gets attached. It is a private, internal network created by docker on the host. All containers attach to this network by default, and they get an internal IP address, usually in the range of 170.17.x.x.
Containers can access each other using this internal IP if required. To access any of these containers from outside-world, the docker bridge architecture maps the ports of these containers to ports on the docker host, as shown below:
II. Host Network
Another type of Docker network is the host network. This removes any network isolation between the docker host and the docker containers.
For example, if you were to run a web server on port 5000 in a web app container attached to the host network, it would automatically be externally accessible on the same port without requiring you to publish the port using the -p option. Below is an example of a command that binds nginx container to a host network:
docker run --rm -d --network host --name my_nginx nginxAs a web container using the host’s network, it would mean that, unlike before, you will not be able to run multiple web containers on the same host and port, as these are now common to all containers in the host network.

III. None Network
The third type is the none network. Under this, containers are not attached to any network and do not have access to the external network or other containers. It is isolated from all other networks. Here is an example of a container on a network:
docker run --rm -d --network none --name my_nginx nginxBelow is a graphical representation of the none network:

For a more detailed explanation of the three Docker network types, check out this blog: Docker Certified Associate Exam Series (Part-5): Networking.
Docker Swarm Networking
Docker Swarm is a native clustering and orchestration solution for Docker. It allows users to create and manage a cluster of Docker nodes, which can be used to deploy and manage applications across multiple hosts. With Docker Swarm, users can easily scale their applications, manage their resources, and ensure high availability and fault tolerance.
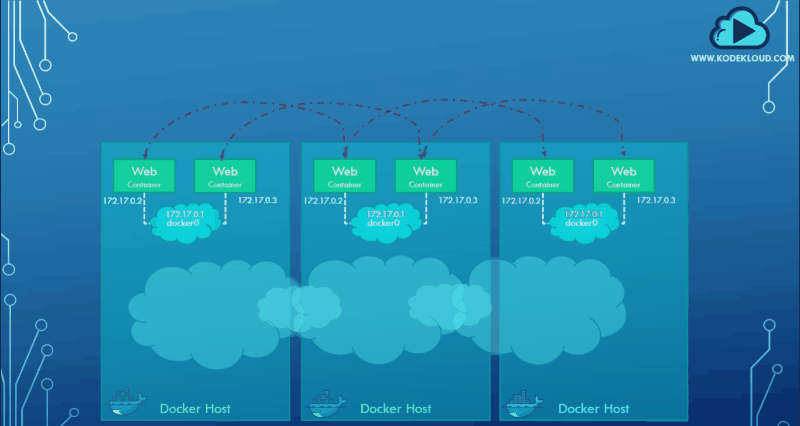
It is a powerful tool for DevOps engineers and organizations that need to manage large-scale deployments of Docker containers. Assume we have multiple docker hosts running containers. Each docker host has its own internal private network in the 172.17.x.x series, allowing the containers running on each host to communicate.
However, containers across the host have no way of communicating with each other unless you publish the ports on those containers and set up some kind of routing yourself. This is where an overlay network comes in.
Below is a graphical representation of the manual routing setup required for cross-host container communication.

Learn more about Docker Swarm from this blog: Kubernetes vs. Docker Swarm: A Comprehensive Comparison (2023)
Let's look at how an overlay network solves our problem.
Overlay Network in Docker Swarm
You can create a new network of type overlay, which will create an internal private network that spans all the nodes participating in the swarm cluster.
docker network create driver -d overlay subnet --10.0.9.0/24 my-overlay-networkWe could then attach the containers or services to this network using the--network option while creating a service to get them to communicate with each other through the overlay network.
docker service create --replicas --network my-overlay-network nginxBelow is a graphical representation of the overlay network spanning three hosts:
Ingress Network
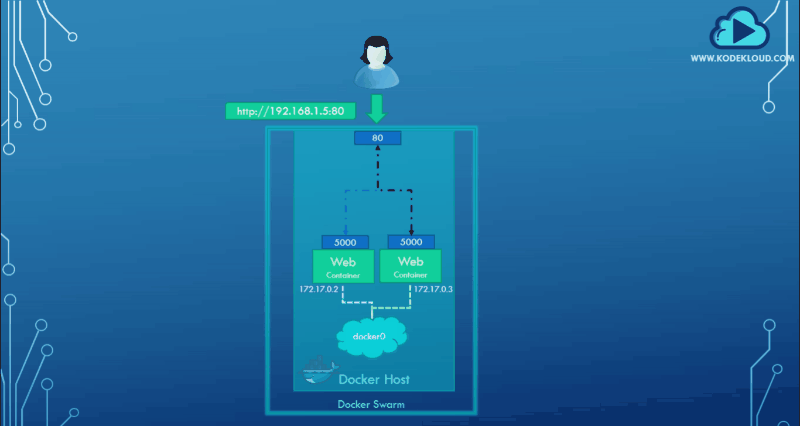
Previously, we learned about port publishing or port mapping. Assume that we have a web service running on port 5000. For an external user to access the web service, we must map the port on the docker host. In this case, map port 5000 on the container to port 80 on the Docker host.
Once we do that, a user can access the web server using the URL with port 80. This functions when running a single container and is easy to understand, but not when working with a swarm cluster like the one shown above.
For example, think of this host as a single-node swarm cluster. Say we were to create a web-server service with two replicas and a port mapping of ports 80 to 5000. Since this is a single-node cluster, both instances are deployed on the same node. This will result in two web service containers trying to map their 5000 ports to the common port 80 on the docker host, but we cannot have two mappings to the same port. See the graphical representation below:

This is where ingress networking comes into the picture.
When you create a docker swarm cluster, it automatically creates an ingress network. The ingress network has a built-in load balancer that redirects traffic from the published port, port 80. All the mapped ports are port 5000 on each container. Since the ingress network is created automatically, you do not have to configure it.
The graphical representation below shows how the ingress network directs traffic.
You have to create the service you need by running the service create command and specify the ports you would like to publish using the -p parameter. Just like before. The ingress network and the internal load balancing will work out of the box, but it is important for us to know how it really works. Here is a command that creates two services for containers with the same port mappings.
docker service create — replicas=2 -p 80:5000 my-web-serverLet us now look at how it works when multiple nodes are in the docker swarm cluster. In this case, we have a three-node docker swarm cluster running two instances of the my-web-server. Since we only requested for two replicas, the third docker host is free and has no instances. Let us first keep ingress networking out of our discussion and see how this arrangement works without it.
Without the ingress networking, how do we expect the user to access our services in a swarm cluster of multiple nodes?

From the representation above, the third host finds the cluster services inaccessible.
Since this is a cluster, we expect the users to be able to access services from any node in our cluster, meaning any user should be able to access the web server using the IP address of any of these containers since they are all part of the same cluster.
Without ingress cluster networking, a user could access the web server on nodes 1 and 2 but not on node 3 because there is no web service instance running on node 3.
Here is how an ingress network solves this problem:

An ingress network creates a load balancer that works by receiving requests from any node in the cluster and forwarding that to the respective instance on any other node, essentially creating a routing mesh.
Routing Mesh
The routing mesh helps in routing the user traffic received on a node that isn’t even running an instance of the web service to other nodes where the instances are actually running. Again, all of this is the default behavior of Docker Swarm, and you don’t need to make any additional configurations. Simply create your service, specify the number of replicas, and publish the port.
Docker swarm will ensure that the instances are distributed equally across the cluster. The ports are published on all the nodes, and the users can access the services using the IP of any of the nodes. When they do, traffic is routed to the right services internally.
How Do Containers Discover Each Other?
We have been talking about containers communicating with each other. Now, how exactly does that work? Consider the scenario below:

Here, we have a web service and a MySQL database service running on the same node or worker.
How can I get a user or service to access the database on the database container? You could use the internal IP address of the MySQL container, which in this case is 172.12.0.3.
mysql.connect(172.17.0.3)But this is not ideal. The container is not guaranteed the same IP when the system reboots. The right way to do it is to use the container name. All containers in the docker host can resolve each other with the container's name.
Docker has a built-in DNS server that helps the containers resolve each other using the container name. Note that the built-in DNS server always runs at address 127.0.0.11.
Conclusion
The Docker network's power lies in its versatility. Developers have many options available when considering what's best for their project.
The best way to master Docker Networking concepts is to practice them. Check out our Docker Learning Path.

.webp)
The Docker Learning Path is tailored to individuals aiming to gain expertise in Docker containerization technology, from foundational concepts to advanced certification preparation.
More on Docker:
- WebAssembly vs. Docker: Exploring their Connection and Potential
- How to Get Docker Container IP Address From the Host?
- Docker Certified Associate Exam Series (Part-5): Networking
- Docker Architecture Explained: Docker Client, Docker Daemon & Docker Registry
- Docker vs. Containerd: A Quick Comparison (2023)


Discussion