


In this blog, we'll learn how to use the tee command. But also answer an interesting question. Why do we need tee to redirect (save) a command's output to a file? When we can do the same thing with the > redirect operator?
What does tee bring to the table that > does not have?
How to Use the "tee" Command on Linux
Imagine a simple scenario. We want to upgrade our Ubuntu system with the usual:
sudo apt upgradeAnd we want to capture all the output that we get:

We can save all of this text to a file. If something doesn't work after the upgrade, we can later read that file, and try to figure out what went wrong.
To save the output from the previous command, we can use the tee command like this:
sudo apt upgrade | tee upgrade.logWhat we did here is called piping (with the | character). We piped (transferred) the output from:
sudo apt upgrade- To another command:
tee upgrade.log
This tells the tee command to pick up the output from the previous command and save it to a file called upgrade.log.
We can choose any file name we want. And if the file does not exist, it will be created automatically.
At first glance, after running this, nothing special seems to happen:
sudo apt upgrade | tee upgrade.log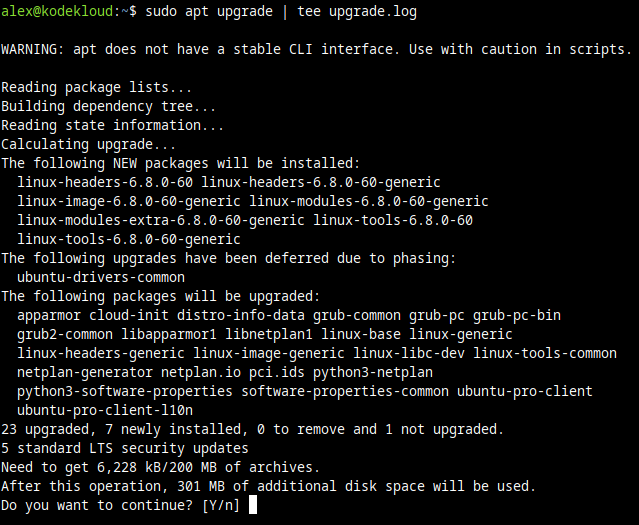
We will get the same output, and the same "yes" or "no" questions. But, behind the scenes, tee will do its job and save all of this output that we see on our screen.
Let's read the file, and check:
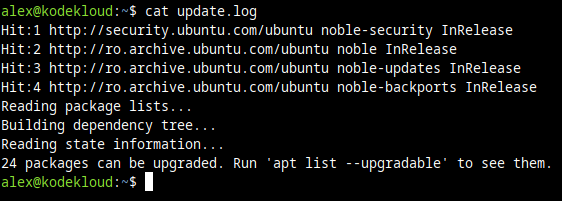
cat upgrade.log
Yes, it's all there, except that WARNING line. But we'll get to that, and explain why it doesn't appear in this file.
So we can conclude that the general syntax of the tee command is something like this:
some command here | tee name_of_output_file/var/log/apt/ directory.Why Do We Need the "tee" Command?
With tee you can capture all the output generated by a command, and save it to a file.
At first glance, it might seem that this is not that different from output redirection. I mean, we can run a command like this:
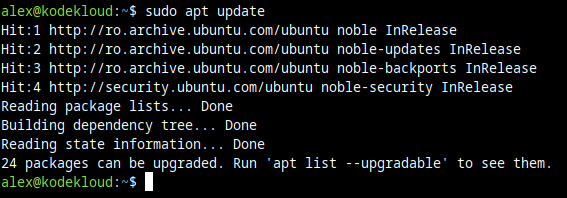
sudo apt update > update.logWhere we use the > character to redirect all output from that command, to a file called update.log.
But notice the problem:

Now we get almost nothing displayed on-screen.
sudo apt update normally generates a lot of output. But this time, it mysteriously disappeared. Usually, when we run this command (without redirecting output), we'll get something like this:
So, one advantage of tee: It lets you SEE the output of the previous command, and at the same time, also saves that output to a file. A "2 in 1" sort of thing.
> "hides" the output from the screen.
And tee actually has a third advantage; so it's more of a "3 in 1": It also lets you interact with the previous command. Meaning:
- When we use
>for redirection, we cannot interact with the command. Cannot "Press y to continue," or stuff like that. Technically, we could still press keys to interact with that program. But since we cannot see any output on the screen, it's unfeasible. We wouldn't know what actions we are taking, and what the results would be if we press those keys. - But when we redirect / save output with
tee, we can do that. We can still interact normally with that program, press "y" to continue, and so on.
It's still worth mentioning that our previous command, sudo apt update > update.log did its job. The update.log file contains the redirected output.

But for this particular scenario > is not what we needed. It works well when we don't need to see the output of the command, just save it. And when that command is not interactive, doesn't ask us to press any keys, and so on.
The conclusion?
- For commands that generate non-interactive output, and where we don't need to see that output, just save it to a file, the
>operator can be used. - But when we need to interact with the previous command, and also need to see its output, we should use
tee.
How to Make "tee" Also Save Error Messages (stderr)
If we use a command like this, we'll notice a small issue:
sudo apt update | tee update.log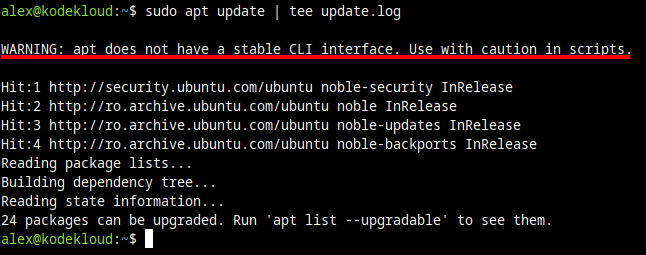
See that WARNING line of text? Well, if we look at the file where we saved our output, we won't find it:
That's because, by default, tee does not save errors/warning messages.
Normally, this is not a problem. We can see that even in our example here, we don't really need that warning in our update.log file. But, there will be situations where we will actually want to save errors and warnings too.
To understand how to make tee also save error messages, we first have to understand how Linux treats output.
For any program that generates output, that output is split into two types:
- Normal output that goes to something called stdout (standard output).
- Error messages (and warnings) that go to something called stderr (standard error).
So the command sends normal output to stdout, and errors to stderr. And then the operating system checks to see what these stdout and stderr "are connected to".
If they're "connected to" our terminal window, both streams of text end up there, on-screen. If one is "wired to" our terminal window, but the other is "wired to" a file, then they'll go to different places. Which is exactly what happens when we run a command like sudo apt update | tee update.log.
Essentially, tee will make stdout go to our screen, and our update.log file. But stderr won't get any special treatment. stderr will remain "connected" just to our screen (and not the file). So stderr output will just end up on the screen, but not the file.
To visualize this:
- stdout connected to:
- screen (terminal window)
- and file
- stderr connected to:
- just the screen (terminal window)
However, there's a trick we can use. We can add 2>&1 at the end of the command for which we want to save the extra stderr output.
What 2>&1 does is tell our system to redirect stderr to stdout (because 2 represents stderr in this case, and &1 represents stdout). By doing this we essentially "mix" all messages into stdout.
We can imagine two boxes: Box A and Box B. Messages are separated. But with 2>&1 we take all messages from box B and drop them in Box A. Now that everything is in Box A (stdout), we can simply pipe to the tee command and all the output, including error messages / warnings, will be saved to the file.
So, to save both stderr and stdout messages with tee (include error messages), we can add 2>&1 at the end of the first command, like this:
sudo apt update 2>&1 | tee update.log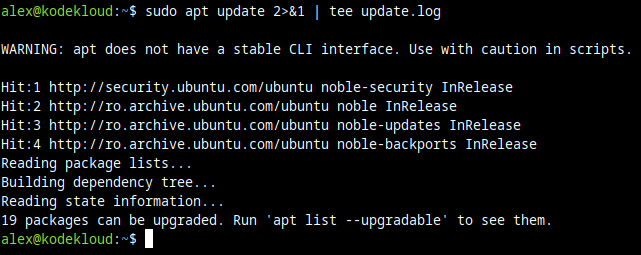
Now let's check the contents of the update.log file:
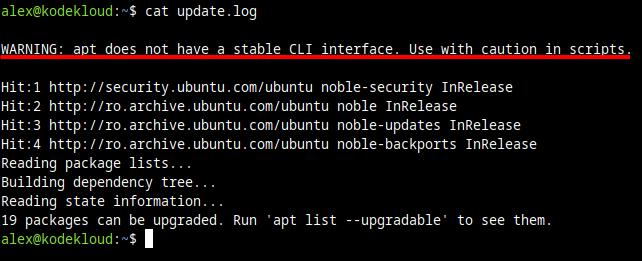
The WARNING line (part of stderr) is now saved into our file.
How to Append to File with the "tee" Command, Instead of Overwriting
Let's use a simple command to save the current date and time to a file:
date | tee date.logNow let's run this command 3 times:
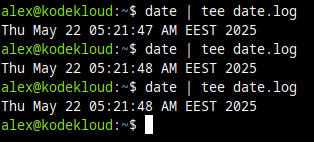
What will the date.log file contain?
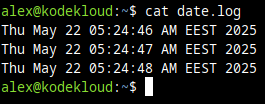
cat date.log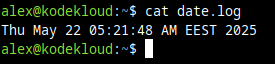
Just the last output we saved, from the third command. The content from the first two is missing. Why?
Because, by default, tee will overwrite the previous content of the file.
But we can tell tee to append (add) content to the file (instead of overwriting) with the -a option. We just add it after the tee command and before the name of the file.
Here's an example of using the -a option to tell tee to append content instead of overwriting:
date | tee -a date.log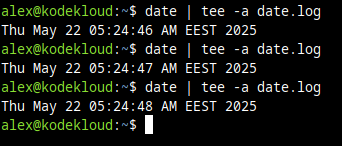
We'll see that tee kept adding the new content at the end of the date.log file. So we'll find all the output saved this time:
Hope you found this interesting.
Learn More
If you love Linux, and want to learn more about it, check out this Linux course:

It will help you learn fast about how to manage Linux systems. And you also get access to interactive labs — essentially, "Linux virtual machines" running in your browser. So you can test the commands you learn about, instantly, without having to install Linux yourself.
See you in the next blog!


Discussion