Following up from our previous release, Kubernetes 1.30, we’re excited to bring you the second release of the year — Kubernetes 1.31!
K8s 1.30: UWUbernetes
This release is extra special as it comes right after Kubernetes celebrated its 10th anniversary. Kubernetes v1.31 continues the tradition of delivering high-quality updates, with a mix of new features in stable, beta, and alpha stages. This release introduces 45 enhancements: 11 are now stable, 22 are moving into beta, and 12 are just beginning in alpha.
f you're curious about how Kubernetes Enhancements work, be sure to watch the KodeKloud video on Kubernetes Enhancement Proposals (KEPs) for an in-depth explanation!
K8s KEPs
Running the project requires a tremendous amount of effort, yet there is never a shortage of people who consistently show up with enthusiasm, smiles, and a sense of pride in contributing and being part of the community. This "spirit" we see from both new and seasoned contributors is a testament to the vibrancy and "joy" of the community.
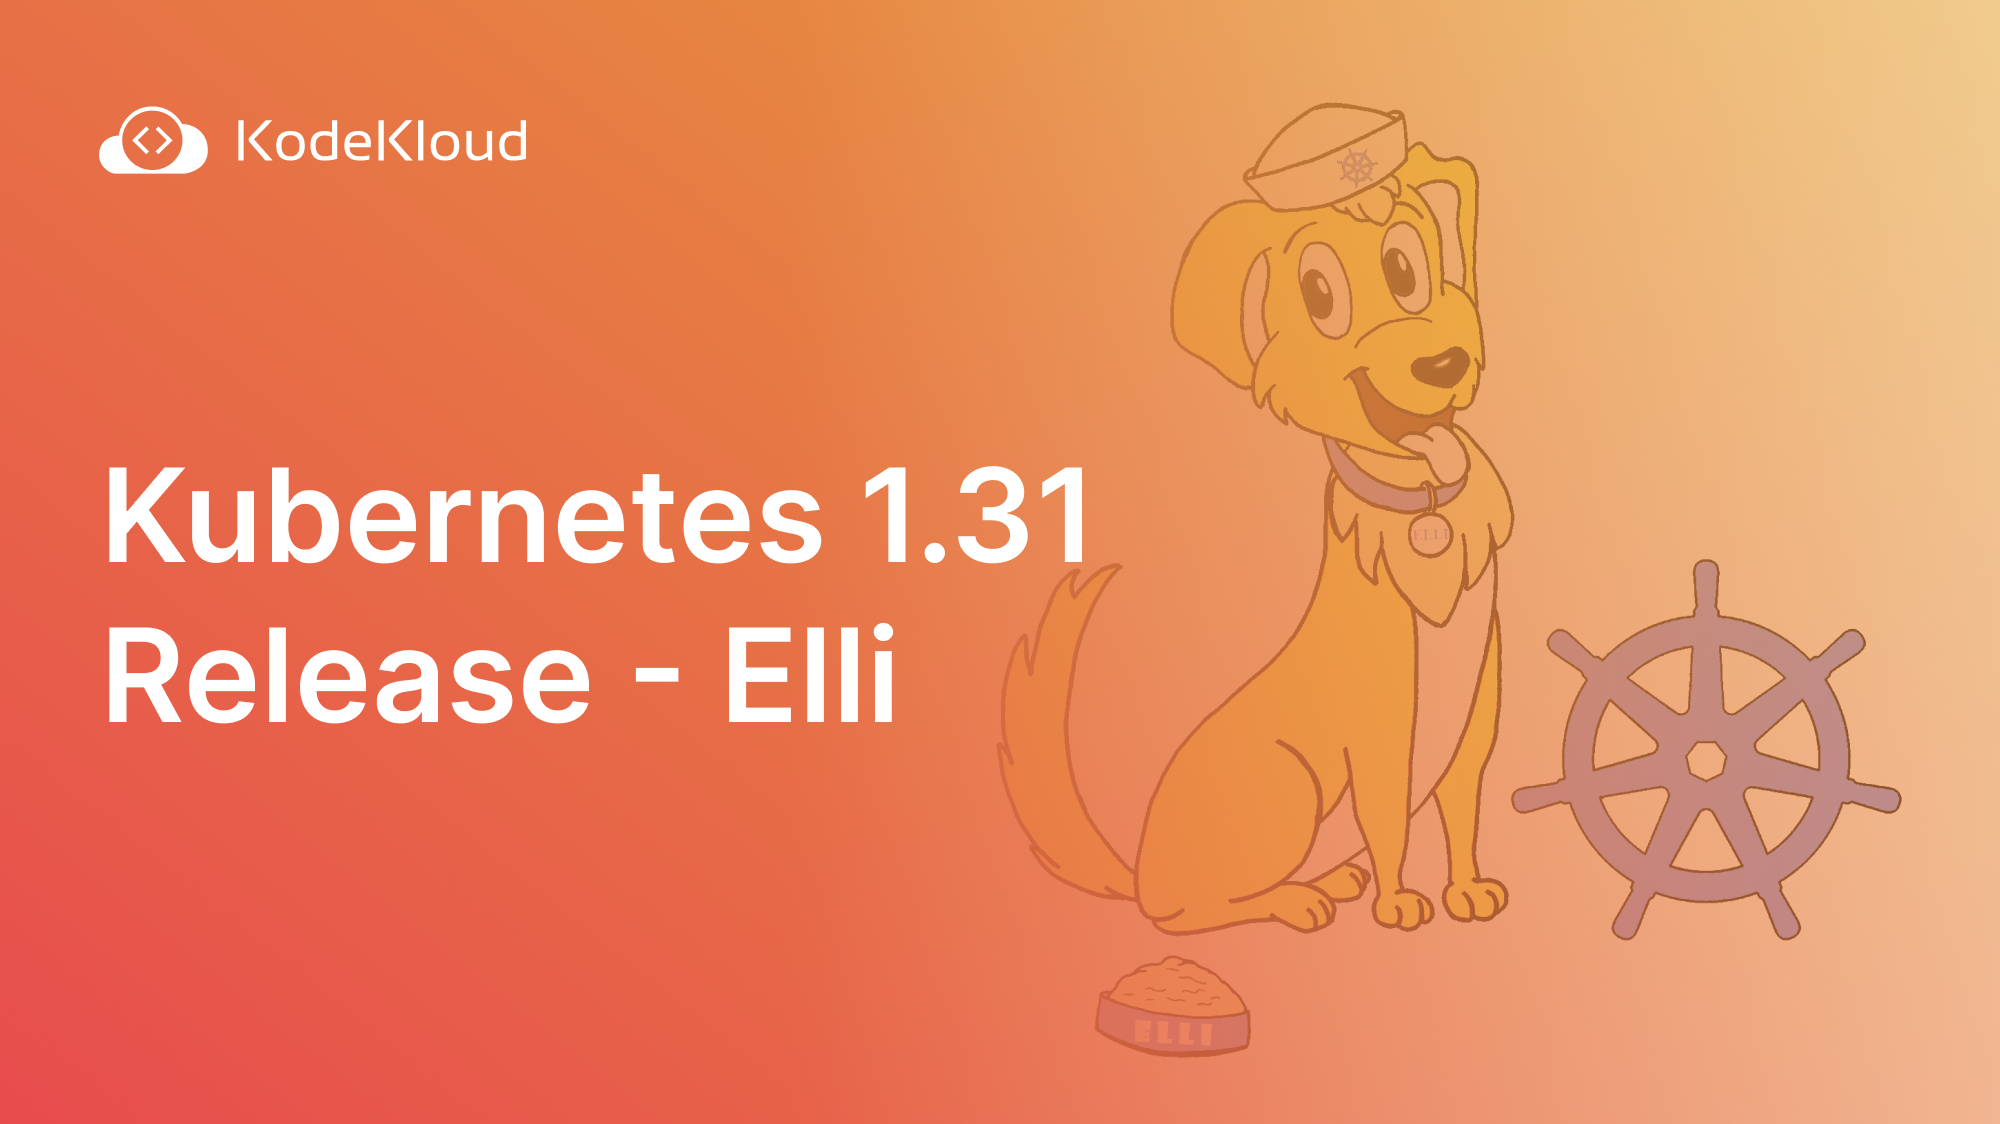
With that in mind, the theme for this release is Elli. The "Elli" theme is inspired by a joyful dog wearing a sailor’s cap, representing the diverse and committed Kubernetes community. With Kubernetes v1.31 - Elli, we celebrate the lively and joyful spirit that makes the Kubernetes community so unique.

We have selected 5 features that have received a lot of attention.
- The removal of in-tree cloud provider code.
- AppArmor support graduating to stable.
- Custom profile support in
kubectl debuggraduating to beta. - Improved ingress connectivity reliability for Kube Proxy, now graduating to stable.
- Random Pod selection on ReplicaSet downscaling, also graduating to stable.
Before moving on, if you prefer a video version of the updates, watching it here!
K8s 1.31 Release : Elli
The removal of in-tree cloud provider code.
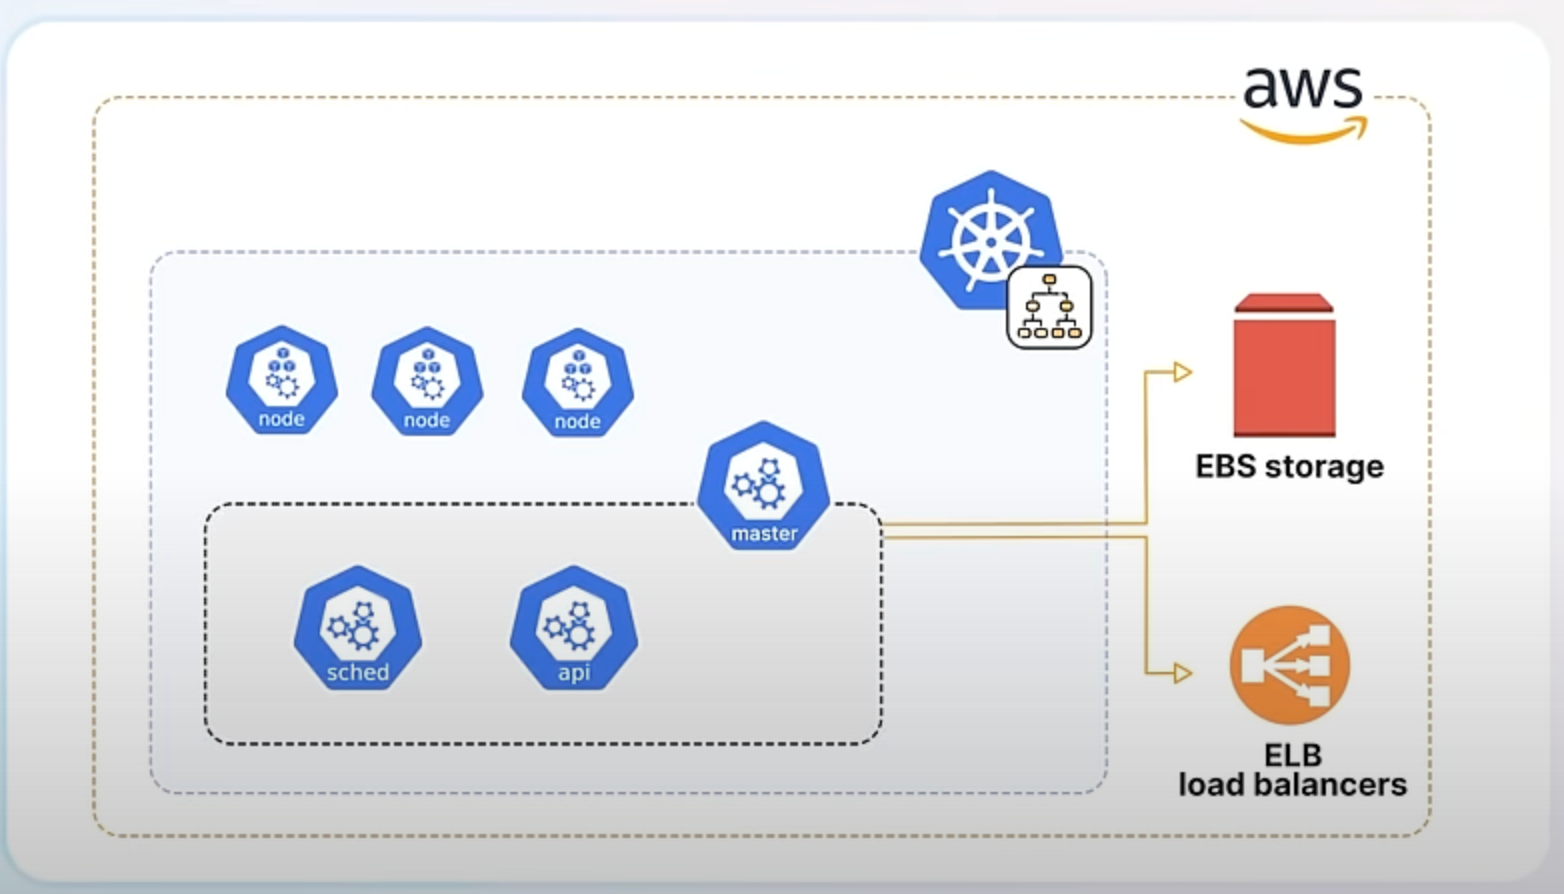
In Kubernetes, "in-tree" integrations refer to the built-in components that support various cloud providers directly within the core Kubernetes codebase. For instance, if you have a Kubernetes cluster running on AWS, the in-tree integrations would include the necessary code to manage AWS resources like EBS storage or ELB load balancers directly from Kubernetes.
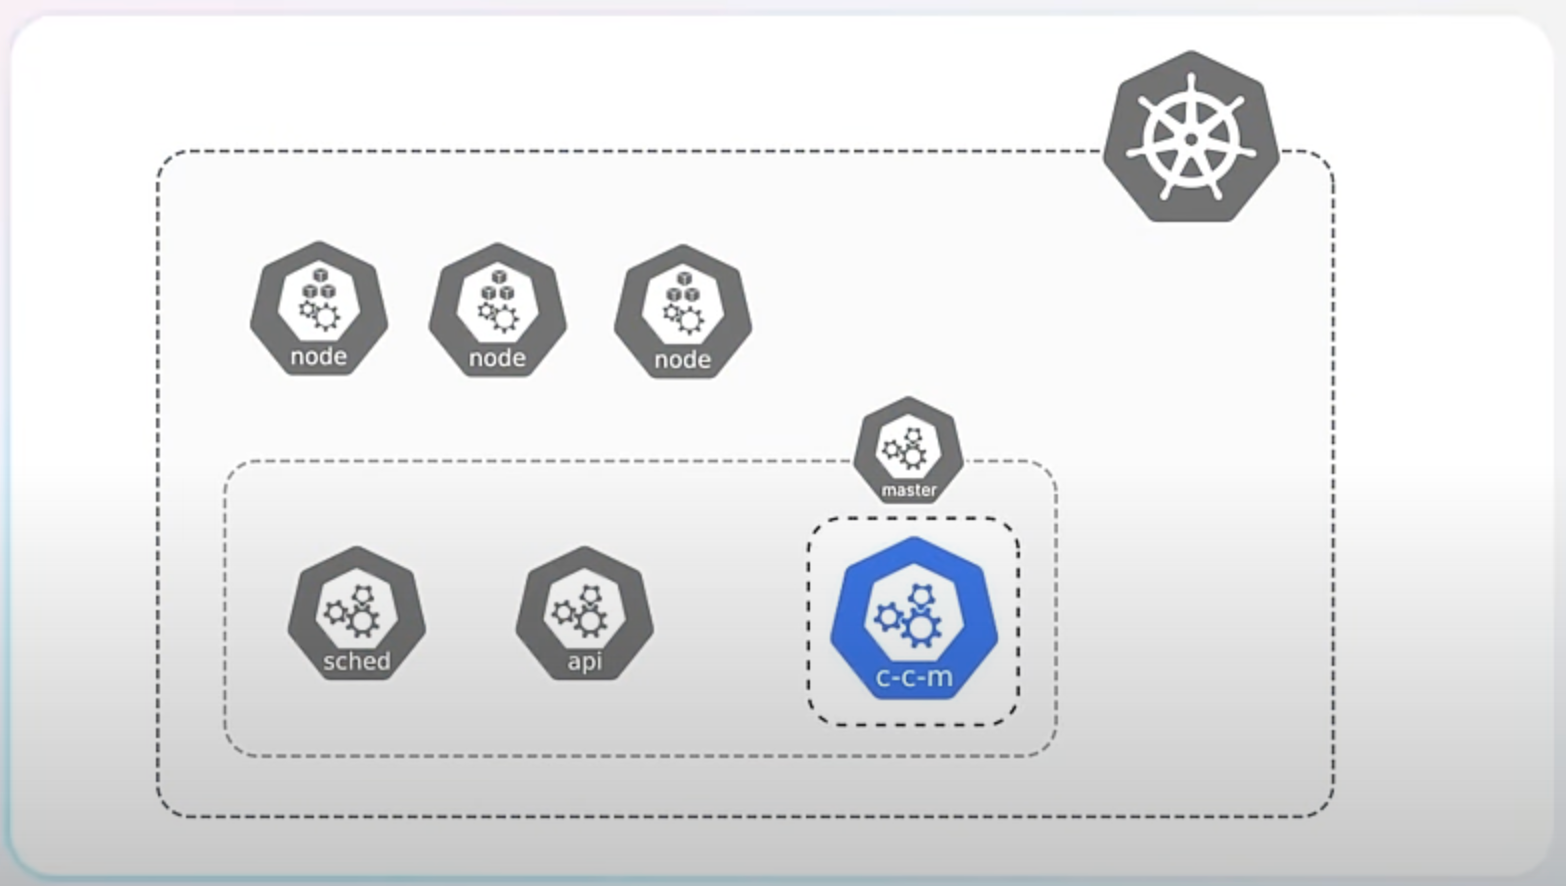
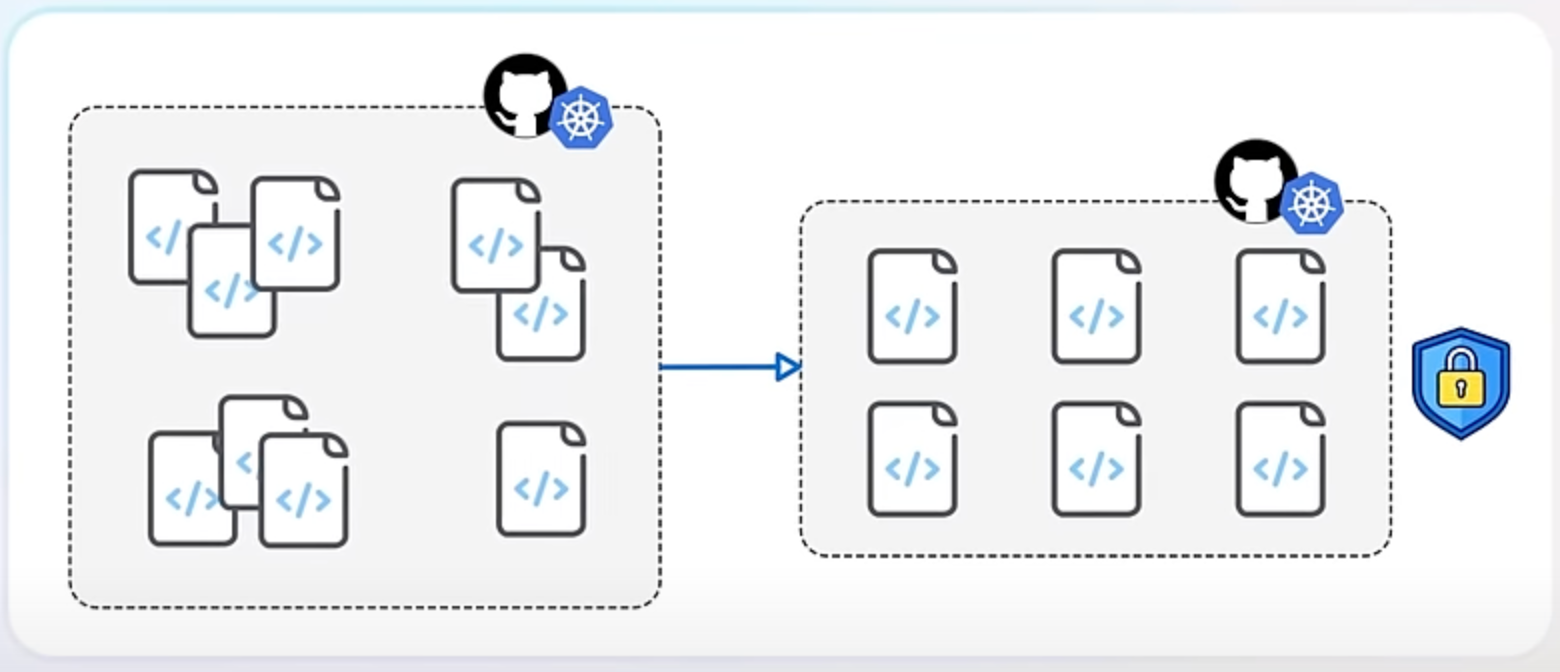
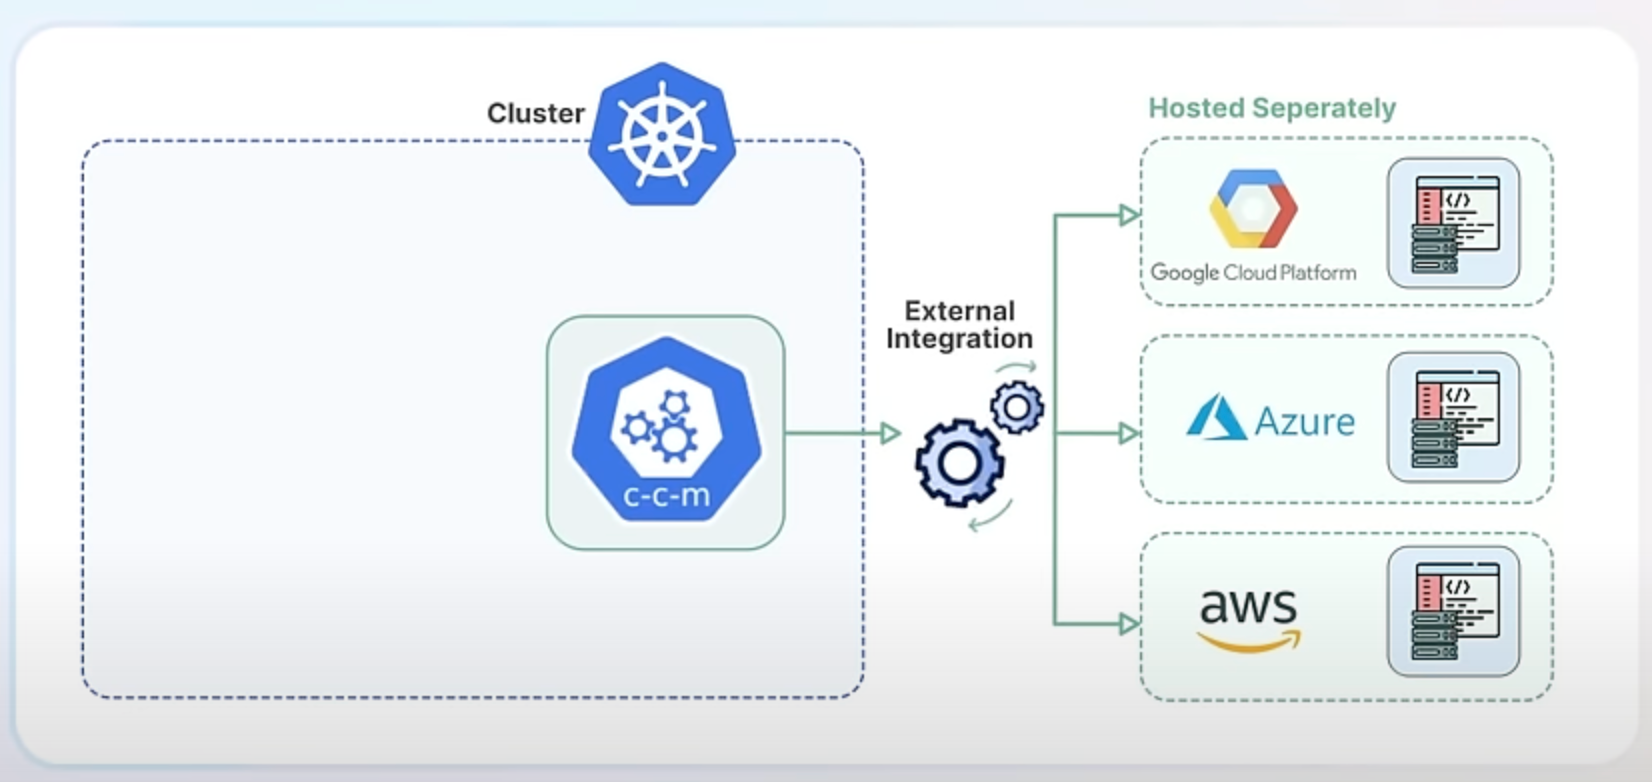
Starting from Kubernetes version 1.26, the project began transitioning these integrations out of the core codebase. This process, known as "externalization," means that the code to interact with cloud services is no longer included directly in Kubernetes but is maintained as separate components. The code specific to cloud providers is now moved to a new component called the Cloud Controller Manager and the respective cloud vendors are responsible for building and maintaining their own cloud controller managers.
There are several reasons for this change. Firstly, it makes Kubernetes truly vendor-neutral, meaning it doesn't favor any specific cloud provider. This makes Kubernetes more versatile and adaptable to different environments.
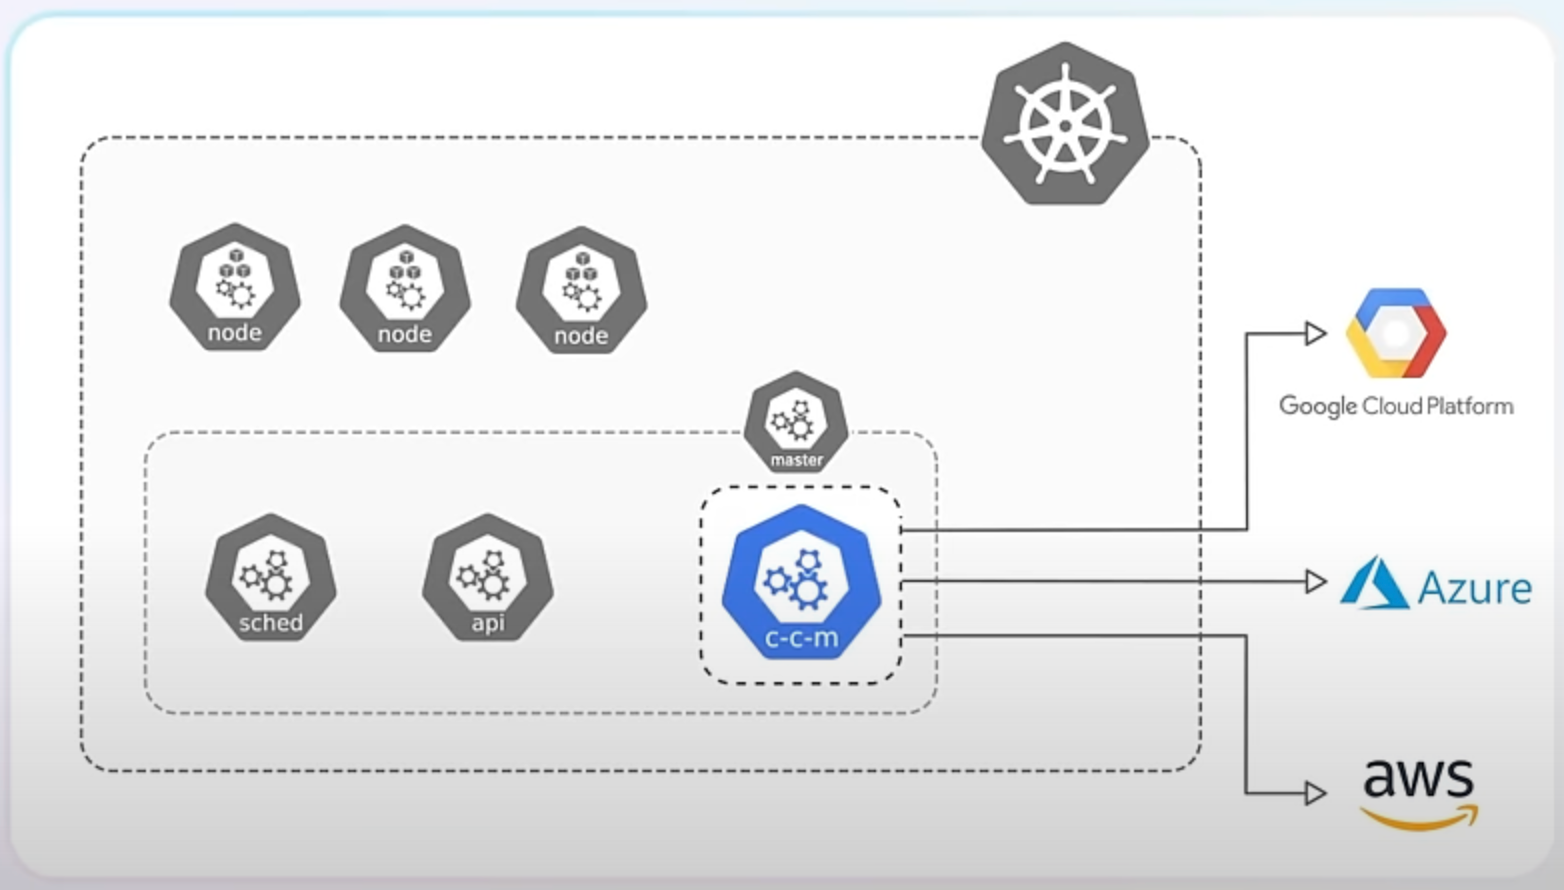
Secondly, externalizing integrations allows each cloud provider's integration to be developed, updated, and maintained independently of the Kubernetes release cycle. This leads to faster improvements and fixes.
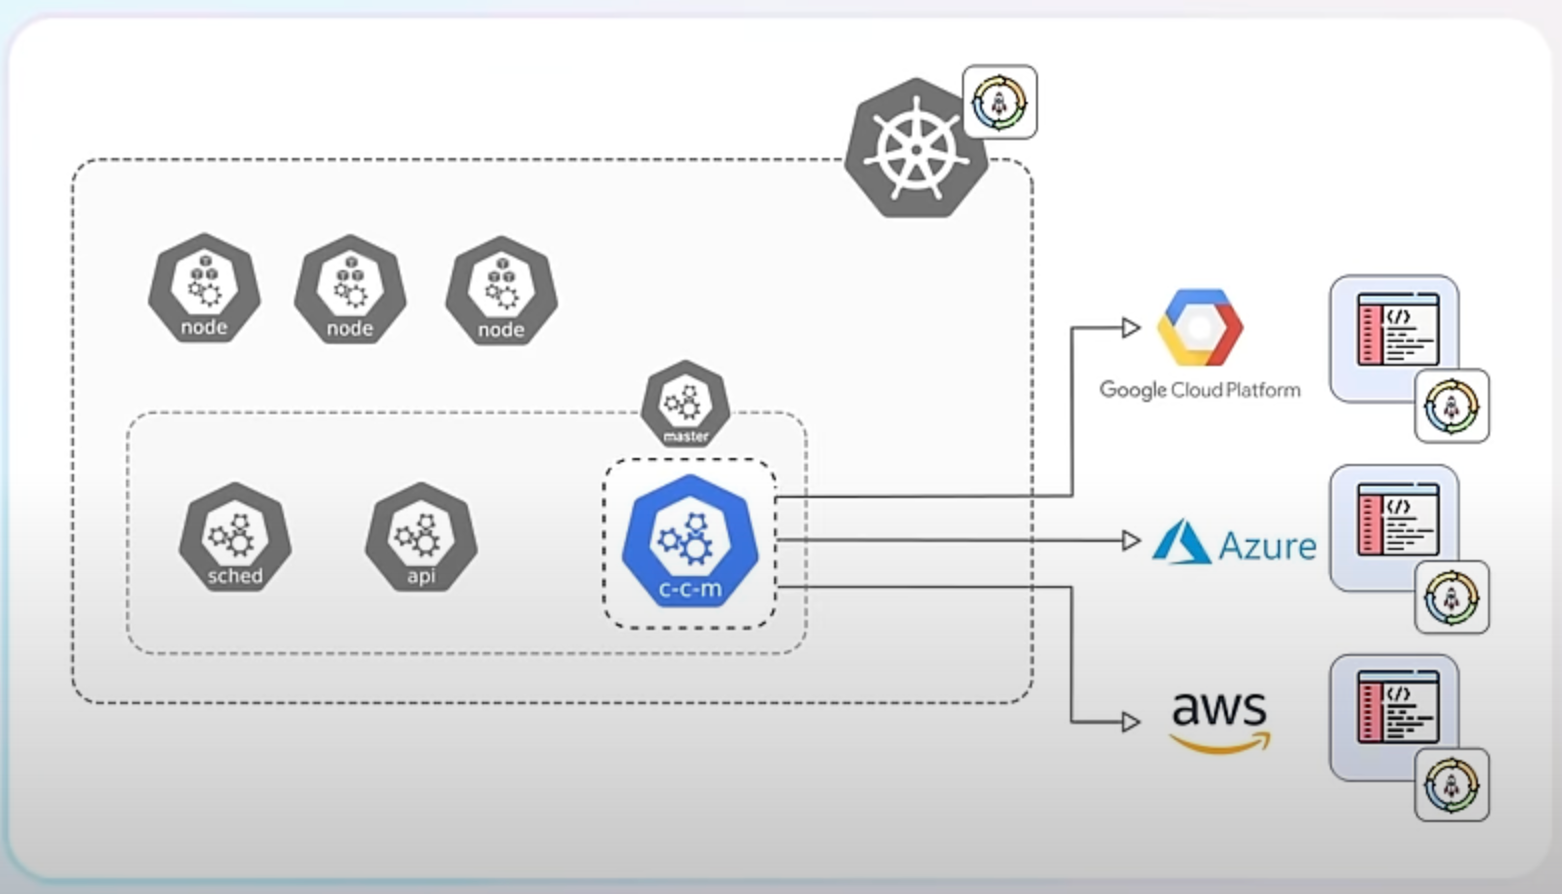
Finally, removing these integrations simplifies the Kubernetes core, making it more secure and easier to maintain.
Despite the removal of in-tree integrations, you can still integrate Kubernetes with cloud providers using external integrations - or cloud controller managers. These can be either part of the Kubernetes project but hosted separately or provided by third-party developers or the cloud providers themselves.
For example, instead of using the in-tree integration for AWS EBS volumes, you now use the AWS EBS CSI (Container Storage Interface) driver, which is an external component maintained by AWS.
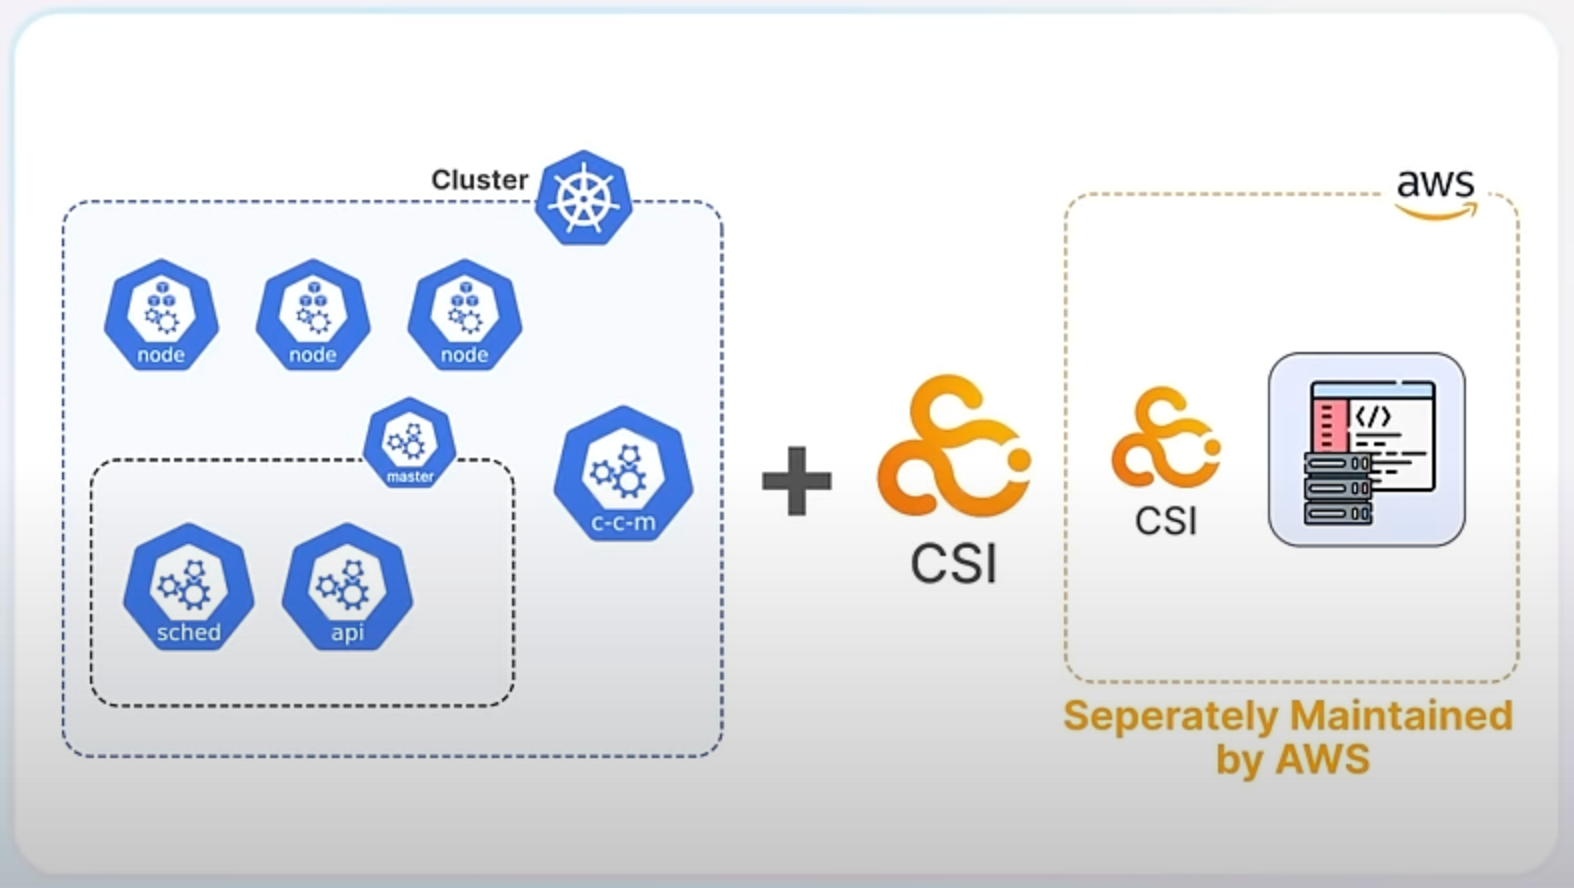
You can check out these types of Kubernetes projects hosted separately for AWZ, Azure or GCE.
- AWS - https://github.com/kubernetes/cloud-provider-aws
- Azure - https://github.com/kubernetes-sigs/cloud-provider-azure
- GCE - https://github.com/kubernetes/cloud-provider-gcp
- OpenStack - https://github.com/kubernetes/cloud-provider-openstack
AppArmor support graduating to stable.
Imagine a Kubernetes environment hosting multiple applications, each running in its own container. This is a common scenario in a multi-tenant setup, where different applications or services share the same cluster. If one of these containers gets compromised, it could potentially access sensitive data or interfere with other containers. For example, a compromised container might try to read passwords from other containers or modify critical system files on the host, posing a risk to the entire system. Without a way to enforce strict security rules, managing and securing these applications in Kubernetes becomes a challenging task.
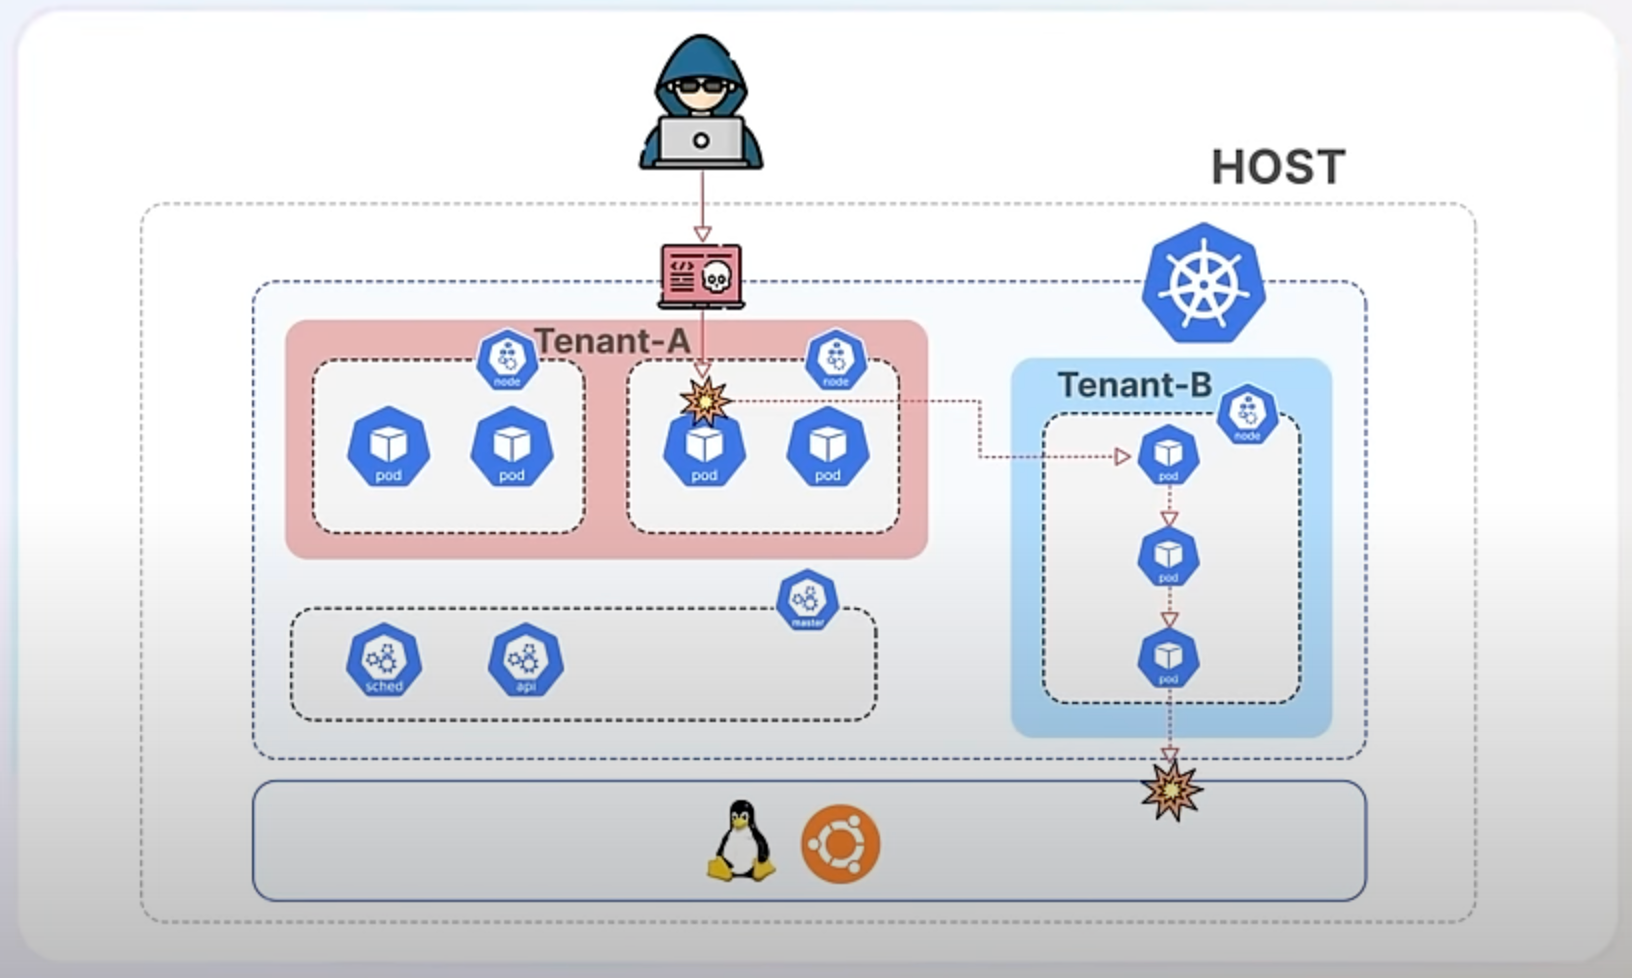
Kubernetes 1.31 addresses this issue by adding support for AppArmor, a Linux tool that lets you set rules on what programs can do. Think of AppArmor as a security guard for your applications, ensuring they only do what they are supposed to. This new feature allows developers to define these security rules directly within the Kubernetes configuration for their applications, making it easier to secure containerized workloads.
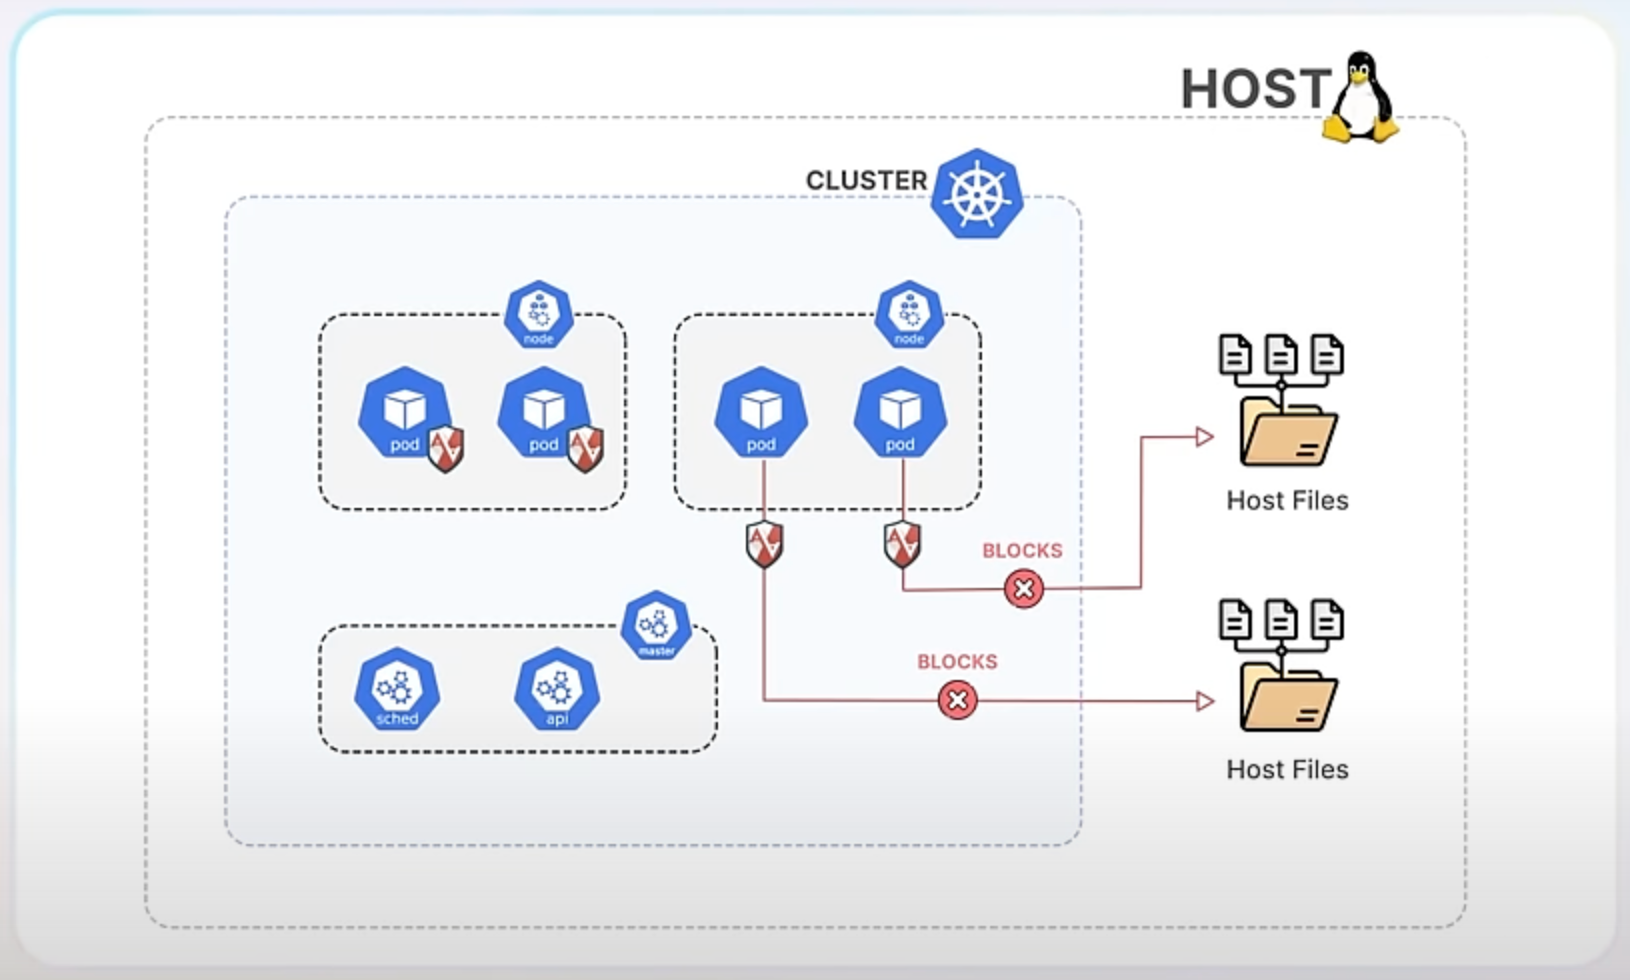
AppArmor works by attaching profiles to applications or containers. These profiles specify what actions the program can and cannot perform. For instance, you can create a profile that allows an application to read certain files but not write to them. This helps prevent unauthorized actions and limits the potential damage if an application is compromised.
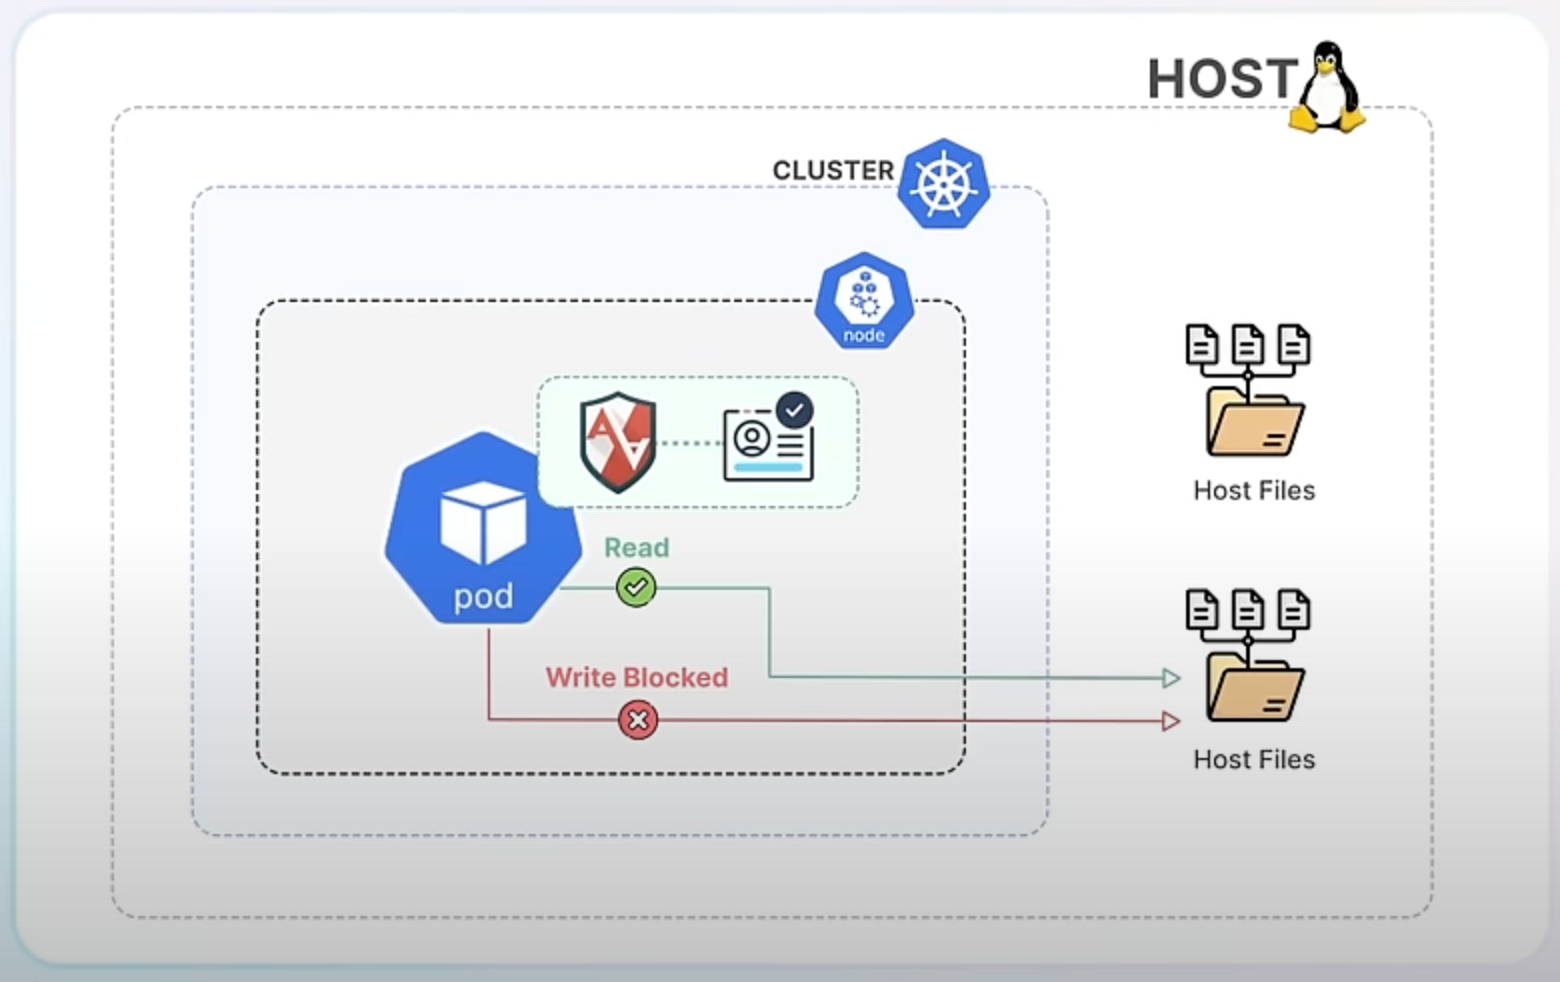
By integrating AppArmor into Kubernetes, you can now specify these security profiles directly in your app’s Kubernetes configuration. This means each container or pod can have its own set of security rules that the container runtime enforces. If an application tries to perform an action outside of its allowed profile, AppArmor blocks it, thereby preventing potential security breaches.
Let’s walk through a simple example to see how AppArmor can be used in Kubernetes.
Creating an AppArmor Profile: First, you define an AppArmor profile on your host system. Here’s a basic profile saved as /etc/apparmor.d/custom-profile:
profile custom-profile flags=(attach_disconnected, mediate_deleted) {
    capability,
    /etc/passwd r,
    /etc/shadow w,
}
This profile allows reading from /etc/passwd but denies writing to /etc/shadow.
Loading the Profile: Load the profile into AppArmor with the apparmor_parser command like this:
sudo apparmor_parser -r -W /etc/apparmor.d/custom-profile
Now, you update your Kubernetes pod specification to include the AppArmor profile. Here’s how you can do it:
apiVersion: v1
kind: Pod
metadata:
  name: apparmor-example
  annotations:
    container.apparmor.security.beta.kubernetes.io/app-container: localhost/custom-profile
spec:
  containers:
  - name: app-container
    image: nginx
    securityContext:
      runAsUser: 1000
      runAsGroup: 3000
      allowPrivilegeEscalation: false
In this YAML configuration, the annotation container.apparmor.security.beta.kubernetes.io/app-container: localhost/custom-profile specifies that the app-container should use the custom-profile AppArmor profile.
Implementing AppArmor in production comes with challenges. You need to create detailed profiles for each container to prevent attacks without hindering daily operations. Additionally, managing multiple profiles across all Kubernetes nodes can be complex, as each node must have the correct profiles loaded and updated consistently.
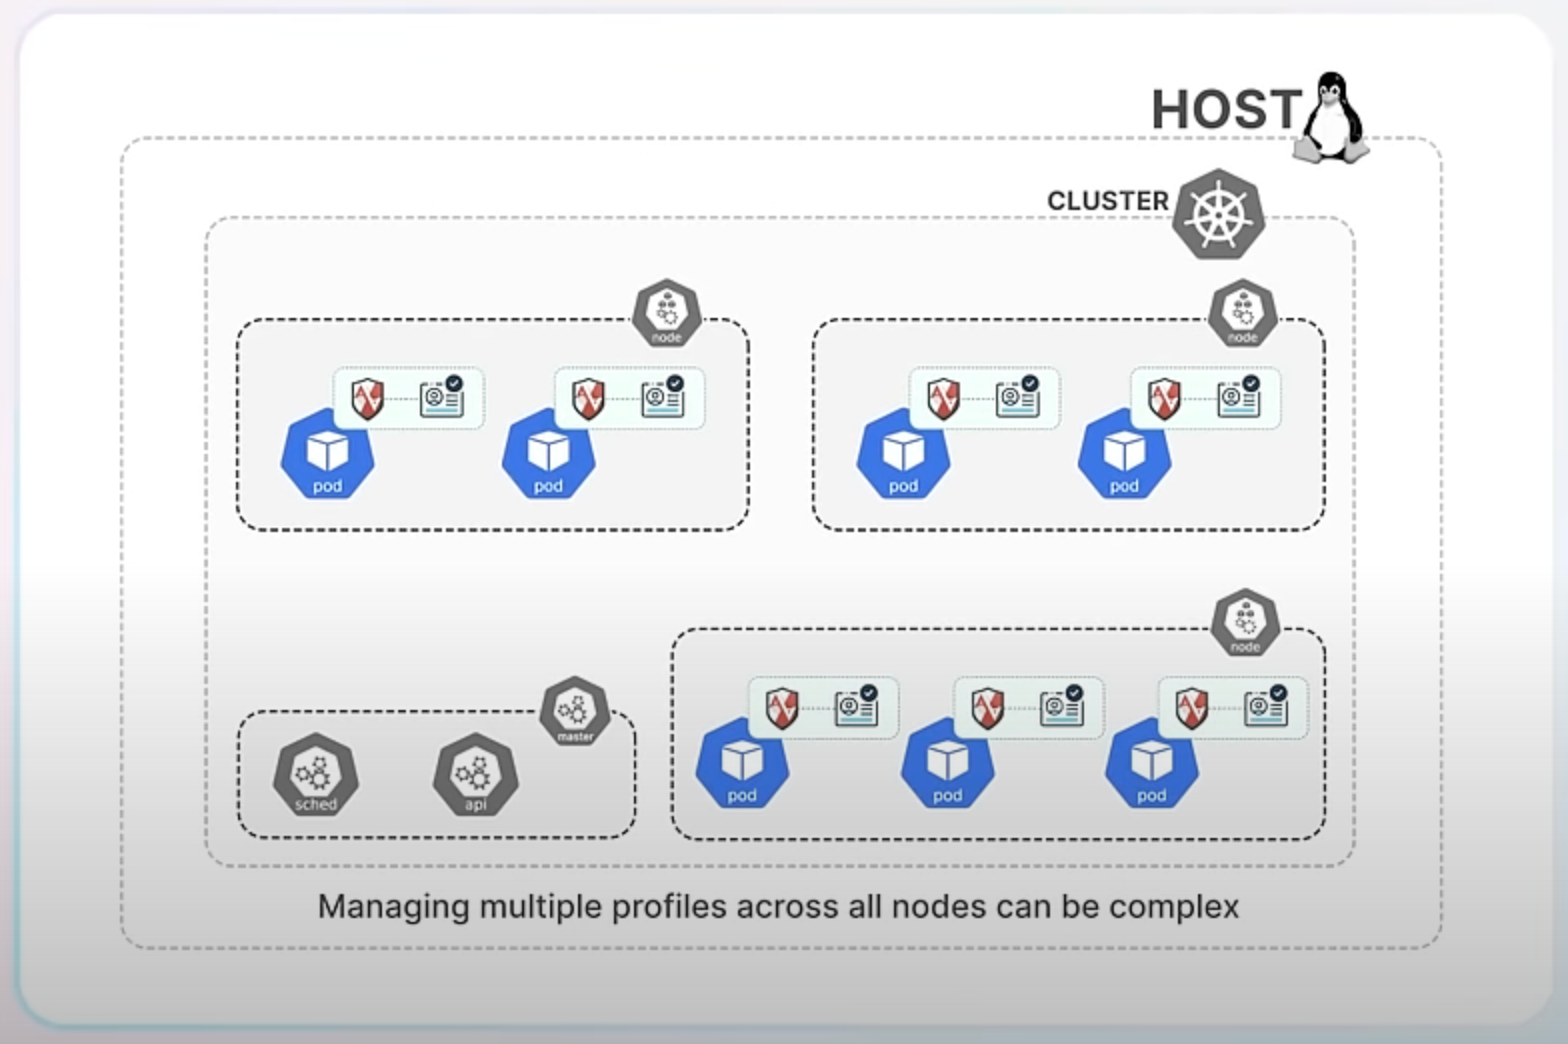
the kube-apparmor-manager tool simplifies managing AppArmor profiles across your Kubernetes cluster. It helps distribute and update profiles, ensuring consistent security policies are enforced on all nodes.
Custom profile support in kubectl debug graduating to beta.
Kubernetes provides a powerful command called kubectl debug to help developers and administrators troubleshoot running applications. This command allows you to create a debugging session in a running pod, which is especially useful when dealing with issues in containerized applications.

Previously, kubectl debug provided predefined profiles for debugging, but these were often insufficient for specific needs. Users might need to add environment variables, replicate volume mounts, or adjust security contexts to match the problematic container's environment. Additionally, shell-less base images—container images without a shell like bash—pose a challenge because they improve security but make debugging difficult since commands can't be run directly inside the container. Without customizable profiles, users had to manually patch pod specifications, which was cumbersome and impractical for frequent debugging tasks.
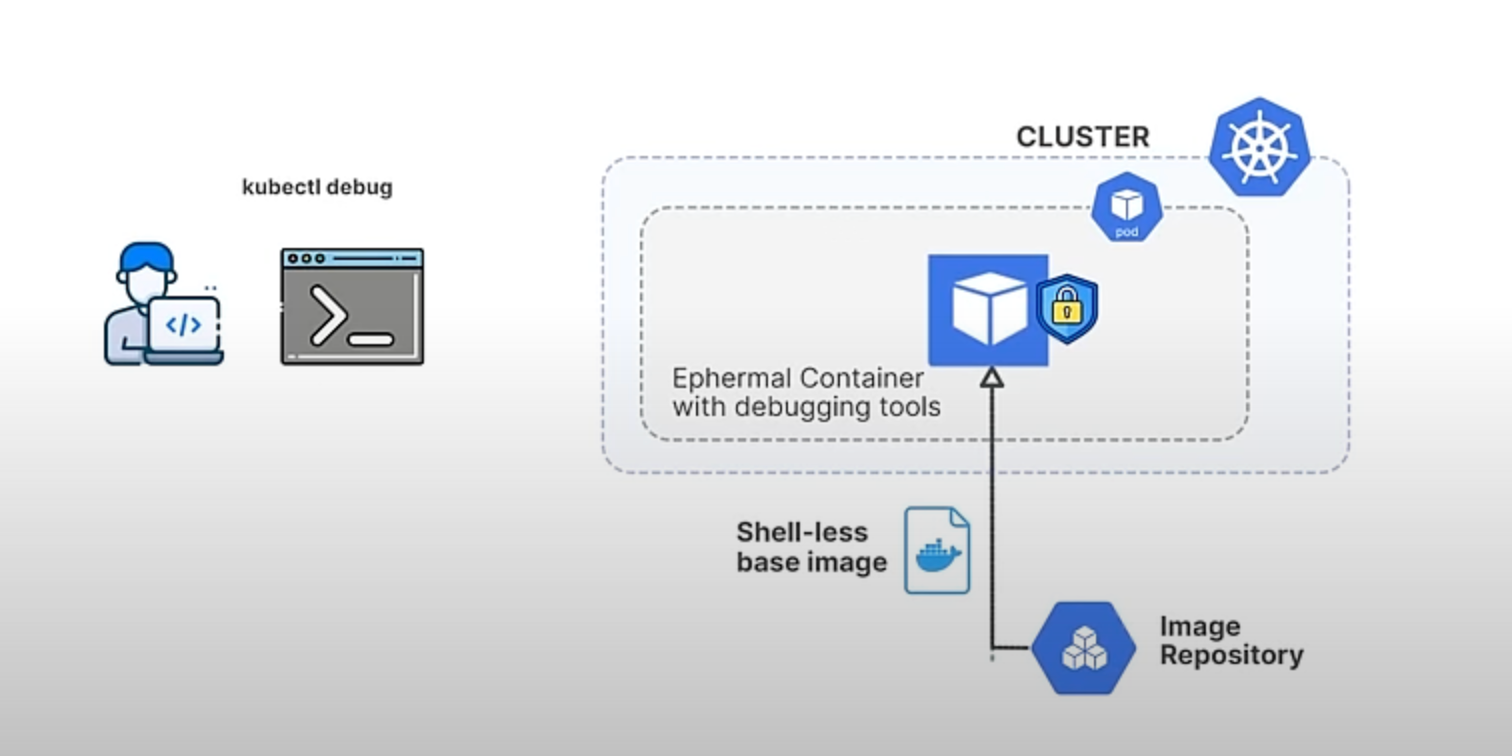
The new custom profiling feature in Kubernetes 1.31 addresses these limitations by allowing users to define their own debugging profiles. This feature enhances the flexibility and effectiveness of kubectl debug by letting you pass a JSON file that specifies the container configuration you need.
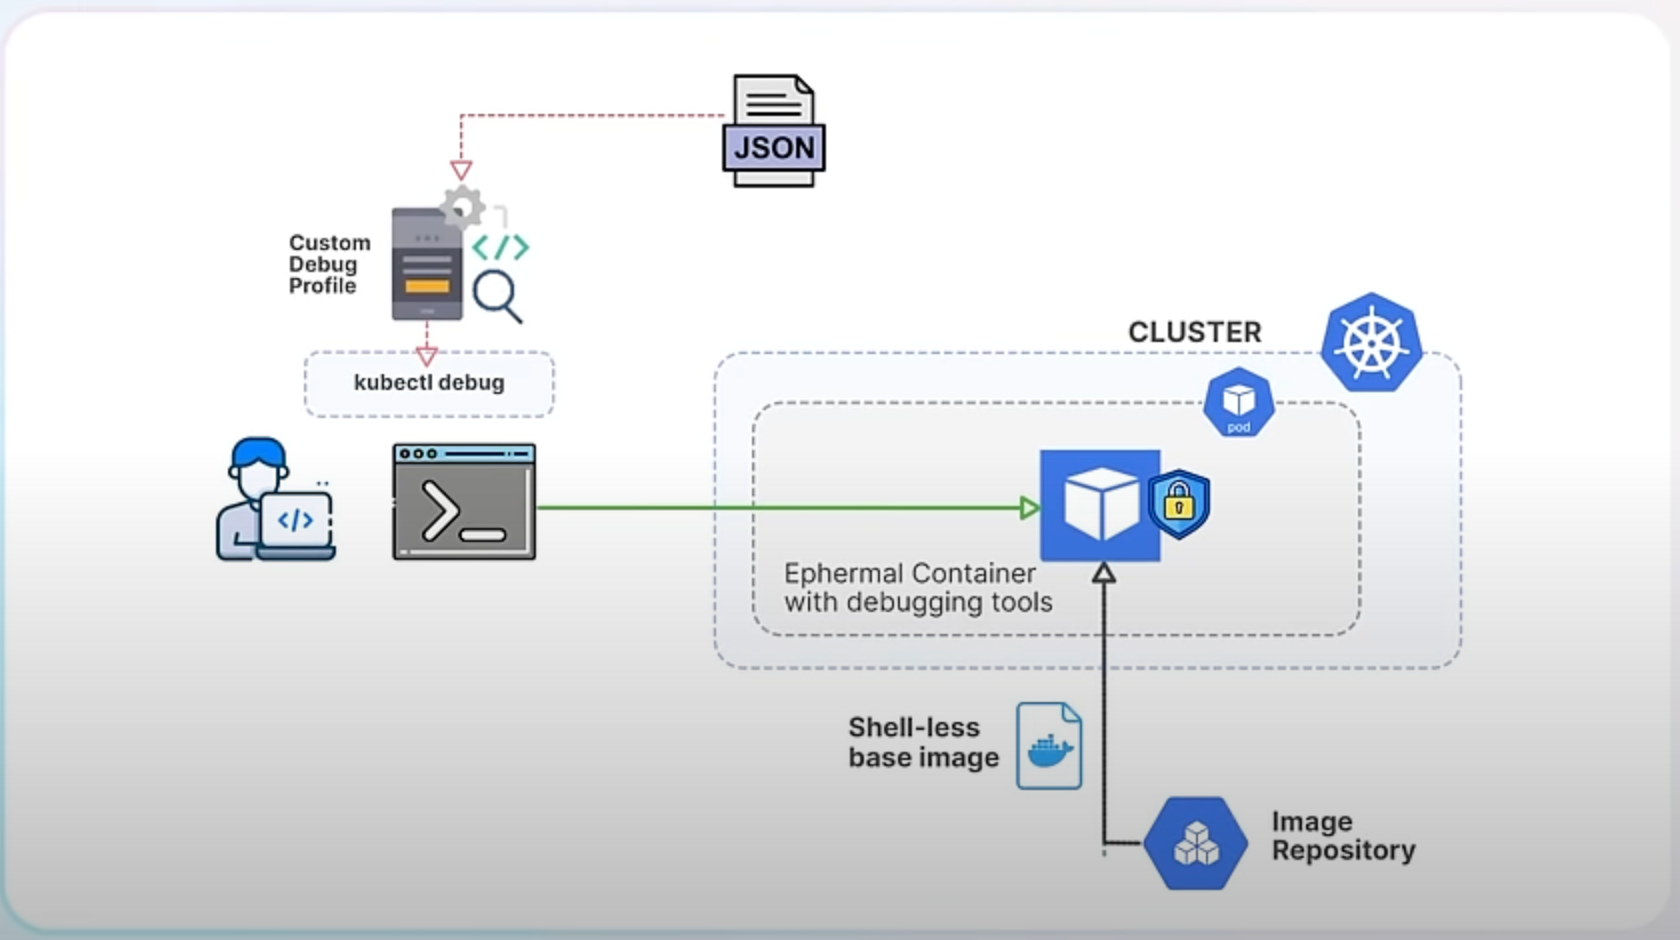
With the custom profiling feature, you can create a JSON file that includes fields compatible with the corev1.Container specification. The corev1.Container is a standard Kubernetes object that defines the configuration for a container, including details like ports, environment variables, and resource limits. When you use the custom profile, Kubernetes will merge it with the predefined profile, allowing your custom settings to override the defaults.
Here's a simple example of how to use a custom profile with kubectl debug.
Create a Custom Profile JSON: Save the following JSON as custom-profile.json:
{
  "ports": [
    {
      "containerPort": 80
    }
  ],
  "resources": {
    "limits": {
      "cpu": "0.5",
      "memory": "512Mi"
    },
    "requests": {
      "cpu": "0.2",
      "memory": "256Mi"
    }
  },
  "env": [
    {
      "name": "ENV_VAR1",
      "value": "value1"
    },
    {
      "name": "ENV_VAR2",
      "value": "value2"
    }
  ]
}
Use the Custom Profile with kubectl debug: Run the following command to start a debugging session with your custom profile:
kubectl debug pod/<pod-name> --custom=custom-profile.json
In this example, the custom profile specifies port configurations, resource limits, and environment variables that will be used in the debug container. This flexibility ensures that the debug environment closely matches the actual running environment of the application.
Custom profiles not only solve the limitations of predefined profiles but also allow you to handle the challenges of debugging shell-less base images. With custom profiles, you can mount necessary tools and resources into the debug container, even if the original container image lacks a shell. This makes it possible to run commands and perform thorough debugging without compromising the security benefits of using shell-less base images.
Improved ingress connectivity reliability for Kube Proxy, now graduating to stable.
Let’s assume you run an online store with a Kubernetes cluster handling a lot of traffic. One day, you decide to reduce the number of nodes because traffic is low. This decision could have led to some issues with how traffic was managed, but the new enhancements make everything smoother.
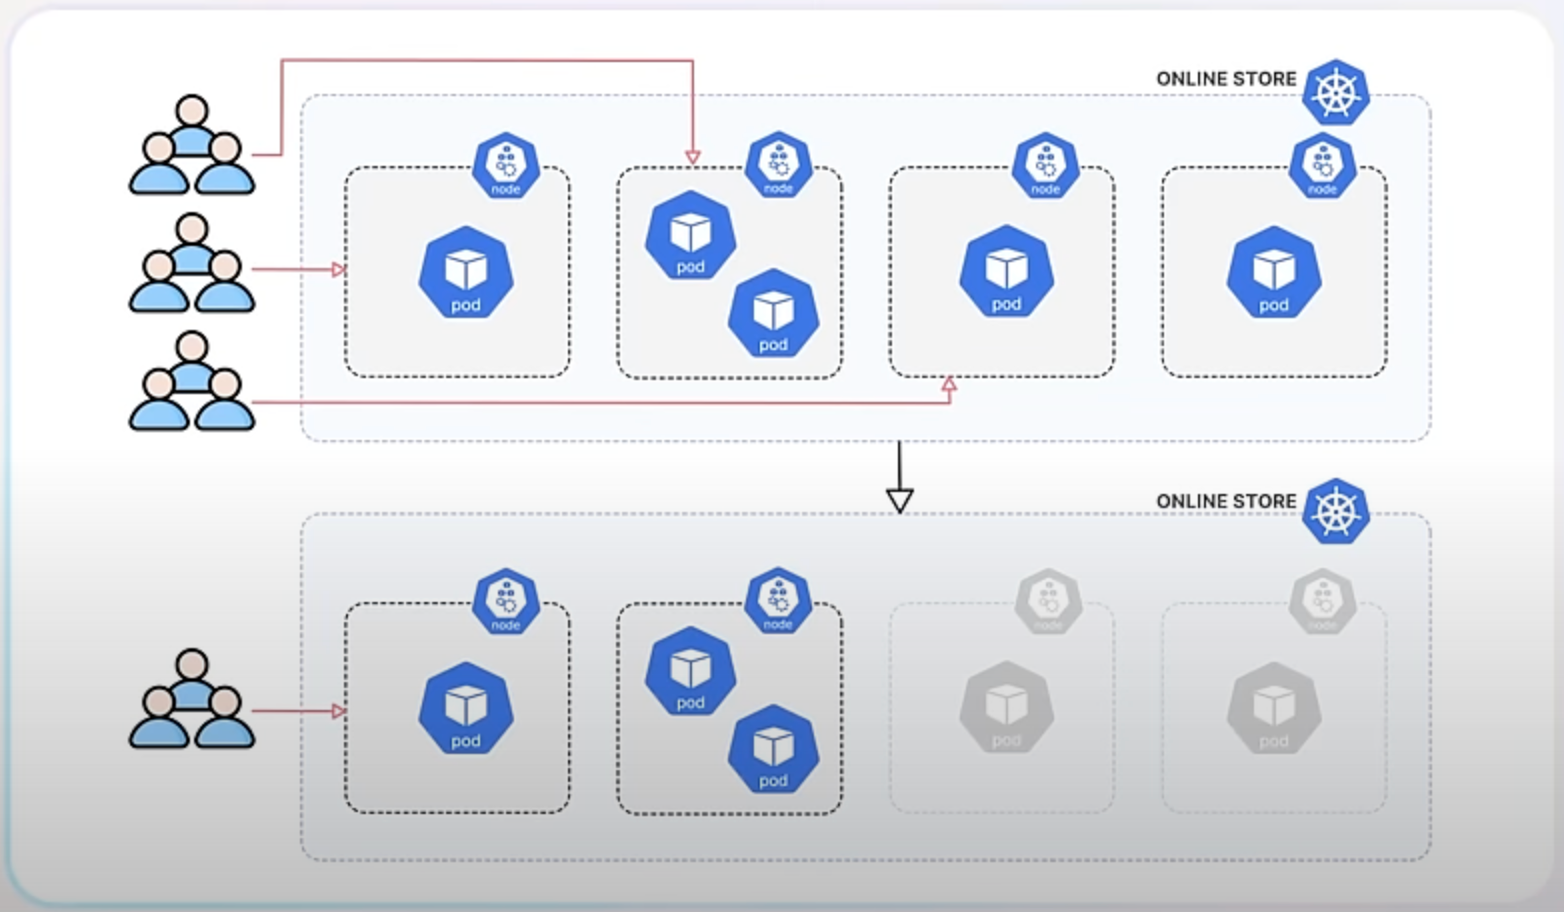
Before the enhancement, when you terminated nodes to downscale, those nodes might still receive new traffic, leading to failed connections and a poor user experience. Additionally, the health checks used to determine if nodes were healthy weren't always reliable, especially for services set to accept traffic from any node in the cluster. This is known as externalTrafficPolicy: Cluster.
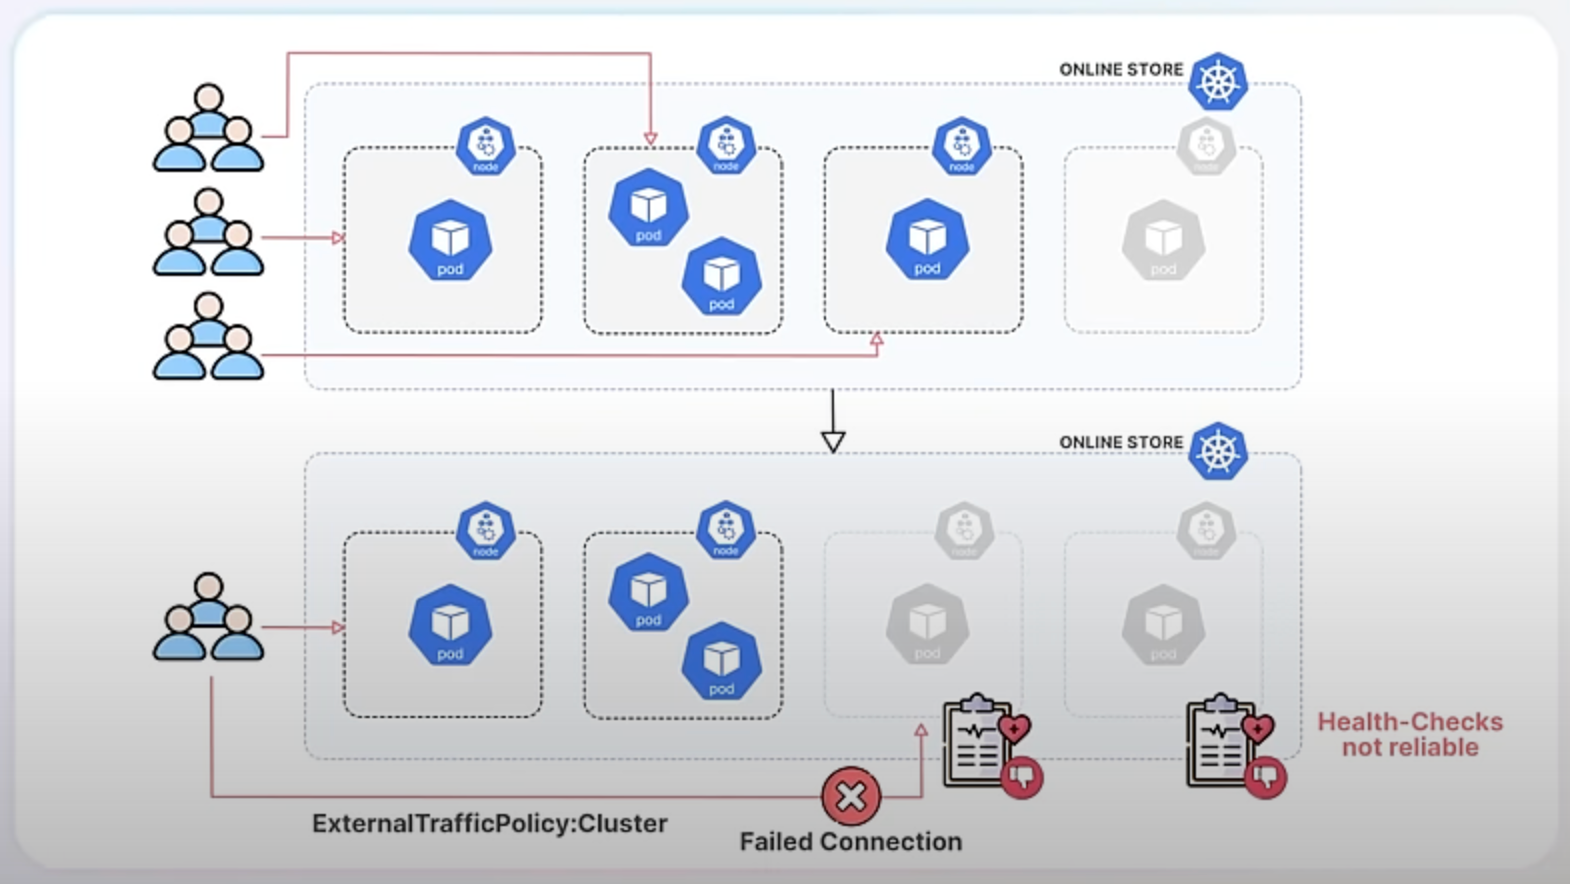
With the new enhancement, Kubernetes ensures that when a node is shutting down, it stops receiving new traffic and allows existing connections to finish smoothly. This is achieved by Kube-Proxy detecting a specific signal on the node called the ToBeDeletedByClusterAutoscaler taint. In Kubernetes, a taint is a special marker applied to nodes that can influence scheduling decisions. In this context, the ToBeDeletedByClusterAutoscaler taint indicates that a node is about to be terminated. When Kube-Proxy detects this taint, it fails its health check, signaling the load balancer to stop sending new traffic to the node. This way, the node can gracefully complete its current tasks without disruption.
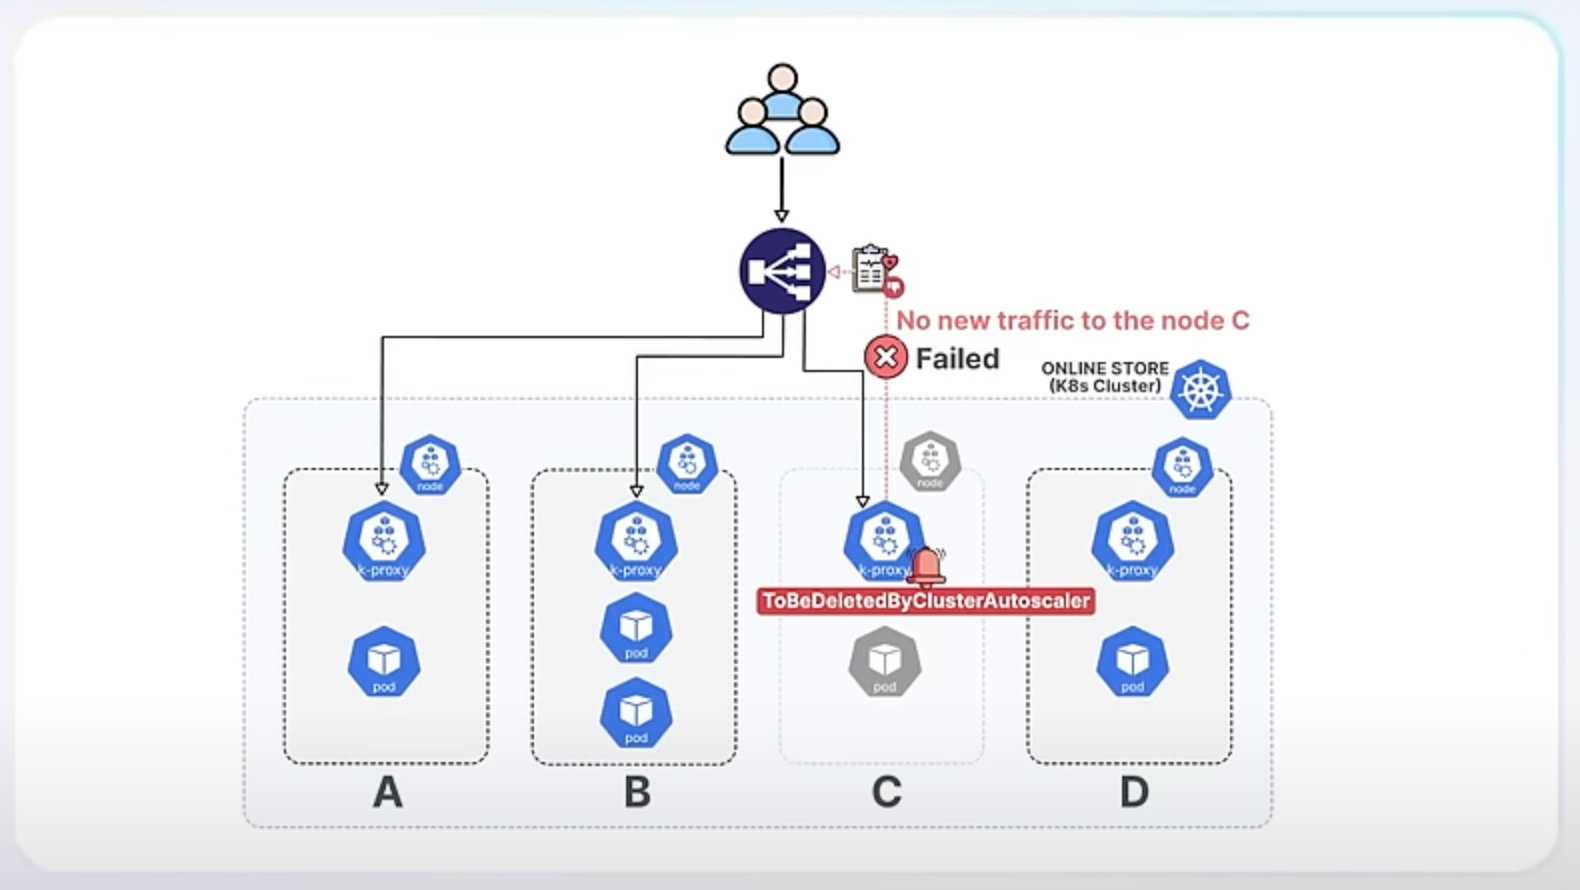
In our online store example, using externalTrafficPolicy: Cluster might lead to problems if terminating nodes still receive traffic. The enhancement solves this by ensuring terminating nodes stop receiving new traffic.
To make health checks more reliable, a new endpoint called /livez has been added. This endpoint provides a clear status of Kube-Proxy itself, indicating whether it is functioning properly. Unlike previous health checks, this one focuses solely on the health of Kube-Proxy, making it a better indicator of its actual status. For your online store, this means that the system will have a more accurate view of whether Kube-Proxy is working correctly, avoiding false positives or negatives.
curl -k https://localhost:6443/livez?verbose
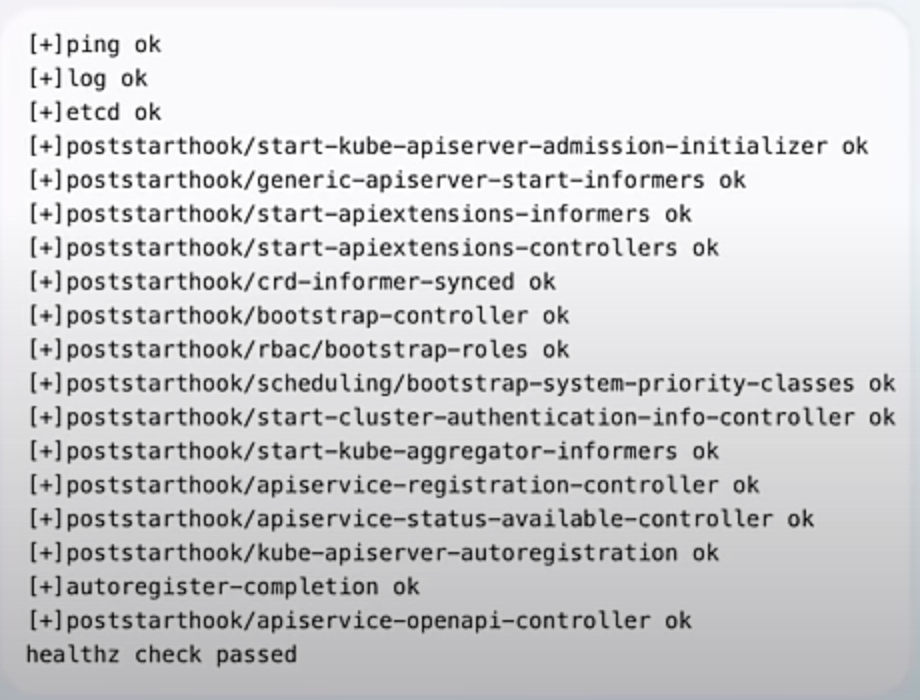
The enhancement also provides guidance for cloud providers on performing better health checks for services using externalTrafficPolicy: Cluster. While it does not enforce a standard method, it encourages cloud providers to adopt best practices through documentation and recommendations. This improves the overall reliability of health checks across different cloud environments, ensuring that the health of your services is accurately monitored and managed.
Random Pod selection on ReplicaSet downscaling, also graduating to stable.
A ReplicaSet in Kubernetes ensures that a specified number of pod replicas are running at any given time. It helps maintain the desired state of your application by creating or deleting pods as needed.
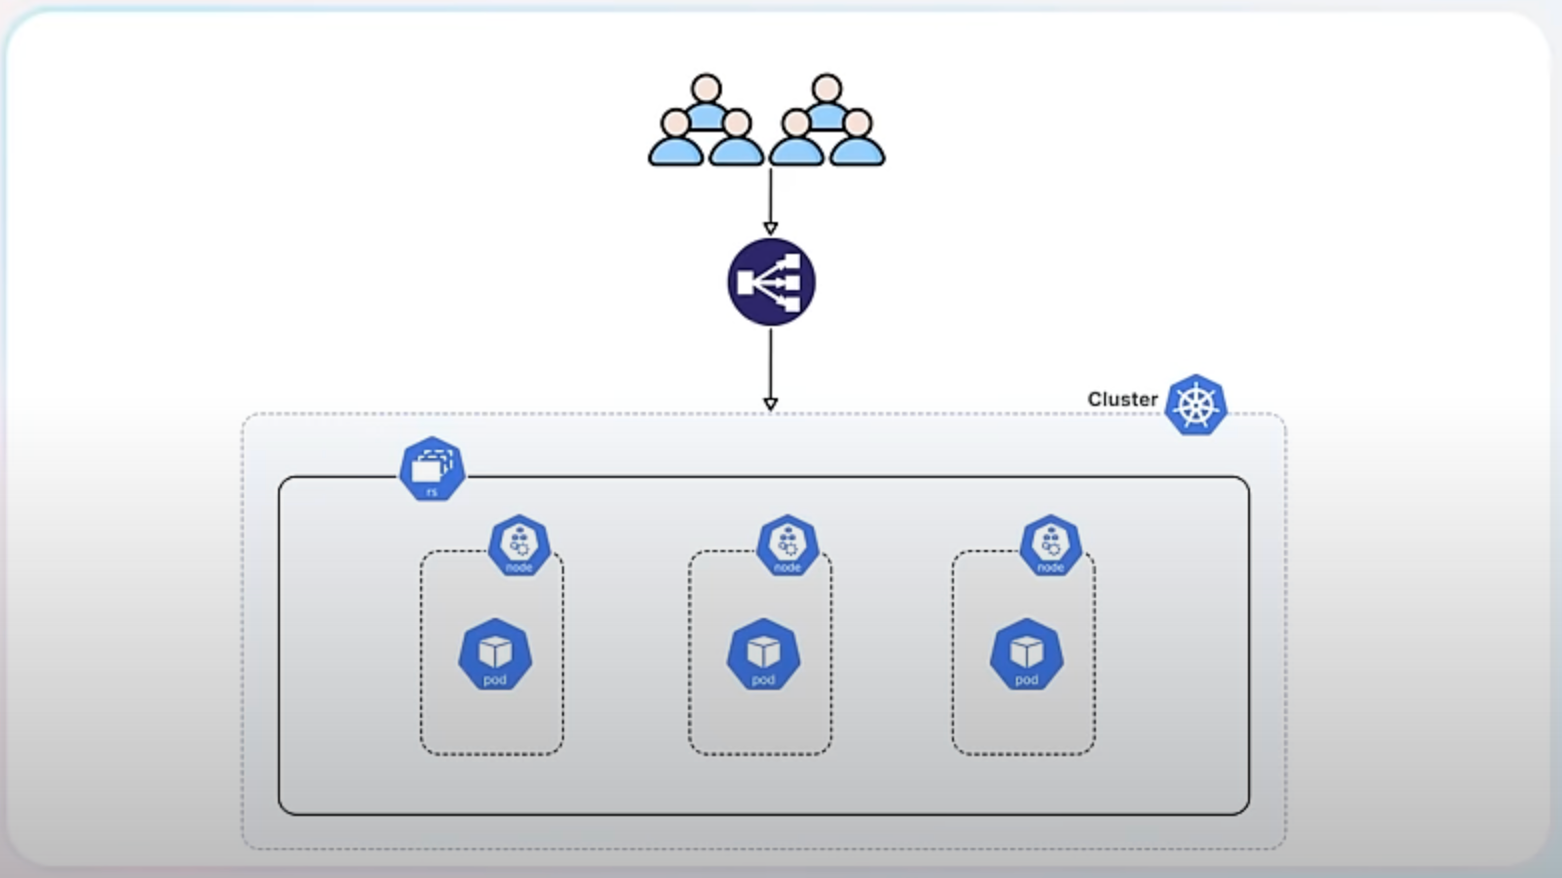
When you scale up a ReplicaSet, you add more replicas (pods) to handle increased load.
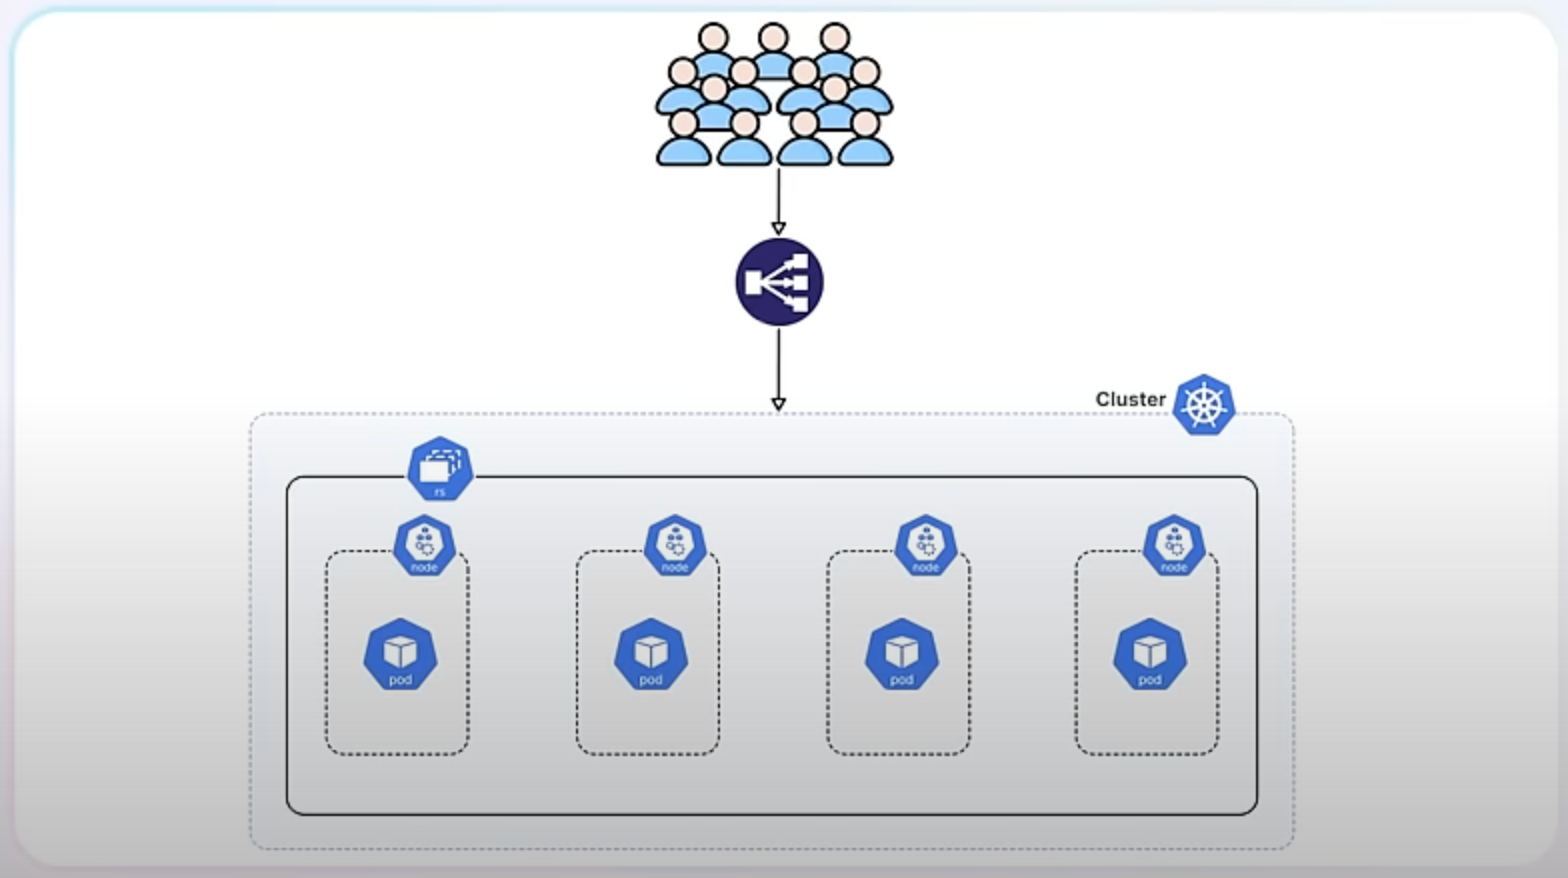
When you scale down, you reduce the number of replicas to save resources.
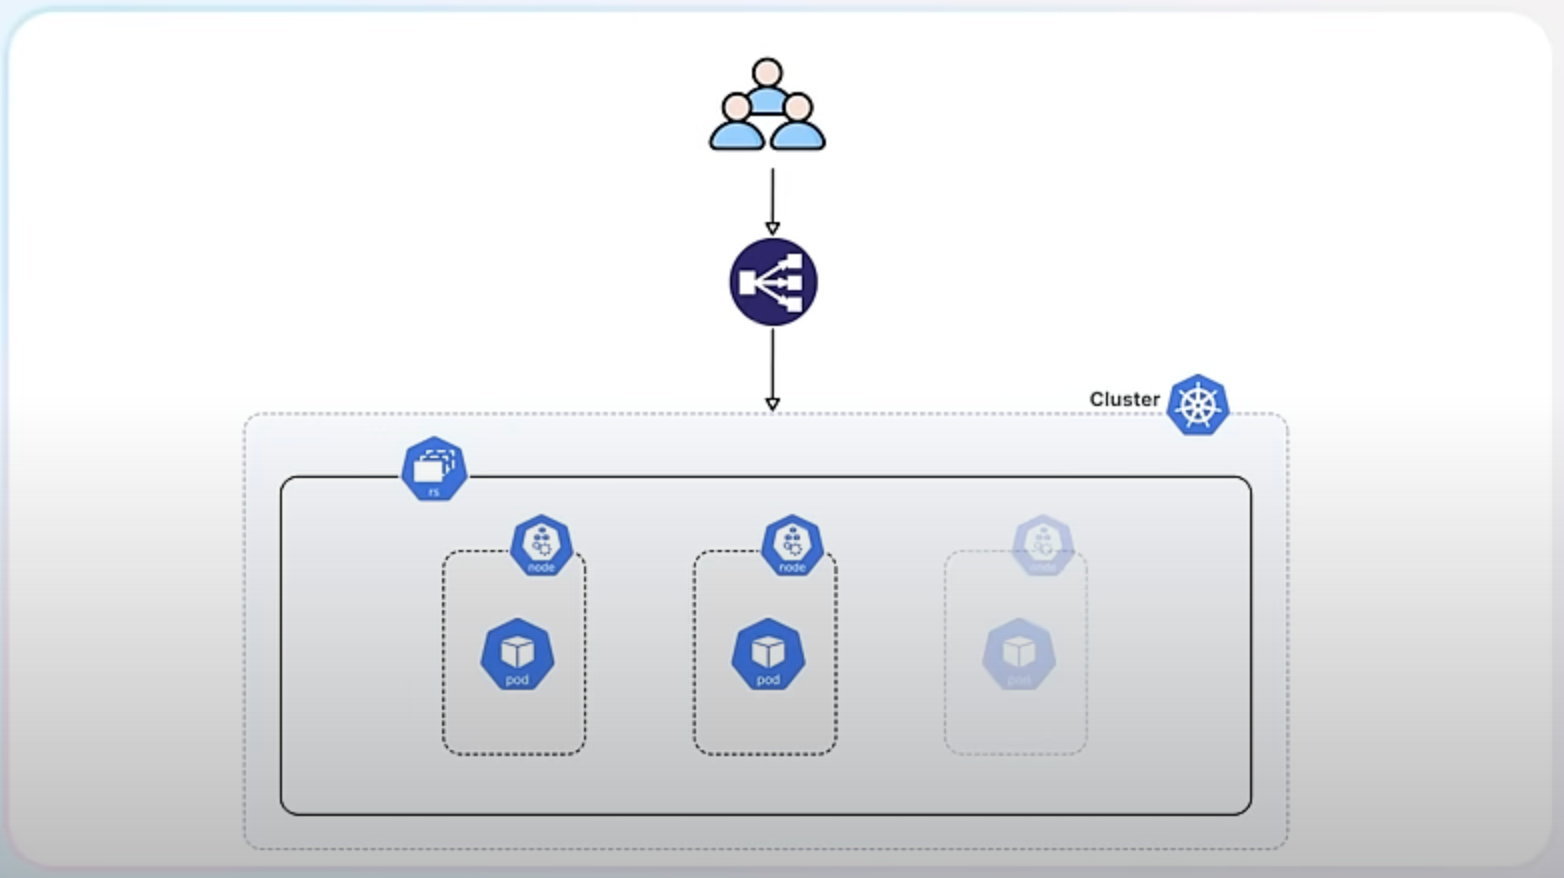
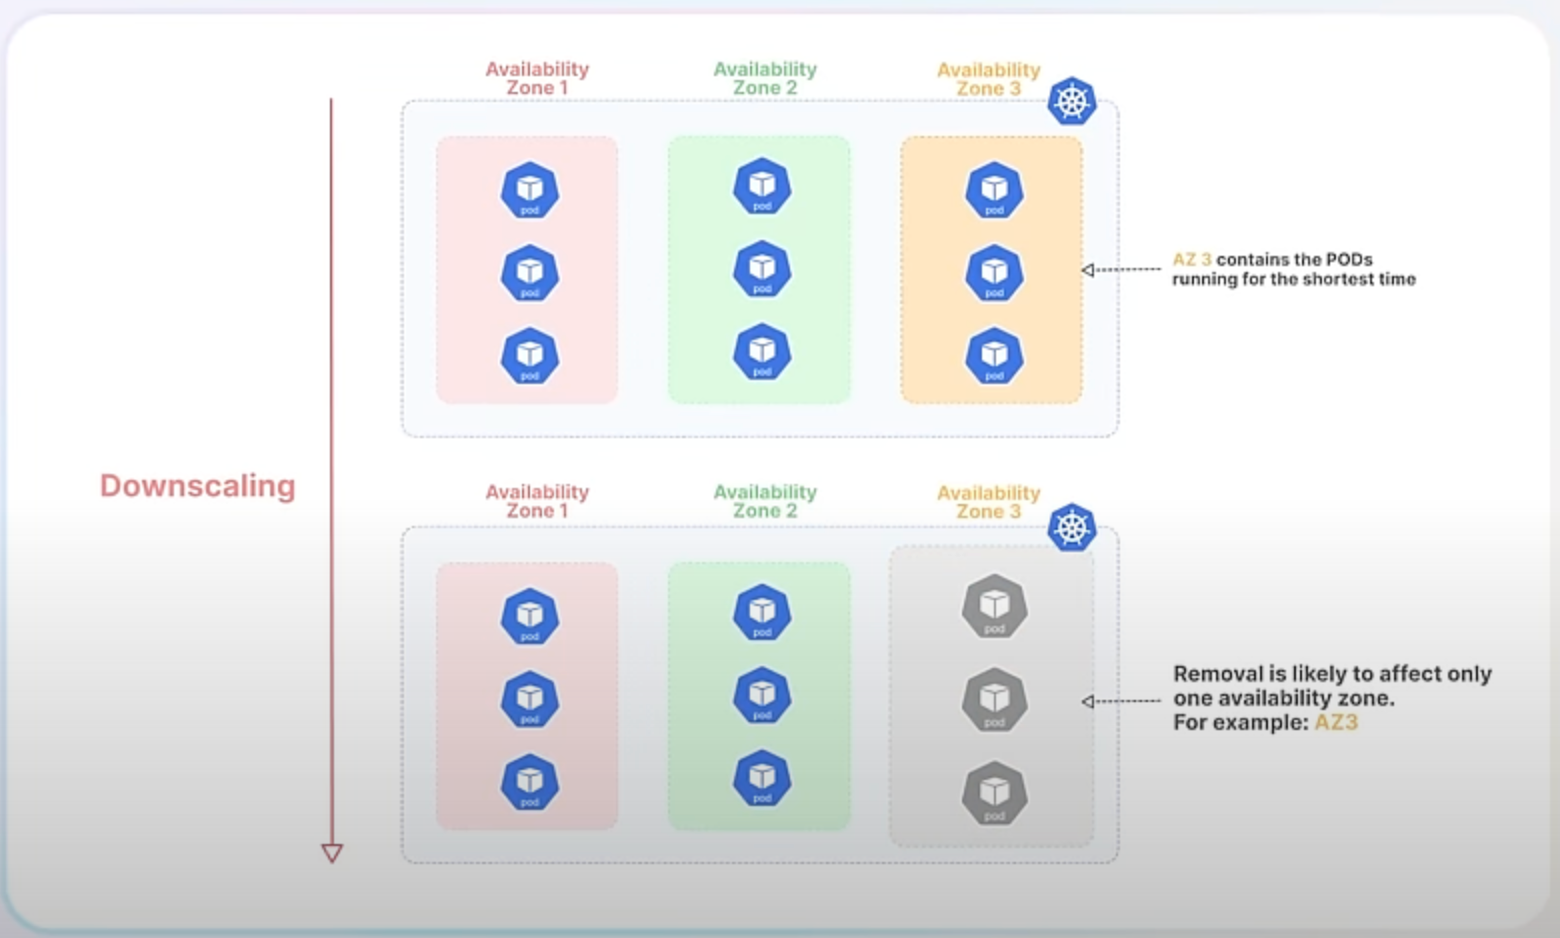
Currently, when Kubernetes downscales a ReplicaSet, it prefers to delete the Pods that have been running for the shortest amount of time. This approach tries to minimize disruption by assuming that newer Pods are serving fewer clients. However, this can cause issues, especially in high availability scenarios where Pods are distributed across multiple failure domains (such as different availability zones in a cloud environment).
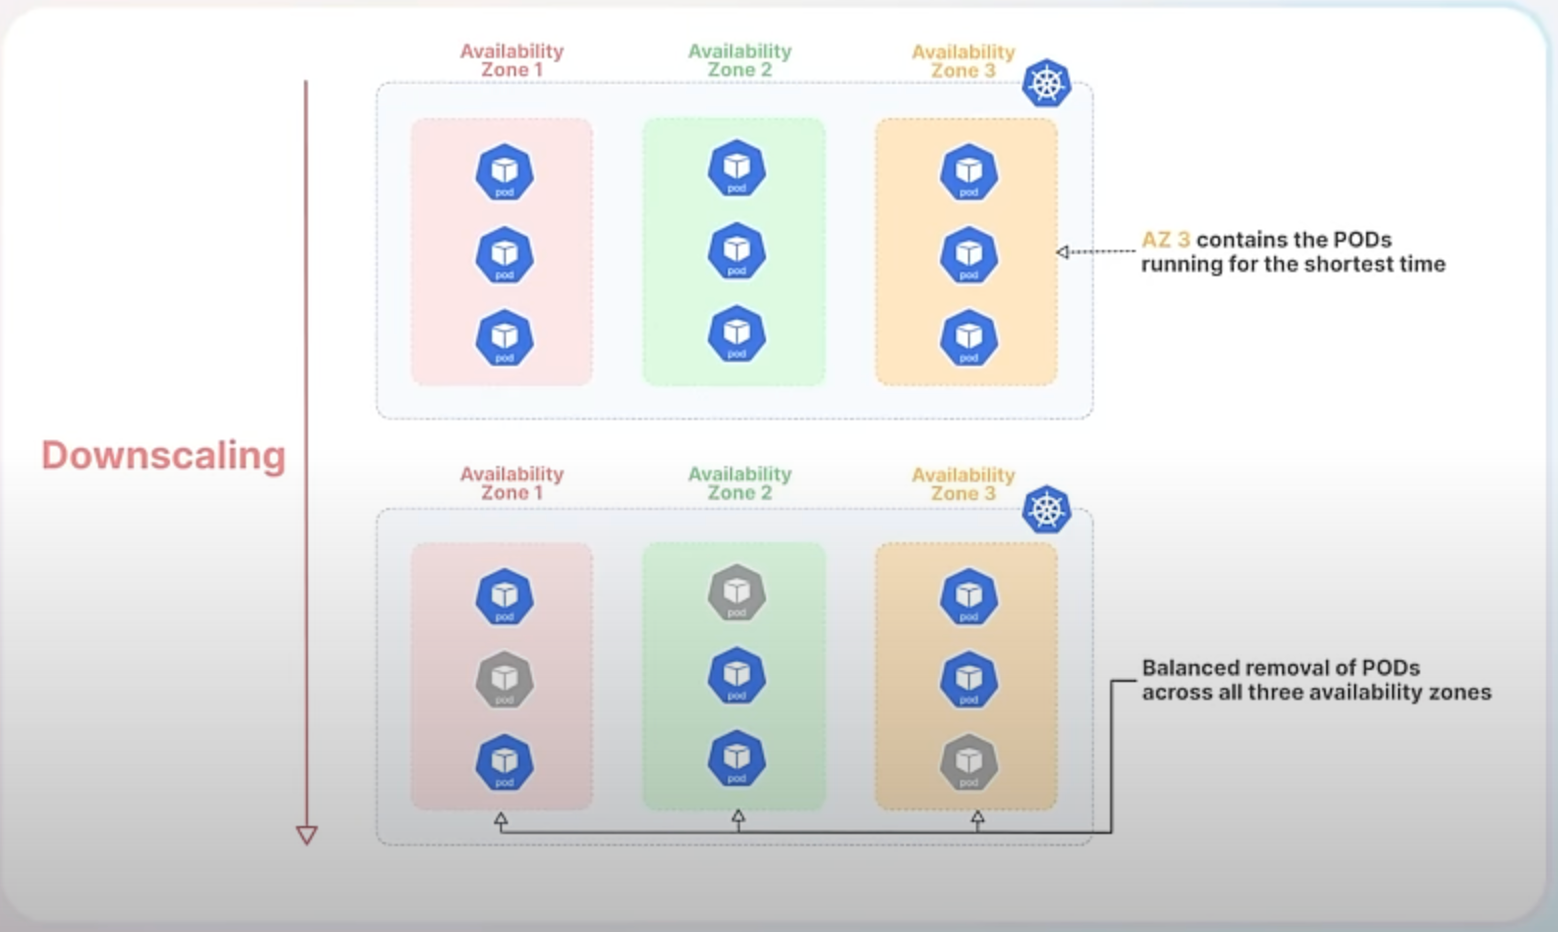
The new randomized algorithm mitigates this issue by introducing randomness into the selection of Pods for termination. This means that instead of always removing the newest Pods, Kubernetes will make more balanced decisions that better preserve the distribution of Pods across failure domains.
Let's break down an example to make this clearer:
Imagine you have a ReplicaSet with 6 Pods, evenly distributed across 3 availability zones, with 2 Pods in each zone.
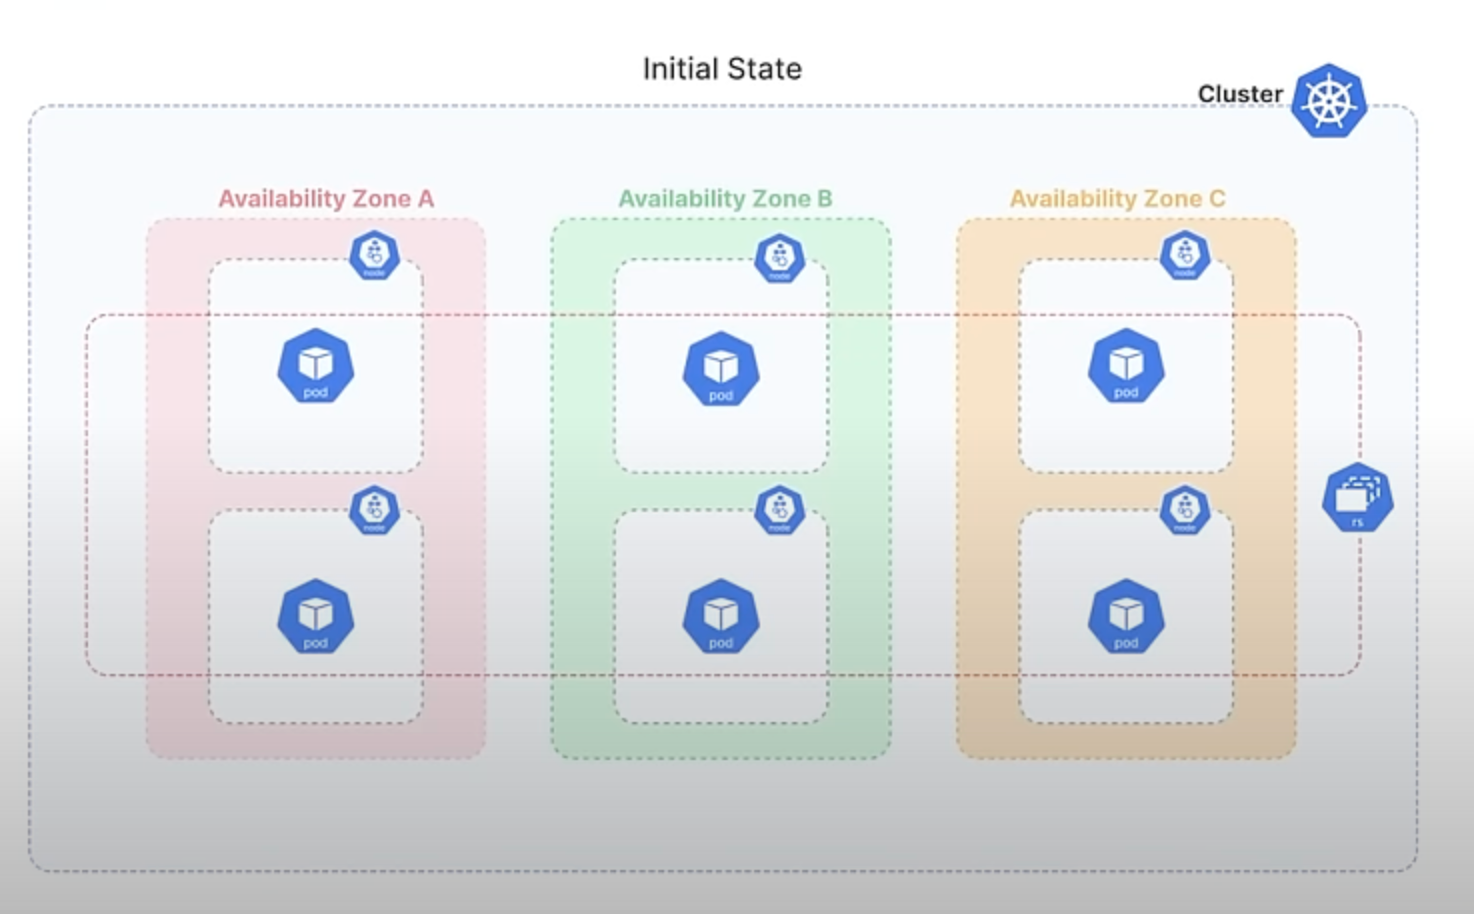
If one of these zones experiences a failure and becomes unavailable, Kubernetes detects this and attempts to maintain the desired number of Pods by creating new ones in the remaining zones. So, if Zone C goes down, the ReplicaSet controller will create 3 Pods in each Zones A and B, resulting in 3 Pods in each of these zones.
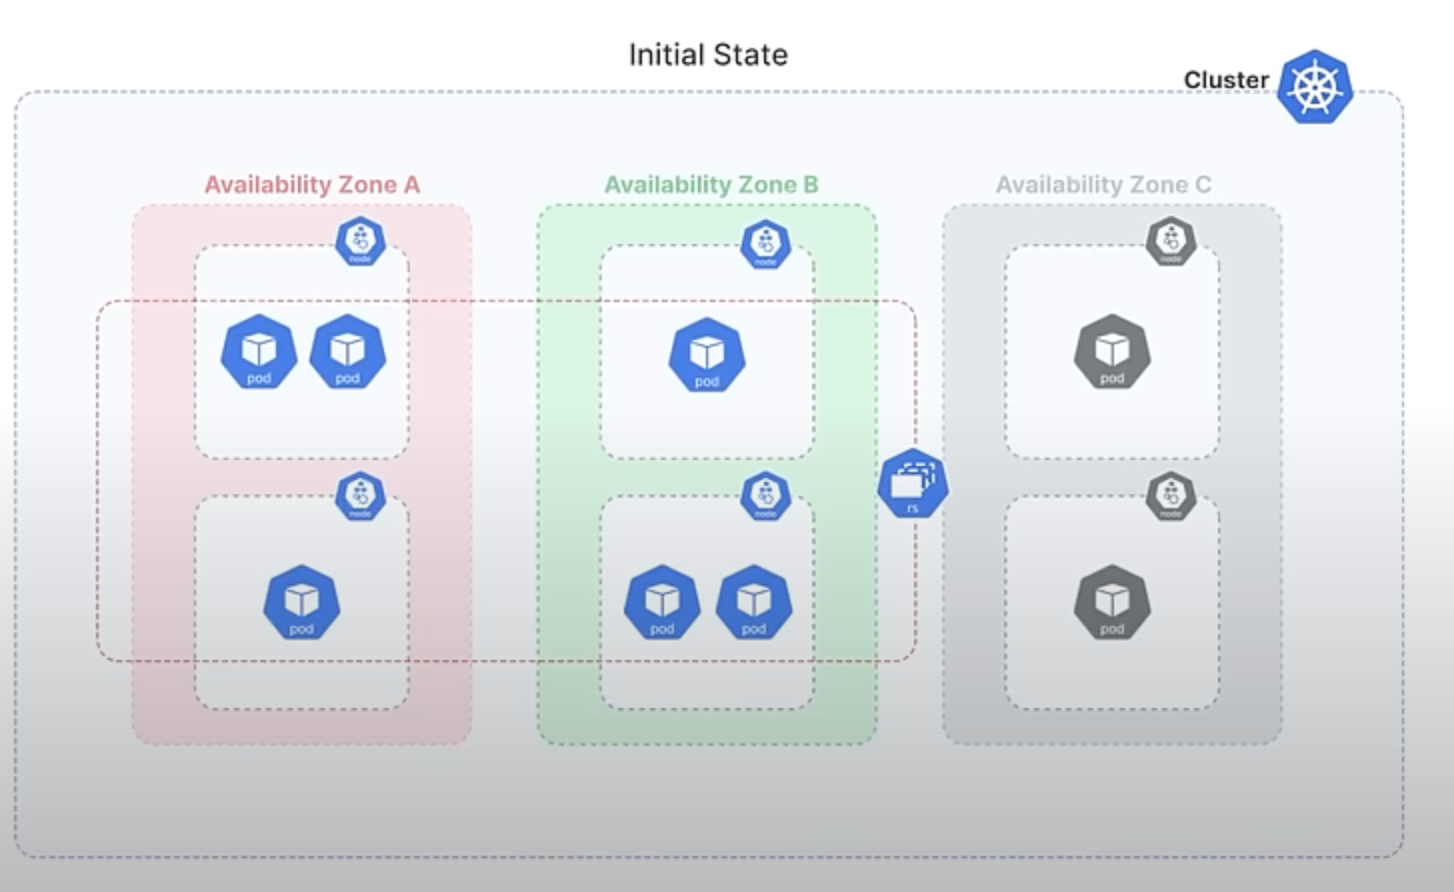
Now, suppose the failed Zone C comes back online. To balance the load, you decide to scale up the ReplicaSet to 9 Pods, which leads to 3 Pods being scheduled in Zone C. As a result, each of the three zones now has 3 Pods.
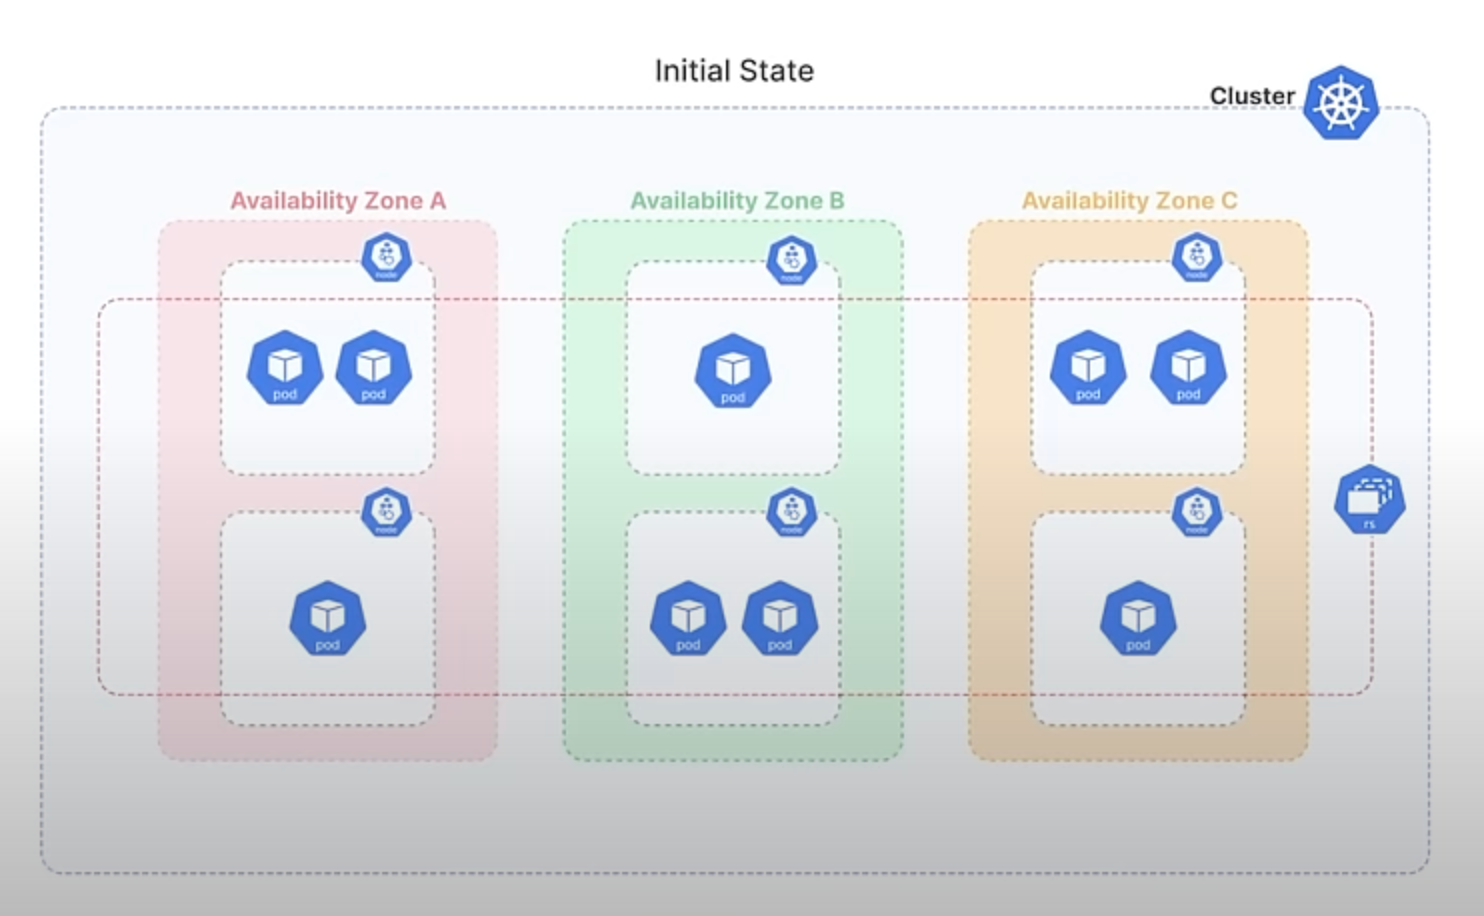
Later, when the demand decreases, you decide to scale down the ReplicaSet back to 6 Pods. With the current algorithm, Kubernetes would likely remove the 3 newest Pods, which could all be from Zone C, causing an imbalance again, leaving Zones A and B with 3 Pods each and Zone C with none.
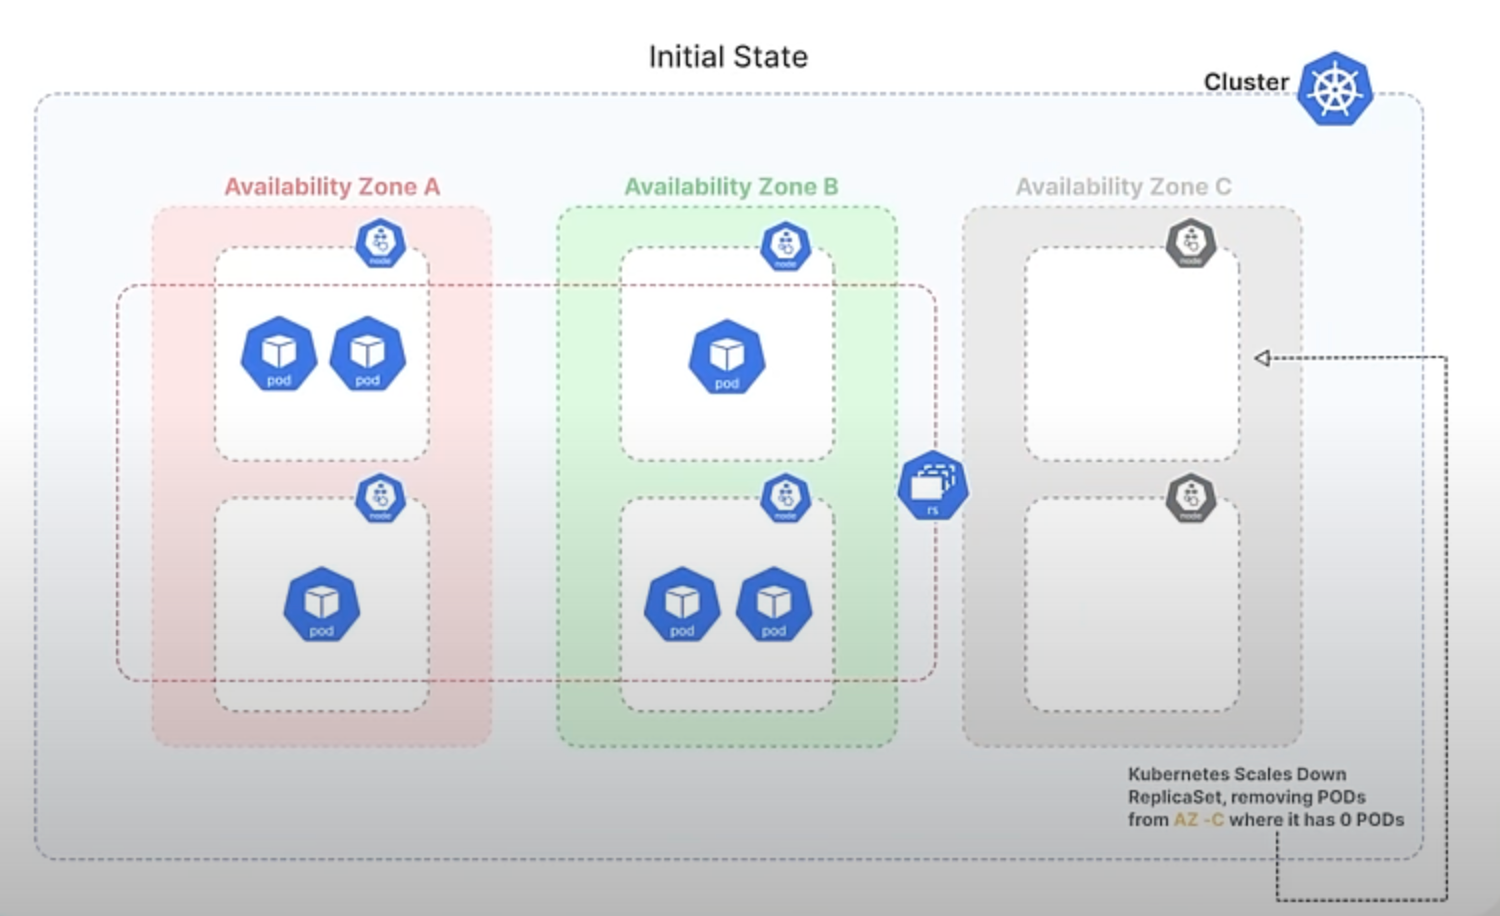
With the new randomized algorithm, Kubernetes will select Pods for termination in a more balanced manner. Instead of always removing the newest Pods, it randomly chooses which Pods to terminate, ensuring that the distribution across all zones remains more even. This helps maintain stability and high availability by preventing any single zone from becoming underrepresented.
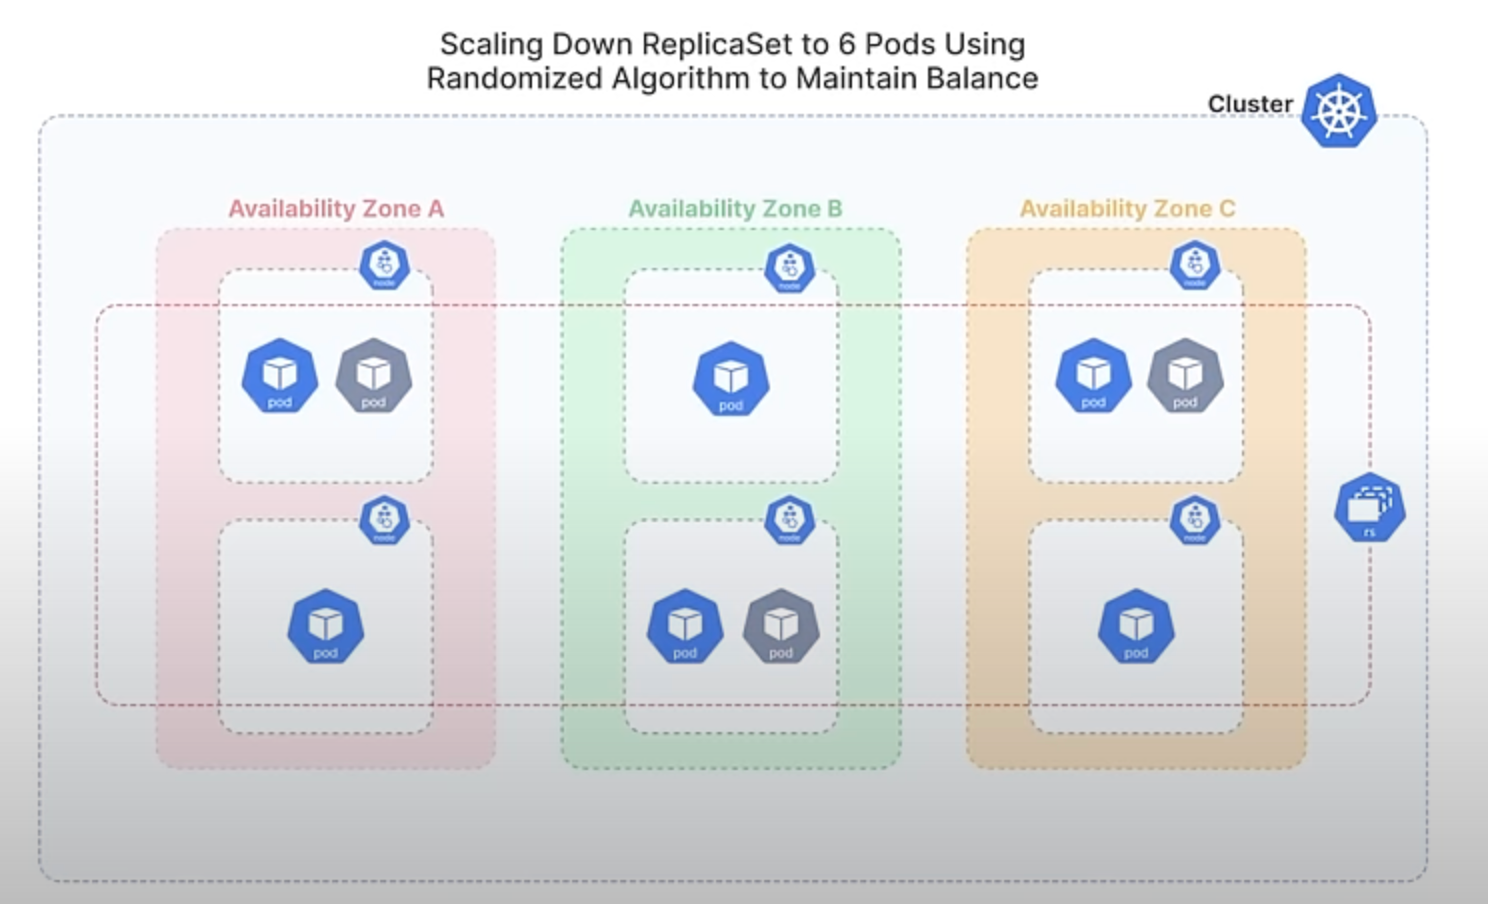
So, This enhancement improves the balance of Pod distribution across failure domains, enhancing high availability and reducing the risk of significant disruption by avoiding the removal of all Pods from a single domain. It also ensures a fairer approach to Pod termination, preventing certain Pods from being consistently chosen over others.
That's all for today! We’ll reconnect soon to dive into the exciting new features and updates coming with Kubernetes 1.32, which is scheduled for release on December 11th this year, marking the third release of 2024. Let's meet again in three months to explore the exciting enhancements that come with this release!









Discussion