


Highlights
- SSH stores server fingerprints to prevent spoofing and MITM attacks.
- The error occurs when the server’s current key doesn’t match what's in
known_hosts. - Common reasons include server reinstall, key rotation, IP/DNS changes, or corrupted known_hosts.
- You can fix the issue by removing the old key and accepting the new one.
- Regenerating host keys on the server resolves mismatches caused by compromised or outdated keys.
- SSH options like
StrictHostKeyChecking=nobypass verification but are not secure. - SSHFP DNS records provide automated, secure host key verification.
- A simple troubleshooting flow helps confirm legitimacy before updating keys.
As DevOps engineers, we've all been there - you SSH into a server, run your first command, and suddenly “host key verification failed” SSH errors stop you in your tracks. In this guide, We’ll explain what causes these SSH known_hosts errors, how to detect a host key mismatch, and share four simple ways to fix SSH host key verification failed issues quickly and safely.
Many engineers encounter variations of this issue, such as “host key verification failed SSH”, “SSH host key verification failed fix”, or general SSH known_hosts errors. These messages all point to the same underlying problem - your local machine believes the remote server’s identity has changed, causing an SSH host key mismatch.
How SSH Works
When you connect to a remote server via SSH for the first time, your client generates and stores a cryptographic host key for that server's IP or hostname. This acts as a digital fingerprint, uniquely identifying the server you're connecting to. Anytime you reconnect in the future, SSH verifies that the key presented by the server matches what's stored locally in the known_hosts file. This prevents man-in-the-middle attacks, where an adversary could intercept your connection and impersonate the target server. Without host key verification, you'd have no way to be sure you reached the intended host rather than an imposter.
So, in summary, SSH host keys:
- Uniquely identify servers
- Prevent spoofing or man-in-the-middle attacks
- Are stored locally on your client for future verification
Check our course on Linux Basics to learn more on how to work with SSH and SCP.
Common SSH Errors You May See
Depending on your system and SSH version, you may see slightly different variations of this problem, including:
- host key verification failed ssh
- ssh known_hosts error
- ssh host key verification failed fix
- fix ssh host key mismatch
All of these point to the same root cause: your SSH client cannot verify the server’s identity.
What Causes The Host Key Verification Failure Error?
The host key verification failure error occurs when SSH detects a mismatch between the host key stored locally and the host key sent by the server. Here are some of the reasons why this can happen:
- The server has been reinstalled or upgraded, which may have generated a new host key or changed the host key format or algorithm.
- The server has rotated its host key, which is a good security practice to prevent the host key from being compromised or leaked.
- The network configuration of the server has changed, such as the IP address or the hostname.
- The known_hosts file on the client has been altered or corrupted, which may have deleted or modified the host key entry for the server.
Troubleshooting Steps
Before attempting any fix, confirm that what you’re seeing is truly an SSH known_hosts error, because this is the most common trigger for the host key verification failed SSH message.
- Check if the server host key fingerprint matches your expectations. Compare the fingerprint of the host key with the one in the known_hosts file. If the fingerprints match, then you can safely assume that the host key has changed for a legitimate reason and proceed to the solutions. If the fingerprints do not match, then you should be cautious and investigate further before connecting to the server.
- Check for IP address or DNS changes on the server. Verify that the IP address or the hostname of the server you are trying to connect to is the same as the one you used before. You can use tools such as
ping,nslookup, ordigto check the IP address or the DNS records of the server. If the IP address or the hostname has changed, you must update your SSH command or configuration to use the new one.
If your server is running as a docker container, check out this blog to learn how to obtain the container’s IP address: How to Get Docker Container IP Address From the Host
- Check if the server is behind a firewall, a proxy, or a NAT device that may affect the SSH connection. Use tools such as
nmap,telnet, ortracerouteto check the network connectivity and configuration of the server. If the server is behind a firewall, a proxy, or a NAT device, then you may need to adjust your SSH command or configuration to use the correct IP address, port, or protocol. - Check if the SSH server configuration and host key files have been altered. Log in to the server using another method, such as a console or a web interface, and check the SSH server configuration and host key files. Look for any changes or anomalies that may have caused the host key verification failure error. Check the following:
- The SSH server configuration file located at
/etc/ssh/sshd_config, may have changed the host key file location, format, or algorithm. You should check the values of theHostKey,HostKeyAlgorithms, andHostKeyFormatdirectives and make sure they are consistent with the host key files and the SSH client settings. - The host key files, usually located at
/etc/ssh/, may have been replaced, deleted, or corrupted. Check the permissions, ownership, and integrity of the host key files and make sure they are readable and valid. You should also check the fingerprints of the host key files and compare them with the ones that SSH displays.
- The SSH server configuration file located at
How to fix “host key verification failed” in SSH
Below are four easy ways to fix host key verification failure in SSH:
Solution 1: Remove the old host key from known_hosts file
This is the most common and quickest method people use when trying to fix SSH host key mismatch problems caused by outdated or rotated server fingerprints. The easiest and most common way to fix the host key verification failure error is to remove the old host key entry from the known_hosts file and add the new one. The known_hosts file is in your home directory at ~/.ssh/known_hosts. Follow these steps to remove the old host key entry from the known_hosts file:
- First, identify the host key entry that is causing the error. SSH will tell you the line number and the fingerprint of the host key that does not match. For example, if you try to connect to a server with the IP address 192.168.1.100, you may see a message like this:
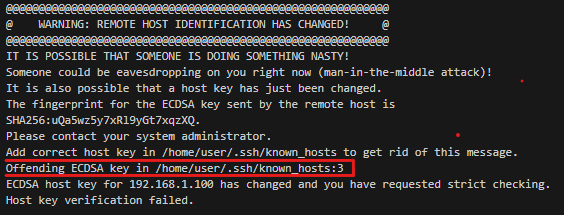
In this case, the host key entry that is causing the error is on line 3 of the known_hosts file and has the fingerprint SHA256:uQa5wz5y7xRl9yGt7xqzXQ.
- Remove the host key entry from the known_hosts file. Use any text editor or command-line tool to edit the known_hosts file and delete the line that contains the offending host key. For example, you can use the `sed` command to delete line 3 of the known_hosts file like this:
sed -i '3d' /home/user/.ssh/known_hosts
Alternatively, you can use the `ssh-keygen` command to delete the host key entry by specifying the hostname or IP address of the server. Here is the command to do that:
ssh-keygen -R 192.168.1.100
This command will remove all host key entries that match the given hostname or IP address from the known_hosts file. Removing the outdated entry resolves the ssh known_hosts error and allows your SSH client to store a fresh, correct host key when you reconnect.
- Connect to the server again and accept the new host key. After you have removed the old host key entry from the known_hosts file, you can try to connect to the server again. SSH will prompt you to confirm the new host key and add it to the known_hosts file. You may see a message like this:

Type yes or the fingerprint to accept the new host key and continue connecting. SSH will add the new host key to the known_hosts file and will not ask you again for the same server.
However, you should be careful when using this solution, as it may compromise the security of your SSH connection. By removing the old host key entry from the known_hosts file, you are essentially trusting the new host key without verifying its authenticity. This may expose you to a man-in-the-middle attack, where an attacker may have replaced the host key with their own and intercepted your SSH connection. Therefore, you should only use this solution if you are sure that the host key has changed for a legitimate reason and that you are connecting to the correct server.
Solution 2: Replace the server host key
Another way to fix the host key verification failure error is to replace the host key on the SSH server with a new one. This may be necessary if the host key has been compromised, corrupted, or lost. To replace the host key on the SSH server, you can follow these steps:
- Generate a new host key on the SSH server. Use the
ssh-keygencommand to generate a new host key with the desired format and algorithm. For example, you can generate a new ECDSA host key with 256 bits by running this command on the server:
ssh-keygen -t ecdsa -b 256 -f /etc/ssh/ssh_host_ecdsa_key
This will create a new host key file called `ssh_host_ecdsa_key` and a corresponding public key file called `ssh_host_ecdsa_key.pub` in the `/etc/ssh/` directory. You can choose a different format, algorithm, or file name according to your preference.
- Back up the old host key on the SSH server. Before replacing the host key, back up the old host key file and the corresponding public key file in case you need to restore them later. Use the `cp` command to copy the old host key files to a different location. Run these commands on the server to back up the old ECDSA host key files:
cp /etc/ssh/ssh_host_ecdsa_key /etc/ssh/ssh_host_ecdsa_key.old
cp /etc/ssh/ssh_host_ecdsa_key.pub /etc/ssh/ssh_host_ecdsa_key.pub.old- Update the SSH server configuration to use the new host key. Next, edit the SSH server configuration file at
/etc/ssh/sshd_configand specify the new host key file location, format, and algorithm. Uncomment or add the `HostKey` directive and set its value to the new host key file name. For example, you can update the SSH server configuration to use the new ECDSA host key file by adding this line to the/etc/ssh/sshd_configfile:
HostKey /etc/ssh/ssh_host_ecdsa_key
You also need to update the HostKeyAlgorithms and HostKeyFormat directives to match the new host key format and algorithm. You do that by adding these lines to the /etc/ssh/sshd_config file:
HostKeyAlgorithms ecdsa-sha2-nistp256
HostKeyFormat 2- Restart the SSH server to apply the changes. Restart the SSH server service to load the new host key and configuration using the
systemctlcommand below:
systemctl restart sshd
- Notify the clients of the new host key. After you have replaced the host key on the SSH server, you need to inform the clients that connect to the server of the new host key. Ask them to remove the old host key entry from their known_hosts file and accept the new host key when they connect to the server. Alternatively, you can use SSHFP DNS records to publish the new host key, which we will discuss in the next section.
Solution 3: Use SSH key options to bypass verification
Another way to fix the host key verification failure error is to use SSH key options to bypass the verification process. This is a quick and easy solution, but it is also very risky and insecure.
There are two SSH key options that you can use to bypass the verification process: -o UserKnownHostsFile= and -o StrictHostKeyChecking=. These options can be used in the SSH command or in the SSH configuration file. Here is how they work:
- The
-o UserKnownHostsFile=option allows you to specify a different file to store the host keys instead of the default known_hosts file. You can use this option to specify a blank or a dummy file that does not contain any host key entries. This will prevent SSH from checking the host key against the known_hosts file and will accept any host key from the server. For example, you can use this option to specify a blank file called/dev/nullby running this command:
ssh -o UserKnownHostsFile=/dev/null user@server1
- The
-o StrictHostKeyChecking=option allows you to specify how SSH should handle the host key verification. You can use this option to set the value to no oraccept-new, which will disable the strict host key checking and will accept any new or changed host key from the server. For example, you can use this option to set the value to no by running this command:
ssh -o StrictHostKeyChecking=no user@server1
By using these options, you are essentially trusting the server without any verification. Therefore, you should only use these options temporarily to resolve the issue and not permanently. You should also use these options in combination with other security measures, such as SSH keys, passwords, or certificates, to authenticate to the server.
Advanced solution: Configure SSHFP records
An advanced way to fix the host key verification failure error is to configure SSHFP DNS records for your domain. SSHFP, or SSH Fingerprint, is a type of DNS record that allows you to publish the host key fingerprints of your servers in the DNS system. This allows SSH clients to automatically verify the host key of the server by querying the DNS system and comparing the host key fingerprint with the SSHFP record. This helps avoid the host key verification failure error and also prevents man-in-the-middle attacks, as the DNS system provides a trusted source of host key information.
Follow these steps to configure SSHFP records for your domain:
- Generate the SSHFP records for your servers. Use the
ssh-keygencommand to generate the SSHFP records for your servers. You need to specify the-roption and the hostname or IP address of the server. For example, you can generate the SSHFP records for a server with the hostnameserver1.example.comby running this command on the server:
ssh-keygen -r server1.example.com
This will output the SSHFP records for the host keys of the server in the following format:
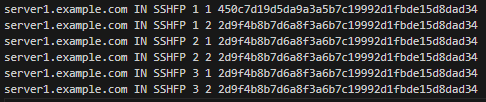
The SSHFP record consists of four fields: the hostname, the record type (SSHFP), the host key algorithm, and the host key fingerprint. The host key algorithm is a number that represents the type of the host key, such as 1 for RSA, 2 for DSA, or 3 for ECDSA. The host key fingerprint is a number that represents the hash algorithm and the hash value of the host key, such as 1 for SHA-1 or 2 for SHA-256. You can generate the SSHFP records for different host keys and hash algorithms by using different options with the `ssh-keygen` command.
- Add the SSHFP records to your DNS zone file. The DNS zone file is a file that contains the DNS records for your domain, such as A, CNAME, MX, or TXT records. Use any DNS service or tool to edit the DNS zone file and add the SSHFP records. For example, you can add the SSHFP records to the DNS zone file for the domain `example.com` by appending them to the file like this:

3. Update the SSH client configuration to use the SSHFP records. Edit the SSH client configuration file, located at ~/.ssh/config, and enable the verification of the host key using the SSHFP records. You need to uncomment or add the `VerifyHostKeyDNS` directive and set its value to yes or ask, as shown below:
VerifyHostKeyDNS yes
This will tell SSH to automatically verify the host key of the server by querying the DNS system and comparing the host key fingerprint with the SSHFP record. If the value is set to `ask`, SSH will prompt you to confirm the host key verification using the SSHFP record.
4. Connect to the server using the SSHFP records. After you have configured the SSHFP records for your domain and updated the SSH client configuration to use them, you can connect to the server using the SSHFP records. SSH will query the DNS system and verify the host key of the server using the SSHFP record. For example, you may see a message like this:

You can type yes or the fingerprint to accept the host key and continue connecting. SSH will add the host key to the known_hosts file and will not ask you again for the same server.
Check our course on DevSecOps - Kubernetes DevOps and Security to learn more on how to integrate security into your software development cycle.
To complement this article, here's our video breakdown of DNS in Linux:
Conclusion
With these solutions, you can confidently fix any host key verification failed SSH issue - whether it’s a simple SSH known_hosts error, a server-side rotation, or a deeper SSH host key mismatch.
With these four simple solutions, you now have full control over SSH host keys. Note that as your systems and configs evolve, keys will inevitably drift, but armed with these solutions, reconciliation is easy.
Are you ready for hands-on learning? Become a subscriber by visiting our plan and pricing page to access 70+ top DevOps courses. Start your journey today!
We hope you have found this article useful and interesting. Please share your feedback, questions, or suggestions in the comment box below.
FAQs
Q1: What triggers the “host key verification failed” error?
A mismatch between the server’s host key and the one stored in your client’s known_hosts file.
Q2: Is deleting the known_hosts entry safe?
Yes, but only if you’ve verified that the key change is legitimate.
Q3: Why do host keys change unexpectedly?
Usually due to server reinstalls, migrations, or intentional host key rotations.
Q4: Can I bypass host key verification?
Yes using SSH options, but it is insecure and should only be done temporarily.
Q5: How do I avoid this issue in the future?
Use SSHFP DNS records or maintain proper server key management practices.


Discussion