


Highlights
- Manual Binary Installation: Terraform is distributed as a single binary file. You download the ZIP archive, extract it, and place the executable in a dedicated folder.
- Environment Variable Config: Adding the Terraform binary path to your system's PATH environment variable is crucial for running Terraform commands from any terminal window.
- Verification: Always verify your installation by running
terraform -versionin a new Command Prompt or PowerShell window. - No Installer Wizard: Unlike typical Windows applications, Terraform does not use an MSI installer wizard; the setup is manual but straightforward.
- Cross-Platform Consistency: Once installed, the Terraform commands and workflows on Windows are identical to those on Linux or macOS.
Terraform has become an essential tool for infrastructure as code (IaC), allowing developers and operations teams to automate the provisioning and management of infrastructure resources. If you are a Windows user looking to harness the power of Terraform, you're in the right place.
In this blog, I will walk you through the step-by-step process to install terraform on windows.
Prerequisites
Before you begin, make sure that you have the following prerequisites:
- A Windows 10 or 11 PC with 64-bit architecture
- Administrator privileges on your Windows machine
Installing Terraform on Windows
To install Terraform on Windows, you have to download and extract the correct Terraform package. This process serves as a manual terraform installation guide for Windows users.
Download and Extract Terraform on Windows
Navigate to the Terraform download page. It should list out Terraform downloads for various platforms. Navigate to the Windows section and download the respective version. I have a 64-bit Windows machine, so I will download the AMD64 file. Click on download, and the process will start automatically. For this example, I am downloading V1.6.5, this will download the file - terraform_1.6.5_windows_amd64.zip

Extract the downloaded Terraform zip archive to a directory of your choosing (for example, C:\terraform). You can use a built-in Windows utility or a third-party extraction tool like 7-Zip.
Update Path Environment Variable
The Path Environment Variable is a list of where the PowerShell, Command Prompt, or Git Bash will look to find a command. If you input a command and it is not in the Path Environment Variable list, then the command will not be recognized.
To add the Terraform folder in the Path Environment Variable, click on the Start Menu and search for the environment variables option.

Open the "Environment Variables" window by searching for it in the Start menu.
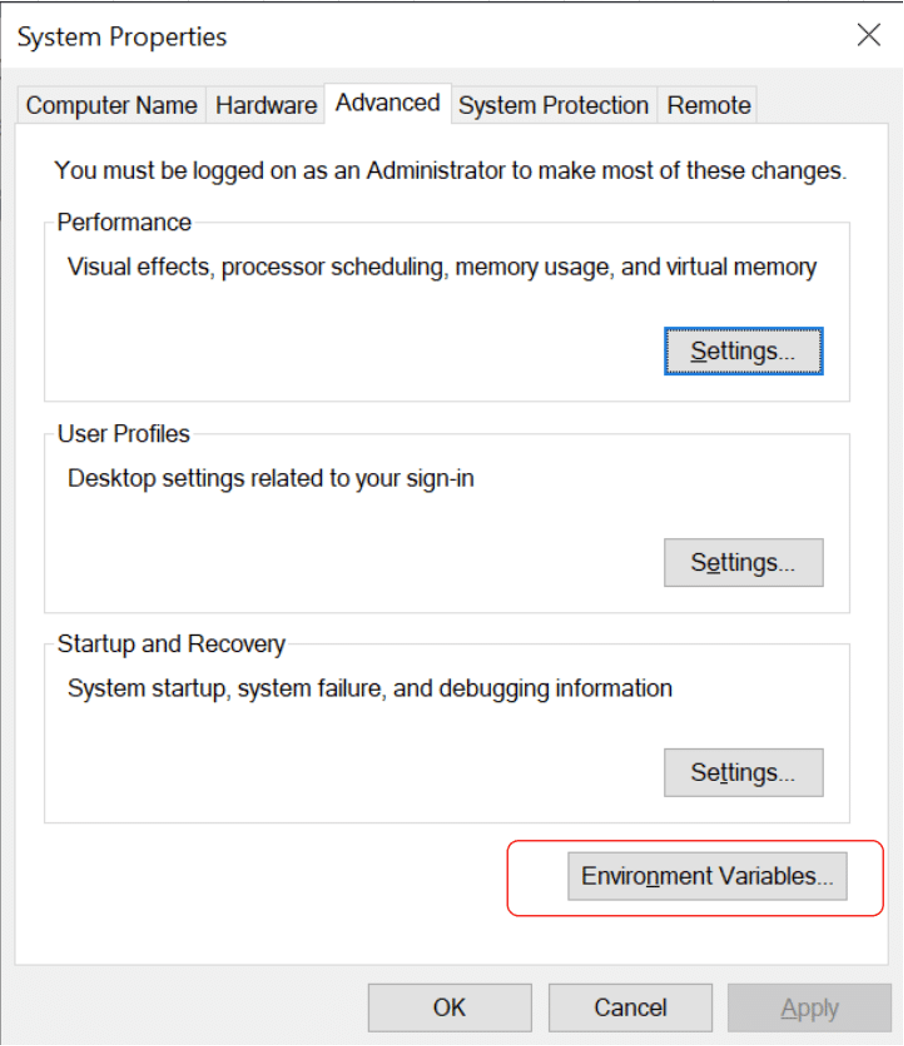
Navigate to the "User variables" tab and click "New."
In the "Variable name" field, enter "TERRAFORM_HOME."
In the "Variable value" field, specify the path to the extracted Terraform directory (e.g., C:\terraform).
Click "OK" to save the new variable.
Or, the easy way is to add it as a system variable. Navigate to the "System variables" tab and click "Edit."

Select the "Path" variable and click "Edit."
Append the path to the Terraform executable to the end of the variable value (e.g., C:\terraform\terraform.exe). Separate the new path from the existing paths using a semicolon (;).
Click "OK" to apply the changes.
Verify Windows Terraform Installation
Open a Command Prompt or PowerShell to check if Terraform is correctly added to the environmental variable PATH. Run the terraform command.
C:\users\admin\teraform> terraformYou will see an output similar to the one shown below.
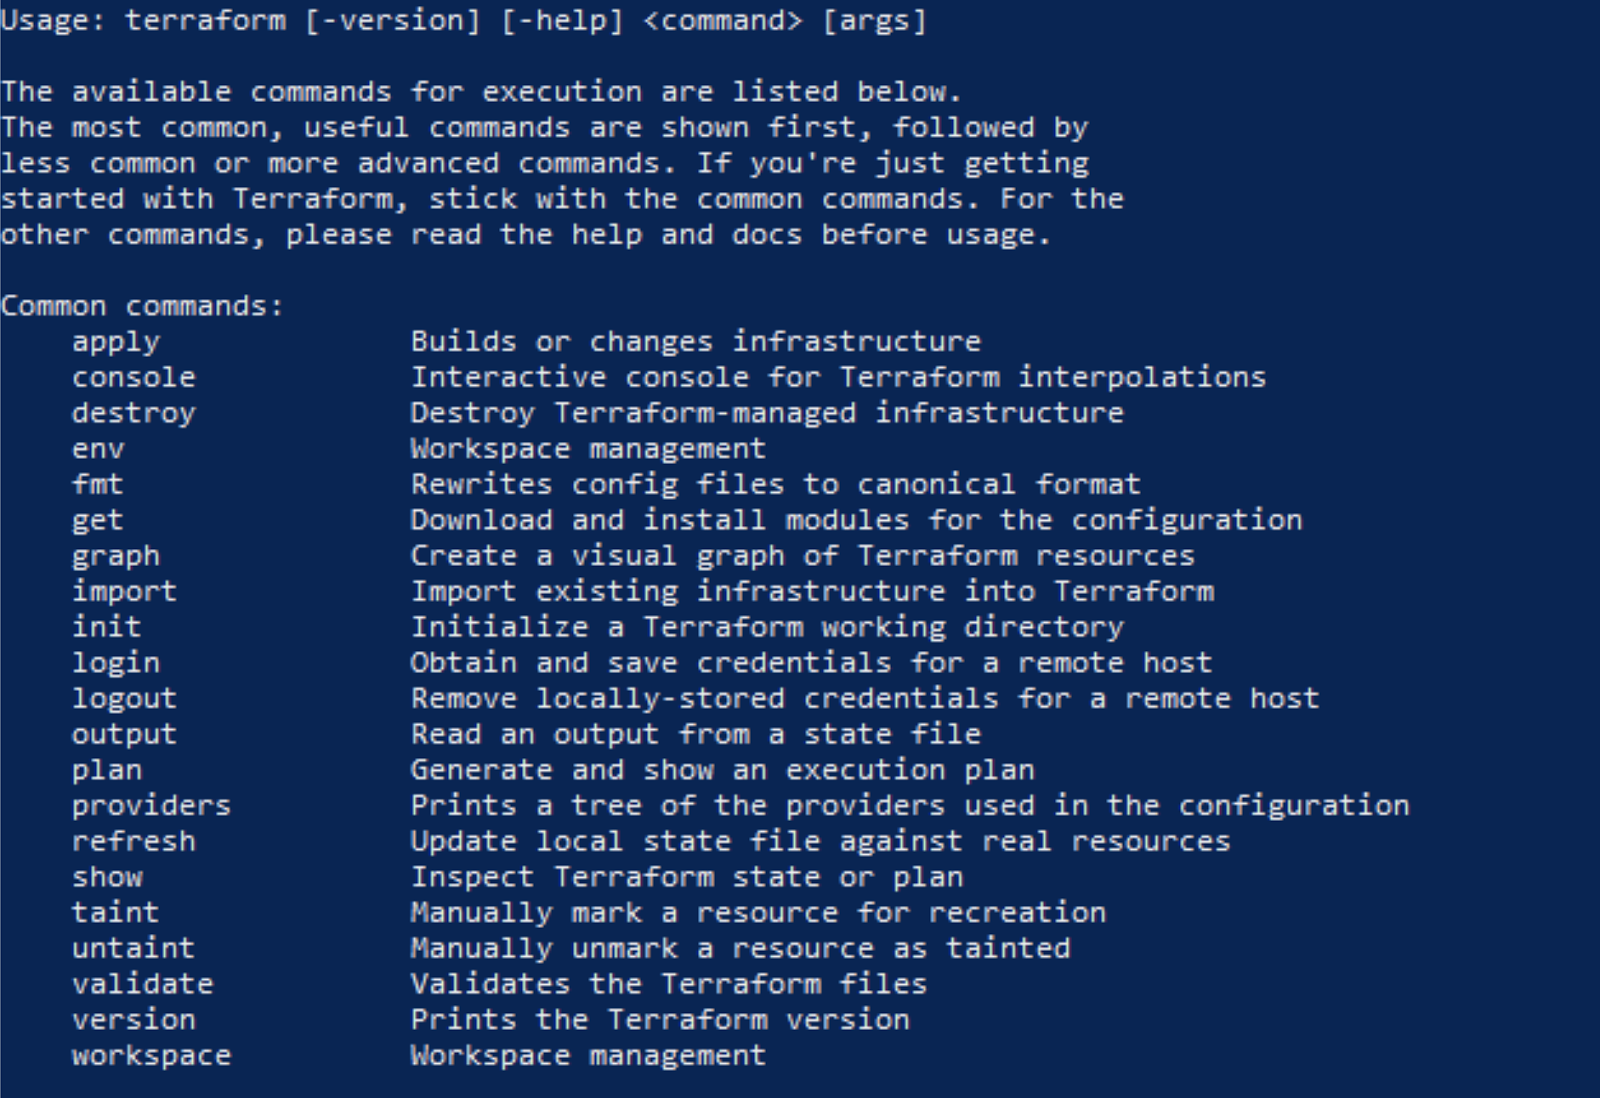
Enter the command terraform -version to check the Terraform version. This should display the version of Terraform you just installed, as shown below:
C:\users\admin\teraform> terraform -version

Terraform v1.6.5
on windows_amd64
How to Create AWS EC2 Instance Using Terraform
To create an AWS EC2 instance using Terraform, get the AWS access key ID and secret access key. You can create these in the AWS Management Console under IAM (Identity and Access Management).
Next, open a command prompt and set your AWS credentials as environment variables:
setx AWS_ACCESS_KEY_ID "your-access-key-id"
setx AWS_SECRET_ACCESS_KEY "your-secret-access-key"
Create a directory for your Terraform files in any Windows drive of your choice, preferably where Teaforrm is installed (C drive). Inside this directory, create a Terraform configuration file main.tf and add the below configurations:
provider "aws" {
  region = "us-east-1"
}
resource "aws_instance" "example" {
  ami           = "ami-0c55b159cbfafe1f0"
  instance_type = "t2.micro"
}
This configuration creates an EC2 instance using a specific Amazon Machine Image (AMI) and instance type.
Open a command prompt in the directory where your Terraform configuration file is located.
Run the following commands to initialize Terraform.
terraform initRun the following commands to apply the configuration:
terraform applyTerraform will download the necessary provider plugins and prompt you to confirm the creation of the resources. Type "yes" to proceed.
Once Terraform completes the provisioning, it will output information about the created resources, including the public IP address of the EC2 instance. You then connect to the EC2 instance using SSH or any other method appropriate for your instance and operating system.
Conclusion
Congratulations! You've successfully installed Terraform on Windows. With Terraform, you can now define, deploy, and manage your infrastructure efficiently. Dive into Terraform's documentation to discover the full potential of Infrastructure as Code. Happy coding!
Are you looking to polish your Terraform skills in a real-world environment? Explore our comprehensive Terraform for Beginners Course for hands-on learning. The course covers all of Terraform fundamentals using video lectures, interactive exercises, and hands-on labs to help you internalize concepts and commands.
If you found this article interesting, consider sharing it on your socials, and check out our Terraform courses:


Or, test your expertise with our challenges:

FAQs
Q1: Is there an MSI installer for Terraform on Windows?
No, HashiCorp does not provide an official MSI installer. The standard method for terraform windows setup is to download the binary zip file, extract it, and configure the system PATH manually as described in this guide.
Q2: Can I use Chocolatey to install Terraform?
Yes. If you have Chocolatey installed, you can simply run choco install terraform. This automates the download and PATH configuration process, making it a quick option for a terraform beginner.
Q3: How do I upgrade Terraform on Windows?
To upgrade, download the new version of the binary from the Terraform website, unzip it, and replace the existing terraform.exe file in your installation directory (e.g., C:\terraform).
Q4: Why is my Terraform command not recognized?
This usually happens if the folder containing terraform.exe is not added to your system's PATH environment variable. Double-check your Environment Variables settings and restart your Command Prompt or PowerShell terminal.
Q5: Do I need to install any dependencies for Terraform?
Terraform is a standalone binary compiled from Go, so it does not require external dependencies like Python or Java to run. However, you will need the AWS CLI or other provider CLIs if you plan to use them for authentication.


Discussion