


In our previous lesson, we discussed the Docker + Wasm integration. Theory is always helpful, but nothing beats experience! So, let's demystify some concepts by actually seeing all of this in action. What will we see? Well, pretty much everything.
What better way to understand how Docker runs Wasm than to build a Wasm container from zero? Here's what we will do:
Tutorial Steps
- Install Docker Desktop, an application that includes a graphical user interface. Currently, this is the only Docker build that can actually run Wasm. In the future, this might change. We might be able to run Wasm with the usual Docker Community Edition build we use on servers, which does not require the graphical app.
- Next, we'll write a simple C++ application.
- Then, we'll learn how to compile this into Wasm bytecode.
- After that, we'll package this Wasm app into a Docker image.
- Finally, we'll run a Wasm application with Docker.
Try the Docker Run Lab for free
Operating System Notes
Many people use the Windows operating system. So, we'll explore how to take all of our steps on this platform. However, we know some of you use MacOS or even Linux-based operating systems. So, our steps will be as platform-agnostic as possible.
For example, the command we use to compile C++ to bytecode on Windows can also be used on MacOS or Linux. After you install Docker Desktop on the operating system you love, you can easily follow the same steps described here to test things for yourself.
Prerequisite - Installing Windows Subsystem for Linux (WSL2)
Modern Windows makes it easy to run Linux apps on top of it. The technology that allows this is called Windows Subsystem for Linux, or WSL for short. And WSL2 is the newest version of this tech. Docker Desktop actually makes use of this and runs the Linux-based Docker application on top of Windows.
There is a bit of virtualization magic going on behind the scenes. If you want to test these steps yourself, make sure virtualization is fully enabled in your UEFI/BIOS settings. On most computers, this is usually enabled by default.
Start by checking if you have WSL2 installed on your Windows machine. Open the command prompt or PowerShell with Administrator permissions and execute this command:
wsl -l -vIf it's not installed, run the following command to install it:
wsl --install
Next, we restart the operating system. After the restart, WSL2 will automatically continue with the installation process.

From this point on, the rest of the steps should be similar regardless of the operating system you're using.
Step 1 - Installing Docker Desktop
Now, we're ready to install Docker Desktop. We'll head over to docker.com and download the installation package. We begin the install process and keep the default installation settings, especially the one that tells Docker to use WSL2. After the installation process is completed, Windows might ask us to restart Windows.
Enable Beta Feature that Allows Docker to Run Wasm Containers
At this point, Docker Desktop does not support Wasm containers by default. It's a beta feature, still in the early stages, and not yet tested enough in the real world. But we need it, so let's enable it.
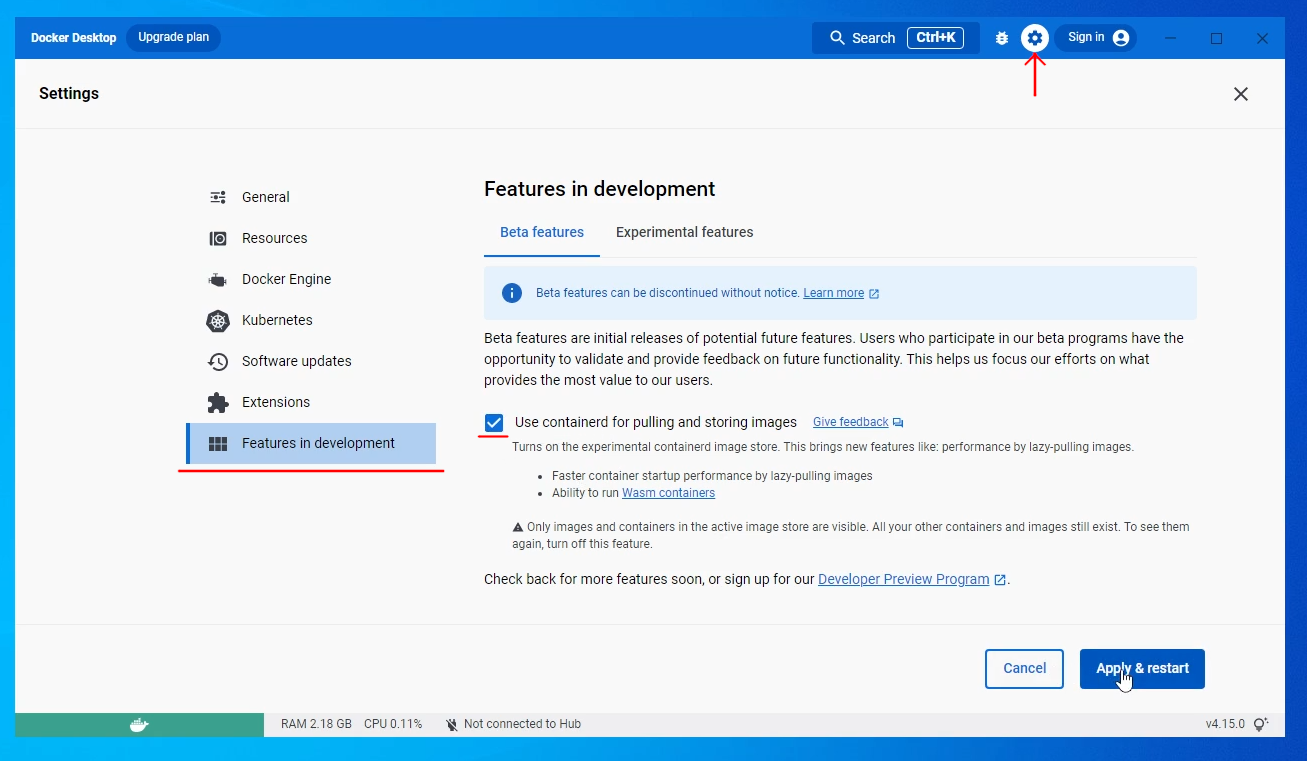
We'll go to settings by clicking on the top-right gear icon. Then we'll click on "Features in development" and enable the setting to "Use containerd for pulling and storing images."
Future Docker Desktop versions will probably have this enabled by default. We can click "Apply & restart" and wait until the Docker Desktop fully restarts.
Test Wasm Container
Now it's time to test if Wasm containers actually work. To do this, we can open up a Command Prompt on Windows. On Linux or MacOS, we'd open a terminal emulator. We'll use this command to try to run a Wasm container:
docker run --rm --runtime=io.containerd.wasmedge.v1 --platform=wasi/wasm32 sl1ck/wasm-testLet's go through these arguments in order.
--rmsimply tells Docker to remove the container after execution finishes.- With
--runtimewe tell Docker to use the WasmEdge runtime integrated in containerd. WasmEdge is simply software that can run Wasm bytecode. There are many other runtimes available. Docker simply chose to use this one. - With the
--platformargument, we tell Docker what kind of application this is. In this case, we say it's a 32-bit Wasm app, with an additional WASI integration. WASI stands for WebAssembly System Interface. We'll see what that is later on.

The message "Docker + Wasm is working!" confirms that a Wasm container was successfully launched. That's cool, stuff works. But at this point, it might just feel like "so what?". There seems to be no difference. Just another "docker run" command with the same effects we've seen 1000 times before. However, this perception will change when we go through the next steps.
Step 2 - Writing a C++ Application
After we'll take some code, transform it into a Wasm app, and turn that into a Docker image, the differences will become obvious.
Remember the C++ function we looked at in the previous lesson?
int factorial(int n) {
  if (n == 0)
    return 1;
  else
    return n * factorial(n-1);
}
Let's actually turn this into Wasm bytecode.
The first thing we'll do is create a factorial.cpp file. On Windows, we can write this in Command Prompt:
notepad factorial.cppWe want to make our code able to interact with the user. So, we'll start with these two lines:
#include <iostream>
using namespace std;
This essentially gives our small C++ program the ability to interact with iostream, Input/Output stream. In a nutshell, this lets the program display text on our screen (output). However, it also allows the program to accept input from a user. We want to be able to type a number and instruct our application to calculate the factorial of that number. Factorial of 3 is the result of 1 * 2 * 3. Factorial of 4 is 1 * 2 * 3 * 4, and so on.
Now, let's add the factorial function:
int factorial(int n) {
  if (n == 0)
    return 1;
  else
    return n * factorial(n-1);
}
This is a recursive function that calculates the result we want. Recursive functions are a neat programming trick, but they do require a long time to explain. In case you're unfamiliar with how this works, you can watch this video about recursion.
At this point, we just have a function that calculates something. However, we have no way for the user to interact with the program. So let's add that too:
int main() {
int x;
cout << "Enter number:";
cin >> x;
cout << "Factorial of " << x << " is: " << factorial(x) << "\n";
return 0;
}
This will display the text "Enter number:" on the screen. The user can then type a number. Finally, the program will output the factorial value of the number, x, that the user provided.
Our entire C++ code will look like this:
#include <iostream>
using namespace std;

int factorial(int n) {
  if (n == 0)
    return 1;
  else
    return n * factorial(n-1);
}

int main() {
  int x;
  cout << "Enter number:";
  cin >> x;
  cout << "Factorial of " << x << " is: " << factorial(x) << "\n";
  return 0;
}
Let's save our factorial.cpp file.
Now, for the next step. How do we compile this to Wasm bytecode?
Step 3 - Compiling Code to Wasm Bytecode
Every programming language has its own compilers. And many already have their own methods for compiling code to Wasm bytecode. Some support it out of the box. Some need helper tools. But users are usually free to choose from multiple solutions. In our case, we'll use a compiler toolchain called emscripten. This will also help us with an additional thing, besides compiling.
Remember how, in the previous lesson we mentioned Wasm bytecode runs in a sort of mini virtual computer, called a virtual stack machine? So, it's isolated from the rest of the system. Well, that would be a problem for us. If it's isolated, it has no way of displaying text on our screen. And we have no way of inputting numbers into our small Wasm application.
However, developers have already come up with an awesome solution called WASI – WebAssembly System Interface. This gives Wasm bytecode a way to interact with the outside world. In an overly simplified way, you can view it like this:
- Wasm bytecode wants to display some text on the screen, but it can't do that. It's isolated to its virtual stack machine.
- But WASI, in a way, sits in the middle, connected to both our operating system and our Wasm application.
- So our Wasm bytecode tells WASI: "Hey, I want to write this on the screen used by the operating system."
- WASI says, "Ok, I'll tell the operating system to do that."
- WASI then sends this message along to the operating system, and text appears on the screen.
The reverse is true for inputting a number to our Wasm bytecode. The user types it, WASI picks it up and sends it to the Wasm app. Just like that, Wasm can get input from the outside world. Pretty cool stuff. This gives us the best of both worlds.
The virtual stack machine can communicate with the operating system, but we still have a good level of isolation and security. WASI makes sure to only allow certain pre-approved interactions between the operating system and Wasm bytecode. For example, our Wasm app cannot read files on our computer, unless we specifically allow it.
emscripten can be installed on almost any operating system. But let's do it the easy way. We'll actually use a Docker image where emscripten is packaged inside. This way, we avoid having to go through extra installation steps.
Now, let's compile our C++ app to Wasm bytecode with WASI enabled.
Back to our command prompt, we'll write this command on Windows:
docker run --rm -v %cd%:/src emscripten/emsdk emcc factorial.cpp -o factorial.wasmIf you're trying this out on a Linux-like operating system, the command should be:
docker run --rm -v $(pwd):/src emscripten/emsdk emcc factorial.cpp -o factorial.wasmLet's look at the arguments. We already saw what --rm does.
- The next argument,
-v %cd%:/srcallows emscripten to access our factorial.cpp file. It basically connects our current directory on our computer with the directory /src inside the container. The %cd% notation is a trick that specifies the path to the current directory. For example, if we're currently in C:\Users\kodekloud, then -v %cd%:/src basically becomes -v C:\Users\kodekloud:/src. The$(pwd)notation does the same thing on Linux as %cd% does on Windows. - Next, we use the emcc command from the remote container image located at emscripten/emsdk. emcc is simply a compiler application. The emcc command takes the factorial.cpp file as input. So it's simply instructed to compile code found in that file.
- Finally, we pass the
-o factorial.wasmcommand line option to emcc. With that, we tell it to save its output in a file called factorial.wasm. By looking at the extension, .wasm, emcc figures out it needs to compile this into Wasm bytecode.

And just like that, we get our first Wasm bytecode; an application neatly packaged into a single .wasm file.
We can see the file on Windows with this command:
dirOr with this command on Linux:
ls -lh
Awesome! We actually compiled C++ code into Wasm bytecode! And with a WASI interface enabled to top it all off. That's why the file is actually quite large, for Wasm, at least. On this system, it was around 166 Kilobytes. All that WASI stuff adds programming routines needed to interface with the outside world. And that's a lot of extra code added to the Wasm app. Without it, the file would be much smaller. Some Wasm files can have just a few hundred bytes or just a few kilobytes.
But we can still reduce the size of our app a little bit if we want. We can do that with compiler optimizations. For example, we could run this command on Windows:
docker run --rm -v %cd%:/src emscripten/emsdk emcc -O3 factorial.cpp -o factorial.wasmOr this one on Linux:
docker run --rm -v $(pwd):/src emscripten/emsdk emcc -O3 factorial.cpp -o factorial.wasmThe -O3 option tells the emcc compiler to do some optimizations. And if we run the
dircommand again, we'll see that indeed, the file is smaller.

Long story short, where did we arrive? Well, we have a 150 kilobytes file. And this contains our entire application. In fact, it's the only file we need to create a container image. One file and just 150 kilobytes of data is not a bad deal for a container. In fact, it's rather awesome. A regular container image doing the same thing as our Wasm container image could be a lot larger and could need many more files.
Now, let's see how we package our factorial.wasm file into a Docker container image.
Step 4 - Building a Wasm Docker Container Image
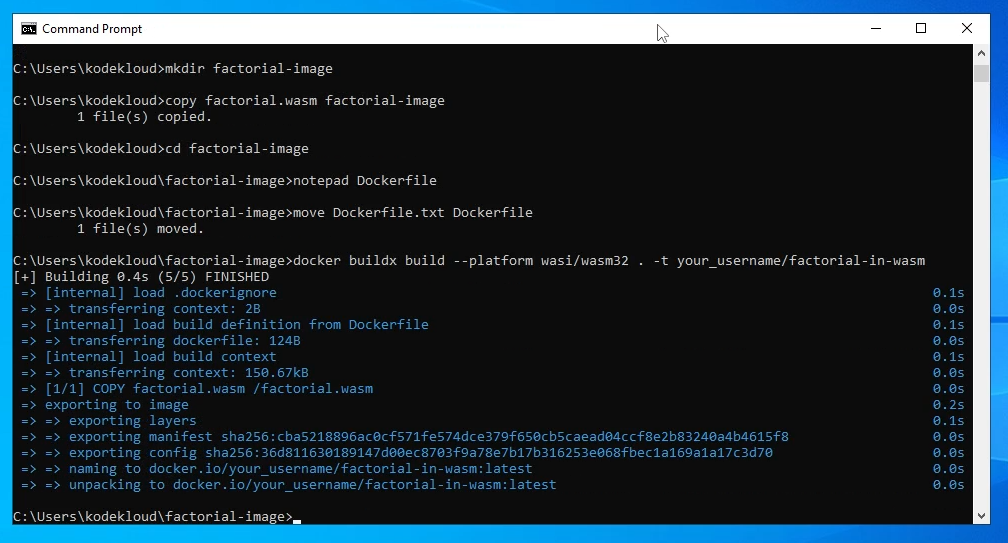
First, we'll need to create a directory:
mkdir factorial-imageNext, we'll copy our Wasm file to this directory:
copy factorial.wasm factorial-imageFinally, let's step into this directory:
cd factorial-imageAnd we'll create a Dockerfile here. This will contain instructions that will help a Docker utility called buildx generate the container image.
notepad DockerfileLet's add this content to the file:
FROM scratch
 COPY factorial.wasm /factorial.wasm
 ENTRYPOINT [ "/factorial.wasm" ]
With these lines, we basically tell the utility:
- Build an image from scratch, start from nothing.
- Copy the factorial.wasm file from our local system to the container image at /factorial.wasm (the "/" slash symbolizes the root directory or top-level directory)
- When Docker tries to run this image, it should execute this file: /factorial.wasm, the so-called entry point.
Let's save the file.
Notepad automatically added the .txt extension to this file, but we don't need it. We'll rename Dockerfile.txt to plain Dockerfile, effectively removing the extension:
move Dockerfile.txt DockerfileNow we can build the image:
docker buildx build --platform wasi/wasm32 . -t your_username/factorial-in-wasmDon't forget to replace "your_username" with the actual username you have on Docker Hub if you intend to upload this online.
We basically use the buildx utility, instruct it to build an image for the wasi/wasm32 platform. Otherwise, 32-bit wasm bytecode, with the WASI interface enabled. The . dot tells it to build the image using the Dockerfile and files contained in the current directory.
Now, guess what? Our job is done. Let's give ourselves a pat on the back.
- We wrote C++ code.
- We compiled it to Wasm bytecode.
- We enhanced it with the WASI interface so that our app can interact with our operating system.
- We built a Wasm Docker image.
Now, we can see that this is not the same as a regular Docker image. It's especially obvious if you've also built regular images in the past.
Step 5 - Running Wasm Container
Finally, we can test if our hard work pays off. Remember, we wrote our app in C++. But we didn't compile it as a regular Windows application or a Linux or MacOS one. No, we compiled it as Wasm bytecode. This can run anywhere, on any operating system, and on any processor architecture.
Anywhere you can install a Wasm runtime, like WasmEdge or anything else, you can run this Wasm app. And you don't need to change a single line of code. So this is super-portable, even more portable than regular Docker containers.
Now let's run our Wasm container image:
docker run --rm -i --runtime=io.containerd.wasmedge.v1 --platform=wasi/wasm32 your_username/factorial-in-wasmThe -i option tells Docker to run this interactively, so we can actually input a number when the container launches. The --runtime instruction tells Docker to use this special wasmedge "engine" that can run Wasm bytecode. Finally, we tell this engine, technically called a runtime, that this is a WASI-enabled 32-bit Wasm bytecode app.

And it works perfectly! Use 12 as the maximum number to test our simple app, as that's the largest that our code can calculate correctly due to the variable types we used.
Now, only the imagination is your limit. You have a super small image to use with Docker. You can push this to an image repository. Then, you can potentially run it in your Kubernetes cluster. All you need to do is add support for a runtime like WasmEdge in your cluster.
So you get super small Wasm containers that can start amazingly fast, and perform a bit better than regular containers. And to top it all off, they're also super-well isolated, so you get some security benefits as well. Some workloads can be improved tremendously. You could bring costs down considerably in some cases. And you can make the experience of your users fast and buttery-smooth.
Personally, I find Wasm an exciting piece of tech that will open a lot of doors in the near future. What possibilities do you think Wasm containers bring to the table?
To learn more about Wasm, check out our video.
What better way to understand how Docker runs Wasm than to build a Wasm container from zero? Here's what we will do:


Discussion