


Highlights
- Purpose of
docker exec: Lets you open an interactive shell inside a running container, so you can inspect, debug, and modify it. - Syntax:
docker exec -it <container-name-or-id> <shell> -i: Keeps STDIN open to accept input.-t: Allocates a pseudo-TTY, giving you a proper shell prompt and formatted output.
- Shell Options: Use
/bin/bash(if available) or/bin/shfor lightweight containers. - Workflow Demo:
- Start a container (
docker run -d --name mynginx nginx:latest). - Check it’s running (
docker ps). - Enter the container (
docker exec -it mynginx /bin/bash). - Run commands like
ls /usr/share/nginx/htmlorcurl http://localhost. - Exit with
exitorCtrl + D.
- Start a container (
- Use Cases: Perfect for troubleshooting, inspecting logs, installing packages, or editing files inside containers.
- Best Practice: Use
docker execfor quick debugging - not as a permanent way to manage applications.
Docker is a platform that helps run applications inside containers. Once you have your application running in a container, you might want to carry out some tasks that require you to get inside the container. For example, you might want to modify files or directories, install new packages, or perhaps analyze logs to troubleshoot issues.
How do you do this? One common solution is to open and enter a container shell.
The shell is a command line interface utility that lets you interact with the container. It's kind of like opening up a window into the container, so you can see what's going on inside and make changes as needed. You can use the shell to run commands just like you would on a regular computer.
This blog post explores how to use the docker exec command to access a container’s shell. Let’s get started!
We've put together a detailed video tutorial to help you understand this better:
Docker Exec Syntax
The "docker exec" syntax for accessing a container’s shell is:
docker exec -it <container-name-or-id> <shell-executable>Here’s an explanation of the fields:
- docker exec: This tells Docker to execute a command inside a container.
- -it: These flags (-i and -t) specify that the command should be run in an interactive (-i) session with a pseudo-TTY (-t terminal) attached to the container. This allows you to enter commands and receive output from the container.
- <container-name-or-id>: This is the name or ID of the container to execute the command in.
- <shell-executable>: This is the name of the shell executable (a file that contains a program) that you want to use to start an interactive session inside the container. For example, you could specify bash to start an interactive session with the Bash shell.
As noted above, -it is a combination of two separate flags, -i, and -t. Here's a more in-depth explanation of what they do.
The -i flag tells Docker to keep STDIN (standard input) open, even if not attached. For example, the keyboard is an input device. However, the input from our keyboard is not directly connected to that container. So, this is a way to tell Docker to connect our input device (keyboard) to the shell of that container. Now, everything we type on our main computer goes to the container's STDIN (standard input).
Without the -i flag, the container's shell would not be able to receive input from us, and we'd have no way to interactively use it (type and run commands).
The -t flag is used to attach a pseudo-TTY (terminal) to the container's shell. To understand this better, here's how the output from the container shell looks like when a pseudo-TTY is attached (first part of the image):
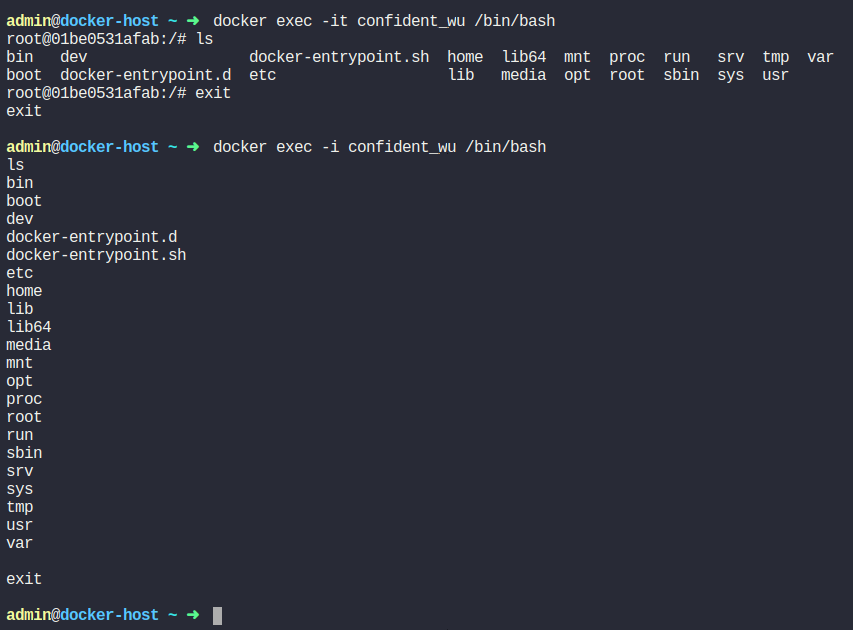
Now, notice how, in the next docker exec command, we omitted the -t flag. And the output is entirely different. First, there is no Bash/shell prompt ("root@01be0531afab:/#" is missing).
Then, the output from the ls command is unformatted (it doesn't appear organized in columns as it does in the first scenario, with TTY attached). It's the terminal's job to do some of these things. Without a pseudo-TTY attached to the container's shell session, you get messy output, as there is nothing there to process it accordingly.
To further your understanding of Docker commands, check out KodeKloud's course, Docker for the Absolute Beginner.


Now that you understand the syntax let's go through an example to see the docker exec command in action.
Try the Docker Run Lab for free:

Accessing a Container’s Shell Using Docker Exec
To run the commands you’ll see in this section, you must have Docker already installed on your system. If not, you need to install it first. To do so, you can follow the official Docker installation guide based on your operating system.
Alternatively, if you are a KodeKloud Pro member, you can use the Docker playground. This gives you access to an environment with all Docker tools pre-installed. You can start experimenting in seconds without having to install anything on your main computer.
Step 1: Run a container
Before we can use the docker exec command, we need to have a container already running. So, let's do that now. We'll start a simple Nginx container using the following command:
docker run -d --name mynginx nginx:latestThe command will start a new container in detached mode (-d) from the latest version of the nginx image and give it the name "mynginx".
Note: When you run a container in detached mode using the -d flag, Docker starts the container in the background and returns control to the command-line utility you're currently using. Without -d, you'd be stuck inside that container environment. You'd see the output generated by the container, and you wouldn't be able to type other commands until you exit from the container (CTRL+C).
If the container starts successfully, you should see a long hash string printed to your terminal window, which represents the container ID.

Step 2: Check the container status
To check the status of the container and see if it’s running properly, run the following command:
docker psThis command will list all the running containers on your system. You should see the "mynginx" container in the list along with its details, such as CONTAINER ID, IMAGE, COMMAND, etc.

Step 3: Access the container's shell
To access the container's shell using docker exec, run the following command:
docker exec -it mynginx /bin/bashWhen you run this command, the following happens:
- Docker runs "/bin/bash" (a command interpreter, also called a shell) inside the "mynginx" container.
- Next, it attaches your input/output to this Bash shell. Basically, your keyboard's input now goes to the shell, and the shell's output is displayed on your screen. So, you get an interactive shell session inside this container.
After running this command, you should see the shell/command prompt of the Bash session running inside the container:

Step 4: Run commands using the shell
Now, you can run any command you want to test within the container shell. For example, you can list the contents of the "/usr/share/nginx/html" directory by running:
ls /usr/share/nginx/htmlThis should show you two files: "index.html" and "50x.html".

The "index.html" file is the default file served by nginx when someone accesses your web server. The "50x.html" file is an error page that is displayed when the nginx web server encounters an error.
Note: The directory "/usr/share/nginx/html" inside the nginx Docker container typically contains the web content served by the nginx web server.
Let’s run another command to test the nginx web server from within the container shell:
curl http://localhostThis will send a request to the nginx web server and display the response in the terminal. If the web server is working properly, you should see the default "Welcome to nginx!" web page.

Step 5: Exit the container's shell
To exit the container's shell, you can simply type the exit command or press "Ctrl + D". This will bring you back to the command interpreter running on your own computer.
That's it! You have successfully accessed the container's shell using docker exec.
If you want to further your understanding of containers, check out our Docker Learning Path:
.webp)
Conclusion
In this post, we saw how to use the "docker exec" command to access a container's shell and run commands inside it.
More on Docker:
- How to Fix Docker Build Requires Exactly 1 Argument
- How to Clear Docker Logs for a Container
- How to Keep Docker Container Running
- How to Build a Docker Image With Dockerfile From Scratch
- How to Pass Environment Variables to Docker Containers
- How to Use Docker CP Command With Examples
- How to Tag a Docker Image
- How to Remove Unused and Dangling Docker Images
- How to Get Docker Container IP Address From the Host
FAQ
Q1: What’s the difference between docker exec and docker attach?
docker execstarts a new process (e.g., a shell) inside a running container.docker attachconnects you to the main process already running in the container.
Q2: Why use -it with docker exec?
Without -i, you can’t type into the container. Without -t, output is messy and lacks a proper shell prompt. Together, -itmakes the session interactive and user-friendly.
Q3: What shell should I use inside a container?
- Use
/bin/bashif the container has Bash installed (e.g., Ubuntu-based images). - Use
/bin/shfor minimal images (e.g., Alpine).
Q4: Can I run non-interactive commands with docker exec?
Yes. For example:docker exec mynginx ls /usr/share/nginx/html
This runs the command inside the container and prints the output without starting a shell session.
Q5: Is it safe to make changes inside a container shell?
Changes made inside the container are temporary unless you commit them into a new image. Containers are meant to be ephemeral. For long-term changes, update the Dockerfile instead.
Q6: How do I exit the container shell?
Type exit or press Ctrl + D to return to your host system.


Discussion