I decided to build something hands-on using my AWS Free Tier account
Since I already had my AWS account created, I directly started with the setup. (If you’re new, the first step would be creating an AWS & GitHub account.)
Environment Setup
- Configured Git
- Configured AWS CLI
- Used my local openSUSE Tumbleweed machine for development
![]() Step 1: Create Source Code
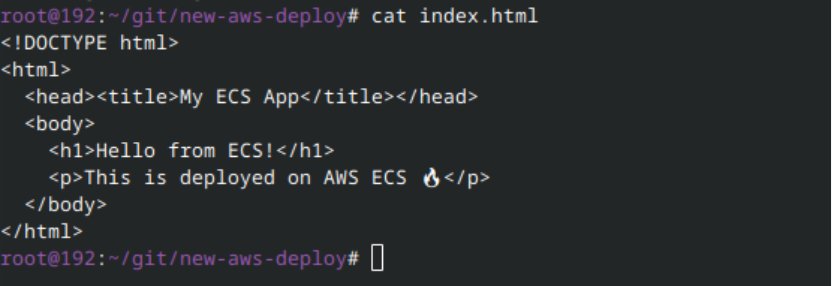
Step 1: Create Source Code
I started with a very simple web application:
Created a very simple Dockerfile to containerize the application
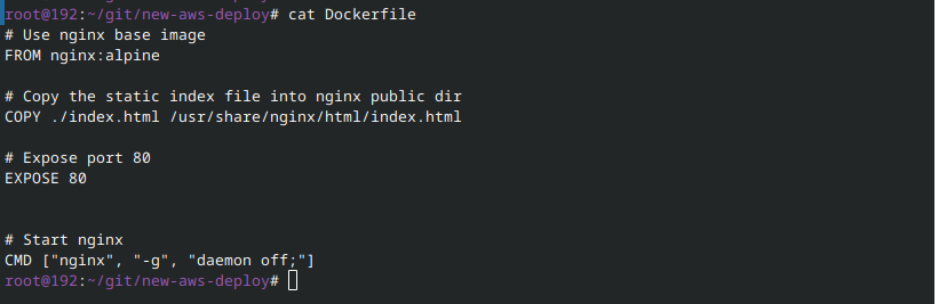

Then I built the Docker image locally to test everything before pushing it.


Then i tried to run this image locally to test the webserver. Using below cmd
docker run -d -p 80:80 new-aws-deploy:latest > latest is a tag

Local browser screenshot:

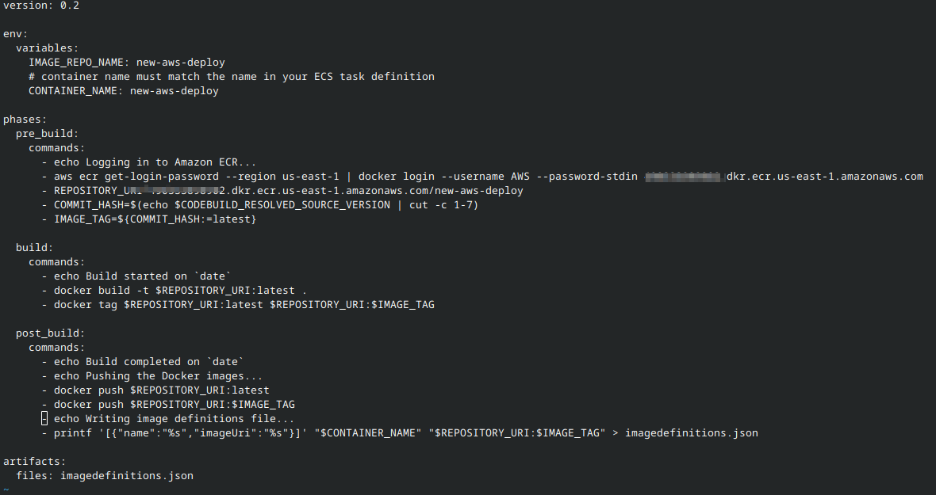
![]() Step 2 : Now create a Buildspec.yml file (A buildspec file is a YAML-formatted configuration file used in a CI/CD pipeline, primarily with services like AWS CodeBuild, to define the build, test, and packaging steps of a project.
Step 2 : Now create a Buildspec.yml file (A buildspec file is a YAML-formatted configuration file used in a CI/CD pipeline, primarily with services like AWS CodeBuild, to define the build, test, and packaging steps of a project.

![]() Step 3: Version Control
Step 3: Version Control
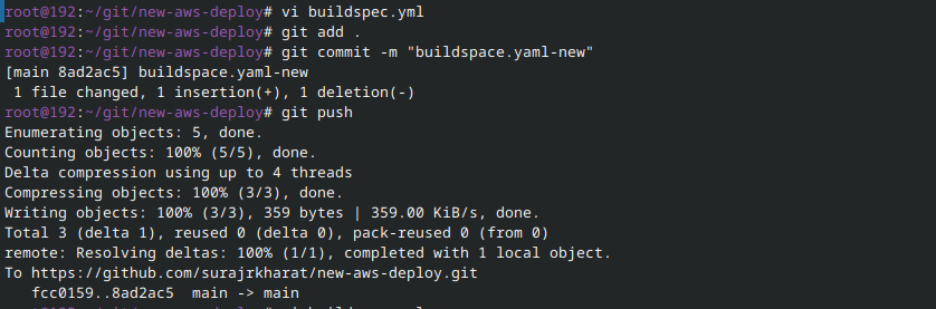
- Created a new public GitHub repository (https://github.com/)
- Pushed the source code (HTML + Dockerfile) to GitHub
ON AWS,
ECR created on AWS: refer to the screenshot below for more details.

Created new build
AWS official document for the code build service. https://docs.aws.amazon.com/codebuild/latest/userguide/welcome.html
- Go the AWS codebuild clicks on Create project
- Give proper name
- Configure the source for the code.
- there are multiple options available select GitHub options as our code is on GitHub (create an access token on GitHub and map it to aws )
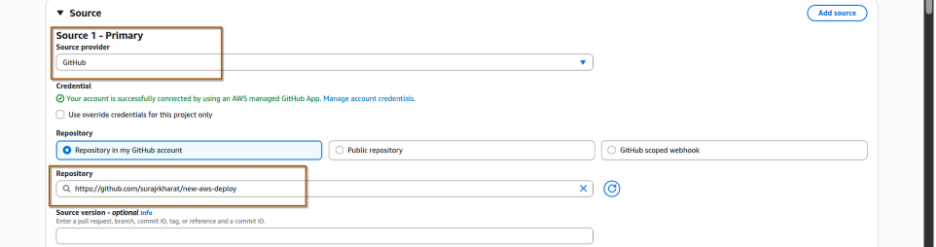
Don’t forget to copy the role name if you are creating a new role for this. As we need this role name to setup permission.
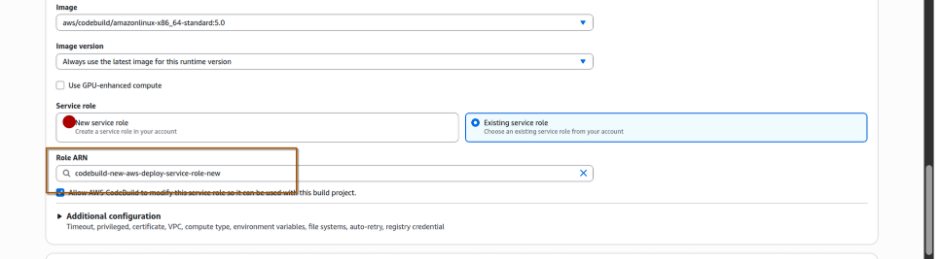
Select the “Use a build spec file” option as we are using buildspec.yml file for this.

Now click on “create build project”. Once the project is created click on the project and start build to test it.

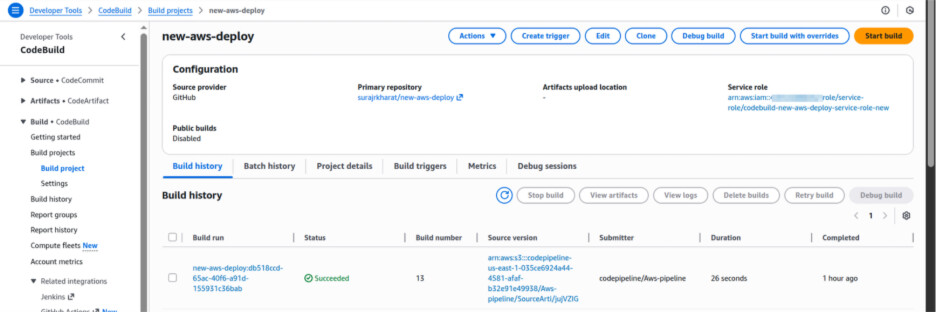
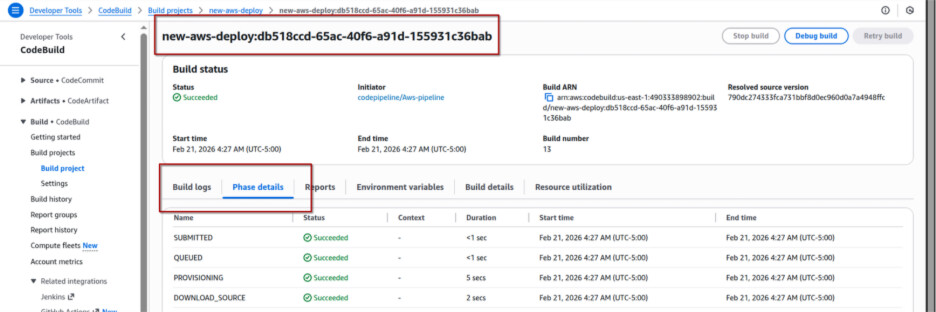
Now click on the newly created batch to check the phases and the build logs. You can also see the logs in the CloudWatch.
Important Notes
- I used the default VPC and Security Groups (SG) for this setup.
- Depending on your environment configuration, you might encounter some errors.
- Always verify that your IAM role permissions are correctly configured.
- Ensure your build and deployment roles have proper access to required services.
- Always check logs of the build to troubleshoot any errors.
Misconfigured IAM roles are one of the most common reasons for pipeline failures.
![]() Step 4: Create new ECS cluster.
Step 4: Create new ECS cluster.
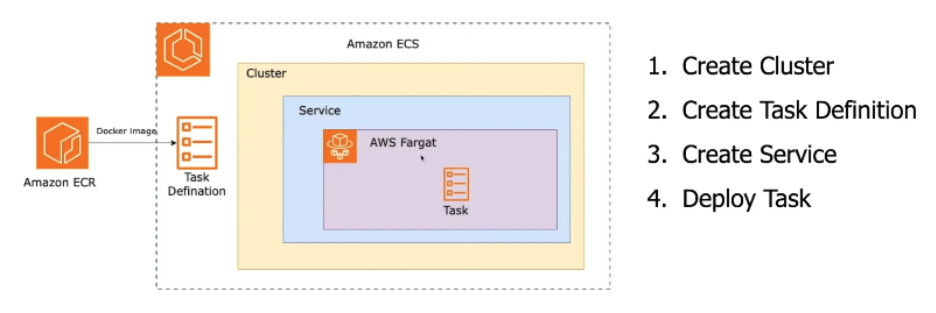
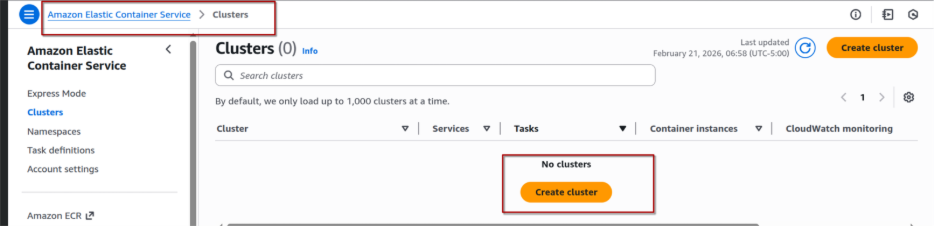
1) Open ECS Service
- Login to Amazon Web Services Console
- Search for Amazon ECS
- Click Clusters
- Click Create Cluster
Fill in:
- Cluster name → my-fargate-cluster (or any name)
- Infrastructure: Forget only
- Leave default VPC (if you’re using default setup)
- Leave default settings unless you need customization
Click Create

2) Next: Create Task Definition (Very Important) Cluster alone does nothing. You must create a Task Definition.
- In ECS → Click Task Definitions
- Click Create new Task Definition
- Select Fargate
- Click Next
Fill:
- Task definition name → my-fargate-cluster (or any name)
- Task role → Select IAM role (ensure permissions)
- CPU → 0.25 vCPU (Free tier friendly)
- Memory → 0.5 GB or 1 GB
- Click Add Container
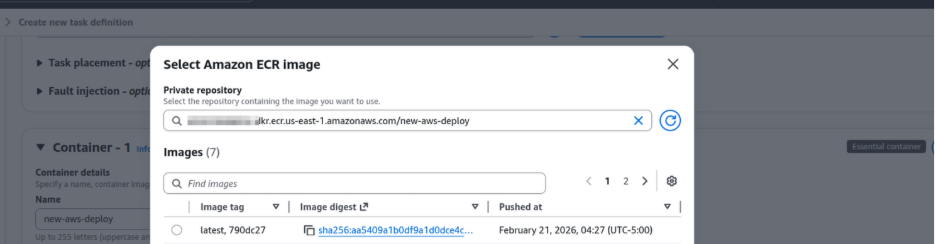
Fill:
- Container name → As per the buildspec.yam file
- Image → Your ECR image (browse ECR image)
- Port mappings → 80

3) Final Step: Run Service
Now deploy it:
- Go to Clusters
- Click your cluster
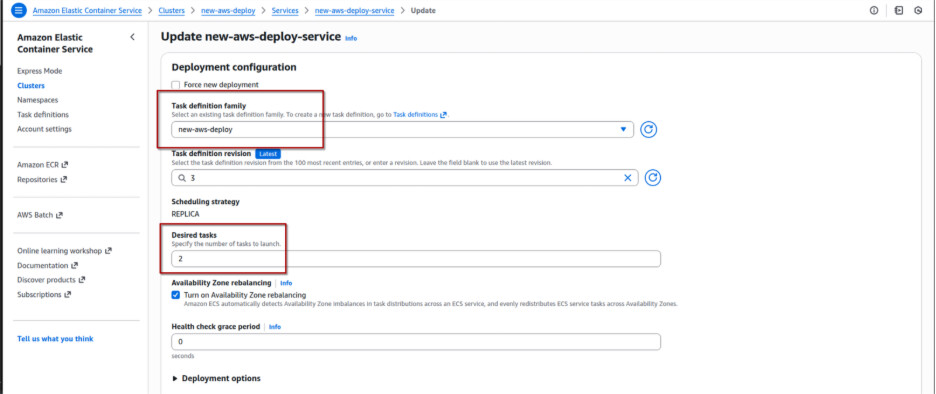
- Click Create Service
- Launch type → Fargate
- Select Task Definition
- Number of tasks → 2 (as per the traffic)
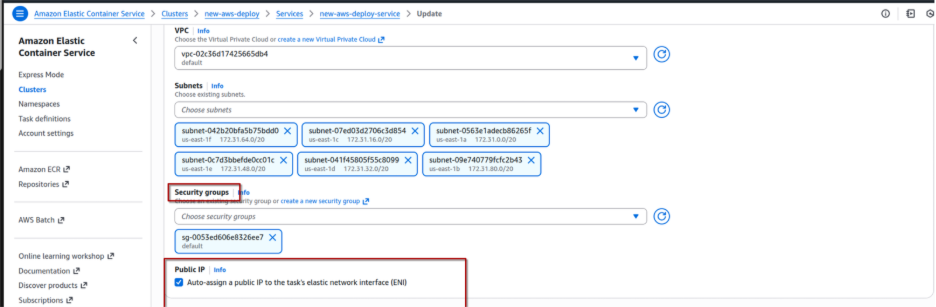
- Select default VPC
- Select public subnet
- Select Security Group → Allow inbound port 80
After service runs:
- Go to Tasks
- Click running task
- Copy Public IP
- Open in browser:
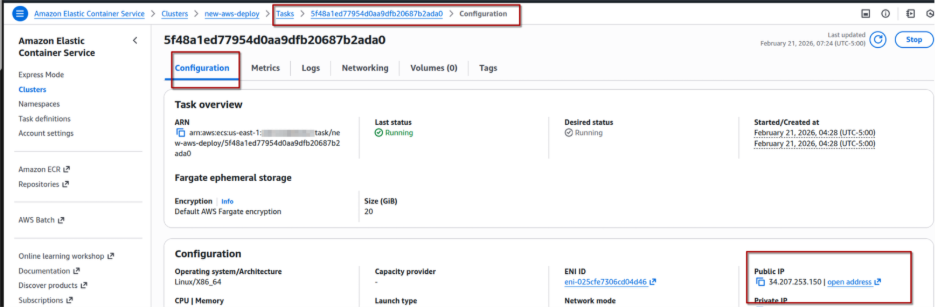
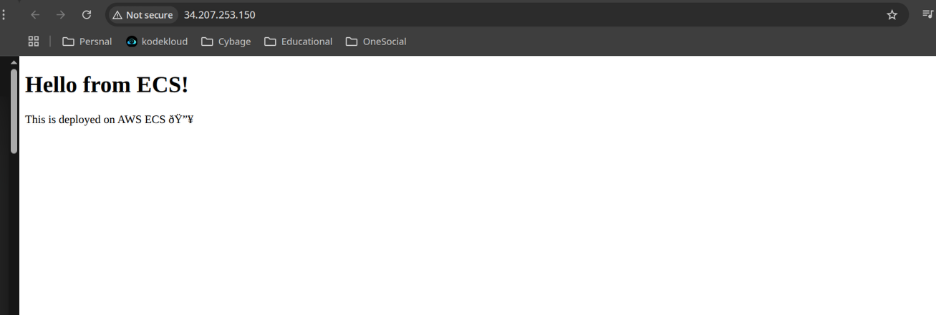
HURRREEE IT’S WORKINGGGG ![]()
![]()
![]()
If it is not, Common Mistakes.
-
 Not allowing port 80 in Security Group
 -
Not assigning public IP
-
Wrong ECR image URI
-
IAM role missing permissions
Step 5: Create Pipeline.
Now that your ECS cluster is running, time to automate it like a real DevOps engineer ![]() Before creating pipeline:
Before creating pipeline:
![]() ECS Cluster running
ECS Cluster running ![]() ECS Service created
ECS Service created ![]() Task Definition created
Task Definition created ![]() ECR repository created
ECR repository created ![]() Code pushed to GitHub (Dockerfile + index.html)
Code pushed to GitHub (Dockerfile + index.html) ![]() buildspec.yml file added
buildspec.yml file added
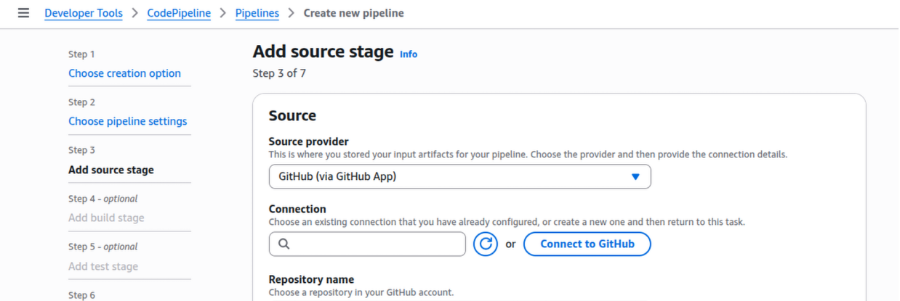
- Go to CodePipeline
- Click Create Pipeline
- Pipeline name → ecs-pipeline or my-fargate-cluster-pipeline (or any name)
- Service role → Create new role
- Artifact store → Default S3 bucket

Click Next
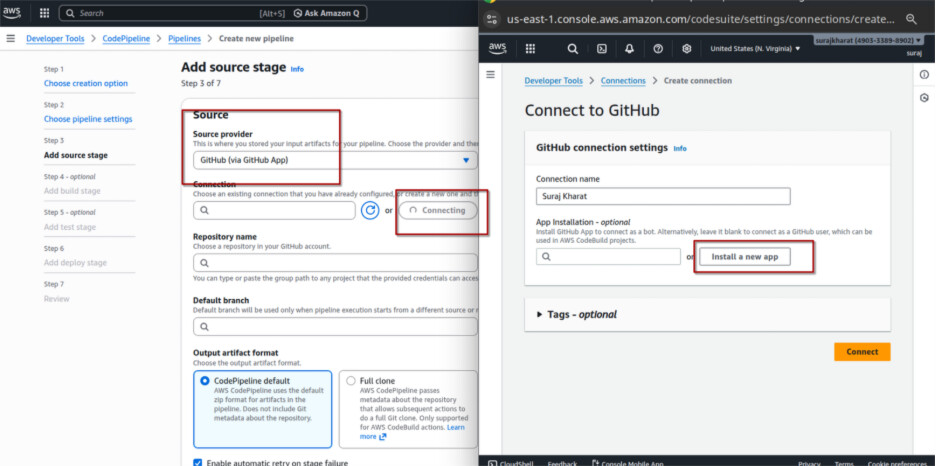
- Source provider → GitHub
- Connect GitHub
- Select repository
- Select branch (main)
- Change detection → GitHub webhook (recommended)
Click Next
Add Build Stage
- Build provider → CodeBuild
- Select the project you created (ex: ecs-build-project)
Click Next
Add Deploy Stage (ECS)
- Deploy provider → Amazon ECS
- Select:
A:Cluster name
B:Service name
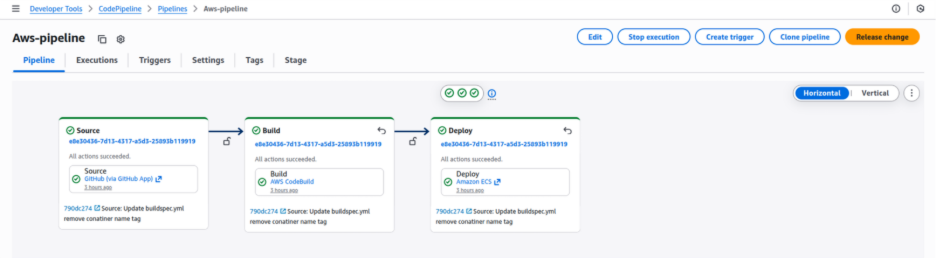
Click Create Pipeline
![]() Make sure:
Make sure:
- container-name matches ECS task definition container name
- ECR repo name is correct
- Region matches
![]() What Happens Now?
What Happens Now?
Every time you push code to GitHub:
GitHub → CodePipeline → CodeBuild → ECR → ECS → App Updated ![]()
No manual deployment anymore.
![]() Common Errors
Common Errors
![]() Privileged mode not enabled
Privileged mode not enabled
![]() IAM role missing ECR permission
IAM role missing ECR permission
![]() Wrong container name in imagedefinitions.json
Wrong container name in imagedefinitions.json
![]() Wrong region.
Wrong region.
once this works, you officially move from:
“I deploy manually” to “I automate everything” ![]()
![]()
![]() Important Tip
Important Tip
Don’t forget to delete your AWS resources after completing the project.