In this post, I will show you how to set up a Kubernetes cluster using kubeadm version 1.26 which is currently being used for the CKAD, CKA, and CKS exams. You can also use this method to set up Kubernetes for your project. The fact that having a good overview of the basic setup of Kubernetes is to help you a lot to understand its components. Besides, we can use these steps with Ansible to build Kubernetes automatically. For instance, you just need to provide the ssh information of the nodes and everything will be installed automatically.
Note:
Ubuntu version 22.04
Containerd version 1.6.21
Kubernetes version 1.26
CNI Calico version 3.25.1
Prerequisites:
At least Ubuntu nodes (1 master, 1 worker)
2 GB or more of RAM per node
2 CPUs or more per node
Step 1: Prepare the Environment
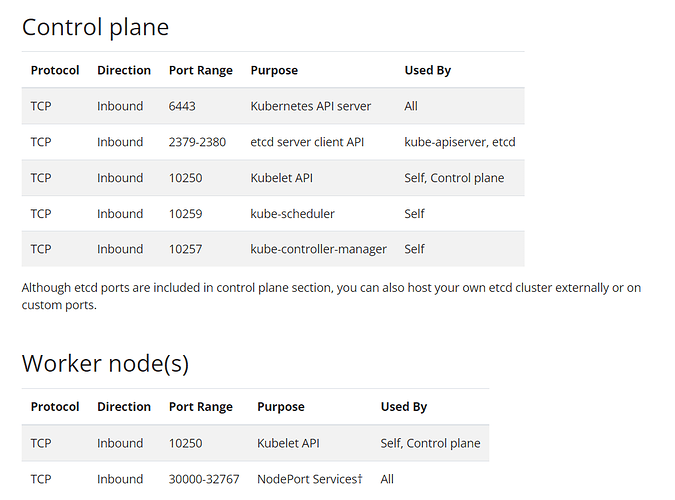
Ports and protocols requirements:
First of all, you’d better ensure that all the ports are allowed for the control plane and the worker nodes. You can refer to Ports and Protocols or see the screenshot below.
Disable swap:
The swap has to be disabled on all the nodes in order for the Kubelet to work properly.
sudo swapoff -a
And then disable swap on startup in /etc/fstab
sudo sed -i '/ swap / s/^/#/' /etc/fstab
Step 2: Install Container Runtimes
Each node in the cluster needs to have a container runtime installed in order for Pods to run there. In my experience, I always use containerd.io for the Kubernetes clusters, you can read more about several common container runtimes here.
To install it and configure prerequisites please run the commands below on all the nodes
Forwarding IPv4 and letting iptables see bridged traffic:
cat <<EOF | sudo tee /etc/modules-load.d/k8s.conf
overlay
br_netfilter
EOF

sudo modprobe overlay
sudo modprobe br_netfilter

# sysctl params required by setup, params persist across reboots
cat <<EOF | sudo tee /etc/sysctl.d/k8s.conf
net.bridge.bridge-nf-call-iptables  = 1
net.bridge.bridge-nf-call-ip6tables = 1
net.ipv4.ip_forward                 = 1
EOF

# Apply sysctl params without reboot
sudo sysctl --system
Add repository:
sudo install -m 0755 -d /etc/apt/keyrings
curl -fsSL https://download.docker.com/linux/ubuntu/gpg | sudo gpg --dearmor -o /etc/apt/keyrings/docker.gpg
sudo chmod a+r /etc/apt/keyrings/docker.gpg
echo \
 "deb [arch="$(dpkg --print-architecture)" signed-by=/etc/apt/keyrings/docker.gpg] https://download.docker.com/linux/ubuntu \
 "$(. /etc/os-release && echo "$VERSION_CODENAME")" stable" | \
 sudo tee /etc/apt/sources.list.d/docker.list > /dev/null
Install Containerd:
sudo apt-get update
sudo apt-get install containerd.io
Configuring the systemd cgroup drive:
At this point, you need to create a containerd configuration file by executing the following command
sudo mkdir -p /etc/containerd
sudo containerd config default | sudo tee /etc/containerd/config.toml
Then to set the cgroup driver, you can edit the containerd config file to enable the systemd cgroup driver for the CRI In /etc/containerd/config.toml
Below the section:
[plugins."io.containerd.grpc.v1.cri".containerd.runtimes.runc.options]
Change the value for SystemCgroup from false to true.
Or you can use the command below to do it easily
sudo sed -i 's/ SystemdCgroup = false/ SystemdCgroup = true/' /etc/containerd/config.toml
Eventually, restart containerd
sudo systemctl restart containerd
Step 3: Install Kubernetes Components
Update and install required packages on all the nodes:
sudo apt-get update
sudo apt-get install -y apt-transport-https ca-certificates curl
Add Kubernetes repository:
curl -s https://packages.cloud.google.com/apt/doc/apt-key.gpg | sudo apt-key add -
echo "deb https://apt.kubernetes.io/ kubernetes-xenial main" | sudo tee /etc/apt/sources.list.d/kubernetes.list
Update apt package index, install kubelet, kubeadm and kubectl, and pin their version:
sudo apt-get update
sudo apt-get install -y kubelet=1.26.1-00 kubectl=1.26.1-00 kubeadm=1.26.1-00
sudo apt-mark hold kubelet kubeadm kubectl
Here I want to use this version because the current Kubernetes version for CKA, CKAD, and CKS exams is version 1.26. However, If you want to, you can use the newest version by executing the install comment without a special version.
sudo apt-get install -y kubelet kubeadm kubectl
Step 4: Initialize the Kubernetes
Run the following command on the control-plane node:
sudo kubeadm init --pod-network-cidr=192.168.0.0/16
Note: If 192.168.0.0/16 is already in use within your network you must select a different pod network CIDR, replacing 192.168.0.0/16 in the above command.
Execute the following commands to configure kubectl (also returned by kubeadm init):
mkdir -p $HOME/.kube
sudo cp -i /etc/kubernetes/admin.conf $HOME/.kube/config
sudo chown $(id -u):$(id -g) $HOME/.kube/config
Step 5: Set Up a Pod Network
In this example, I’ll use Calico as the pod network. If you’d like, you can pick a different one.
Install the Tigera Calico operator:
kubectl create -f https://raw.githubusercontent.com/projectcalico/calico/v3.25.1/manifests/tigera-operator.yaml
Install Calico by creating the necessary custom resource:
kubectl create -f https://raw.githubusercontent.com/projectcalico/calico/v3.25.1/manifests/custom-resources.yaml
Note: Please read the contents of this manifest and make sure its settings are correct for your environment before creating it. You also should ensure that the default IP pool CIDR matches your pod network CIDR.
Step 6: Join Worker Nodes in the Cluster
On the worker nodes, run the Kubeadm join command that is also returned by kubeadm init. The command should look similar to this:
sudo kubeadm join <control-plane-ip>:<control-plane-port> --token <token> --discovery-token-ca-cert-hash <hash>
Update control-plane-ip, control-plane-port, token, and hash with the actual values from your Kubeadm init output. Actually, you should copy the command and paste it to the worker nodes.
In case you are missing the join command or maybe in the future you want to add more nodes to the cluster for scaling. You can recreate the join command with the follow command:
kubeadm token create --print-join-command
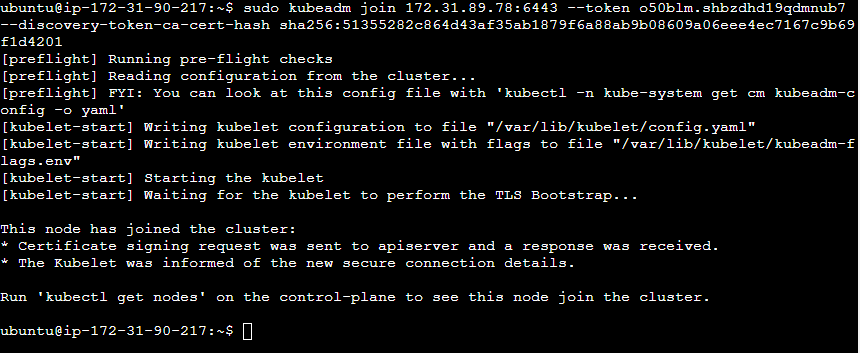
For example, the command looks like below
kubeadm join 172.31.89.78:6443 --token o50blm.shbzdhd19qdmnub7 --discovery-token-ca-cert-hash sha256:51355282c864d43af35ab1879f6a88ab9b08609a06eee4ec7167c9b69f1d4201
Then run it with sudo on the worker nodes
Step 7: Verify the Cluster
On the control-plane node, check the status of your nodes by running:
kubectl get node
The follow output as:

At first, the status of the worker nodes are NotReady. After a few minutes, they should change to Ready.
I hope that you have already known how to deploy a cluster Kubernetes with the kubeadm tool. If you have any questions or get stuck on any steps, please let me know in the comment below. In the next posts, we will use Ansible to install Kubernetes automatically.
References:
https://devopscube.com/setup-kubernetes-cluster-kubeadm
https://devopsforu.com/how-to-install-kubernetes-1-27


