Helm2 vs. Helm3
Helm is a valuable tool for developers and DevOps teams, as it simplifies the deployment and management of applications in Kubernetes. It provides a standardized way to package, distribute, and deploy Kubernetes applications, making it quick and easy to install and manage them. Over time, Helm has been updated to make it more efficient, improve compatibility, and introduce new features.
In this blog, we will see the difference between two Helm versions, Helm2 and Helm3.
Welcome to KodeKloud!
We are the #1 DevOps courses provider. Register today to gain access to the richest collection of DevOps courses and labs and try sample lessons of all our courses.
No credit card required!
Origin of Helm
As administrators had to manage more and more Kubernetes objects in their clusters to run their apps and infrastructure, a natural need for something to manage all of this complexity arose. So, the Helm project appeared under the CNCF’s (Cloud Native Computing Foundation) umbrella. Since its initial launch in 2016, the project has matured, and it has gotten better and better. The improvements were also made possible by the fact that Kubernetes itself was improving, so Helm had more tools at its disposal it could leverage right off of Kubernetes.
In the next section, we'll discuss each of the differences in more detail.
If you are new to Helm, check out this blog: What is Helm in Kubernetes? (Role & Benefits Explained).
No More Tiller
When Helm 2 was around, Kubernetes lacked features such as Role-Based Access Control and Custom Resource Definitions. To allow Helm to do its magic, an extra component called Tiller had to be installed in the Kubernetes cluster. So, whenever you wanted to install a Helm chart, you used the Helm (client) program installed on your local computer.
This communicated with the Tiller, which was running on some server. Tiller, in turn, communicated with Kubernetes and proceeded to take action to make whatever you requested happen. So, Tiller was the middleman, so to speak.
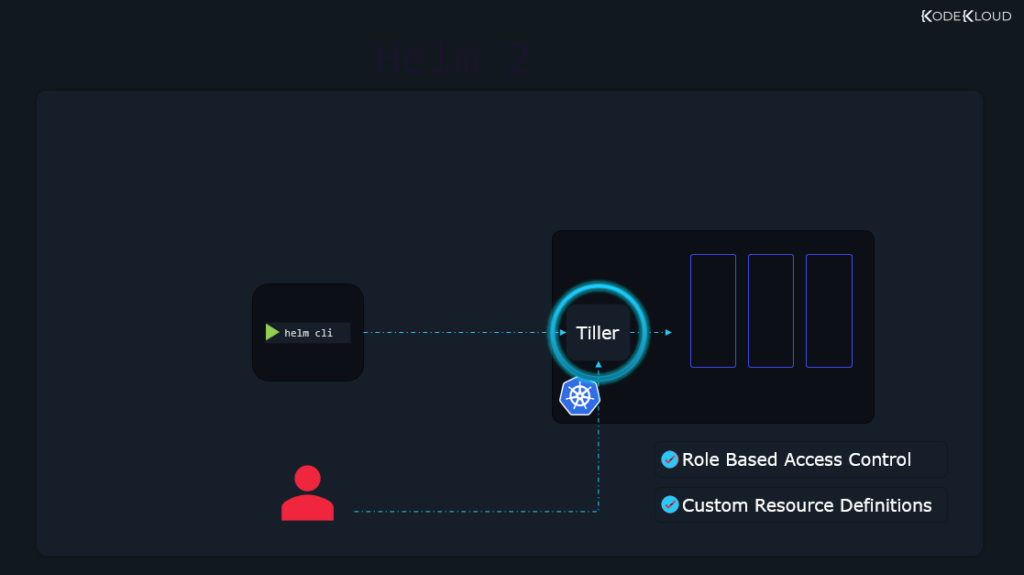
Besides the fact that an extra component sitting between you and Kubernetes adds complexity, there were also some security concerns. By default, Tiller was running in “God mode” or otherwise said, it had the privileges to do anything it wanted. This was good since it allowed it to make whatever changes necessary in your Kubernetes cluster to install your charts. But this was bad since it allowed any user with Tiller access to do whatever they wanted in the cluster.
After cool stuff like Role-Based Access Control (RBAC) and Custom Resource Definitions appeared in Kubernetes, the need for Tiller decreased, so it was removed entirely in Helm 3. Now, nothing is sitting between Helm and the cluster.
That is when you use the Helm program on your local computer, it connects directly to the cluster (Kubernetes API server) and starts to work its magic.
Furthermore, with RBAC, security is much improved, and any user can be limited in what they can do with Helm. Before, you had to set these limits in Tiller, and that was not the best option. But with RBAC built from the ground up to fine-tune user permissions in Kubernetes, it’s now straightforward to do. As far as Kubernetes is concerned, it doesn’t matter if the user is trying to make changes within the cluster with kubectl or with helm commands. The user requesting the changes has the same RBAC-allowed permissions for whatever tool they use.
Three-way strategic merge patch
Now, this is probably a more important change than what we discussed before with Tiller.
The name might sound intimidating but don’t worry. At the end of this section, we’ll see that it’s actually simple but a very smart thing that can prove quite useful.
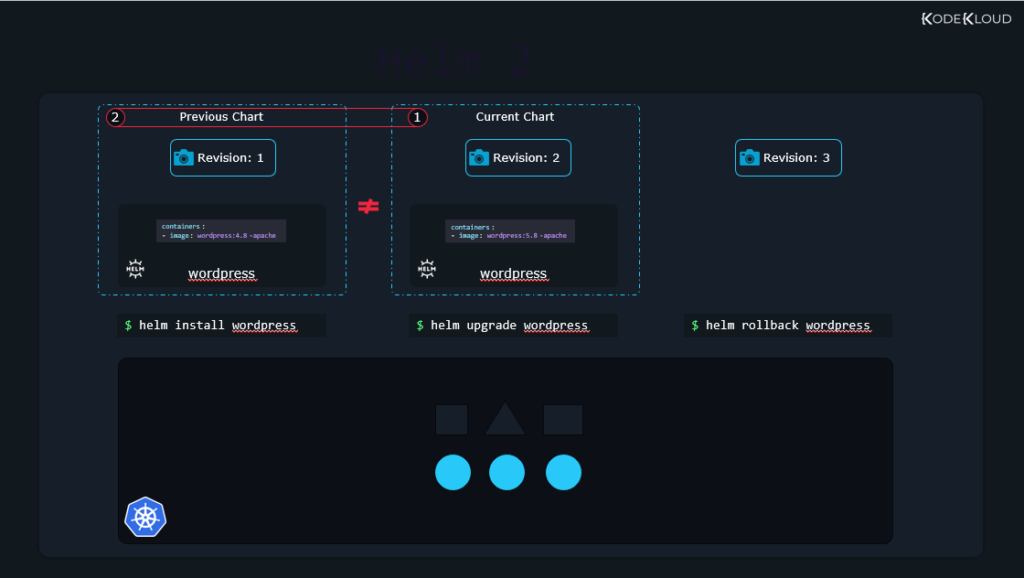
Helm has something like a snapshot feature. Here’s an example:
You can use a chart to install a full-blown WordPress website. This will create revision number 1 for this install. Then, if you change something, for example, you upgrade to a newer chart to upgrade your WordPress install, you will arrive at revision number 2. These revisions can be considered snapshots, the exact state of a Kubernetes package at that moment in time. If there’s a need, you can return to revision number 1 and do a rollback. This would get your package/app to the same state it was in when you first installed your chart.
New revisions are created whenever important changes are done with the Helm command. For example, when we install a package, a revision is created. When we upgrade that package, a new revision appears. Even when we roll back, a new revision is created.
This is not like a typical backup/restore feature in the sense that you do not get old data back. If you delete a database in a persistent volume, this does not restore the persistent volume with the old data. What this does is bring all Kubernetes objects back to their old state, their old declarations, as they were at the time the revision was created.
To learn more about how Helm works, check out this blog: Helm Chart Tutorial: A Quick Guide to Working With Helm.
Another way to think about this is that a rollback restores pretty much everything back to the way it was, EXCEPT for persistent data. Persistent data should be backed up with regular methods.
Helm 2 was less sophisticated when it came to how it did such rollbacks. To understand what was lacking, the official documentation page gives us this example:
You install a chart. This creates revision number 1, which contains a deployment with 3 replicas. But someone, for some reason, brings down the number of replicas to 0 with a command like:
kubectl scale --replicas=0 deployment/myappNow, this does not create a new revision, as it wasn’t a helm upgrade, install, or rollback command. It was just a “manual” change done without Helm.
But we still have revision 1 available, with the original state. So, no problem, we would think; we just roll back to the original:
helm rollback myappHelm 2 compares the chart currently used with the chart we want to revert to. Since this is the original install, revision 1, and we want to roll back to revision 1, the current chart and the old chart are identical. We did not change any chart; we just manually edited a small Kubernetes object. Helm 2 considers nothing should be changed, so nothing happens. The count of replicas remains at 0.
Helm 3, on the other hand, is more intelligent. It compares the chart we want to revert to, the chart currently in use, and also the live state (how our Kubernetes objects currently look like, their declarations in .yaml form). This is where that fancy “Three-way strategic merge patch” name comes from. By also looking at the live state, it is noticed that the live state replica count is at 0, but the replica count in revision 1 we want to revert to is at 3, so it makes necessary changes to come back to the original state.
Besides rollbacks, there are also things like upgrades to consider, which Helm 2 was also lacking. For example, say you install a chart. But then you make some changes to some of the Kubernetes objects that are installed. It all works nicely until you perform an upgrade. Helm 2 looks at the old chart and the new chart you want to upgrade to.
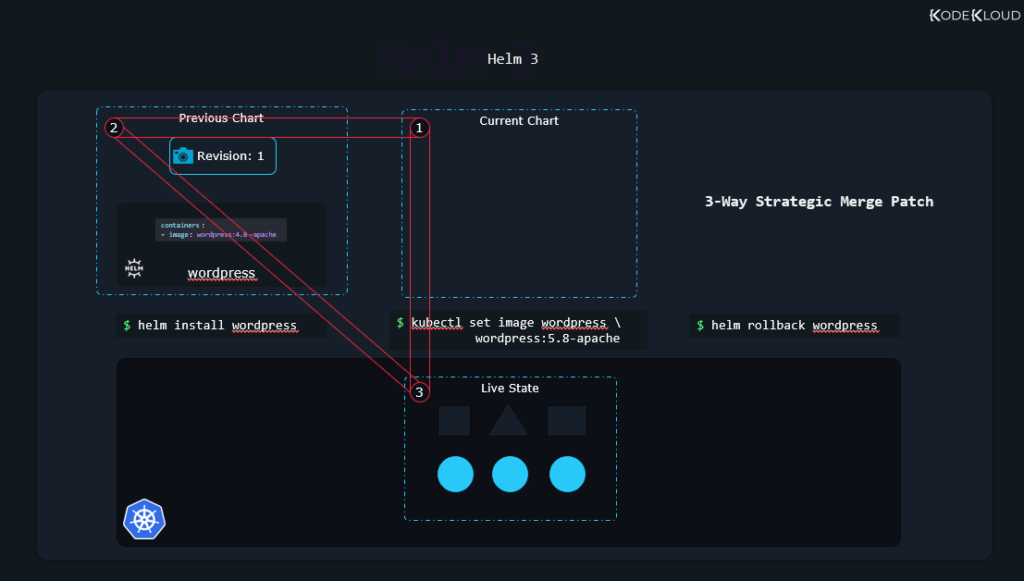
All your changes will be lost since they don’t exist in the old chart or the new chart. But Helm 3, as mentioned, looks at the charts and also at the live state. It notices you added some stuff of your own, so it performs the upgrade while preserving anything you might have added.
Check out the Helm for the Absolute Beginners course.

Conclusion
What was mentioned above are probably the biggest changes in Helm 3. There are some other smaller changes, but they don’t really affect how you’ll work with the newer version of Helm, especially if you’re a new user.
Want to understand Helm2 vs. Helm3 comparison better? Check out this video.
More on Helm:
- Writing a Helm Chart
- What is a Template Function and Pipeline in Helm?
- What are Helm Charts?
- Helper Files and Named Templates
- Helm Flow Control with Conditional Control Structures
- Helm Plugins
- Uploading a Helm Chart
- Package, Sign, and Verify Helm Charts (Commands & Examples)