Docker Certified Associate Exam Series (Part-2): Kubernetes
In the previous blog of this 7-part series, we discussed Container Orchestration. This blog dives into Kubernetes.
Here are the six other blogs in the series:
- Docker Certified Associate Exam Series (Part-1): Container Orchestration
- Docker Certified Associate Exam Series (Part-3): Image Creation, Management, and Registry
- Docker Certified Associate Exam Series (Part-4): Installation and Configuration
- Docker Certified Associate Exam Series (Part-5): Networking
- Docker Certified Associate Exam Series (Part-6): Docker Engine Security
- Docker Certified Associate Exam Series (Part-7): Docker Engine Storage & Volumes
What is Kubernetes?
Kubernetes is the most popular container orchestration tool that integrates seamlessly with Docker. The DCA certification test emphasizes specifically services, architecture, and commands used in Kubernetes, so it is crucial to develop a firm grasp of the framework. The Kubernetes section of the DCA exam preparation tutorials combines the Kubernetes for Beginners and Kubernetes CKAD curriculum. This makes it perfect for those either starting out or experienced in Kubernetes to refresh their skills.
Welcome to KodeKloud!
We are the #1 DevOps courses provider. Register today to gain access to the richest collection of DevOps courses and labs and try sample lessons of all our courses.
No credit card required!
Kubernetes Architecture
Before we go deep into the Kubernetes Architecture, let us understand its CLI first.
The Docker CLI only lets you deploy a single instance of an app with the run command. On the contrary, the Kubernetes CLI (known as kubectl) lets you deploy many instances of your app using a single run command. You can also scale this number up or down with a single command, as required.
Try the Kubernetes Deployments Lab for free
Kubernetes also has the ability to scale your application automatically depending on usage through the use of POD Autoscalers and Cluster AutoScalers. Performing rolling updates on your applications is easy using the command:
kubectl rolling-update my-web-server --image=web-server:2Rolling back a failed update is also performed using this single command:
kubectl rolling-update my-web-server --rollbackThis allows you to test updates on a few application instances before rolling them out into production.
Kubernetes is built on an open architecture that supports third-party networks and storage renders. Kubernetes uses Containerd as a container runtime platform to run applications on containers. It also integrates with other container runtimes, such as Crio and Rocket.
Nodes
In a Kubernetes cluster, there are typically two types of nodes: worker nodes and control plane nodes.
Worker nodes, or minion nodes, are responsible for running the application containers and providing the computing resources needed to support them. The actual work happens in these nodes, and the control plane nodes manage them.
Control plane nodes, also known as master nodes, are responsible for managing the cluster and its worker nodes. They handle tasks such as scheduling, scaling, and monitoring the application containers running on the worker nodes. Control plane nodes also store the configuration data for the entire cluster and ensure that the desired state of the applications is maintained. Below are the components of a control plane:
- API server: The API server is the main entry point for all the communications between the nodes and the control plane. It exposes the Kubernetes API, which allows you to interact with your cluster using the kubectl CLI, the Kubernetes dashboard, or other tools and clients.
- Scheduler: The scheduler is responsible for assigning Pods to nodes based on the resource availability and requirements of the Pods.
- Controller manager: The controller manager runs various controllers that monitor and manage the state of your cluster. For example, the replication controller ensures that the desired number of Pods are running for a given deployment, the service controller creates and updates the load balancers for your services, and the node controller handles the node registration and health checks.
- Etcd: Etcd is a distributed key-value store that stores the configuration and state data of your cluster. It is used by the API server and the other control plane components to store and retrieve the cluster information.
Pods
Before you start working with Kubernetes Pods, the following conditions should be met:
- An application has been developed and built into an OCI-compliant image.
- A Kubernetes cluster is set up and working.
- All services in the cluster should be in running mode.
Kubernetes does not deploy containers directly onto nodes; instead, it encapsulates them using Pods. A Pod is the smallest object you can deploy in Kubernetes, and each Pod runs a single instance of an application.
Pods help you scale your application by adding a new Pod with a new application instance within the same node. You can also deploy Pods on new nodes to help improve capacity and for load balancing.
Multi-Container Pods
Pods typically have a 1:1 relationship with containers. However, A single Pod can run multiple containers so long as they are not the same type. For instance, a Pod can run your application container, and a helper container provides helper container support tasks. Since these containers share a network and storage space, they can easily communicate by referring to each other as local hosts.
When you deploy a containerized application in Kubernetes, you are actually deploying a pod that's running your containers in the node. For instance, to deploy a Nginx server, we run the following command:
kubectl run nginx --image=nginxTo get the running Pods in a node, run the command:
kubectl get pods
Once you have developed familiarity with Pods, you can proceed to the demo lesson, where you will learn the practical aspects of deploying PODs.
Pods with YAML
To create a pod using YAML, you can start by creating a YAML file with the following contents:
apiVersion: v1
kind: pod
metadata:
  name: my-pod
  labels:
    app: nginx
    tier: frontend
spec:
  containers:
  - name: nginx
    image: nginx
In this YAML file, you specify the API version, the kind of resource you're creating (in this case, a Pod), some metadata (like the name of the Pod), and the specification for the Pod (which includes the containers that will run inside the Pod).
To create the Pod using this YAML file, you can run the following command:
kubectl apply -f my-pod.yamlThis will create a Pod with the name "my-pod" and a single container running the image "nginx". You can modify the YAML file to suit your specific needs, like adding environment variables, specifying resource limits, or mounting volumes.
To see the pods available in your cluster, run the command:
kubectl get podsTo get information on a particular Pod, run the command:
kubectl describe pod myapp.podOnce you are thorough with this section, head over to the demo class and research questions to test your grasp.
ReplicaSets and Replication Controllers
Controllers are the intelligent agents of Kubernetes that monitor the state of objects and respond accordingly. The Replication Controller is one such agent, and it helps to run several instances of a Pod in a cluster, leading to high availability.
The Replica Controller automatically brings up a new Pod when one fails within a cluster. The Replica Controller also ensures that the specified number of Pods are running at all times. The Replica Controller also creates multiple Pods and distributes workloads among them, allowing for scaling and load balancing.
Creating a Replica Controller
To create a Replica Controller, you define its properties in a YAML file. The code block below shows the fields required to create a Replication Controller called myapp-rc.
apiVersion: v1
kind: ReplicationController
metadata:
  name: myapp-rc
  labels:
    app: myapp
    type: front-end
spec:
  template:
    metadata:
      name: myapp-pod
      labels:
        app: myapp
        type: front-end
    spec:
      containers:
      - name: nginx-controller
        image: nginx
  replicas: 3
The Pod template is extracted from the Pod YAML definition file.
You will also need to define the number of replicas, nestled within the spec field as a sibling of the template.
To run this replication controller in Kubernetes, use the command:
kubectl create -f rc-definition.ymlTo view a list of replication controllers, use the command:
kubectl get replicationcontrollerTo list the pods running a replication controller:
kubectl get podsCreating a ReplicaSet
A ReplicaSet performs most functions similar to the Replication Controller, except that it uses a Selector and Labels to filter and identify Pods. The code block below shows the YAML definition file used in creating a ReplicaSet.
apiVersion: apps/v1
kind: ReplicaSet
metadata:
  name: myapp-replicaset
  labels:
    app: myapp
    type: front-end
spec:
  template:
    metadata:
      name: myapp-pod
      labels:
        app: myapp
        type: front-end
    spec:
      containers:
      - name: nginx-container
        image: nginx
  replicas: 3
  selector:
    matchLabels:
      type: front-end
Once you have defined the YAML file, you can deploy this ReplicaSet using the command:
kubectl create -f replicaset-definition.ymlLabels and Selectors
ReplicaSets utilize Selectors to find the right Pods that need to be monitored or replaced. They do this by looking at Labels defined in the YAML definition file.
There are three ways to scale your application using ReplicaSets:
- You can change the number of Replicas listed in the YAML file, then run the Kubernetes replace command:
kubectl replace -f replicaset-definition.yml2. Secondly, you can also scale the number of replicas directly using the command:
kubectl scale --replicas=n -f replicaset-defintion.yml3. Lastly, you may scale your application by increasing the number of instances within the app using the command:
kubectl scale --replicas=6 replicaset myapp-replicasetThe table below highlights some common commands you’ll use for ReplicaSets and Controllers.
|
Action |
Command |
|
Deploy a ReplicaSet |
kubectl create -f replicaset-definition.yml |
|
Display all ReplicaSets running in a Cluster |
kubectl get replicaset |
|
To remove a ReplicaSet |
kubectl delete replicaset myapp-replicaset |
|
Update a ReplicaSet |
kubectl replace -f replicaset-definition.yml |
|
Scale a ReplicaSet |
kubectl scale -replicas=6 -f replicaset-definition.yml |
Deployments
In Kubernetes, Deployment is an object that lets you perform rolling updates and upgrades on various instances of an application within a ReplicaSet. To create a Kubernetes deployment, you can specify its contents in a YAML file, similar to a ReplicaSet but with Kind being a deployment.

Below is the YAML file for a deployment called deployment-definition.
---
apiVersion: apps/v1
kind: Deployment
metadata:
  name: deployment-definition
  labels:
    app: web
spec:
  replicas: 2
  selector:
    matchLabels:
      app: web
  template:
    metadata:
      labels:
        app: web
    spec:
      containers:
        - name: front-end
          image: nginx
          ports:
            - containerPort: 80
        - name: rss-reader
          image: nickchase/rss-php-nginx:v1
          ports:
            - containerPort: 88
Some common commands you’ll use when working with deployments include:
|
Task |
Command |
|
Run a Deployment |
kubectl create -f deployment-definition.yml |
|
Display running deployments |
kubectl get deployments |
|
Update a Deployment |
kubectl apply -f deployment-definition.yml kubectl set image deployment/myapp-deployment nginx=nginx:1.9.1 |
|
Check the status of your rollouts |
kubectl rollout status deployment/myapp-deployment |
|
Display Rollout History |
kubectl rollout history deployment/myapp-deployment |
|
Roll Back Changes |
kubectl rollout undo deployment/myapp-deployment |
Update and Rollbacks
A Rollout is a version of your application that is triggered when you create a deployment. This is the first version (Revision 1) of your application. When you update your application, a new version (Revision 2) is created. If you are unsatisfied with the updates, you can Rollback the changes and have Revision 1 of your application running.
To create a newer rollout of your application, use the command:
kubectl rollout status deployment/myapp-deploymentTo check the history of your deployment rollouts:
kubectl rollout history deployment/myapp-deploymentDeployment Strategies
There are two strategies you can use to deploy revisions of your application. The Recreate strategy is one in which you destroy all running instances of your application and replace them with newer ones. This typically causes application downtime during upgrades. The Rolling Update strategy lets you take down application instances and release new ones one-at-a-time. The Rolling Update is the default strategy used by Kubernetes deployments on applications.
Update Strategies

There are two ways you can update your deployment.
- You can specify the changes in the deployments YAML definition file, then use the Kubernetes
applycommand:
kubectl apply -f deployment-definition.yml2. You can also force changes into your configuration file directly from the command line interface using the set command:
kubectl set image deployment\myapp-deployment\nginx=nginx:1.9.1To check whether your deployment is a recreate or a rolling update, use the Kubernetes describe command:
kubectl describe deploymentsThe screenshots below show the difference between a deployment set on Recreate and Rolling updates.
Recreate
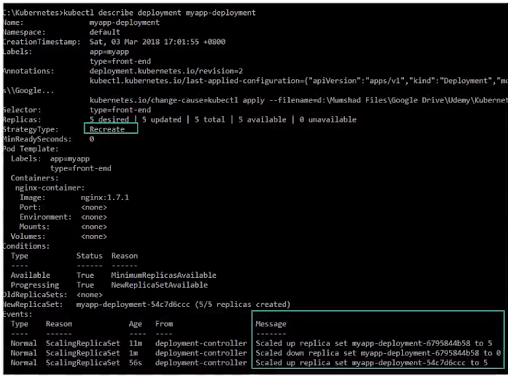
Rolling Update

Upgrades
When you launch a new deployment, it automatically creates the underlying ReplicaSet, which also creates a number of Pods based on the required number of Replicas. When performing upgrades, the deployment will create a new ReplicaSet, then take down containers in the old set, replacing them using a Rolling Update.
To keep track of rolling updates, you can use the command:
kubectl get replicasetsRollbacks
If you are unsatisfied with changes to your application, you can roll them back using the command:
kubectl rollout undo deployment/myapp-deploymentNetworking
In a node setup, the Pods host containers. Each Pod is assigned an IP address in the order of 10.24.x.x. In each Node, Kubernetes creates an internal IP address (10.24.0.0) to which all Pods attach. This default network also assigns IP addresses to all Pods created within the node. If two nodes running Kubernetes have been assigned the IP addresses 192.168.1.2 and 192.168.1.3, there is no automatic network connection between Pods in these nodes.
To establish communication between Pods in different nodes, two conditions should be met:
- All containers and Pods can automatically communicate with each other without needing a Network Address Translator (NAT).
- Nodes and containers can communicate back and forth without requiring a NAT.
You will then use a custom networking solution (e.g., Cisco, Cilium, Flannel, VMware NSX, etc.) to manage networking within a node and assign addresses to virtual networks within the node. These solutions also create virtual networks within the node and establish communication between nodes using routing algorithms.

Services
In Kubernetes, services are objects that enable communication between applications, components within applications, and communication with external sources. Services, therefore, enable the front ends that allow for communication between users and the application. Services also establish connections between various groups of Pods in a node. Finally, services are the key objects that enable loose coupling between microservices in containerized applications.
Let’s say you want to access the webserver in a Pod whose IP address is 10.244.0.2. If you are within the node, you could use an ssh connection using the command:
curl http://10.244.0.2Alternatively, you could use a browser to access a graphical web page using the address http:// 10.244.0.2.
If you are not within the node, however, you will require the NodePort service, which makes internal Pods accessible on ports in a Node. This service receives a request from a port within a node and points this request to a specific Pod running the required application.

ClusterIP
The ClusterIP service creates a virtual IP inside a cluster to enable communication between different services and servers in a node. It achieves this by organizing Pods into distinct groups that can be managed from a single interface. You can create the ClusterIP service using a YAML definition file.
For instance, we can create a ClusterIP service named service-definition.yml using the following specifications:
apiVersion: v1
kind: Service
metadata:
  name: service-definition
spec:
  type: ClusterIP
  selector:
    app: MyApp
    type: Backend
  ports:
    - protocol: TCP
      port: 80
      targetPort: 80
Then run this service using the command:
kubectl create -f service-definition.ymlTo check the services running in a cluster, use the command:
kubectl get servicesLoadBalancer
The LoadBalancer service helps you distribute workloads among nodes and Pods running your application. In this lesson, you’ll be introduced to load balancing using the service on the Google Cloud Platform.

Since Google Cloud Platform offers native support for Kubernetes Services, you can easily configure load balancing by creating a YAML definition file with the type being LoadBalancer, as shown below:
apiVersion: v1
kind: Service
metadata:
  name: myapp-service
spec:
  type: LoadBalancer
  ports:
    - targetPort: 80
      port: 80
      nodePort: 30008
Demo App
Having grasped the major concepts of Kubernetes, you can test your knowledge through a series of classes to create, deploy, and manage a demo voting app, as shown in the image below.

NameSpaces
In Kubernetes, Namespaces provides us a way to organize your clusters into subclusters that are logically separated yet can still communicate with each other. When you create a deployment, Kubernetes automatically creates three NameSpaces: Default, kube-system, and kube-public. You can use namespaces to allocate resource limits and enforce network policies.
Services within the same NameSpace can communicate using a simple call. See the example below:
mysql.connect("db-service")To connect to a service in a different namespace, the service has to use the command:
mysql.connect("db-service.dev.svc.cluster.local")The breakdown of the service label is as shown in the screenshot below:

To create a NameSpace, define its attributes in a YAML file and run it using the create command. The specifications for the namespace-dev.yml file are:
apiVersion: V1
kind: Namespace
metadata:
    name: dev
You can then create this namespace by typing the command:
kubectl create -f namespace-dev.ymlHere are some common commands you’ll use when dealing with namespaces:
|
Task |
Command |
|
Deploy a Namespace |
kubectl create -f namespace-dev.yml |
|
View pods running in the current namespace |
kubectl get pods |
|
View pods running in a different namespace |
kubectl get pods --namespace=dev |
|
Switch to another namespace |
kubectl config set-context $(kubectl config current-context) --namespace=dev |
|
View pods running in all namespaces |
kubectl get pods --all-namespaces |
Namespaces also allow you to limit resource allocations. To do this, you define a resource quota using a YAML definition file as shown below:
apiVersion: V1
kind: ResourceQuota
metadata:
    name: compute-quota
    namespace: dev
spec:
  hard:
    pods: "10"
    requests.cpu: "4"
    requests.memory: 5Gi
    limits.cpu: "10"
    limits.memory: 10Gi
Then run the command:
kubectl create -f compute-quota.yamlCommands and Arguments
Commands in Docker
In Docker, we use Dockerfiles to define the tasks and processes that run in specific containers. This file contains scripted instructions that guide Docker on how to build the image. There are two types of instructions that can be defined in this script: an ENTRYPOINT and a COMMAND (CMD). CMD instructions are mostly used for creating default tasks that users can easily override. An ENTRYPOINT is used to define containers with specific executables that are hard to override unless the –entrypoint flag is invoked.
Learn more about how to create images using Dockerfiles from this blog: How to Build a Docker Image With Dockerfile From Scratch.

Commands in Kubernetes
In this short class, you will set up a pod definition file to run the command created in Docker earlier to familiarize yourself with Commands and Arguments in Kubernetes.
The specifications for the pod-definition.yml file are:
apiVersion: v1
kind: Pod
metadata:
  name: ubuntu-sleeper-pod
spec:
  containers:
    - name: ubuntu-sleeper
      image: ubuntu-sleeper
      args: ["10"]
You can then deploy this pod using the command:
kubectl create -f pod-definition.ymlSpecifying arguments in the command line also results in changes to the YAML definition file, as shown below:

The Command field overrides the ENTRYPOINT instruction, while the args field overrides the cmd instruction.
Environment Variables
Variables Docker
Environment Variables let you define dynamic elements for your containerized application. For instance, rather than having to rewrite the code every time you want to change your application’s background color, you could define it as an environment variable. Now all you have to do is include the application color in your docker run command to update the background color:
docker run -e APP_COLOR=blue simple-webapp-colorYou can run this command multiple times to have different instances of your application working with different background colors, as shown in the screenshot below:
Variables Kubernetes
In Kubernetes, you can set up environment variables by setting them up directly in a Pod definition file. The attributes for setting up the environment variable APP_COLOR are shown in the code block below:
apiVersion: v1
kind: Pod
metadata:
  name: simple-webapp-color
spec:
  containers:
    - name: simple-webapp-color
      image: mmumshad/simple-webapp-color
      ports:
        - containerPort: 8080
      env:
        - name: APP_COLOR
          value: pink
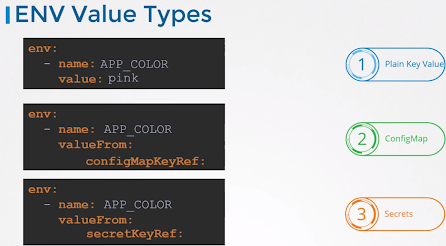
You can also specify an environment variable using Kubernetes secrets and configuration maps, as shown in the screenshot:
Probes
We use probes in Kubernetes to investigate the running and readiness states of containers.
Readiness Probes
The kubelet uses Readiness Probes to know when a container is ready to start accepting traffic. There are two important concepts to understand when dealing with a pod’s lifecycle:
- Pod status – indicates where a pod is in its lifecycle, and it could be Succeeded, Failed, Unknown, Pending, ContainerCreating or Running.
- Pod Conditions – arrays of TRUE/FALSE values that give extra details about a Pod’s status. The conditions include PodSchedules, Initialized, ContainersReady, and Ready.
To check a pod’s condition, use the command:
kubectl describe pod POD-NAMEReadiness probes investigate the ContainersReady and Ready conditions to check whether specific containers can accept traffic. With a readiness probe, you can investigate the actual state of an application as it runs inside a container. You can also define the attributes of your readiness probe inside a Pod’s YAML configuration file.
The code block below shows the YAML definition file of a simple-webapp pod that includes the HTTP readiness probe.
apiVersion: v1
kind: Pod
metadata:
  name: simple-webapp
spec:
  containers:
  - name: liveness
    image: k8s.gcr.io/liveness
    args:
    - /server
    readinessProbe:
      httpGet:
        path: /healthz
        port: 8080
The screenshot below shows the output of running the HTTP Test as a readiness probe on an application:


Other ways you can test your container’s readiness are the TCP Test and. The YAML scripts for these methods are:

Liveness Probes
The liveness probes help check whether the containers that run instances of your application are ready. Liveness probes are configured just like readiness probes, replacing the word readiness with liveness. The YAML definition file for a liveness probe is shown below:
apiVersion: v1
kind: Pod
metadata:
  name: simple-webapp-liveness
spec:
  containers:
  - name: liveness
    image: k8s.gcr.io/liveness
    args:
    - /server
    livenessProbe:
      httpGet:
        path: /healthz
        port: 8080
To dive deeper into Kubernetes probes, check out this blog: Kubernetes Readiness Probe: A Simple Guide with Examples.
Volumes in Kubernetes
Containers in Docker are transient in nature, i.e., they only exist while running a process and terminate when the process is over. Data in containers is also transient, i.e., it is lost once the container terminates. We use volumes to create persistent data that can be accessed permanently. We also use volumes to turn transient Kubernetes pods into persistent storage. The screenshot below shows how you can assign a volume to a pod using the YAML definition file.

Once we have created a volume, we mount it to a host, making it accessible to users. Most third-party host services support Kubernetes volumes. For instance, to mount your volume on Amazon Elastic Block Storage (EBS), use the specifications in the screenshot below:

Persistent Volumes
Persistent volumes help you manage storage centrally, allowing your administrators to configure a cluster-wide volume when deploying your application. Users can now access parts of this volume using Persistent Volume Claims. This is suitable for a large environment where users deploy multiple pods continuously.
The screenshot below shows a sample YAML definition file for a persistent volume.

Once you have specified the attributes, you can create this volume by running the command:
kubectl create -f pv-definition.ymlPersistent Volume Claims
A Persistent Volume Claim (PVC) is created by a user when they want to access shared volumes. Kubernetes binds each PVC to a Persistent Volume based on the user request and the volume’s properties. Each PVC can only be bound to one PV, so they have a 1:1 relationship. If more than one PV satisfies the requirements of a PVC, users can specify their required volumes using labels and selectors.
Here is a YAML definition file for a persistent volume claim:
apiVersion: v1
kind: PersistentVolumeClaim
metadata:
  name: myclaim
spec:
  accessModes:
    - ReadWriteOnce
  resources:
    requests:
      storage: 500Mi
When a user withdraws a persistent volume claim, you can reclaim the persistent volume in one of three ways: Delete it completely, Retain it so it is present but won’t accept more claims, or Recycle it so that it can serve other users.
Storage Classes
With storage classes, you can provision storage for your volumes dynamically. A storage class creates storage (for instance, on Google Cloud) and then automatically avails it to pods as needed. You can create different classes to serve different storage and replication needs. The YAML definition file for a storage class (google-storage) to handle the volumes created earlier is outlined below:

There are different storage services availed by various providers. Following are some of the most popular storage services you may encounter:
- AWSElasticBlockStore
- AzureFile
- AzureDisk
- CephFS
- Cinder
- FC
- FlexVolume
- Flocker
- GCEPersistentDisk
- Glusterfs
- iSCSI
- Quobyte
- NFS
- RBD
- VsphereVolume
- PortworxVolume
- ScaleIO
- StorageOS
ConfigMaps
When you have numerous pod definition files, you can use Kubernetes’ ConfigMaps to manage environmental data centrally. ConfigMaps allows you to parse environment data in the form of key-value pairs. To set up ConfigMaps on your pod, you need to follow two steps:
- Create a ConfigMap
- Inject the map into a Pod
To create a ConfigMap imperatively, use the command:
kubectl create configmapTo add the key-value pairs to your ConfigMap, run the command:
kubectl create configmap\ app-config --from-literal=APP_COLOR=blueNote that the above key-value pairs use the following configuration appended to the actual command --from-literal==.
You can also use a file to add key-value pairs using the command in the format:kubectl create configmap –from-file=. Actual command:
kubectl create configmap app-config --from-file=app_config.propertiesTo create a ConfigMap using the declarative command:
kubectl create -f config-map.yamlTo get configuration data from a file, run the command:
kubectl get -f config-map.yamlTo view your configuration maps, run the command:
kubectl get configmapsTo describe configuration maps, run the command:
kubectl describe configmapsTo run a configuration map within a Pod, run the command:
kubectl create -f pod-definition.yamlYou could inject this configuration data as a single environment variable or as a file within a volume.
Secrets
While secrets also store environment data, they are used to protect sensitive information by storing them in a hashed format. To activate a secret in your Pod, you’ll need two steps:
- Create a secret.
- Inject it into a Pod.

To create a secret imperatively, use the command:
kubectl create secret genericSpecify key-value pairs directly on the command line using the following format:
kubectl create secret generic app-secret --from-literal=DB_Host=mysAdd other variables to your secrets as shown below:
kubectl create secret generic app-secret1 --from-literal=DB_Host=mys --from-literal=DB_User=root --from-literal=DB_Password=paswrdTo specify a secret from a file, use the command:
kubectl create secret generic \
 app-secret --from-file=app_secret.properties
You will need to encode the content into base64 string. To do this on a Linux command line, use the script:
echo -n 'elementname' | base64 *elementname is the value you want to encode
Write a Secret config file with the following configurations:
apiVersion: v1
kind: Secret
metadata:
  name: mysecret
type: Opaque
data:
  username: ZWxlbWVudG5hbWU=
To create this secret declaratively, run the command:
kubectl create -f secret-data.yamlTo view your secrets, run the command:
kubectl get secretsTo view your encoded values, run the command:
kubectl get secret app-secret -o yamlTo decode your hashed values, run the command:
echo -n 'hashedvalue' | base64 --decodeYou can also inject secrets as single environment variables or as files in a volume.
Network Policies
In this course curriculum section, you'll advance your knowledge of various commands and configuration settings to use when creating and managing network policies.
This section also tests your ability to:
- Identify the impact of rules configured on a policy
- Access the user interface of applications from the terminal
- Perform connectivity tests using these UIs
- Create a specific network policy using Kubernetes documentation
Some common network policy actions and their commands include:
To see the number and names of active network policies:
kubectl get netpolTo get the pod onto which a policy is applied:
kubectl get pods -l name=podselector-nameTo understand the type of traffic that a policy should handle:
kubectl describe netpol policy-nameAt Kodekloud, we have a comprehensive Docker Associate Associate Exam preparation course. The course explains all Docker concepts included in the certification's curriculum. After each topic, you get interactive quizzes to help you internalize the concepts learned. At the end of the course, we have mock exams that will help familiarize you with the exam format, time management, and question types.

You can now proceed to the next part of this series: Docker Certified Associate Exam Series (Part-3): Image Creation, Management, and Registry
Here is the previous part of the Docker Certified Associate Exam Series: Docker Certified Associate Exam Series (Part-1): Container Orchestration
Research Questions & Conclusion
This concludes the Kubernetes curriculum for the DCA certification exam.
Here is a quick quiz to help you assess your knowledge. Leave your answers in the comments below and tag us back.
Quick Tip – Questions below may include a mix of DOMC and MCQ types.
1. Which of the following are the correct commands to create config maps? Select all the answers that apply.
[A] kubectl create configmap CONFIGMAP-NAME --from-literal=KEY1=VALUE1 --from-literal=KEY2=VALUE2
[B] kubectl create configmap CONFIGMAP-NAME --from-file=/tmp/env
[C] kubectl create configmap CONFIGMAP-NAME --file=/tmp/env
[D] kubectl create configmap CONFIGMAP-NAME --literal=KEY1=VALUE1 KEY2=VALUE2
2. Where do you configure the configMapKeyRef in a pod to use environment variables defined in a ConfigMap?
[A] spec.containers.env
[B] spec.env.valueFrom
[C] spec.containers.valueFrom
[D] spec.containers.env.valueFrom
3. Which statements best describe Kubernetes secrets?
[A] Kubernetes secrets let you store and manage sensitive information, such as passwords, OAuth tokens, and ssh keys.
[B] Storing confidential information in a Secret is safer.
[C] Secrets may be created by Users or the System itself.
[D] It is a best practice to check-in secrets into source code repositories.
4. Inspect the below pod-definition file and answer the following questions.
apiVersion: v1
kind: Pod
metadata:
  name: myapp-pod
  labels:
    app: myapp
spec:
  containers:
   - name: nginx-container
     image: nginx
   - name: agent
     image: agent
How many IP addresses are consumed by the pod when it’s created?
[A] 1
[B] 2
[C] 3
[D] 4
5. Where do you specify image names in a pod definition YAML file to be deployed on Kubernetes?
[A] containers.image
[B] spec.containers.image
[C] template.containers.image
[D] kind.containers.image
6. How do you inject configMap into a Pod in Kubernetes?
[A] Using envFrom and configMapRef
[B] Using env and configMapRef
[C] Using envFrom and configMap
[D] Using env and configMap
7. Refer to the below specification and identify which of the statements are true?
ports:
      - containerPort: 80
      - name: logger
        image: log-agent:1.2
      - name: monitor
        image: monitor-agent:1.0
[A] This is an invalid configuration because the selector matchLabel nginx does not match the label web set on the deployment
[B] This is an invalid configuration because there are more than 1 containers configured in the template
[C] This is an invalid configuration because the selector field must come under the template section and not directly under spec
[D] This is an invalid configuration because the API version is not set correctly
[E] This is a valid configuration
8. Which of the following are valid service types in Kubernetes?
[A] NodePort
[B] ClusterIP
[C] LoadBalancer
[D] ExternalName
[E] ElasticLoadBalancer
9. What are the 4 top-level fields a Kubernetes definition file for Pod contains?
[A] apiVersion
[B] templates
[C] metadata
[D] labels
[E] kind
[F] spec
[G] namespaces
[H] containers
10. Which of the below statements are correct?
apiVersion: v1
kind: Service
metadata:
  name: web-service
  labels:
    obj: web-service
    app: web
spec:
  selector:
    app: web
  type: NodePort
  ports:
    - protocol: TCP
      port: 80
      targetPort: 9376
      nodePort: 39376
[A] Traffic to port 39376 on the node hosting the Pod in the cluster is routed to port 9376 on a Pod with the label app web on the same node
[B] Traffic to port 39376 on all nodes in the cluster is routed to port 9376 on a random Pod with the label app web
[C] Traffic to port 80 on the service is routed to port 9376 on a random Pod with the label app web
[D] Traffic to port 80 on the node is routed to port 9376 on the service
11. What is the default range of ports that Kubernetes uses for NodePort if one is not specified?
[A] 32767-64000
[B] 30000-32767
[C] 32000-32767
[D] 80-8080
12. Which among the following statements are true without any change made to the default behavior of network policies in the namespace?
[A] As soon as a network policy is associated with a Pod, traffic between all Pods in the namespace is denied
[B] As soon as a network policy is associated with a Pod, all ingress and egress traffic to that Pod is denied except allowed by the network policy
[C] As soon as a network policy is associated with a Pod, all ingress and egress traffic to that Pod are allowed except for the ones blocked by the network policy
[D] A group of teams that share a specific set of permissions
13. What is the command to delete the persistent volumes?
[A] kubectl delete pv PV-NAME
[B] kubectl del pv PV-NAME
[C] kubectl rm pv PV-NAME
[D] kubectl erase pv PV-NAME
14. What command would you use to create a Deployment? Select the correct answer.
[A] kubectl get deployments
[B] kubectl get nodes
[C] kubectl create
[D] kubectl run
15. Regarding the following YAML, What should we do to correct the syntax errors?
apiVersion: v1/apps
  kind: Pods
  metadata:
    name: apache
     labels:
      app: myapp
  spec:
   containers:
   - name: apache
     image: httpd
[A] We need to use apiVersion as v1 but not v1/apps
[B] kind should be Pod but not Pods
[C] containers should be container
[D] labels keyword should be in line with name under metadata
16. Which statement best describes the Worker Node component of Kubernetes?
[A] kubelet and container runtime is the worker node components
[B] kube-proxy is one of the worker node component
[C] kube-scheduler is one of the worker node component
By properly following this study guide till the end, you have prepared yourself to handle all Kubernetes-related tasks for working on Docker – and are a step closer to passing the DCA certification test.
On KodeKloud, you also get a Docker Learning Path.
.webp)