Certified Kubernetes Administrator Exam Series (Part-6): Security
In the previous blog of this 10-part series, we discussed Cluster Maintenance. This blog covers three parts: Introduction to Kubernetes Security, Authentication, and Authorization.
Here are the eight other blogs in the series:
- Certified Kubernetes Administrator Exam Series (Part-1): Core Concepts
- Certified Kubernetes Administrator Exam Series (Part-2): Scheduling
- Certified Kubernetes Administrator Exam Series (Part-3): Logging & Monitoring
- Certified Kubernetes Administrator Exam Series (Part-4): Application Lifecycle Management
- Certified Kubernetes Administrator Exam Series (Part-7): Storage
- Certified Kubernetes Administrator Exam Series (Part-8): Networking
- Certified Kubernetes Administrator Exam Series (Part-9): Troubleshooting
- Certified Kubernetes Administrator Exam Series (Part-10): Practice Topics
Introduction
Security is one of the most complex aspects of a Kubernetes application’s lifecycle since clusters are highly distributed and dynamic. Kubernetes Security practices and processes are typically founded on the 4 C’s guiding cloud-native security:
- Code Security
- Container Security
- Cluster Security
- Cloud Security
These levels of security are enforced differently for the different phases of the application’s lifecycle. This blog explores the key areas of Kubernetes security, including:
- Primitives
- Cluster access
- Authentication
- Certificates
- Transport Level Security (TLS) and many others.
Welcome to KodeKloud!
We are the #1 DevOps courses provider. Register today to gain access to the richest collection of DevOps courses and labs and try sample lessons of all our courses.
No credit card required!
The first part introduces Kubernetes primitives and terms to be used throughout this course. The second and third parts explore how to handle cluster access using authentication and authorization in deeper detail.
Try the Kubernetes Services Lab for free
Kubernetes Security Primitives
This section introduces Kubernetes security primitives from a high level before they are explored in detail.
Access to all hosts running in a cluster should be secured since the entire application is affected if one host is compromised. Security practices used to secure the host machine include:
- Restricted root access
- Enabling/disabling password-based authentication
- Enforcing SSH key authentication, among others.
The Kubernetes platform entirely relies on the API for communication, so the foundation of security involves limiting who can access the cluster through the kube-apiserver and what tasks they can perform. All communication through the Kubernetes API is encrypted with TLS by default. Most Kubernetes deployment options allow for the creation and distribution of all the necessary TLS certificates.
Authentication mechanisms determine which users can access a Kubernetes application through the API. Kubernetes supports different authentication strategies matching different cluster sizes and access patterns. These include: Username-password combinations, Username-token combinations, Certificates, and Service accounts, among others.
Kubernetes users are categorized into two:
- Normal users– these are managed by an active directory or external independent service. These users are authenticated using standard TLS certificates.
- Service Accounts– these are Kubernetes resources meant to be used by in-cluster objects to authenticate to the Kubernetes API. Service Accounts are created and managed by the Kubernetes API server.
Authorization describes the roles, responsibilities, and restrictions for users with access to cluster resources. Kubernetes comes with integrated authorization components to check every API call. The Kubernetes API server evaluates all the properties of a call against policies to determine whether the call passes the authorization checks or not. By default, Kubernetes enables Role-Based Access Control (RBAC) for cluster authorization. Other authorization modes supported in Kubernetes include:
- Attribute-Based Access Control (ABAC)
- WebHook Mode
Besides securing communication through the API, cluster security is also enforced by controlling access to the Kubelet service for worker nodes. This is because the Kubelet exposes an HTTP endpoint allowing unauthenticated API access.
Security controls can also be enforced for the workload or user’s capabilities. Some of these controls include:
- Limiting resource consumption using quotas and ranges
- Controlling container privileges
- Restricting network access
- Limiting which nodes a pod will attach to using the PodNodeSelector spec
Other common measures that can be taken to protect a Kubernetes cluster from compromise include:
- Restricting access to the ETCD cluster
- Utilizing audit logging capabilities
- Frequently rotating user and infrastructure credentials
- Encrypting secrets at REST
When building Kubernetes clusters to run an application, it is important to create a system that can be trusted and relied upon by users. Kubernetes applications often host three types of users:
- Privileged users- These are administrators and developers who have explicit rights to manage, develop, and update the application.
- End-users- The intended users of the application. These users have varied roles and access rights depending on policies set by administrators.
- Non-human users- These are machines and applications that connect with the application through the API and are managed using Service Accounts.
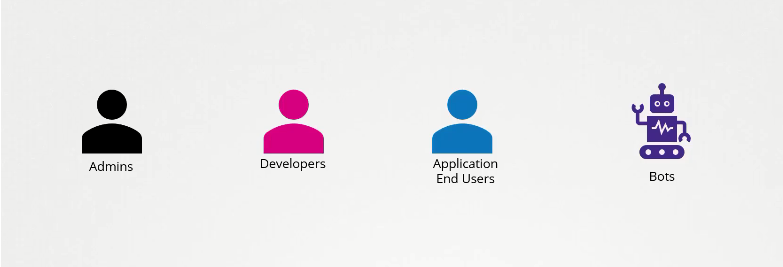
Privileged and End-Users are collectively known as Human Users, and their user access is not managed internally in Kubernetes. Their credentials are typically provisioned using external authentication services or active directories.
Kubernetes manages machines, applications, and other non-human users interacting with the API Server using Service Accounts.
Kubernetes also enables multiple authentication strategies and plugins to authenticate HTTP requests. Authentication strategies include:
- Client Certificates
- Bearer Tokens
- Authenticating Proxies
- HTTP Basic Auth
These plugins pass API access requests through the server and associate the request’s key attributes with access rights. These attributes include:
Username -a string bearing the user’s identityUID – a more consistent and unique identity for each userGroups – strings that identify logical collections of users with similar access rightsExtra Fields – these strings contain any extra details about users that may be useful for authentication purposes
For non-human users, the kubectl tool can be used in creating and managing service accounts through the commands:
kubectl create serviceaccount sa1To check the available service accounts, run the command:
kubectl get serviceaccountIntroduction to TLS
Transport Layer Security is an encryption protocol that is designed to facilitate secure communications over computer networks. Client-server applications rely on encryption ciphers and handshake procedures to negotiate a successful connection using TLS.
TLS Basics
TLS is the standard protocol that guarantees data security and privacy for network connections. This section describes various concepts of TLS and explores commonly used terms.
Kubernetes applications are secured by encrypting a Transport Layer Security (TLS) private key and CA-signed certificate. Kubernetes allows for the provisioning of CA-signed certificates that can be used to establish trust for workloads through the certificates.k8s.io API.
Why Use TLS with Kubernetes
Below are some of the reasons why TLS is used to secure traffic coming into Kubernetes clusters:
- It allows for secure connections through SSL encryption.
- TLS works with most browsers and operating systems, allowing for interoperability.
- TLS allows for algorithm flexibility as it provides extra mechanisms to ensure a secure session.
- TLS is easily deployed on any system.
- TLS is implemented beneath the application layer, which means its operations are hidden from the client, making it simple to use.
This class explores the concepts of TLS and how it can be used to secure access to cluster resources in Kubernetes. Concepts explored in this class include:
- What TLS certificates are
- Certificates in Kubernetes
- Generating certificates
- Viewing certificates
- Troubleshooting TLS certificate-related issues
TLS/SSL Encryption Types
Below are the two TLS/SSL encryption types:
- Symmetric Encryption: This is a simple type of encryption that relies on a single key to cipher and decipher data. This key is shared with the intended users of a service.
- Asymmetric Encryption: This method relies on a private-public pair of keys. The public key is accessible to anyone and is used to encrypt the data before it is transmitted. Users holding a private key can decrypt this message.
Secure TLS/SSL is founded on private-public key pairs and certificates. When communicating via TLS, the client and server handshake on a session key and encryption cipher used to secure communication. The server has a digital certificate verifying that it owns a public key, and clients can connect using permissions made by a private key corresponding to the certified public key.
Some of the most common terms encountered in TLS include:
- Encryption: Method of scrambling/hiding a message so that only authorized users can view it.
- Decryption: The process of converting an encrypted message into what it was originally.
- Key: The string of characters used to alter data when being encrypted.
- Certificate: An electronic document that contains a server’s public key, the server’s identity, and other related information. Details included in a certificate include:
- The server’s domain name
- The Identity of the Certificate’s Owner- this could be a device, person, or organization.
- The Certificate Authority (CA) issuing the certificate.
- The CA’s digital signature
- The date of issue
- Associated subdomains
- The certificate’s expiration date
- The public key
- Certificate Authority (CA): A trusted third party responsible for generating, signing, and issuing TLS/SSL certificates.
Securing a Server with the Public-Private Key Pair
This section explores how to configure SSH public-private key authentication between a client and a server.
An SSH server allows multiple methods of authenticating clients, the most basic being password authentication, which is simple but not secure enough to resist repeated, persistent attacks. Authentication using SSH key pairs allows for higher cryptographic strength, improving data security while making the sign-in experience seamless for users.
The process for authenticating using public-private key-pairs involves the following:
- Generating the public-private key pair
- Sending the public key to the server in a certificate while having the client retain the private key- the server will always make this key available to users accessing the application.
- Generating a Certificate Signing Request (CSR)
- The CA validates and signs the certificate
- The end-user (browser) generates a symmetric key using the public key and sends it to the server
- The server uses the symmetric key to decrypt and retrieve login information
- The user can then log into the application using their login credentials
This entire process happens under the hood, so the end-user does not have to worry about obtaining and configuring certificates. Some of the most common commands used in this blog include:
Quick Tip: Public key certificates will have a *.crt or *.pem extension while Private keys will always be suffixed by a *.key or *-key.pem extension.
TLS in Kubernetes
This section explores how cluster components are secured using TLS certificates.
Kubernetes relies on communication between master and worker nodes to run secure applications. To secure a Kubernetes application using TLS, one must create a Kubernetes Secret object containing a digital certificate and a TLS private key.
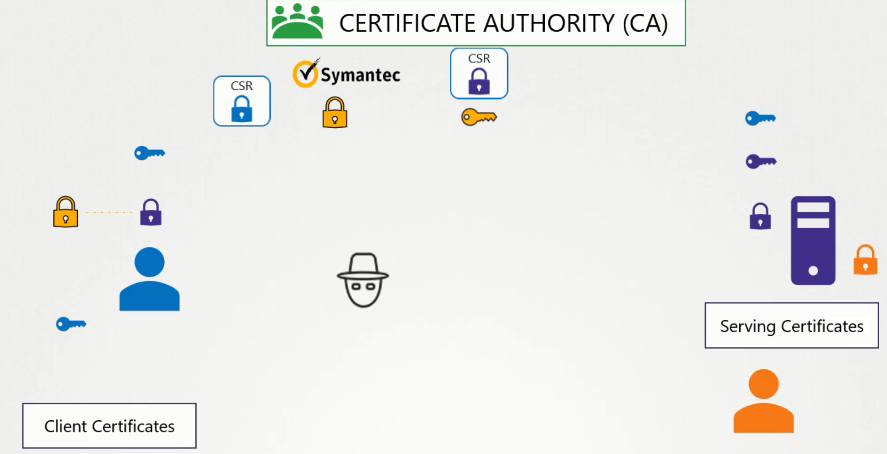
There are three types of certificates used in Kubernetes TLS:
- Server certificates - These offer proof of the Kube-API server’s identity to clients accessing an application.
- Client Certificates - validate the client’s identity, allowing for authentication into the server.
- Root certificates - These are key pairs and certificates created by the Certificate authorities to sign server certificates.
The Kubernetes API Server uses Certificate authorities specified in a file to validate client certificates presented by the client. The file should be passed to the Kubernetes API server as a --client-ca-file=<CERTFILE> specification.
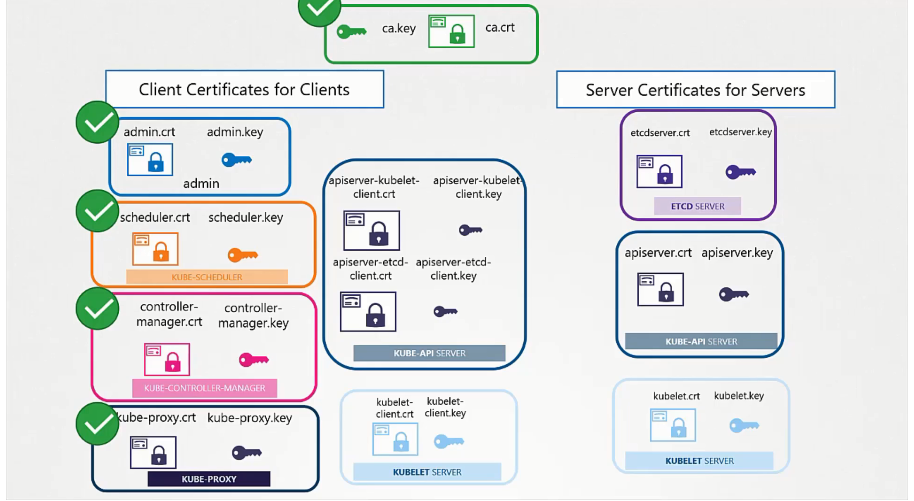
The Kubernetes environment contains different machines and services communicating with each other to run an application. Each transaction requires a unique configuration of client and server certificates to perform server and user authentication. For instance, the kube-apiserver exposes an HTTPS service through which users and other Kubernetes components can manage the cluster. kube-apiserver needs to generate a certificate-key pair apiserver.crt and apiserver.key to establish its identity to cluster users.
Other components may need to access the cluster’s ETCD server to access data about the cluster and all running components. The ETCD server, therefore, uses the certificate-key server.crt and server.key pair to authenticate itself to these users.
When a master node is communicating with worker nodes, it connects through an HTTPS API endpoint exposed by the Kubelet service. The Kubelet service authenticates itself to its users through the kubelet.crt and kubelet.key certificate-key pair. This is true for other cluster services such as the kube-controller-manager and kube-scheduler services.
Each client looking to access any of these services authenticates themselves using the certificate-key pair that verifies their identity. This makes for a large number of certificates: Client certificates mostly for cluster components that access the kube-apiserver and server certificates for services that need to authenticate to their users.
Kubernetes requires at least one Certificate Authority (CA) per cluster to sign server and client certificates. A cluster can also have more than one CA. For instance, one CA can be used to verify ETCD certificates while the other CA checks certificates for other cluster components.
A cluster with one CA is assigned a key pair ca.crt and ca.key to sign all certificates.
Certificate Creation
Any application whose backend runs in a Kubernetes cluster now requires secured access (HTTPS). HTTPS can be obtained by accessing self-signed certificates for Kubernetes. Kubernetes supports multiple options for creating and managing self-signed certificates, such as Cert-manager, Easy-RSA, CFSSL, and OpenSSL methods. Each method follows a specific workflow to ensure that the certificates used are valid.
The Cert-manager
Cert-Manager is the certificate controller native to Kubernetes. This makes it the most popular way of using self-signed certificates. The procedure for setting up certificate creation using the cert manager involves the following:
- Installing the Cert-manager. Create a namespace for the Cert-Manager installation. Install the add-on using the official YAML file and the
kubectl applycommand. - Creating a Certificate Issuer. Create a namespace for certificate creation and define a certificate issuer.
- Generate and validate certificates. Generate the self-signed certificates and check the certificate’s validity.
CFSSL
CFSSL is a popular CLI tool and HTTPS server used to bundle, sign, and verify TLS certificates. Created by CloudFlare, CFSSL acts as a self-signed certificate generator and Certificate Authority (CA). The procedure for creating and signing certificates is as follows:
- Install the required Go language packages. Download CFSSL using Go syntax.
- Create a CA, save its details in a JSON file, and Generate root certificates using the CFSSL CLI tool.
- Create the certificate’s configuration file.
- Create an intermediate CA.
- Sign the Certificate.
- Generate host certificates for server, client, and peer profiles.
Easy-RSA
Easy RSA is another popular utility for managing X.509 Public Key Infrastructure (PKI). Easy-RSA features a unified backend, multiple PKI management, interactive & automated operation modes, and flexible configuration, among others. The procedure for generating and managing certificates using Easy-RSA is as follows:
- Download Curlb, download Easy-Packages, unpack the archive, and set up Easy-RSA.
- Create a self-signed CA.
- Generate the Server Certificate and Key.
OpenSSL
OpenSSL implements SSL and TLS protocols, simplifying the generation of private keys and self-signed certificates. OpenSSL offers a global cryptographic library that allows users to perform various TLS-related tasks, including:
- Generating Private Keys
- Creating Certificate Signing Requests (CSRs)
- Installing SSL certificates
This class focuses on certificate generation and management using OpenSSL.
The procedure for creating self-signed certificates using OpenSSL is as follows:
- The CA private key is generated using the command:
openssl genrsa -out ca.key 2048This creates the key file: ca.key.
2. A certificate-signing request is then generated using the command:
openssl req -new -key ca.key -subj "/CN=KUBERNETES-CA" -out ca.csrThis generates a certificate signing request named: ca.csr.
3. The certificate is then signed using the command:
openssl x509 -req -in ca.csr -signkey ca.key -out ca.crtThe CA self-signs this certificate using their own private key generated in step 1 earlier. This CA pair will be used to validate certificates generated in the cluster going forward. The CA now has a Root Certificate file.
To generate a certificate for the client, the following procedure is followed:
1. The private key is generated using the command:
openssl genrsa -out admin.key 20482. The CSR is then generated as follows:
openssl req -new -key admin.key -subj "/CN=kube-admin" -out admin.csrQuick tip: The Client Name CN=kube-admin could be any string, but it is important to follow a conventional pattern for easier management.
3. A signed certificate is then generated using the command:
openssl req -new -key admin.key -subj "/CN=kube-admin" -out admin.csrNote: In this case, the certificate is signed using the ca.crt and ca.key key pair, making it valid within the cluster. The signed certificate is output to the admin.crt file.
This user account should be identified as an administrator account and not a regular user. The ‘Group’ detail should be added to the certificate to enable this. There is a group, SYSTEM: MASTERS, in Kubernetes for users with administrative privileges. This is added to the Certificate Signing Request using this command:
openssl req -new -key admin.key -subj "/CN=kube-admin /O= system:masters" -out admin.csrOnce a signed certificate is returned for this user, they can access the cluster with administrative privileges. This procedure is followed for all client components looking to access the Kubernetes cluster.
For Kubernetes cluster components, the certificates should be prefixed with the word SYSTEM:
These certificates can then be used in place of usernames and passwords to access the cluster through a REST API call:
curl https://kube-apiserver:6443/api/v1/pods --key admin.key --cert admin.crt --cacert ca.crtAlternatively, the certificates can be specified in the service’s YAML configuration file:
apiVersion: v1
Clusters:
-  cluster:
     certificate-authority: ca.crt
     server: https://kube-apiserver:6443
   name: kubernetes
kind: Config
users:
-  name: kubernetes-admin
   user:
     client-certificates: admin.crt
     client-key: admin.key
For Kubernetes Cluster components to communicate securely, they all need a copy of the CA root cert. Let’s explore certificate creation for various cluster components.
The ETCD Server
Here are the guidelines you should be aware of when creating a Server Certificate for the ETCD Server:
- The Certificate and Key are generated as shown in the previous procedures.
- The certificate should be named ETCD-SERVER.
- The ETCD server can be deployed as a cluster across multiple servers in a High-Availability environment. Additional peer certificates are generated to secure communication between the servers running ETCD in a cluster.
This is done by specifying the peers in the ETCD service as follows:
--peer-key-file=/etc/kubernetes/pki/etcd/peer.key
--peer-cert-file=/path-to-certs/etcdpeer1.crt
There are other methods available for specifying peer certificates.
The ETCD service also requires root certificates to ensure that server certificates are valid. These are specified in the service as:
--key-file=/path-to-certs/etcdserver.key
--cert-file=/path-to-certs/etcdserver.crt
--peer-client-cert-auth=true
--peer-trusted-ca-file=/etc/kubernetes/pki/etcd/ca.crt
--trusted-ca-file=/etc/kubernetes/pki/etcd/ca.crt
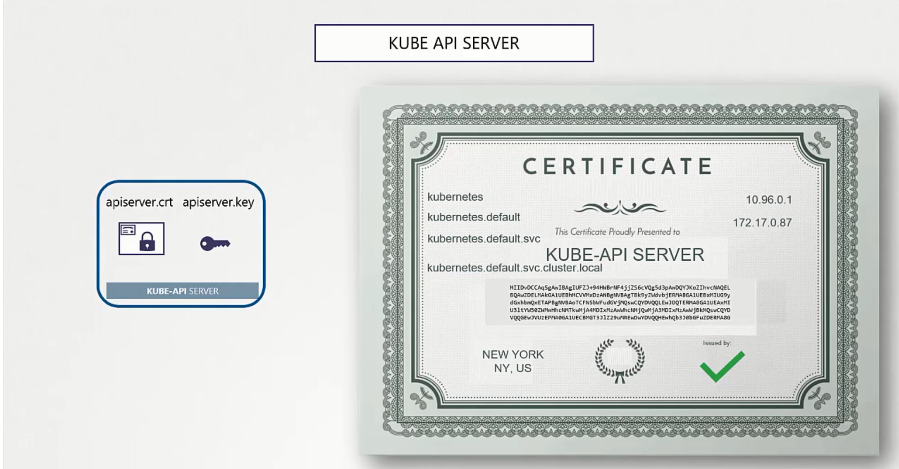
The KUBE API SERVER
The server certificates are generated following the procedures laid out in the previous section. The certificate is named KUBE-APISERVER.
The kube-apiserver can be referred to by multiple names, and each one should be stated in the certificate. This is achieved by creating an openssl configuration file (openssl.cnf) and specifying all the alternate names in the alt-names section:
[req]
req_extensions=v3_req
[v3_req]
basicConstraints= CA:FALSE
keyUsage=nonRepudiation,
subjectAltName=@alt_names
[alt_names]
DNS.1= kubernetes
DNS.2= kubernetes.default
DNS.3=kubernetes.default.svc
DNS.4=kubernetes.default.svc.cluster.local
IP.1=10.96.0.1
IP.2=172.17.0.87
The file is then passed when generating the CSR, as shown:
openssl req -new -key apiserver.key -subj "/CN=kube-apiserver" -out apiserver.csr -config openssl.cnfA signed certificate is then generated using the ca.crt and ca.key pair, creating the file apiserver.crt:
openssl x509 -req -in apiserver.csr -CA ca.crt -CAkey ca.key -out apiserver.crtThese certificates are then passed into the API Server’s executable or configuration file in the following sequence:
The CA root certificate for verifying and signing all other certificates:
--client-ca-file=/var/lib/kubernetes/ca.pem
The API’s server certificates:
--tls-cert-file=/var/lib/kubernetes/apiserver.crt
--tls-private-key-file=/var/lib/kubernetes/apiserver.key
The CA root certificate to verify ETCD server certs:
--etcd-ca-file=/var/lib/kubernetes/ca.pem
The server certificates the API server uses to authenticate to the ETCD server:
--etcd-certfile=/var/lib/kubernetes/apiserver-etcd-client.crt
--etcd-keyfile=/var/lib/kubernetes/apiserver-etcd-client.key
The CA root certificate to verify the kubelet service:
--kubelet-certificate-authority=/var/lib/kubernetes/ca.pem
The server certificates the API server will use for authenticating to the kubelet service:
--kubelet-client-certificate=/var/lib/kubernetes/ca.pem
--kubelet-client-key=/var/lib/kubernetes/apiserver-etcd-client-key
The Kubelet Service
The kubelet is an HTTP API server running on each worker node and helps in node management by allowing the Kube API Server to communicate with the node. Each node in the cluster requires a unique key certificate pair. These certs will be named after each node, i.e., node01, node02, node03, and so on.
These are specified in the kubelet configuration file for each node, as in:
kind: KubeletConfiguration
apiVersion: kubelet.config.k8s.io/v1beta1
authentication:
  x509:
    clientCAFile: "/var/lib/kubernetes/ca.pem"
authorization:
  Mode: WebHook
clusterDomain: "cluster.local"
clusterDNS:
"10.32.0.10"
podCIDR: "${pod_CIDR}"
resolvConf: "/run/system1/resolve/resolv.conf"
runtimeRequestTimeout: "15m"
tlsCertFile: "/var/lib/kubelet/kubelet-node01.crt"
tlsPrivateKeyFile: "/var/lib/kubelet/kubelet-node01.key"
There are client certificates that the kubelet service uses to access the API server and uses them for authentication. These should be created for each node, named [system:node:node-name], and then added to the group SYSTEM: NODES.
Viewing Certificate Details
The solution used to create and manage certificates in Kubernetes clusters depends on the method used to set up the clusters. If the cluster is created from scratch, certificates are manually generated and managed, as performed in the previous lecture.
If the cluster is set up using an automatic tool, such as kubeadm, then all certificate management processes happen under the hood. If custom certificates aren’t provided, the tool will generate all the certificates needed to keep the cluster running.
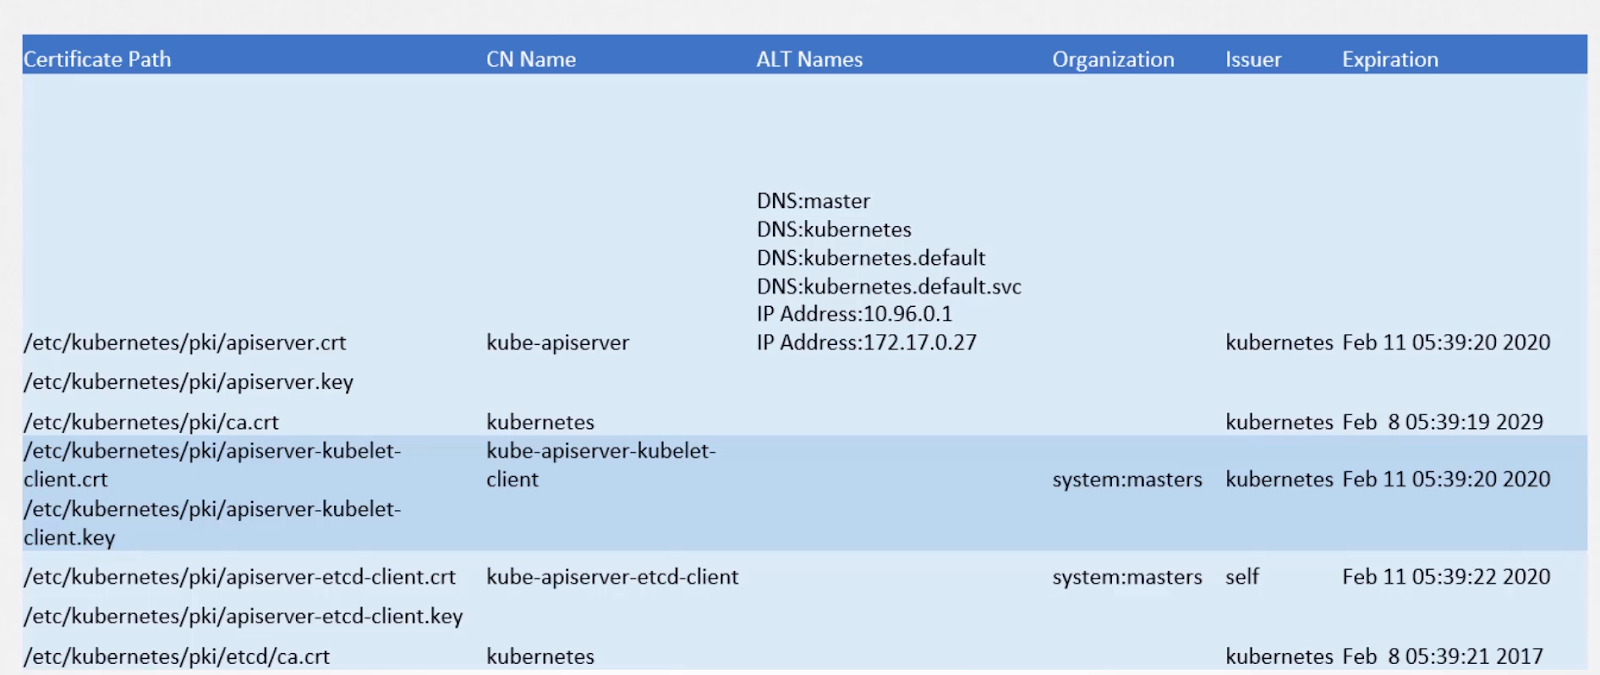
If a cluster is set up using kubeadm, the first step in performing a health check for the cluster involves identifying all certificates created. This is performed by inspecting the kube-apiserver YAML configuration file using the command:
cat /etc/kubernetes/manifests/kube-apiserver.yamlThe service includes details of all certificate files used in the cluster. Each certificate is then inspected against a certificate health checklist for more details. This is performed using the command:
openssl x509 -in /etc/kubernetes/pki/apiserver.crt -text -nooutThe list below shows some common certificate characteristics to look out for:
- The Component Name
- Component Type
- Certificate Path
- CN Name
- ALT Names
- Organization
- Issuer
- File Type
- The Certificate’s Purpose
- Certificate Description
This process is followed for every individual certificate in the cluster. Kubernetes provides all requirements for a certificate health checklist on its documentation page. A sample checklist for a kubeadm bootstrapped cluster could look similar to:
Inspecting event logs can also help troubleshoot issues related to certificates. If the cluster is made from scratch, service logs can be accessed through the OS functionality using the command:
journalctl -u etcd.service -lIf the cluster was set up using kubeadm, then logs are accessed individually for each pod. For instance, the master logs can be accessed using the command:
kubectl -n kube-system logs etcd-masterIf the Kubernetes control plane elements become unavailable, tools like kubectl may fail to function. In this case, Docker can be used to fetch event logs.
First, all containers are listed using the command:
docker ps -aOnce the container names are listed, logs for each container can be accessed through a command that takes the form:
docker logs container-name
Exam Preparation Course
Our CKA Exam Preparation course explains all the Kubernetes concepts included in the certification’s curriculum. After each topic, you get interactive quizzes to help you internalize the concepts learned. At the end of the course, we have mock exams that will help familiarize you with the exam format, time management, and question types.
Certificates API
For large clusters, manually handling and managing all certificates and private keys for users is a complex task. As the number of users in a cluster grows, the need for an automatic solution to generate CSRs and sign certificates arises. Kubernetes includes an in-built solution to help with this: the Certificates API.
The Kubernetes certificates API provides an interface that automates the provisioning of TLS credentials by communicating with the CA to obtain signed certificates. The CA signer receives a user’s Certificate Signing Request through the Certificates API and may approve or deny the request before signing it.
This API serves various functions:
- Obtaining client certificates for authentication with the Kube-API Server
- Serving the Kube-API Server certificates for endpoints that are approved to communicate securely with the server
- Obtaining Certificates from non-custom CAs
With the certificates API, the Certificate Signing Request can be sent directly to Kubernetes through an API call. This procedure follows four simple steps:
- The administrator creates an object known as the CertificateSigningRequest.
- The users send signing requests.
- The new requests are reviewed by an administrator in the cluster.
- The requests are approved by the administrators.
The certificate-key pair ca.crt and ca.key used to help sign certificates for the Kubernetes environment make up the root certificates. Anyone with access to these keys can easily access the CA, create as many users as they need to, and manage privileges. Thus, these files need to be secured and stored in a safe environment. The secure storage on which we host the root certificate key-pair is known as the CA Server.
Any user who needs to have their certificate signed can only do so by logging in to the CA server. Since the current setup has the root certificates stored on the master node, this master node acts as a CA server. The kubeadm tool also creates the root certificate key-pair and stores it in the master node.
Assume a new user Jane wants to join the cluster:
They create their private key jane.key:
openssl genrsa -out jane.key 2048They then send a CSR, jane.csr to the admin:
openssl req -new -key jane.key -subj "/CN=jane" -out jane.csrThe admin then takes the key and creates an object CertificateSigningRequest in a YAML file with values similar to those shown below:
apiVersion: certificates.k8s.io/v1beta1
kind: CertificateSigningRequest
metadata:
  name: jane
spec:
  groups:
  -  system:authenticated
  usages:
  -  digital signature
  -  key encipherment
  -  server auth
  request:
LS0tLS1CRUdJTiBDRVJUSUZJQ0FURSBSRVFVRVNULS0tLS0KTUlJQ1ZEQ0NBVHdDQVFBd0R6RU5NQXNHQTFVRUF3d0VhbUZ1WlRDQ0FTSXdEUVlKS29aSWh2Y05BUUVCQlFBRApnZ0VQQURDQ0FRb0NnZ0VCQUxTd3RvYXduSEExNmxwN0hrNGxaVGo0MndWREZwQ3hmV3FrL0kzM0N6bmRzcTg1CmRVYVZNTDEwMDRBOXl2Y1oyWmtVcGY5eDZ4WmJiYzQyUVVFZ0ZvL0ljTTJramQ0ckNMbTEyYk1FZlcwMDN6VEoKMEVxeDVuK01MRGhCbXlMSlViMTFDVWV0REFOSXFyOVNMZU9nalF0UzBXeW9mamozZk4raEtLQjRzZ3F3UzRDcgowVnQ5QVZrZkxENWx2UkdUNi9FZGxqQWZLZmxocFVzN2c1VFQ4S1V0L2J3RHpESGo4d1J3VEtnS2R2WG45MHlmCjA4NUpvcWczQVp2dmdmNFBTRkFORklKVnhYQWc2b0ZINHErV1M3Z2VYUi9sYU90Um9HU2cyS1NmTTlnUE1ydy8KNWd1Q2pEeGIrQ2xoQm9WZVN3Mzgrb2RLc3doYzRPYllKL0RxYVNzQ0F3RUFBYUFBTUEwR0NTcUdTSWIzRFFFQgpDd1VBQTRJQkFRQStJdkhoK0plejBOY2FHYkZleEI0cnBFSEJCTTljZ1NKZ2NiS00rbVpBWEllQSs0bkRpSHk4CjdWTURlWnNxWkZUS01GZ1MzdWdYNEtwWURsZ1hONmYwcnQ0SE1NM1NvaU0vYVpEaGNHYWZkakp1SG5kME5NZzEKamFVZHhMdno3Z3B1L1BsTVV1RUlnRElDblF0Z2pIRDAyUG5NR0NnMUQ1eWYzdmpaTmVQVnF3NVZDbEpZbUhRUwp5eFRuZk1ncmUxbmdvSUl0ek9pM0p1Y1c5c0tTa1Q1UWU3MEVLa0NCR1VTWG92eCszRFlsRUpRWWZ0TXVoY05wCkdSUXZhL0tKdDRZWVliT0wzSk1MT0VtN2RkeVpFYzZhMjBvUWFKVlhhOWJDSWc3UVBPOGVrandvbWRveHVFMngKbXVjTVN2K1QrTEt0NTNyZThnbXpNV1l3QkFpWWRuR2EKLS0tLS1FTkQgQ0VSVElGSUNBVEUgUkVRVUVTVC0tLS0tCg==
Note: The request should be the CSR encoded in base64 format. This is achieved by using a command that takes the form:
cat jane.csr | base64 | tr -d '\n'The certificate signing requests can then be accessed by cluster administrators using the command:
kubectl get csrThe output of this command shows all certificate signing requests, including jane.csr that was created earlier.
The generated certificate can then be extracted and shared with the user. This is performed by viewing the certificate details in the request YAML file:
kubectl get csr jane -o yamlTo approve the CSR Request:
kubectl certificate approve janeThe certificate details are listed under the certificates section of the output. The certificate is, however, base64 encoded. The value can be decoded by running the command:
echo "cert_name" | base64 --decodeThis command outputs the certificate in plain-text format, and it can be shared with the end-user for access to the cluster.
KubeConfig
It is possible to use a configuration file to organize user credentials and authentication options. If authentication information is saved in a configuration file, the kubectl tool will scan the file for data needed to connect with the Kubernetes API server. By default, the kubectl tool checks for configuration files in the default directory HOME/.kube. Other configuration files can be specified by setting the --kubeconfig flag or KUBECONFIG environment variable.
Administrators can create different clusters for different environments, organizations, or cloud providers, among others. Clusters could include Development, Production, etc.
They are merely an indicator of the clusters a user is allowed to access so that administrators don’t have to specify server and user addresses when managing access.
Administrators use configuration files to store and arrange information on users, clusters, namespaces, and authentication mechanisms. Configuration files can be created and edited as YAML blobs or directly on the CLI using kubectl.
The command for creating a configuration file with authentication information will be similar to:
kubectl config set-credentials NAME [--client-certificate=path/to/certfile] [--client-key=path/to/keyfile] [--token=bearer_token] [--username=basic_user] [--password=basic_password]The YAML file for config could be similar to:
apiVersion: v1
kind: Config
clusters:
- name: production
  cluster:
    certificate-authority: ca.crt
    server: https://172.17.0.51:6443
contexts:
- name: admin@production
  context:
    cluster: production
    user: admin
users:
- name: admin
  user:
    client-certificate: admin.crt
    client-key: admin.key
The file is then listed as an option in the get pods command:
kubectl get pods --kubeconfig configBy default, the tool looks for a file named config in the directory HOME/.kube/config. This is why there’s no need to specify the path’s file in the get pods command.
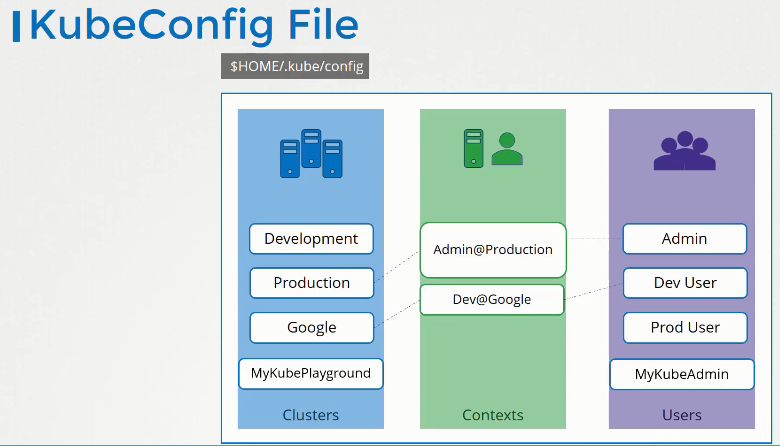
The KubeConfig file follows a specific format. Its main body is divided into three sections:
- Clusters
- Contexts
- Users.
‘Users’ are the accounts with access to the clusters. Users include Developers, Administrators, End-Users, Bots, etc.
Contexts define clusters associated with each user account, i.e., they indicate which users have access to which clusters and their permissions. These could include Admin @ Production, Dev @ Google, etc. Contexts do not create or manage user accounts and privileges.
In a multi-cluster environment, the default cluster can be specified in the KubeConfig YAML file as current-context:
apiVersion: v1
kind: Config
current-context: dev-user@google
clusters:
- name: production
  cluster:
    certificate-authority: ca.crt
    server: https://172.17.0.51:6443
contexts:
- name: admin@production
  context:
    cluster: production
    user: admin
users:
- name: admin
  user:
    client-certificate: admin.crt
    client-key: admin.key
Several commands exist to view and manage config files. These include:
|
Task |
Command |
|
Viewing the configuration files currently in use |
$ kubectl config view |
|
Viewing a specific config file |
$ kubectl config view --kubeconfig=<config-file-name> view |
|
Setting a Context |
$ kubectl config view |
|
Accessing Kubeconfig command options and help |
$ kubectl config -h |
It is possible to switch contexts in a particular namespace. The contexts section in the KubeConfig file can take in an extra option namespace so they can work in a specific namespace, as shown:
contexts:
- name: admin@production
  context:
    cluster: production
    user: admin
    namespace: finance
It is also possible to provide certificate contents instead of a path to a file in the KubeConfig YAML file. This is performed by first encoding the contents of the file in base64 format.
The encoded output is then copied onto a certificate-authority-data section under clusters in the YAML file, as shown:
clusters:
- name: production
  cluster:
    certificate-authority: ca.crt
    server: https://172.17.0.51:6443
    certificate-authority-data: nhD9nMO6P0bGZkDQo9o7K3I6A8Be2o8kDJKGlPW36cOyJBctQI8okiLFQvtV0OCoctBsOHX8ApJFp07t4duSjgLpWllSEz8oUjgD2DX3ZIoMtwFbfW26SwSfjt4tLHuYrWu6b7x0hWQI30zEzYW8iU
eWg5nklEqf3ouRZU1EVw2ktKpx7DVMK3ZdviwuSAq8K8AJU6YON8Omiz4YjIC3ouHo9V6w1juLHLuvYRNa0HmsbYW4eAqdJSHi7d3hdQMaVc3iBK1rjQ4ryytqB3AXNhiaKAG0Oc7m5W5ZhSJbUSxu
API Groups
The API server is the foundation of the Kubernetes control plane and exposes an HTTP interface that enables communication between cluster components. Most Kubernetes operations are performed through CLI tools such as kubectl and kubeadm, which use the API to access and manipulate Kubernetes resources. At its core, communication between various Kubernetes objects and resources is achieved through REST API calls through the HTTP interface.
API groups were created to keep user interaction with the REST API simple and optimize Kubernetes resource handling. API groups also help develop dynamic clients by exposing various groups and versions that the server supports.
The kube-apiserver can be accessed either via kubectl or directly via a REST API:
curl https://kube-master:6443/versionTo get pods directly:
curl https://kube-master:6443/api/v1/podsThe /version and /api specs in the above commands represent API Groups. These groups make it easier to extend the Kubernetes API. Kubernetes is divided into several such groups based on purpose, and these include:
- /api
- /apis
- /logs
- /version
- /metrics
- /healthz
The /version API group helps administrators view version information. Different API versions show how stable and supported an object is in Kubernetes. There are three levels of stability and support in the Kubernetes API:
- alpha – These versions are the least stable and are used for testing and debugging. The software typically contains bugs and comes with most features disabled by default. Support for bugged features can be dropped at any time. Alpha versions completely lack long-term support.
- beta – This is a well-tested software that comes with safe features enabled by default. While features are not dropped, the implementation details may be changed to suit better workflows.
- stable – These are completely stable and supported versions of Kubernetes with features that will appear in subsequent releases.
Rather than performing versioning at the resource level, it is performed at the API level giving administrators a clear view of system resources and behaviour.
- The /metrics and /healthz API groups are used to monitor the status of cluster components.
- /logs help in the integration of third-party logging solutions.
- The /api and /apis API groups are responsible for cluster functionality.
- The /api is the Core/Legacy Group while /apis represents Named Groups.
All core functionalities are specified in the core group. These include namespaces, pods, ReplicationControllers, Events, Nodes, Bindings, and Persistent Volumes, among others.
Named groups are a lot more organized than core groups and will be utilized to make newer features available. This API includes groups such as /apps, /extensions, /networking.k8s.io, /storage.k8s.io, /authentication, and /certificates. These groups are further divided into Resource Groups such as /deployments, /replicasets, and /statefulsets for /apps and /networkpolicies for /networking.k8s.io.
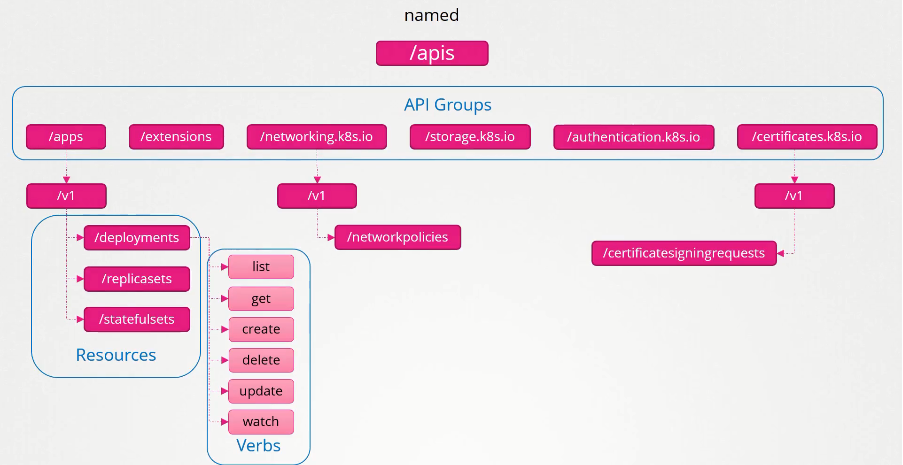
Kubernetes resource operations are categorized by their actions. Most Kubernetes resources respond to the following operations: list, create, get, and delete, among others.
The Kubernetes documentation page includes a list of all actions and group details for resource objects. These can also be viewed within the cluster using the command:
curl http://localhost:6443 -kAll supported resource groups can be accessed within the named API groups using the command:
curl http://localhost:6443/apis -k | grep "name"When accessing from resource groups other than /apps, access to cluster information may be forbidden unless CA certificates are specified in the curl command:
curl http://localhost:6443 -k
      --key admin.key
      --cert admin.crt
      --cacert ca.crt
Alternatively, the administrator could initiate a kubectl proxy client. This client launches a proxy service locally on port 8001 (IP 127.0.0.1:8001) and uses KubeConfig credentials and certificates to access the cluster. The request to view API groups can be forwarded through the proxy as:
curl http://localhost:8001 -kAuthorization
While authentication defines whether a user can access a cluster, authorization defines what the user can do once they access the cluster. Authorization is only performed after successful authentication.
The Kubernetes API uses a set of policies to authorize an access request. Since Kubernetes expects requests to be common to the REST API, cluster authorization works with access control systems that handle various other APIs. By default, the Kubernetes API denies all permissions. The API request’s components have to be allowed by an access policy for access authorization.
An API’s request attributes could include:
- User
- Group
- Extra
- API
- HTTP Request Verb
- Namespace
- And API Group, among others
A cluster can have single or multiple authorization modules. In a single-module cluster, if the authorizer approves or denies a request, the decision is used for access control. In a cluster with multiple modules, each module is checked sequentially. The first authorizer to deny or approve the request determines the fate of user access. If no modules respond to the request, it is denied and returns the HTTP error code 403.
Every authorization module supports various access policies that can authorize requests depending on roles and attributes. An Admin User, for instance, is authorized to perform any cluster operation. This includes viewing, creating, getting & deleting nodes and other cluster resources.
We may have other users accessing the system, such as developers, testers, end-users, and other applications accessing the cluster. These users will have accounts whose access to the cluster is defined by security controls such as Usernames and passwords Passwords, Usernames and tokens, Certificates, etc.). They should not have the same level of access as the Senior Administrator. Developers, for instance, should not have permission to create or delete nodes or manage storage or network configurations.
When a cluster is shared between organizations or teams and is segmented using namespaces, it is important to restrict user access to their specific namespaces.
Authorization helps achieve all these using several mechanisms. These include:
- Node Authorization
- Attribute-Based Authorization
- Role-Based Authorization
- Webhook
Each of these mechanisms is discussed in detail below.
Node Authorization
This is the default authorization mode for Kubernetes, and it grants permission to Kubelets on worker nodes based on the pods running in them. This mode relies on a special authorizer known as the Node Authorizer, which allows the Kubelet service to perform API tasks. Some supported operations include:
- Read Operations- access data on resources such as services, endpoints, nodes, pods, and pod-related secrets, configMaps, PVs & PVCs.
- Write Operations- nodes & node status, pods & pod status, and events.
- Auth-Related Operations- IO access to CSRs for TLS Bootstrapping, creating Token and Subject Access Reviews for authorization checks.

The kubelet service is part of the SYSTEM:NODE group and should have its certificate prefixed with SYSTEM:NODE, e.g., system:node:node01.
Any user whose certificate is prefixed with system:node can be approved by the Node Authorizer and is granted Kubelet-like permissions.
Attribute-Based Authorization Control (ABAC)
In ABAC, access control is achieved by granting users rights using a set of policies, each combining a set of attributes. ABAC authorization is first enabled by specifying --authorization-mode=ABAC in /etc/kubernetes/manifests/kube-apiserver.yaml file.
The access rights and policies are then outlined in a JSON file, using the one JSON per line format. This file is then specified as --authorization-policy-file=SOME_FILENAME on startup.
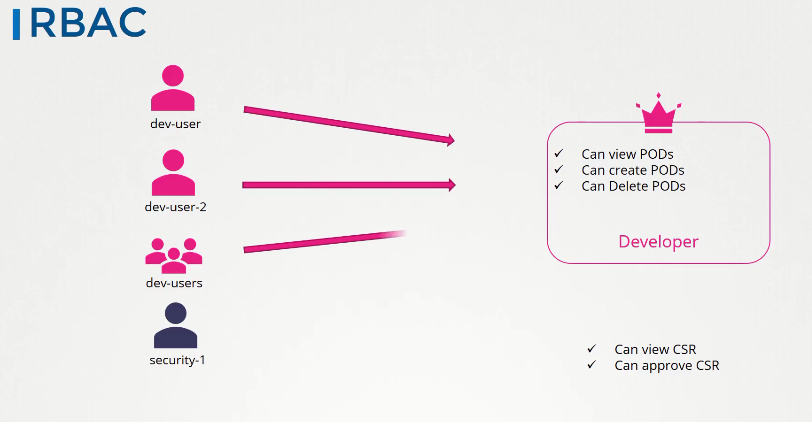
For instance, assume you have a Dev-User that's allowed to:
- View pods
- Create pods
- Delete pods
To associate this user with a set of permissions, a file with their access policies written in JSON format is created, as shown:
{"apiVersion":"abac.authorization.kubernetes.io/v1beta1",
"kind": "Policy", "spec": {"user": "dev-user", "namespace": "*","resource": "pods","apiGroup":"*"}}
The file is then passed into the Kube API Server. The policy for each user/user-group should be defined in this file.
When a request is received, the authorizer determines the attributes. Values not stated are set to their equivalent nil value. The set of attributes is then checked against all policy files for a match. If a line matches any attribute in the request, it is authorized but may or may not be validated later.
Anytime the access policy needs to change, the file has to be edited manually, and then the Kube API Server is restarted. This makes it difficult to manage ABAC controls.
Role-Based Access Controls (RBAC)
RBAC provides a rather systematic approach to authorization in Kubernetes clusters by defining user roles. A group of users is then associated with this role, allowing for the dynamic configuration of policies through the Kubernetes API.
In RBAC, rather than directly associating a user or group with permissions, a Role is created, including the set of permissions applicable to the user group. For instance, the ‘Developer’ role can be created with permission to View, Create, and Delete pods. All Dev-Users can then be bound to this role.
The RBAC API group declares various objects that impose restrictions on access to cluster resources. These are:
- Role– This object encompasses a set of access permissions within a namespace.
- RoleBinding– The object that grants permissions outlined in a Role to a user or set of users.
- ClusterRole– This resource is not bound within a namespace and applies to cluster-wide resources.
- ClusterRoleBinding– Binds a ClusterRole to every namespace in a cluster.
When the access policy changes, the role is modified, and this update applies to all users bound to the role. RBAC, therefore, provides a more standardized approach to user access in the cluster.
For RBAC to be enabled in a cluster, it is specified as an authorization mode when starting the API server.
kube-apiserver --authorization-mode=Example,RBAC --other-options --more-optionsWebhook
Kubernetes uses WebHook, an HTTP POST Callback that posts a message to a specific URL, to query an external service to determine a request’s access privileges. This allows for the outsourcing of authorization mechanisms to a third-party management tool such as the Open Policy Agent.
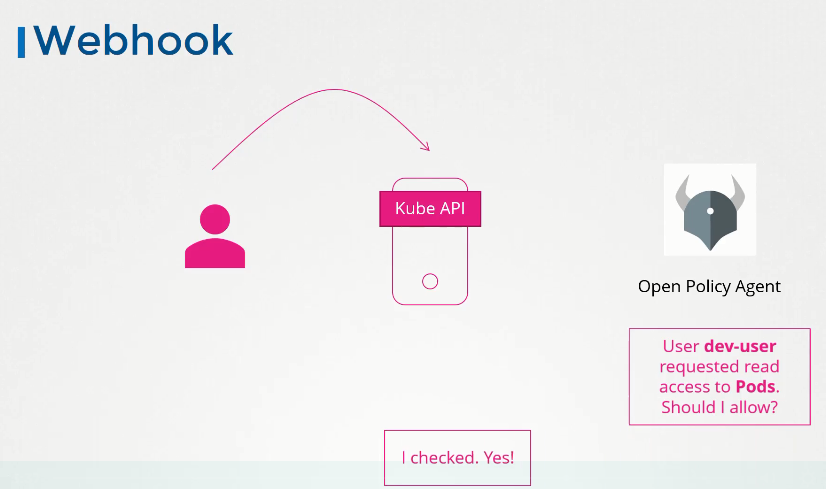
To authorize in WebHook mode, an HTTP KubeConfig file should be specified when starting the API Server:
--authorization-webhook-config-file=<file-name> flagA sample configuration file for a client using HTTP client authentication would be similar to:
apiVersion: v1
kind: Config
clusters:
  - name: name-of-remote-authz-service
    cluster:
      certificate-authority: /path/to/ca.pem
      server: https://authz.example.com/authorize

users:
  - name: name-of-api-server
    user:
      client-certificate: /path/to/cert.pem # cert for the webhook plugin to use
      client-key: /path/to/key.pem          # key matching the cert
current-context: webhook
contexts:
- context:
    cluster: name-of-remote-authz-service
    user: name-of-api-server
  name: webhook
There are two other methods of authorization: AlwaysAllow and AlwaysDeny.
- AlwaysAllow - every request is authorized.
- AlwaysDeny - does not approve any request.
The authorization method to be used in a cluster is always set using the – authorization-mode option in the Kube API Server, for instance: --authorization-mode=Node,RBAC,Webhook.
If an option is not set, the default authorization method is AlwaysAllow. Multiple authorization modes can be set using a comma-separated list, i.e., --authorization-mode=Node,RBAC,Webhook.
In this case, the request is authorized using each mode in the order in which they are specified on the options list. If one mode denies a request, the request is passed to the next authorization mode. The user is granted access when one authorization mode approves the request.
Role-Based Access Control (RBAC)
RBAC enables access control in Kubernetes by defining a set of permissions associated with a certain role and then providing a mechanism to bind users to a role. This class goes through the practical process of establishing RBAC authorization using Roles and RoleBindings.
A role is a Kubernetes object with configuration files similar to:
apiVersion: rbac.authorization.k8s.io/v1
kind: Role
metadata:
  namespace: default
  name: pod-reader
rules:
- apiGroups: [""]
  resources: ["pods"]
  verbs: ["get", "watch", "list"]
Authorizations and permissions are outlined in the rules section of the configuration file.
The apiGroups is left blank for Core Groups. For users in other groups, the Group Name has to be specified. The resources section outlines the cluster resource that users have access to. The verbs section lists all actions that the users are allowed to perform. Multiple rules can be added in the same file to define access to other cluster resources.
The configuration file for a Developer Role could be similar to:
apiVersion: rbac.authorization.k8s.io/v1
kind: Role
metadata:
  name: developer
rules:
-  apiGroups: [""]
   resources: ["pods"]
   verbs: ["list","get","create","update","delete"]
-  apiGroups: [""]
   resources: ["ConfigMap"]
   verbs: ["create"]
The role is then created using the kubectl command.
A user can be given restricted access to specific resources (pods) by specifying a resourceName field under rules in the YAML file:
rules:
-  apiGroups: [""]
   resources: ["pods"]
   verbs: ["list","get","create","update","delete"]
   resourceName: ["Blue","Green","Red"]
-  apiGroups: [""]
   resources: ["ConfigMap"]
   verbs: ["create"]
RoleBinding objects outline specifications that attach roles to specific users. The format for a RoleBinding object’s configuration file is similar to:
apiVersion: rbac.authorization.k8s.io/v1
kind: RoleBinding
metadata:
  name: read-pods
  namespace: default
subjects:
- kind: User
  name: jane
  apiGroup: rbac.authorization.k8s.io
roleRef:
  kind: <role-name>
  name: pod-reader
  apiGroup: rbac.authorization.k8s.io
The body has two main sections: subjects that outline user details and roleRef, which identifies the role.
The configuration file devuser-developer-binding.yaml for the developer role is created with values similar to:
apiVersion: rbac.authorization.k8s.io/v1
kind: RoleBinding
metadata:
  name: devuser-developer-binding
subjects:
-  kind: User
   name: dev-user
   apiGroup: rbac.authorization.k8s.io
roleRef:
  kind: Role
  name: developer
apiGroup: rbac.authorization.k8s.ioSome commands used in establishing RBAC using Roles and RoleBindings include:
|
Task |
Command |
|
$ kubectl create -f <role-name>.yaml |
|
$ kubectl create -f devuser-developer-binding.yaml |
|
$ kubectl get roles |
|
$ kubectl get rolebindings |
|
$ kubectl describe role <role-name> |
|
$ kubectl describe rolebinding <name> |
|
$ kubectl auth can-i <verb> <resource> |
|
$ kubectl auth can-i <verb> <resource> --as <username> |
|
$ kubectl auth can-i create deployments --as dev-user --namespace test |
Cluster Roles
The Roles and Role Bindings created earlier work within the scope of a namespace. This means they are effective at authorizing access to namespaced components such as:
- ConfigMaps
- Pods
- Deployments among others.
If a namespace is not specified when creating these objects, they are created in the default namespace.
Namespaces help in grouping and isolating resources within a cluster. cluster-wide resources are not associated with specific namespaces. These include:
- Nodes
- Persistent Volumes (PVs)
- Persistent Volume Classes(PVCs)
- Namespaces
- CertificateSigningRequests, among others.
To access a full list of namespaced resources, the following command is used:
kubectl api-resources --namespaced=trueFor the full list of non-namespaced resources:
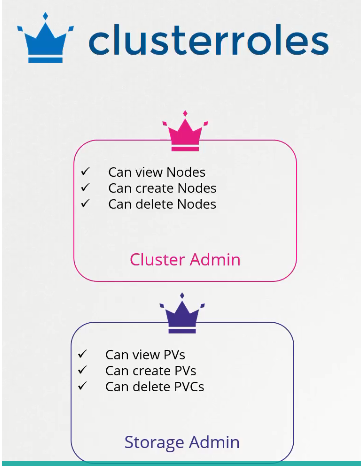
kubectl api-resources --namespaced=falseCluster Roles enable the same permissions as Roles but on a cluster-wide level.
The Cluster Admin Role, for instance, can be bound to users who can view, create, and delete nodes. The Storage Admin, on the other hand, can view, create, and delete PVs & PVCs.
A Cluster Role is created by specifying the configurations in a YAML file, similar to:
apiVersion: rbac.authorization.k8s.io/v1
kind: ClusterRole
metadata:
  name: developer
rules:
-  apiGroups: [""]
   resources: ["nodes"]
   verbs: ["list","get","create","update","delete"]
The Cluster Role is then created by running the command:
kubectl create -f clusteradmin-role.yamlThe users are then bound to this role using a Cluster Role Binding object with specifications similar to:
apiVersion: rbac.authorization.k8s.io/v1
kind: ClusterRoleBinding
metadata:
  name: cluster-admin-role-binding
subjects:
-  kind: User
   name: cluster-admin
   apiGroup: rbac.authorization.k8s.io
roleRef:
  kind: ClusterRole
  name: developer
  apiGroup: rbac.authorization.k8s.io
The Cluster Role Binding is then created using the command:
kubectl -f cluster-admin-role-binding.yamlTo test it:
kubectl auth can-i create node --as cluster-adminCluster Roles can also be created for namespaced components. When this is done, users can access the specified resources across all namespaces in the cluster.
By default, Kubernetes creates a number of ClusterRoles when a cluster is started.
Several cluster roles can be aggregated into a single Cluster Role. ClusterRole objects in an aggregated cluster role are managed by a cluster control plane controller, which selects individual roles using labels and selectors.
Quick Tip: The Kube API server creates a number of default ClusterRole and ClusterRoleBinding objects directly managed by master node controllers. These objects are pre-fixed system. Be careful when accessing and modifying these objects, as wrongful configurations may render a cluster non-functional.
Image Security
Kubernetes applications run on containers, which encapsulate images that represent a snapshot of an application and all the dependencies it needs to run. Container images are created using tools such as Docker and pushed to a registry. The container images are then put into pods, which deploy and run the applications in the deployment environment.
The nginx pod, for instance, runs the Nginx image, and its configurations are as follows:
apiVersion: v1
kind: Pod
metadata:
  name: nginx-pod
spec:
  containers:
  -  name: nginx
     image: nginx
The nginx image is also known as nginx:nginx. This depicts the image name as well as the repository in which it is stored. If a registry is not specified, Kubernetes assumes the image is being pulled from the default docker hub registry: docker.io. The full path for the nginx image will, therefore, be docker.io/nginx/nginx.
Whenever a user creates or updates an image, it is pushed into the repository. If a user downloads an image, it is pulled from the repository. Besides Docker Hub, there are plenty of other registries offered by top public cloud providers.
The DNS for Google Cloud’s registry is gcr.io, and it includes publicly available images for Kubernetes that anyone can access, for instance: gcr.io/kubernetes-e2e-test-images/dnsutils.
Some organizations develop in-house applications that should not be accessible to the public. These applications are therefore hosted in internal private registries. Public cloud platforms like Google’s GCP, Amazon’s AWS, and Microsoft’s Azure include private registries for cloud accounts by default. On any registry, a repository can be made private so that only users with approved credentials can access applications hosted inside it.
Kubernetes uses admission controllers and other mechanisms to ensure that only images that meet security policies are deployed. This class explores how security is managed for Docker images running on Kubernetes.
To run an image hosted in a private registry, a user must first log in to the repository using the command:
docker login private-registry.ioThe user is then prompted for their credentials, and when approved, they can access the privately hosted applications. The applications can then be run on the registry using the command:
docker run private-registry.io/apps/internal-appWhen creating a pod definition file to run this image, the full path is used instead of the image name under specifications:
spec:
  containers:
  -  name: nginx
     image: private-registry.io/apps/internal-app
To pass the credentials from the container runtime (Docker), a secret object of type docker-registry named regcred is created by listing the credentials:
kubectl create secret docker-registry regcred \
       --docker-server=private-registry.io \
       --docker-username=registry-user \
       --docker-password=registry-password \
       [email protected]
This is a secret type built into Kubernetes used to store user credentials.
The secret is then passed into the pod’s configuration file as imagePullSecrets under spec:
apiVersion: v1
kind: Pod
metadata:
  name: nginx-pod
spec:
  containers:
  -  name: private-reg-container
     image: private-registry.io/apps/internal-app
  imagePullSecrets:
  -  name: regcred
When the pod is created, the Kubelet service uses the credentials listed in regcred to pull the image securely.
Some best practices of Docker image security include:
- Build security into the CI/CD pipeline to prevent the introduction of harmful images to the Kubernetes platform
- Carefully vet the third-party sites where images get published and pooled
- Start with a minimal base image, then install the tools and libraries needed to run it selectively
- Only pull images that show a consistent update history
- Remove non-essential software, as this is exploitable
- Don’t bake Kubernetes secrets into any images
- Use verified image scanners to check for vulnerabilities in software
- Always use a private, internal registry where possible
Security Contexts
When running Docker containers, it is possible to define security standards within the docker run command. The Kubernetes security context defines access control and privilege settings for both pods or the containers they encapsulate.
The security settings can either be configured at the Pod level or container level. If security settings are configured at the Pod level, they will apply to all containers running within the pod. If the settings are configured at both the Pod and container levels, the container-level settings override the Pod level configurations.
To configure security settings for a Pod, the configurations are listed under securityContext within the spec section, as shown:
apiVersion: v1
kind: Pod
metadata:
  name: web-pod
spec:
  securityContext:
    runAsUser: 1001
  containers:
  -  name: ubuntu
     image: ubuntu
     command: ["sleep","3600"]
The runAsUser field specifies that for any Containers in the Pod, all processes run with user ID 1001. To check it, Run:
kubectl exec -it web-pod – ps -auxContainer-level security configurations are listed under securityContext within the containers section, as shown:
apiVersion: v1
kind: pod
metadata:
  name: web-pod
spec:
   containers:
   - name: ubuntu
     image: ubuntu
     command: ["sleep","3600"]
   securityContext:
     runAsUser: 1001
     capabilities:
       add: MAC_ADMIN
Note: Capabilities can only be specified at the container level and not at the Pod level.
Some Security context settings include:
- Discretionary Access Control
- Security Enhanced Linux (SELinux)
- Linux Capabilities
- AppArmor
- Seccomp:
- AllowPrivilegeEscalation
- readOnlyRootFilesystem
The complete set of security policy settings can be accessed here.
Network Policies
Network Policies allow for the control of traffic flow at the port of IP Address level. This allows administrators to specify how a Pod communicates with various networked Kubernetes objects. Pods are, by default, non-isolated. This means that they accept traffic from any machine. Network Policies are used to isolate certain Pods. A Pod can communicate with various entities based on three identifiers:
- Other Pods are allowed to connect.
- Namespaces it can connect with
- IP Blocks
Pod and namespace-based network policies match traffic to and from a Pod using labels and selectors, while IP-based policies utilize CIDR (IP Block) Ranges.
To explore security and network policies, consider traffic flowing through a web application and a database server.
This setup has three applications:
- A web server that exposes the front end to the users.
- An application API server that serves the back-end Application Programming interface.
- Database server.
Users send requests through the web server at port 80. This web server then forwards the requests to the API server through port 5000. The API server then fetches data from the database server through port 3306.
In any setup, there are two types of traffic: Ingress and Egress Traffic. Ingress traffic denotes incoming requests to a server. Egress traffic represents requests going out of a server.
In the setup above, if we were to create the rules, they would be:
- An Ingress accepting HTTP traffic on port 80 on the webserver.
- An Egress rule allowing traffic from the webserver to port 5000 on the API server.
- An Ingress rule accepting traffic from the webserver through port 5000 into the API server.
- An Egress rule allowing traffic from the API server through port 3306 on the database server.
- An Ingress rule on the database server that accepts traffic through port 3306.
Consider a Kubernetes cluster that hosts several nodes with several Pods and services. Each Node, Pod, and Server has an IP Address associated with it. In any Kubernetes cluster setup, groups can configure multiple users without specifying extra resources. A cluster could, for instance, have a virtual private network (VPN) that spans across all nodes and pods in the cluster. Services can, therefore, communicate with each other using Service Names, Pod names, and IP Addresses. Kubernetes comes with a default ‘All Allow’ policy for communication between pods, Services, and Nodes in a cluster.
For a Web Application in a Kubernetes cluster, a Pod is created for each of the three applications (database, web server, and API). Services are then created to enable creation between the end user and Pods. Network policies are then created to restrict communication between specific applications, for instance, the Web Server Pod, from accessing the Database Pod.
A Network Policy is a namespaced object linked to one or more pods in the cluster, within which communication rules can be specified.
To restrict the server from accessing the database, a network policy is created for the database to only allow traffic from the API Server on port 3306. Once this network policy is applied, it blocks all other traffic and only allows traffic that matches the rules stated in the network policy. This only works on Pods attached to the network policy.
Labels and selectors are used to attach a Pod to a network policy. First, a label is applied to the Pod, for instance:
labels:
  role: db
The label is then specified as a selector on the Network Policy:
podSelector:
  matchLabels:
    role: db
Note: Some Kubernetes Networking solutions support Network Policies, including Kube-Router, Calico, and Weave-net. Some solutions, like Flannel, do not support Network Policies.
Developing Network Policies
To understand how to develop a network policy for the web application’s Kubernetes cluster, assume the goal is to protect the DB Pod from being accessed by any other Pod except the API Pod. The API can only access the DB Pod on port 3306.
By default, Kubernetes allows traffic from all Pods to all destinations. The first step, then, is to block everything going in and coming out of the DB Pod. This is achieved by creating a network policy db-policy:
apiVersion: networking.k8s.io/v1
kind: NetworkPolicy
metadata:
  name: db-policy
A Pod is then attached to this policy using a podSelector specification:
spec:
  podSelector:
    matchLabels:
       role: db
The Pod should also have its label matching the network policy specification:
labels:
  role: db
This attaches a network policy to the Pod that blocks all incoming and outgoing traffic.
To allow the API Pod to query the DB Pod on port 3306, the rules need to be defined on the db-policy object to meet these requirements. This is an Ingress rule that lets traffic from the API Pod through port 3306. For this use case, the Ingress rule is all that is needed since this exercise only focuses on the API server querying the database server and not the response for the server.
The specifics can then be defined under Ingress in the spec section of the configuration file, as shown:
spec:
  podSelector:
    matchLabels:
       role: db
  policyTypes:
  - Ingress
  ingress:
  - from:
    - podSelector
        matchLabels: api-pod
    ports:
      protocol: TCP
      Port: 3306
If there are multiple Pods in the cluster with the same label but running in different namespaces, the Network Policy will allow them to reach the DB Pod. This is because the label attaches all the API Pods to the network policy. To allow the API Server from just one namespace to access the DB Pod, a namespaceSelector property is added, with a label included in the Namespace manifest file. The network policy’s specifications will be similar to:
spec:
  podSelector:
    matchLabels:
       role: db
  policyTypes:
  - Ingress
  ingress:
  - from:
    - podSelector:
        matchLabels:
          role: api-pod
    - namespaceSelector:
        matchLabels:
        role: prod
    ports:
      protocol: TCP
      Port: 3306
If there’s a namespaceSelector but no podSelector specification, every Pod from the specified namespace can access the DB Pod, while all Pods outside the namespace will be denied access.
If there’s a backup server outside the Kubernetes cluster that needs to access the DB Pod, the namespace and Pod selector specifications will not work. It is possible to allow a connection using the server’s IP Address by specifying it in the network policy template. A new selector is specified for the IP address range:
 ingress:
  - from:
    - podSelector
        matchLabels: api-pod
      namespaceSelector:
        matchLabels: prod
    - ipBlock:
        cidr: 192.168.5.10/32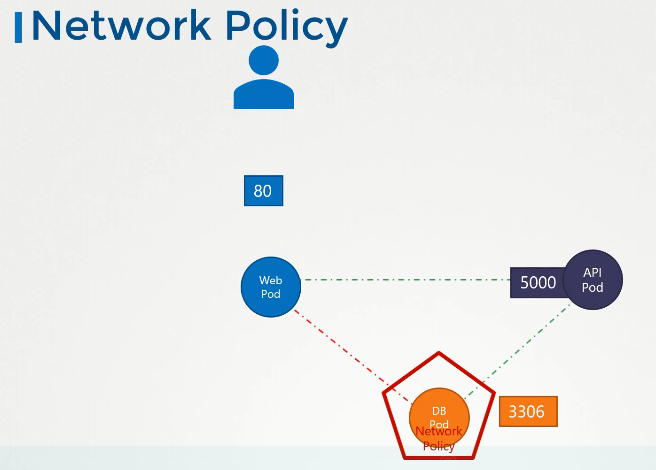
These rules can be passed individually or as part of a single rule. The example above uses two rules: one to select Pods & namespaces and the other one to allow a range of IP Addresses to access the Pod. This works like a logical OR (||) operation in that Pods satisfying just one of the two rules can pass through the network policy.
The first rule consists of 2 sub-rules: one for allowed Pods and another for allowed namespaces.
This rule functions like a logical AND (&&) operation in that Pods must pass both rules to be allowed access to DB Pod. If these rules are arrayed by adding a – to the second rule, they become separate rules. The network policy now has three rules working like a logical OR (||) operator, meaning any pod that satisfies one of the rules is allowed access.
Now consider a situation where the DB Server pushes information to the external backup server. This will need an Egress rule that defines a movement of data from the database server to the external server. An Egress is added to the specifications with a configuration similar to:
 egress:
  - to:
    - ipBlock:
        cidr: 192.168.5.10/32
    ports:
    - protocol: TCP
      port: 80
While this example uses the ipBlock specification for the server, any selector can be used to define communication with other pods and hosts.
The complete manifest file for the network policy will look similar to the following:
apiVersion: networking.k8s.io/v1
kind: NetworkPolicy
metadata:
  name: db-policy
spec:
  podSelector:
    matchLabels:
       role: db
  policyTypes:
  - Ingress
  ingress:
  - from:
    - podSelector:
        matchLabels:
          role: api-pod
    ports:
    - protocol: TCP
      port: 3306
  egress:
  - to:
    - ipBlock:
        cidr: 192.168.5.10/32
    ports:
    - protocol: TCP
      port: 80
If no network policies exist, then all ingress and egress traffic is enabled between Pods within a namespace by default. Some procedures allow for the creation of other default network behaviors in a cluster, which can be accessed here.
Research Questions
This concludes the security section of the CKA certification exam. Here is a quick quiz with a few questions and sample tasks to help you assess your knowledge. Leave your answers in the comments below and tag us back.
Quick Tip – Questions below may include a mix of DOMC and MCQ types.
1. Identify the key used to authenticate kubeapi-server to the kubelet server
[A] /etc/kubernetes/pki/front-proxy-client.key
[B] /etc/kubernetes/pki/apiserver-etcd-client.key
[C] /etc/kubernetes/pki/apiserver.key
[D] /etc/kubernetes/pki/apiserver-kubelet-client.crt
[E] /etc/kubernetes/pki/apiserver-kubelet-client.key
2. Identify the certificate file used to authenticate kube-apiserver as a client to ETCD Server.
[A] /etc/kubernetes/pki/apiserver-etcd-client.crt
[B] /etc/kubernetes/pki/apiserver-etcd.crt
[C] /etc/kubernetes/pki/apiserver-etcd-client.key
[D] /etc/kubernetes/pki/apiserver.crt
[E] /etc/kubernetes/pki/apiserver-kubelet-client.crt
3. Task: Create a CertificateSigningRequest object with the name akshay with the contents of the akshay.csr file.
cat <<EOF > csr.yamlapiVersion: certificates.k8s.io/v1
kind: CertificateSigningRequest
metadata:
name: akshay
spec:
groups:
- system:authenticated
request: $(cat akshay.csr | tr -d \\n | base64)
signerName: kubernetes.io/kube-apiserver-client
usages:
- client authkubectl create -f csr.yaml4. Where is the default kubeconfig file located?
[A] /root/.kube/config
[B] /root/kubeconfig
[C] /root/,kube/kubeconfig
5. Task - Create the necessary roles and role bindings required for the dev-user to create, list, and delete pods in the default namespace.
Use the given spec:
- Role: developer
- Role Resources: pods
- Role Actions: list
- Role Actions: create
- RoleBinding: dev-user-binding
- RoleBinding: Bound to dev-user
kind: Role
apiVersion: rbac.authorization.k8s.io/v1
metadata:
  namespace: default
  name: developer
rules:
- apiGroups: [""]
  resources: ["pods"]
  verbs: ["list", "create"]

---
kind: RoleBinding
apiVersion: rbac.authorization.k8s.io/v1
metadata:
  name: dev-user-binding
subjects:
- kind: User
  name: dev-user
  apiGroup: rbac.authorization.k8s.io
roleRef:
  kind: Role
  name: developer
  apiGroup: rbac.authorization.k8s.io
6. Task - A new user michelle joined the team. She will be focusing on the nodes in the cluster. Create the required ClusterRoles and ClusterRoleBindings so she gets access to the nodes.
kind: ClusterRole
apiVersion: rbac.authorization.k8s.io/v1
metadata:
  name: node-admin
rules:
- apiGroups: [""]
  resources: ["nodes"]
  verbs: ["get", "watch", "list", "create", "delete"]
---
kind: ClusterRoleBinding
apiVersion: rbac.authorization.k8s.io/v1
metadata:
  name: michelle-binding
subjects:
- kind: User
  name: michelle
  apiGroup: rbac.authorization.k8s.io
roleRef:
  kind: ClusterRole
  name: node-admin
  apiGroup: rbac.authorization.k8s.io
Summary
This curriculum series explored almost every aspect of securing Kubernetes clusters in production environments. These concepts will prepare you as a candidate for the CKA exam and arm them with the knowledge to secure production-grade Kubernetes applications.
Exam Preparation Course
Our CKA Exam Preparation course explains all the Kubernetes concepts included in the certification’s curriculum. After each topic, you get interactive quizzes to help you internalize the concepts learned. At the end of the course, we have mock exams that will help familiarize you with the exam format, time management, and question types.
This concludes the Networking section of the CKA certification exam.
You can now proceed to the next part of this series: Certified Kubernetes Administrator Exam Series (Part-7): Storage.
Here is the previous part of the series: Certified Kubernetes Administrator Exam Series (Part-5): Cluster Maintenance.