


You log in to a remote Linux server, and you want to see:
What disks (storage devices) are available on this system?
The easiest way to list all storage devices is with the lsblk command. You run:
lsblkAnd you get output like this:

But what does this output mean? How do you figure out the location of your storage devices? And how do you access them?
Let's explore that, together.
Understanding the Output of the lsblk Command
Sometimes, the lsblk command can generate a lot of output. But don't let that scare you. The information you are looking for is easy to find.
You want to find your disks, right? Notice in the previous output that there's only one real disk displayed:

vda is the disk, and vda1, vda2, and vda3 are the partitions created on that disk.
A partition is a sort of segment you can create on a storage device. So that you can take a big storage device, and split it into smaller parts. And one part can contain your operating system, one part can contain your games, photos, or videos, and so on.
When you run a lsblk command it's the TYPE column that you want to focus on.
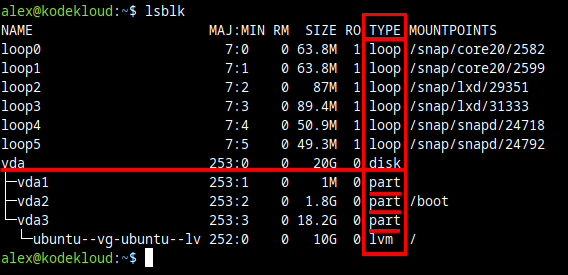
And only pay attention to what is presented as disk type (if it's disks / storage devices you want to keep track of).
But notice that a lot of noise is created by the so-called loop devices. These are essentially "simulated disks" contained in files. Files that are "pretending" to be disks.
In some scenarios it can be useful to see what loop devices are available. But not when you want to explore what real disks you have on your system.
Exclude Loop Devices from lsblk Output

Note how loop devices have a major number (MAJ) 7, and various minor (MIN) numbers. Think of the major number as a sort of "code" that represents a certain storage device type.
You can tell the lsblk command to exclude certain device types from this list. You do that by adding a command-line option, -e, followed by the type number you want to exclude. In this case, the MAJ code you want to exclude is 7.
To tell lsblk to exclude loop devices from its output you run this command:
lsblk -e 7This way, it will be easier to see the disks that actually interest you. Since the output now looks like this:

Shorter, cleaner, and focused on the real disks you want to explore. Including the partitions they might contain, or LVM structures.
Note that on servers (especially virtual private servers hosted in the cloud) you'll often see disks that do not have any partitions (or LVM structures). Which means the output will be even shorter there.
How to Use Device Names Shown by the lsblk Command
Ok, you got the device names listed by the lsblk command.
But how do you continue from here?
You see a disk named vda on a virtual machine (the v in there is for "virtual"). Or you see a disk named nvme0n1. Which is probably an SSD device (nvme stands for "non-volatile memory express").
Different storage devices will be named in different ways. But the way they're named is not really important. The more important thing: How do you use a device name listed by the lsblk command?
Here's a step-by-step tutorial.
First, you list your storage devices (with the command explained in the previous section):
lsblk -e 7Here, you focus on what is labeled as a disk:

In this example, the device name for this disk is vda.
Next, if you want to interact with this device, you just add /dev/ in front of the device name.
If the device name shown by lsblk is vda, when you add /dev/ in front of it you get:
/dev/vdaOtherwise said, you go from:
vda- To
/dev/vda
Think of /dev/vda as the "full path" to access this device. Or a "shortcut" you can use to interact with this disk / device.
If the device name would be nvme0n1 then the full path to it would be:
/dev/nvme0n1Ok, you went from a device name, such as vda, to a device path, such as /dev/vda. What is next? Well, you just use this device path in a command.
Here's an example.
Let's say you want to use the fdisk command to list partitions on this disk / storage device. You would run sudo fdisk -l, followed by the device path. So the resulting command would be:
sudo fdisk -l /dev/vda
So that's about it. To recap and summarize the procedure on how to use a device name shown by the lsblk command:
- Get the device name with the
lsblk -e 7command. - Add
/dev/in front of that device name to get the device path (Think of it as the "full road" to get to that device). - And then use the device path in a command, to interact with that specific disk / storage device.
Here are some examples of other commands.
To create an ext4 filesystem on a storage device:
sudo mkfs.ext4 /dev/vdaThis will create the filesystem on the entire disk.
If the device has multiple partitions on it, you can create the ext4 filesystem on the first partition with a command like this:
sudo mkfs.ext4 /dev/vda1To create it on the second partition:
sudo mkfs.ext4 /dev/vda2This covers a typical use case of the lsblk command. An extra tip:
df if you're looking for disks, specifically. Some blogs recommend using the df command to list disks. I advise against that, because df is focused on exploring filesystems, not disks. In some scenarios, df might not show you all disks available. The disks that do not have an actively used filesystem on them won't show up in a df command. So you might get an incomplete picture.Learn More
If you're on a journey to learn more about Linux check out this learning path we have:

We have courses both for beginners, but also for people already familiar with Linux basics, that want to advance their knowledge even further. Pick whatever applies to you.
Thank you for reading this, and see you in the next blog!


Discussion