


Docker Init is a game-changer for DevOps engineers who want to containerize applications with speed and precision. In this tutorial, we’ll explore what the docker init command does, why it’s important, and how to use it to containerize a Node.js app in seconds.
We’ll also compare Docker Init vs Docker Compose vs Dockerfile approaches, list supported languages, and share pro tips for getting the most out of this Dockerfile generator CLI.
Whether you’re looking to learn how to dockerize a Node.js app fast or understand where Docker Init fits in your workflow, this guide has you covered.
What is Docker Init?
Docker’s init command is a relatively new addition to the Docker CLI (introduced in late 2023/2024) that automatically generates a Dockerfile and other related files for your application.
Think of it as the Docker equivalent of git init, but instead of initializing a repository, it initializes the boilerplate needed to containerize your app. In one command, Docker scans your project to detect the tech stack (language, framework) and produces a Dockerfile (and often a .dockerignore, plus an optional Compose file) with sensible defaults. This means you can go from source code to a container image much faster, without writing a Dockerfile from scratch.
🎥 Prefer video? Watch the full tutorial on for a visual walkthrough.
Why is docker init important?
For many developers and DevOps engineers, writing a Dockerfile manually can be time-consuming or error-prone, especially if you’re not deeply familiar with Docker’s best practices. Tools like Docker Compose or manually crafting Dockerfiles have been the traditional route for containerizing apps, but they require you to define everything yourself.
Docker Init streamlines this process by providing an automated Dockerfile generator CLI that encapsulates Docker’s recommended patterns (such as proper base images, directory setup, dependency installation, etc.). This helps ensure consistency across projects and reduces the barrier to containerizing applications. It’s especially useful for rapid prototyping and onboarding new projects into a containerized environment.
Docker Init vs Docker Compose vs Traditional Dockerfile
It’s important to understand how docker init differs from and complements other Docker tools like Docker Compose and the classic Docker build/run process:
Docker Init: Configuration Generator.
It creates the configuration needed to containerize an app. This includes files like Dockerfile and .dockerignore (and possibly a Compose file). However, docker init by itself does not build or run containers – it simply sets up the files. You would still use docker build and docker run (or docker compose up) after using docker init. It’s a one-time (or few-times) scaffold tool rather than something you run every time you start your app.
Docker Compose: Multi-Container Orchestrator.
Compose uses a docker-compose.yml (or docker-compose.yaml) to define how to run one or more services (containers) together. It doesn’t generate Dockerfiles; instead, it relies on either pre-built images or Dockerfiles you’ve written.
In fact, you can use Docker Compose in conjunction with Docker Init: for example, use docker init to get a Dockerfile for each service, then write a docker-compose.yml to run those services (database, backend, frontend, etc.) with one command. Compose is great for defining complex apps (web server + database + cache, for instance), whereas Docker Init is focused on containerizing a single application quickly.
Traditional Dockerfile + Build/Run: Manual Process.
The classic way to dockerize an app is to hand-write a Dockerfile, then run docker build . to produce an image, and docker run to start a container from that image. This offers full control – you choose the base image, write all the instructions, and set up networking/volumes via command-line flags or subsequent Compose files.
The trade-off is that it requires knowledge of Dockerfile syntax and best practices. Docker init essentially jumpstarts this process by writing a Dockerfile for you (so you don’t forget that EXPOSE 3000 or the proper WORKDIR), but you can always edit the generated Dockerfile for any custom needs before building.
📦 In summary: Docker Init automates Dockerfile creation, Docker Compose orchestrates multi-container setups, and manual Docker build/run gives fine-grained control. They address different stages of containerization.
The table below summarizes the comparison:
| Aspect | Docker Init (Auto-Init) |
Docker Compose (Orchestration) |
Docker Build/Run (Manual) |
|---|---|---|---|
| Purpose | Generate Docker configuration files for an app (Dockerfile, etc.) automatically. Helps you containerize an app fast. | Define and run multi-container applications using a YAML file. Helps you run multiple services easily. | Manually build images and run containers using Docker CLI. Gives full manual control. |
| Usage Stage | One-time initialization at project setup (before build). | Runtime orchestration (during development/deployment to start containers). | Build and deployment (can be repeated as needed in CI/CD or development). |
| Input | Source codebase (Docker scans for language/framework to create config). | docker-compose.yaml with service definitions (uses existing Dockerfiles or images). |
Hand-written Dockerfile + CLI commands (docker build, docker run parameters). |
| Output/Files | Dockerfile, .dockerignore (and optionally a Compose file) generated in your project. |
No Dockerfiles generated; you maintain Dockerfiles separately. Compose file describes how to run containers (including ports, env vars, volumes). | Built Docker image (from Dockerfile) and running container (from docker run). No new config files are generated by the CLI itself. |
| Scope | Focused on single application containerization (though can be run for each service in a multi-service app individually). | Manages multiple containers/services at once (web, db, etc.), including networking between them. | Usually focused on one container at a time (each needs its own Dockerfile and run command, or use Compose for multi). |
| Learning Curve | Very easy – minimal Docker knowledge needed to get a working container (good for beginners or quick starts). | Moderate – you need to understand YAML and Docker Compose syntax, but it’s fairly straightforward for defining services. | Moderate to advanced – requires understanding Dockerfile instructions and various docker run flags (ports, volumes, etc.). |
| Customization | Limited to the generated template (you can modify the Dockerfile after generation). Great starting point but you may tweak for production (e.g., add multi-stage build, smaller base image). | Highly flexible – you define how services run, networks, volumes, dependencies. But Compose doesn’t help you write Dockerfile content. | Fully customizable – you write everything. This gives maximum flexibility (you can craft minimal images, custom entrypoints, etc.), but it’s all manual work. |
As you can see, docker init vs docker-compose vs docker build are not mutually exclusive – they complement each other. docker init often comes first (to set up the Dockerfile), then you use docker build/run or Compose to actually build and run containers.
For DevOps teams, Docker Init can standardize how Dockerfiles are created, after which Compose or other tools can take over for orchestration.
🔸 Note: If you’re new to Docker, it helps to understand how a Dockerfile works and how Docker images are built. Check out our explainer on How Dockerfile Works to get familiar with the basics of Docker images and build instructions. This foundation will make it easier to appreciate what Docker Init generates for you.
Step-by-Step Docker Init Tutorial – Dockerize a Node.js App
Now, let’s walk through a practical example of using docker init to containerize a Node.js application. In this Docker Init tutorial, we’ll create a simple Express.js app and use docker init to generate a working Docker setup for it. This example will show how to dockerize a Node.js app quickly using Docker’s new initializer.
1. Create a Sample Node.js/Express Application
First, set up a basic Node.js project. For illustration, we’ll make a simple Express server that responds with “Hello from Docker!”. If you already have a Node.js app, you can skip this step and use your own app source code.
Initialize a Node.js project and install Express:
After running these commands, you should have a package.json and package-lock.json in the directory, and the Express package installed in node_modules.
Next, create a simple Express server in a file (e.g., app.js or server.js):
This is a minimal Express application listening on port 3000 and responding with a greeting. For our purposes, this will be enough to test the container.
2. Run docker init in the Project Directory
With the Node.js app ready, you can now run the magic command: docker init. Make sure you have Docker installed and running on your system (Docker Init is part of Docker CLI, so you don’t need any separate installation if your Docker CLI is up-to-date. Docker Desktop 4.18 or later version should be installed).
Run the command in the root of your project (where package.json is located):
Docker will analyze the project and generate the necessary files. You should see output similar to the following:
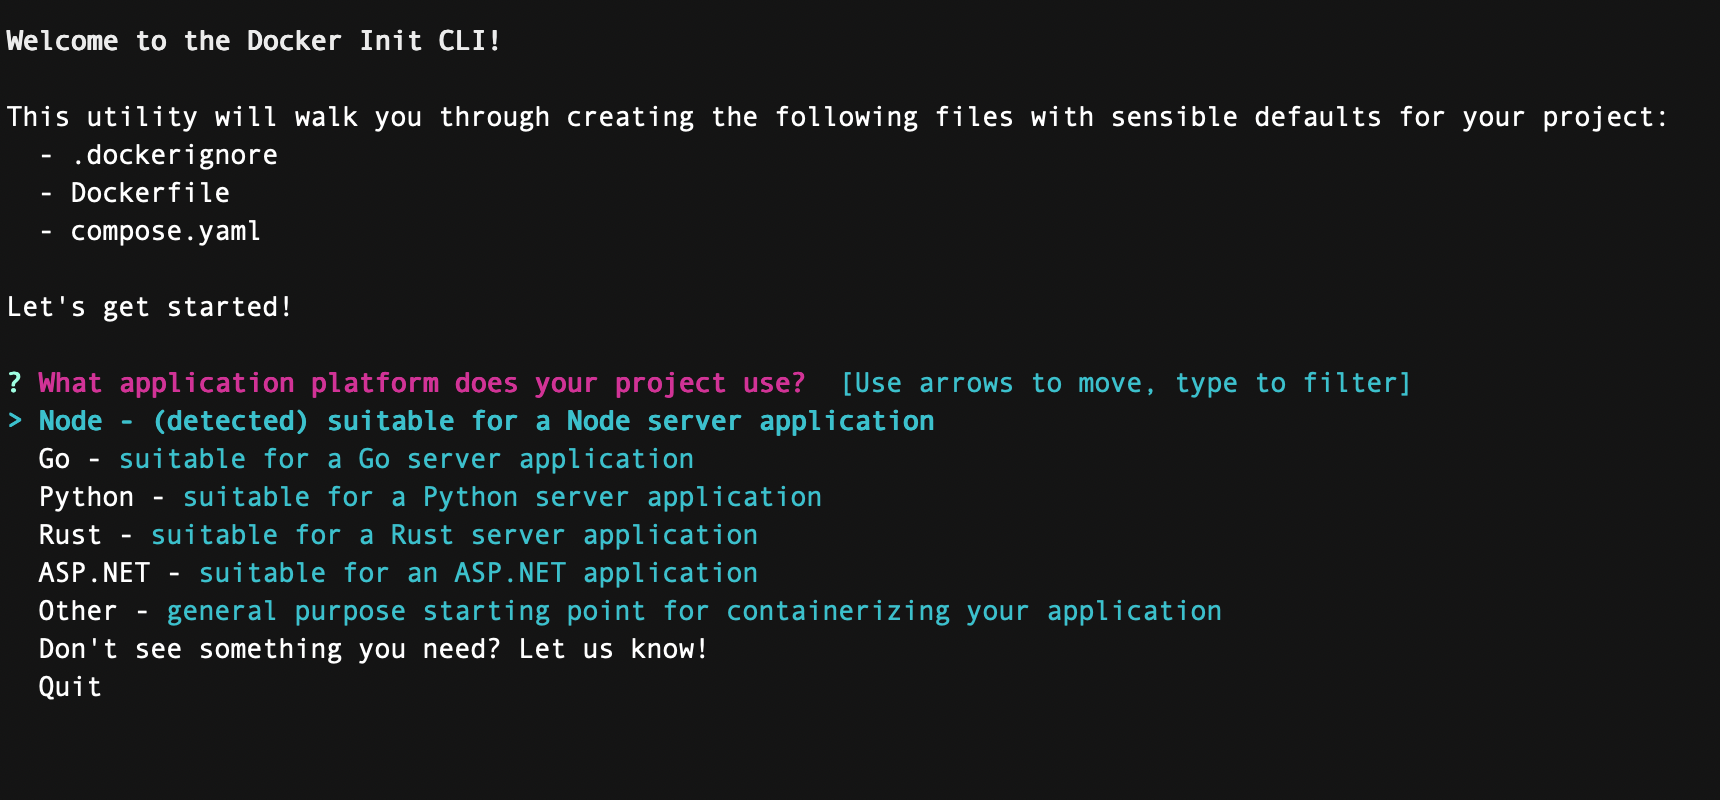

After this, if you list the files in the directory, you will see the newly generated files:

Docker has produced a Dockerfile and a .dockerignore for us. If your project was more complex, Docker might also create a docker-compose.yaml (more on that later), but for a simple single-service app it typically doesn’t unless you request it.
3. Examine the Generated Dockerfile and .dockerignore
Let’s open the Dockerfile that docker init created. This file contains the instructions to build a Docker image for our Node.js application. You should see something along these lines:
Let’s break down what this Dockerfile does:
- Base Image (
FROM node:18-alpine) – Docker Init chose a lightweight official Node.js image (Alpine variant) appropriate for a Node app. This image has Node.js 18 and is optimized for small size. - Working Directory (
WORKDIR /app) – It sets the working directory in the container to/app. All subsequent commands (COPY, RUN, etc.) will operate in this directory. - Copy Dependencies (
COPY package*.json ./&RUN npm install) – It copies thepackage.json(andpackage-lock.jsonif present, thanks to the wildcard) into the container, then runsnpm installto install dependencies. Copying just the package files first and running npm ensures Docker can cache this layer and not reinstall packages if your dependencies haven’t changed (a Docker best practice). - Copy Application Code (
COPY . .) – After installing dependencies, it copies the rest of the app’s source code into the image. This includes files likeapp.js. By doing this afternpm install, it avoids re-installing dependencies every time your application code changes. - Expose Port (
EXPOSE 3000) – This documents that the container will listen on port 3000. (Note:EXPOSEdoesn’t publish the port on the host by itself; it’s mainly informational and for tooling. We’ll still use-p 3000:3000when running the container to map the port.) - Start Command (
CMD ["node", "app.js"]) – This sets the default command to run when the container starts. In our case, it launches the Node process to run our Express server. If your project had a different start process (like usingnpm startor a process manager), you might need to tweak this, but Docker Init makes a reasonable guess.
The generated Dockerfile is pretty much what an experienced Docker user might write for a simple Node.js service. You can always edit this file if needed (for example, to change Node version, or use Yarn instead of npm, etc.), but it’s a solid starting point.
Now, check the .dockerignore file that was created. This file tells Docker which files or directories to exclude when building the image (so the build context doesn’t send unnecessary files, keeping the image smaller and build faster). Open .dockerignore and you’ll see entries such as:
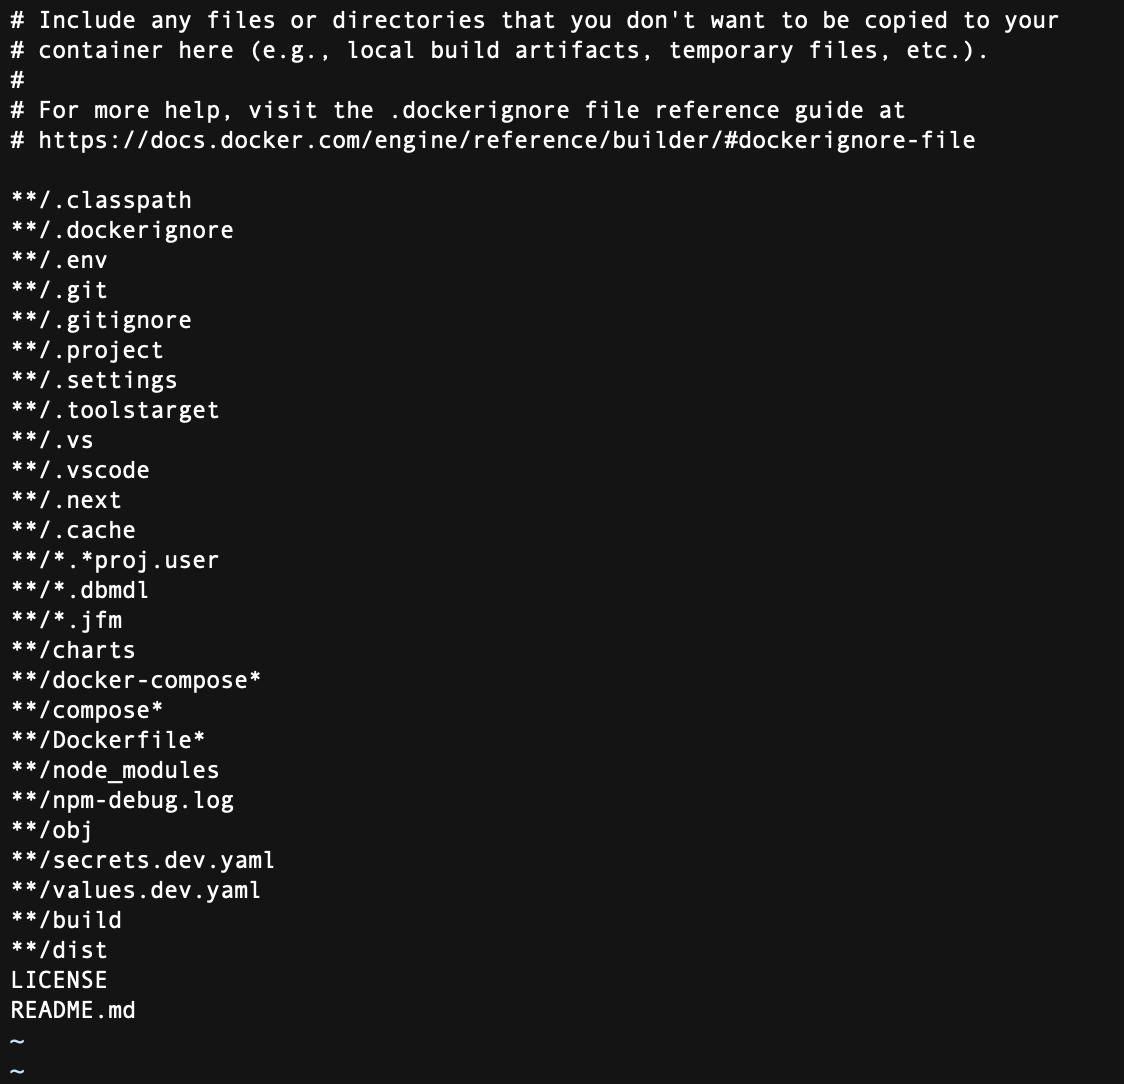
By default, Docker Init added node_modules to the ignore list. This is important because we don’t want to copy our local node_modules into the image – we’re letting npm install inside the Dockerfile handle dependencies, ensuring a clean, platform-specific install inside the container.
It also ignores the Dockerfile itself (no need to copy that into the image) and any npm debug logs. You might see additional ignores depending on the language (for example, for Python it might ignore __pycache__ or venv directories). You can customize the .dockerignore as needed, but the defaults are usually sensible.
4. Build and Run the Docker Image
Now that Docker Init has set up our Dockerfile, let’s build the image and run a container to verify everything works.
Build the Docker image using the generated Dockerfile:
Docker will go through the steps in the Dockerfile. The first time, it will download the node:18-alpine base image (if not already on your system), install dependencies, etc. The -t my-node-app:latest flags tag the image with a name for easier reference. After a successful build, you should see a message like:
Once built, run the container:
Let’s break down this run command:
-druns the container in detached mode (in the background).-p 3000:3000maps port 3000 of the container to port 3000 on the host machine, so we can access the app via localhost.--name mynodecontainergives the container a friendly name (optional but handy for referencing).my-node-app:latestis the image we want to run (the one we just built).
After running this, the container named “mynodecontainer” should be up. You can verify it’s running with docker psor check the logs:
The log shows our Express app has started successfully inside the container. Now test the application by curling the endpoint (or opening a browser):
🎉 We’ve containerized the Node.js app!
The whole process required minimal effort on our part to create a Dockerfile, thanks to docker init. We went from code to a running Docker container quickly.
5. (Optional) Using Docker Compose with the Generated Setup
If you prefer to run your container with Docker Compose (for example, to easily integrate other services like a database, or just because you like using docker compose up), you can still do that.
In our simple example, we can create a docker-compose.yaml manually or use a flag with Docker Init if available.
Docker Init in its current version primarily focuses on Dockerfile generation. In some cases, it might suggest or create a Compose file stub if multiple components are detected.
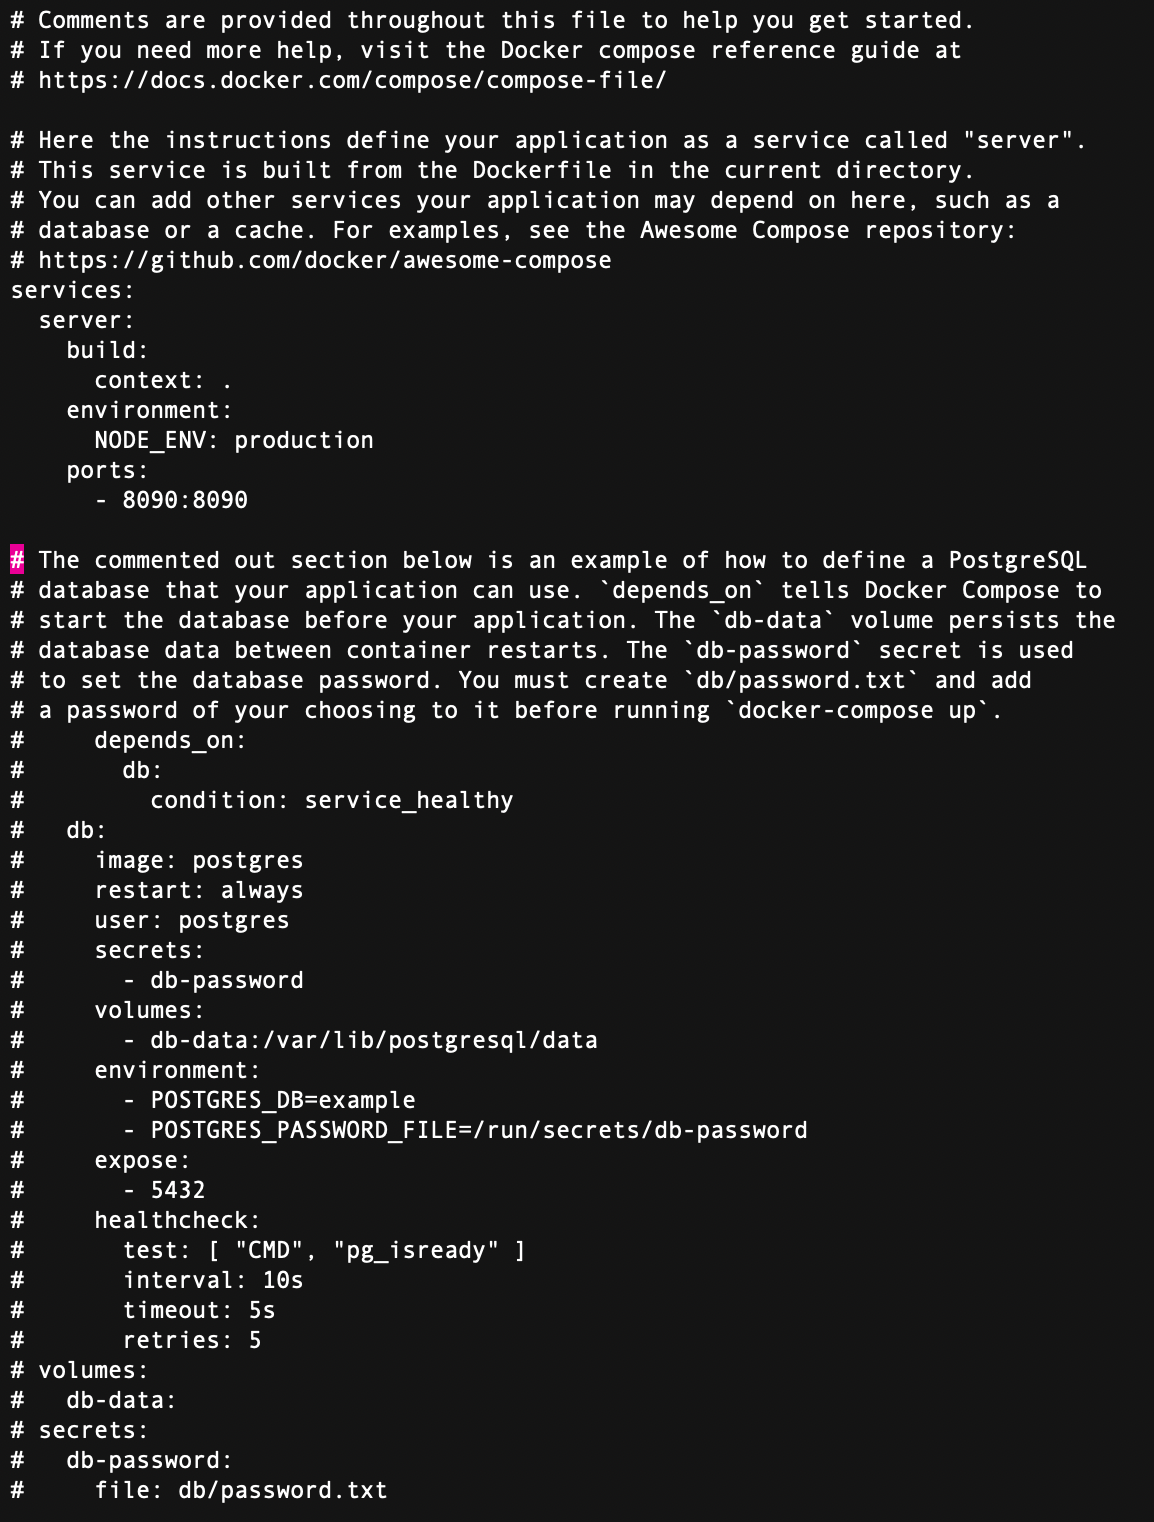
This Compose file tells Docker to build the image from the Dockerfile in the current directory and run the container exposing port 3000.
Now you could start the app with docker compose up -d as well. In either case, the heavy lifting of writing the Dockerfile and .dockerignore was already done by docker init.
⚠️ It’s worth noting: Docker Init is careful not to overwrite existing files.
If you already have a Dockerfile, it will likely warn or skip generation to avoid clobbering your work (unless a force flag is used).
This is useful if you want to try docker init on an existing project without losing anything—just move your original Dockerfile temporarily, run docker init to see what it suggests, compare, and merge as needed.
Supported Languages and Frameworks in Docker Init
As of now, docker init supports a variety of popular languages and frameworks for auto-generation. Docker is actively expanding support, but currently you can expect the following to work out of the box:
- Node.js (JavaScript/TypeScript) – Detected by the presence of
package.json. Ideal for Express.js, Fastify, NestJS, or any Node app. It generates a Node-based Dockerfile (as we saw) using the official Node images and npm/Yarn as appropriate. - Python – Detected by files like
requirements.txtorpyproject.toml/Pipfile. Suitable for Flask, Django, FastAPI, etc. The generated Dockerfile typically uses a Python base image andpip installfor dependencies. It may also handle common gunicorn setup for web apps if needed. - Go (Golang) – Detected by
go.mod(Go modules) or other Go project files. For Go projects, Docker Init can create a Dockerfile that builds the Go binary (often using a multi-stage build: one stage to compile the binary, another lightweight stage to run it). This results in a small image containing just the Go binary and necessary libs. - Java – Detected by build files like
pom.xml(Maven) orbuild.gradle(Gradle). Common for Spring Boot or other Java apps. The generated Dockerfile might use a multi-stage approach: e.g., use Maven/Gradle image to build the app, then use an OpenJDK image to run the compiled JAR. This automates a lot of the Dockerfile writing for Java, which can otherwise be verbose. - .NET (C#) – Detected by
.csprojor other .NET project files. Docker Init supports .NET Core/ASP.NET applications by generating a Dockerfile that restores NuGet packages, builds the project, and then uses a runtime image to host the app. This aligns with the typical Dockerfile you’d write for .NET apps (with SDK and runtime images).
These are the primary languages supported at the time of writing. Other ecosystems may be added in the future as the Docker team expands docker init capabilities (for example, support for Ruby/Rails, PHP/Laravel, etc., might appear later).
Always check the latest Docker documentation for updates on supported languages. If you run docker init on an unsupported project, Docker will inform you that it couldn’t detect a supported app in the directory.
Pro Tips for Using Docker Init Effectively
To get the best results from docker init and to customize its output for your needs, consider these pro tips:
- Run on a clean project state – For the most accurate detection, ensure your project has the standard files (like
package.json,requirements.txt, etc.) present and configured. Commit your code or stash changes if needed, so that Docker Init doesn’t get confused by partial files. If you have multiple applications in one repository (monorepo), rundocker initin the specific service’s directory (or whichever context is relevant) rather than at the root of the whole monorepo. - Customize after generation – Remember that the generated Dockerfile is just a starting point. Feel free to edit it to suit production needs. For instance, you might swap out
node:18-alpinefor a different Node version, or add steps to build your frontend assets, or implement a multi-stage build for smaller images. Docker Init saves you time by giving a functional template, but you remain in control of the final result. - Check for multi-stage opportunities – By default, Docker Init’s output might be a single-stage Dockerfile (except for languages like Go or Java where multi-stage builds are common). If you need an even leaner image, consider refactoring the Dockerfile into a multi-stage build. For example, for Node.js you could add a build stage if you’re compiling TypeScript or bundling, and then use a slimmer base for running. The initial Dockerfile gives you the baseline, which you can enhance.
- Leverage Compose for multi-service apps – If your application requires additional services (database, cache, etc.), generate Dockerfiles for each using
docker initin their respective directories, then write adocker-compose.yamlto tie them together. This approach combines the strength of Docker Init (quick Dockerfile creation) with the convenience of Compose (one-command startup for all services). - Stay updated – Docker is likely to improve
docker initover time, adding more language support and features. Rundocker init --helpto see available options in your version. For instance, future versions might include flags like--composeto auto-generate a Compose file, or allow specifying a base image, etc. Keeping Docker CLI up-to-date will ensure you get these enhancements. - No replacement for understanding – While
docker initis a huge time-saver, make sure to understand the Dockerfile it produces. This is crucial for debugging and optimization. Use the tool as a learning aid: study the generated Dockerfile to see Docker best practices applied (like copying package.json first, using multi-stage builds for certain languages, etc.). Over time, you’ll get better at writing Dockerfiles yourself, and you can still use Docker Init for speed and consistency.
Use Cases: When DevOps Teams Should Use Docker Init
Docker Init brings a lot of efficiency, and there are specific scenarios where it can be incredibly useful for DevOps professionals:
- Rapid Prototyping and POCs: Need to containerize a demo or proof-of-concept application quickly?
docker initcan generate a ready-to-build Dockerfile in seconds. This lets teams spin up containers for new apps or microservices without spending time on boilerplate. It’s perfect for hackathons or initial project scaffolding where speed is key. - Onboarding New Projects: When adopting DevOps practices in an organization, you might encounter many apps that are not yet containerized (legacy apps, new apps by teams new to Docker, etc.). Docker Init provides a fast path to bring those applications into a container format. A DevOps engineer can run
docker initon each app repository to create the Dockerfile, then commit those to version control as a starting point. This accelerates the onboarding of apps into CI/CD pipelines. - Standardizing Dockerfile Quality: Because Docker Init uses Docker’s official image guidelines and best practices, the generated Dockerfiles are reasonably optimized and consistent. This helps standardize how services are containerized across teams. Instead of every developer writing Dockerfiles differently (with varying quality), Docker Init offers a uniform template. DevOps teams can then enforce a quick review of the generated file, adjust if needed, and approve it for use.
- Educational Use: For teams training up on containers, Docker Init can serve as an educational tool. Developers can run it to see “this is how my app would be containerized” and learn from the output. It lowers the barrier to entry for Docker newbies by showing a working example for their specific tech stack. Over time, they can modify and extend it as they become more comfortable.
- CI/CD Pipeline Integration: In some cases, you might integrate Docker Init into automation. For example, you could have a pipeline that checks if a repo has a Dockerfile, and if not, runs
docker init --dry-runand opens a pull request with the suggested Dockerfile. This way, all services are ensured to have containerization support. (This is an advanced use case, and in most cases, you’ll generate the Dockerfile once manually and then maintain it, rather than regenerating automatically.) - Consistent Dev/Prod Environments: DevOps is all about parity between development and production. By containerizing apps with a standardized approach, you ensure that developers can run the same container locally (using the Dockerfile from
docker init) as what will run in production. This consistency reduces “it works on my machine” problems. Docker Init simply makes it quicker to achieve that state for each project. - Saving Time on Boilerplate: Ultimately, using Docker Init is about efficiency. It saves the team’s time on boilerplate so they can focus on what matters – the application itself and its deployment strategy. Especially in a large microservices architecture, writing Dockerfiles for dozens of services can be a chore. Docker Init can expedite this initial setup, and the team can invest their time on monitoring, scaling, and refining the deployments instead.
💡 In practice: Seasoned DevOps engineers might use Docker Init to generate the first version of a Dockerfile, then pair it with configuration management and orchestration tools like Kubernetes or Docker Swarm for full deployment.
It fits nicely into a DevOps toolkit as a smart bootstrap step for containerization.
Conclusion
Docker continues to evolve to make containerization more accessible and efficient. The docker init command is a clear testament to that, acting as a Dockerfile generator CLI that can containerize an app fast with minimal effort. We’ve seen how it works with a Node.js example, and how it compares to tools like Compose and manual Dockerfile creation. For DevOps professionals, this tool can significantly cut down the time spent on repetitive setup and ensure best practices are followed from the start.
Moving forward, you should feel confident to try Docker Init on your own applications. It’s a great starting point for containerizing new projects or migrating existing ones to Docker. Just remember to review and test the generated files as you would any infrastructure code.
Lastly, if you’re looking to deepen your Docker knowledge and DevOps skills, consider exploring further resources. KodeKloud offers a wealth of training material to help you become a Docker expert.
For a solid foundation, check out our Docker for Absolute Beginners course which covers core Docker concepts with hands-on labs.
As you advance, the Docker Certified Associate (DCA) Exam Course can prepare you for certification and real-world scenarios, including working with Dockerfiles and Docker Compose in depth.

By combining these trainings with tools like Docker Init, you’ll be well-equipped to containerize and deploy applications efficiently and with confidence.
🎉 Happy containerizing with Docker Init, and keep automating! 🚀


Discussion